如何使用 Angular 存取 Web API ?
前後端分離後,前端除了負責顯示邏輯外,最重要的就是與 API 溝通。在 JQuery 只要使用 $.ajax() 就可存取 API;但在 Angular,則必須透過 service 與 DI container ,component 才可存取 API,完全遵守 依賴反轉原則。
Version
Node.js 8.9.0
Angular 5.1.0
JSON Server 0.12.1
User Story

Add Post: 使用POST對 API 新增資料Show All Posts: 使用GET對 API 抓資料
Architecture

AppComponent: 專門負責顯示邏輯PostService: 專門負責連接 API 與資料處理部份IPostService: 由AppComponent觀點所定義出的 interfaceHttpClient: Angular 4.3 所新增處理 AJAX 的 class
依賴反轉原則
高階模組不應該依賴低階模組;兩著都應該依賴高階模組所定義的 interface
AppComponent 不直接依賴 PostService,且 AppComponent 與 PostService 都反過來依賴 AppComponent 所定義的 IPostService interface。
Implementation
JSON Server
前後端分離後,前後端所依據的就是 JSON 資料,傳統前端會在先 var 一個 JSON,等要連 API 時,再用 $.ajax() 去改變 JSON 資料,這樣雖然可行,但必須去修改 code。

比較好的方式是改用 JSON Server,讓我們實際去模擬 HTTP 的 GET/POST/PUT/PATCH 與 DELETE,只要透過 proxy,就會連上 JSON Server,若不透過 proxy,就連上 API Server,無論怎麼切換,都不用去修改 code。
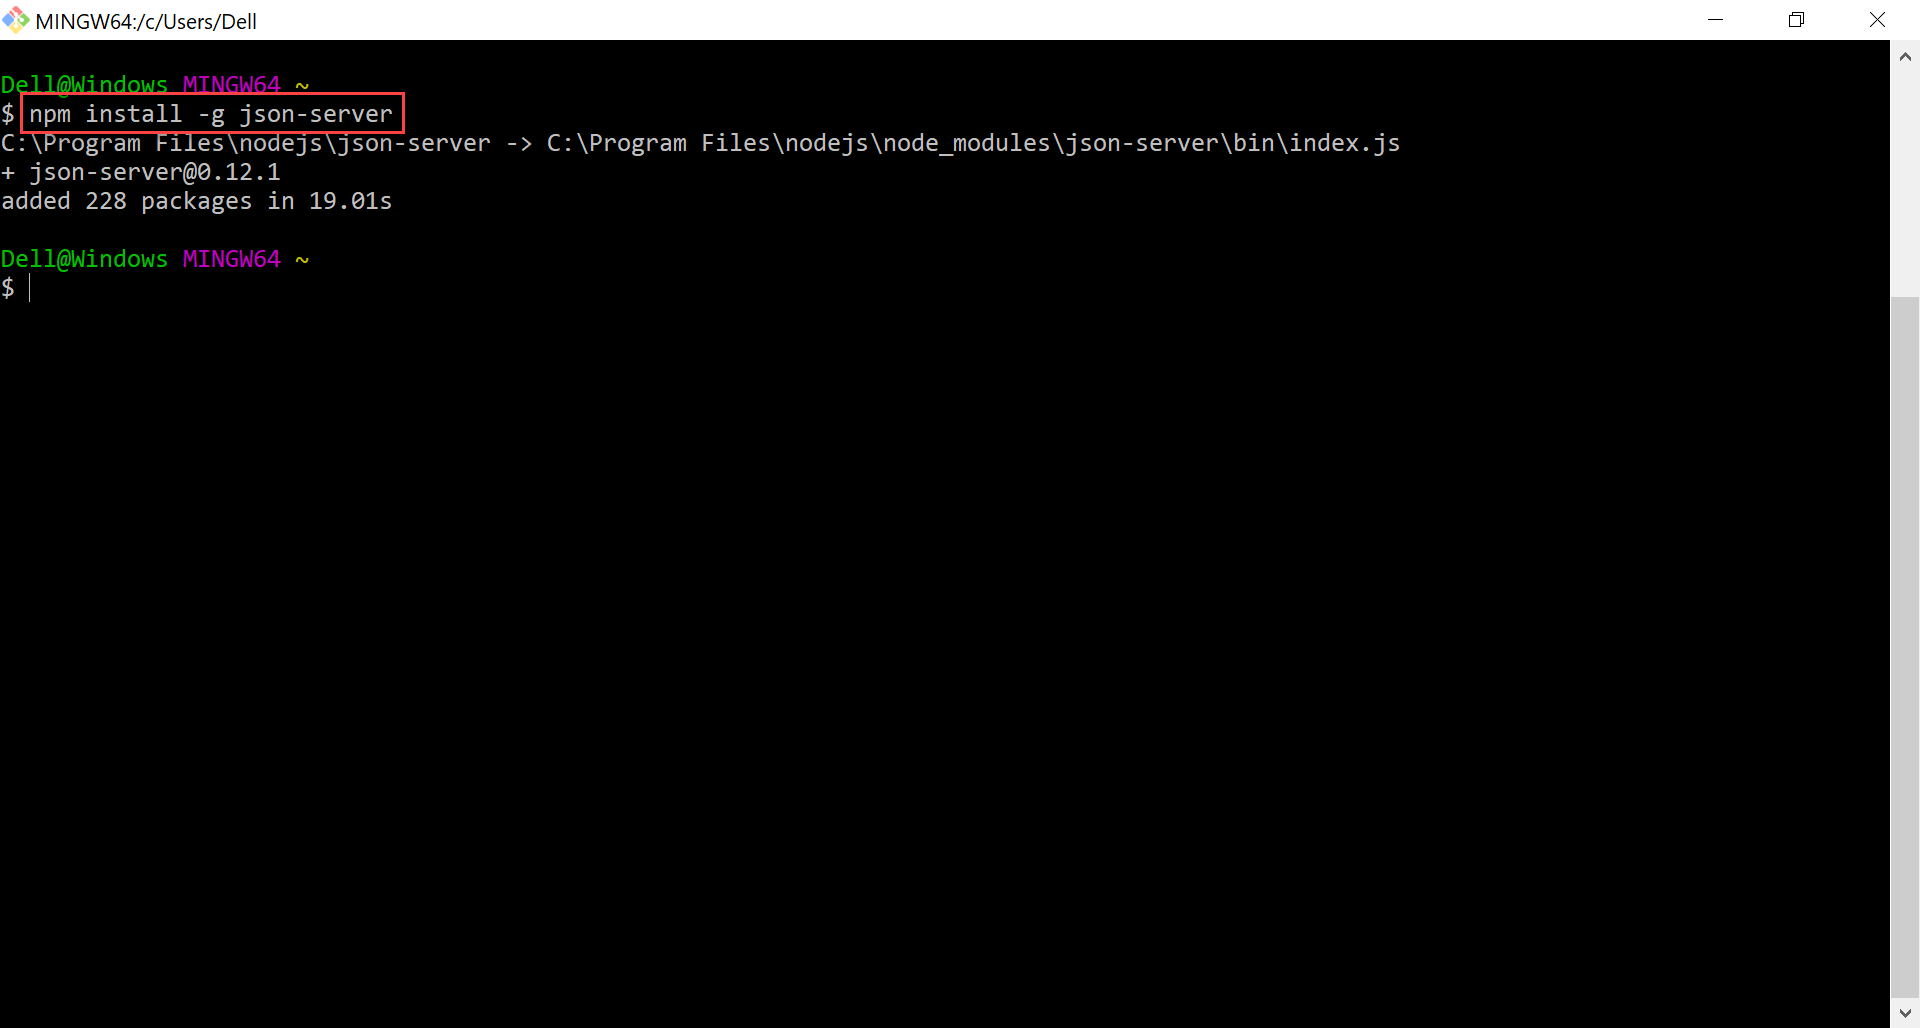
安裝 JSON Server
1 | $ npm install -g json-server |
將 JSON Server 安裝在 global 環境。
第一次啟動 JSON Server
1 | ~$ cd MyProject |
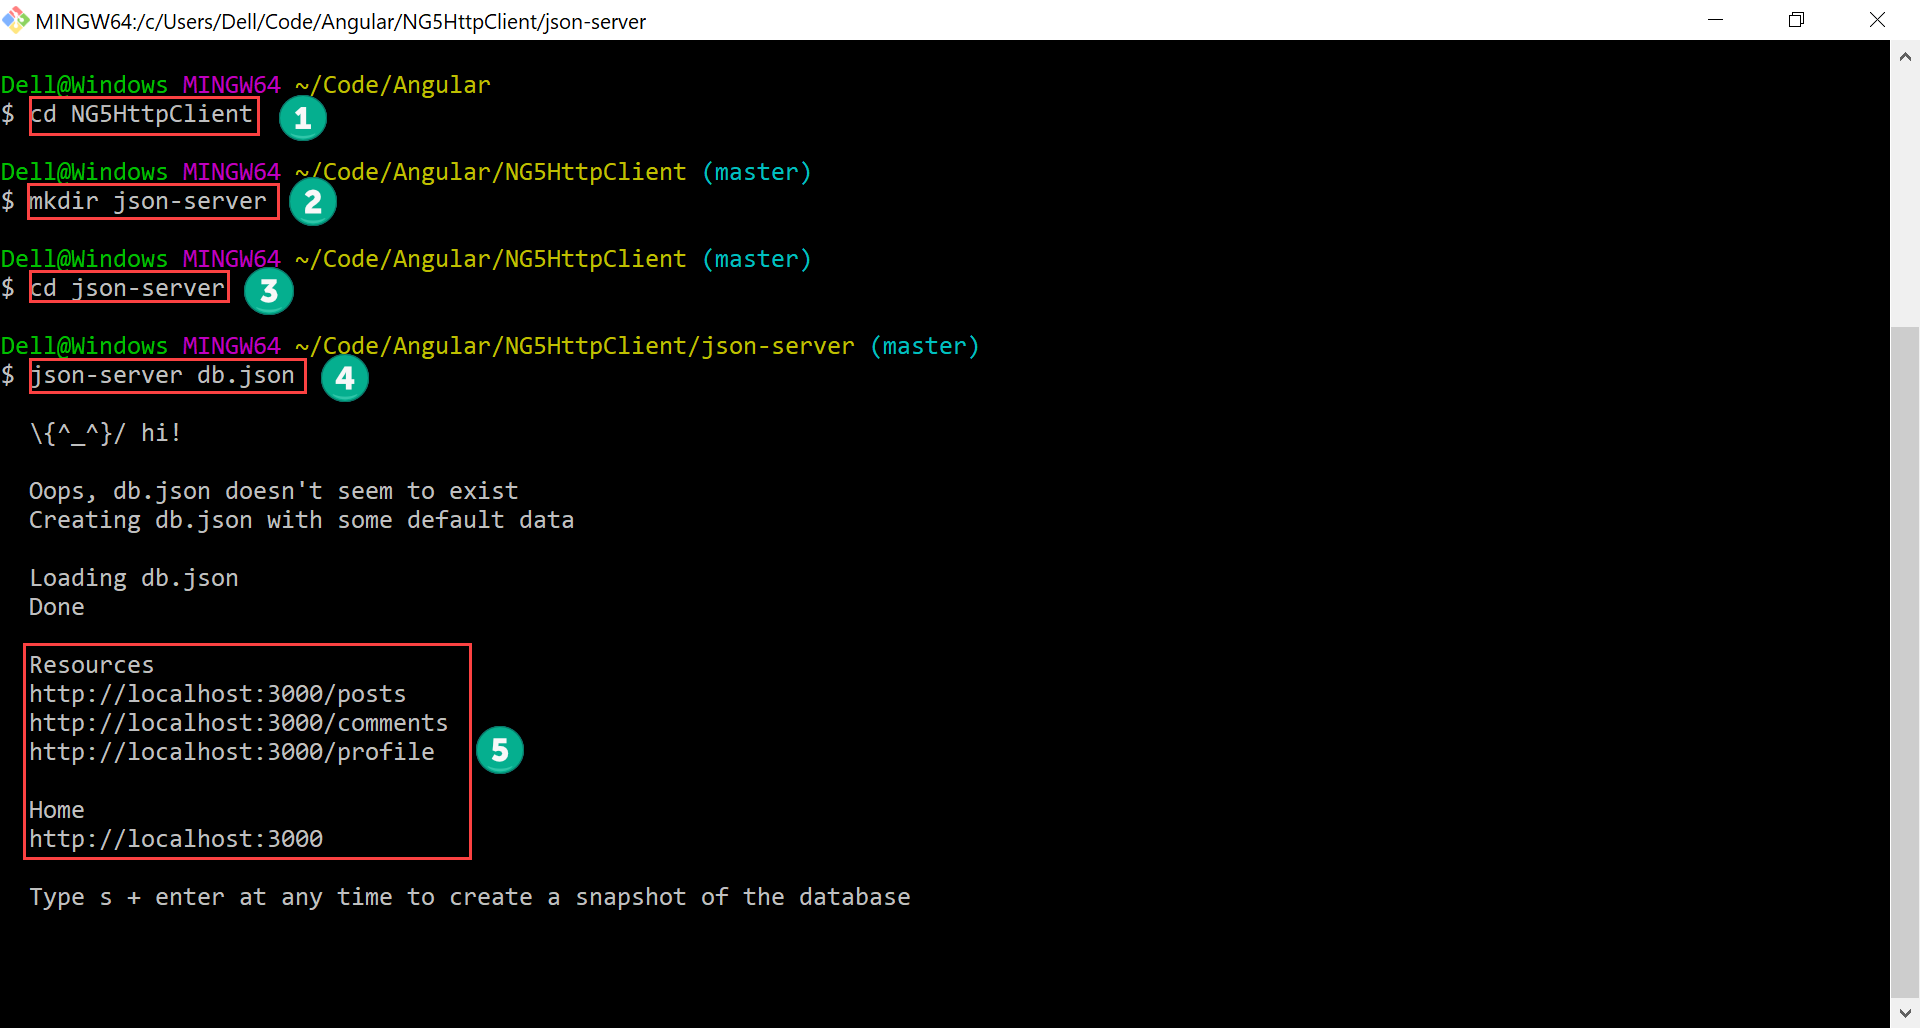
- 進入專案目錄
- 在專案目錄建立
json-server子目錄 - 進入
json-server子目錄 - 第一次啟動 JSON Server,指定
db.json為資料庫檔案 - JSON Server 預設會啟動在
http://localhost:3000,並提供posts、comments與profile3 個 table

- 若
db.json存在,則 JSON Server 會以此檔案為資料庫,若不存在,則會建立新的db.json - 預設會有
posts、comments與profile3 個 table
測試 JSON Server
預設 db.json 已經有資料,可藉此測試 JSONServer 是否有成功啟動。
1 | http://localhost:3000/posts |
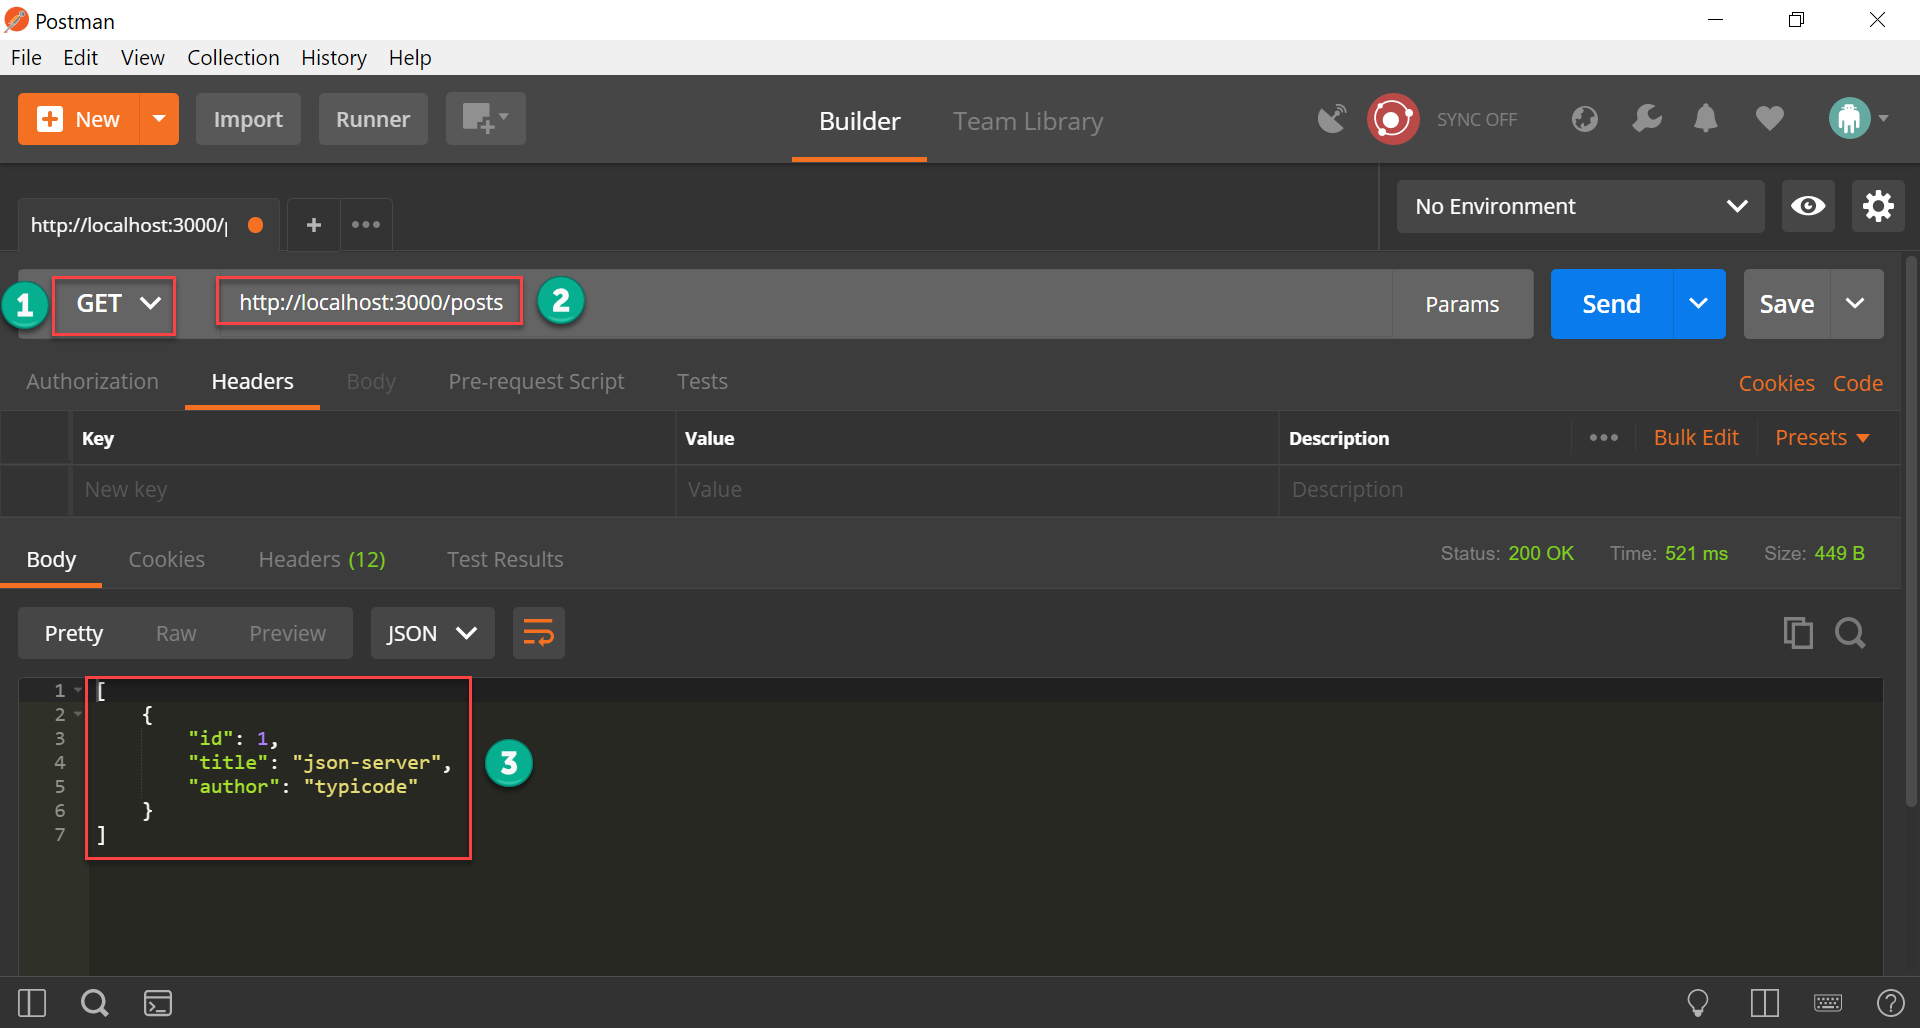
使用 Postman 測試 GET
- 選擇
GET - 輸入
http://localhost:3000/posts - 正確回傳 JSON
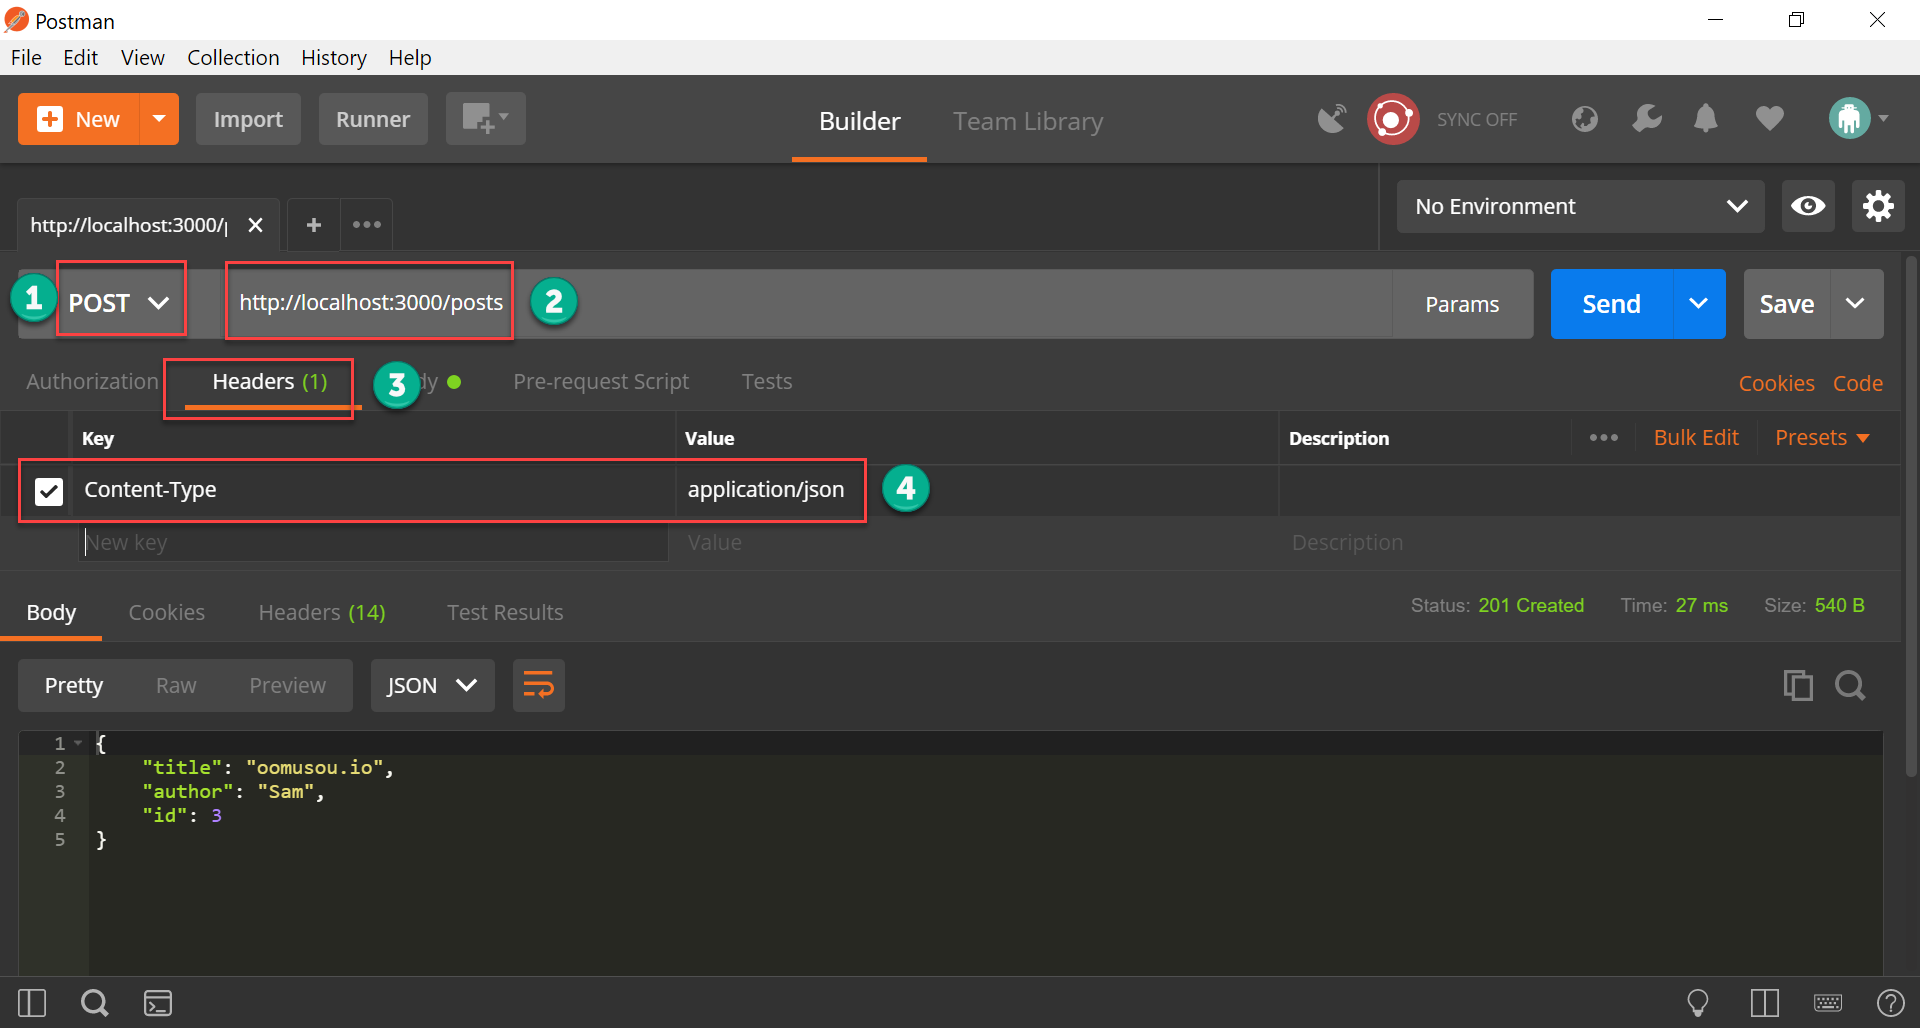
使用 Postman 測試 POST
- 選擇
POST - 輸入
http://localhost:3000/posts - 選擇
Headers - Key 為
Content-Type,value 為application/json
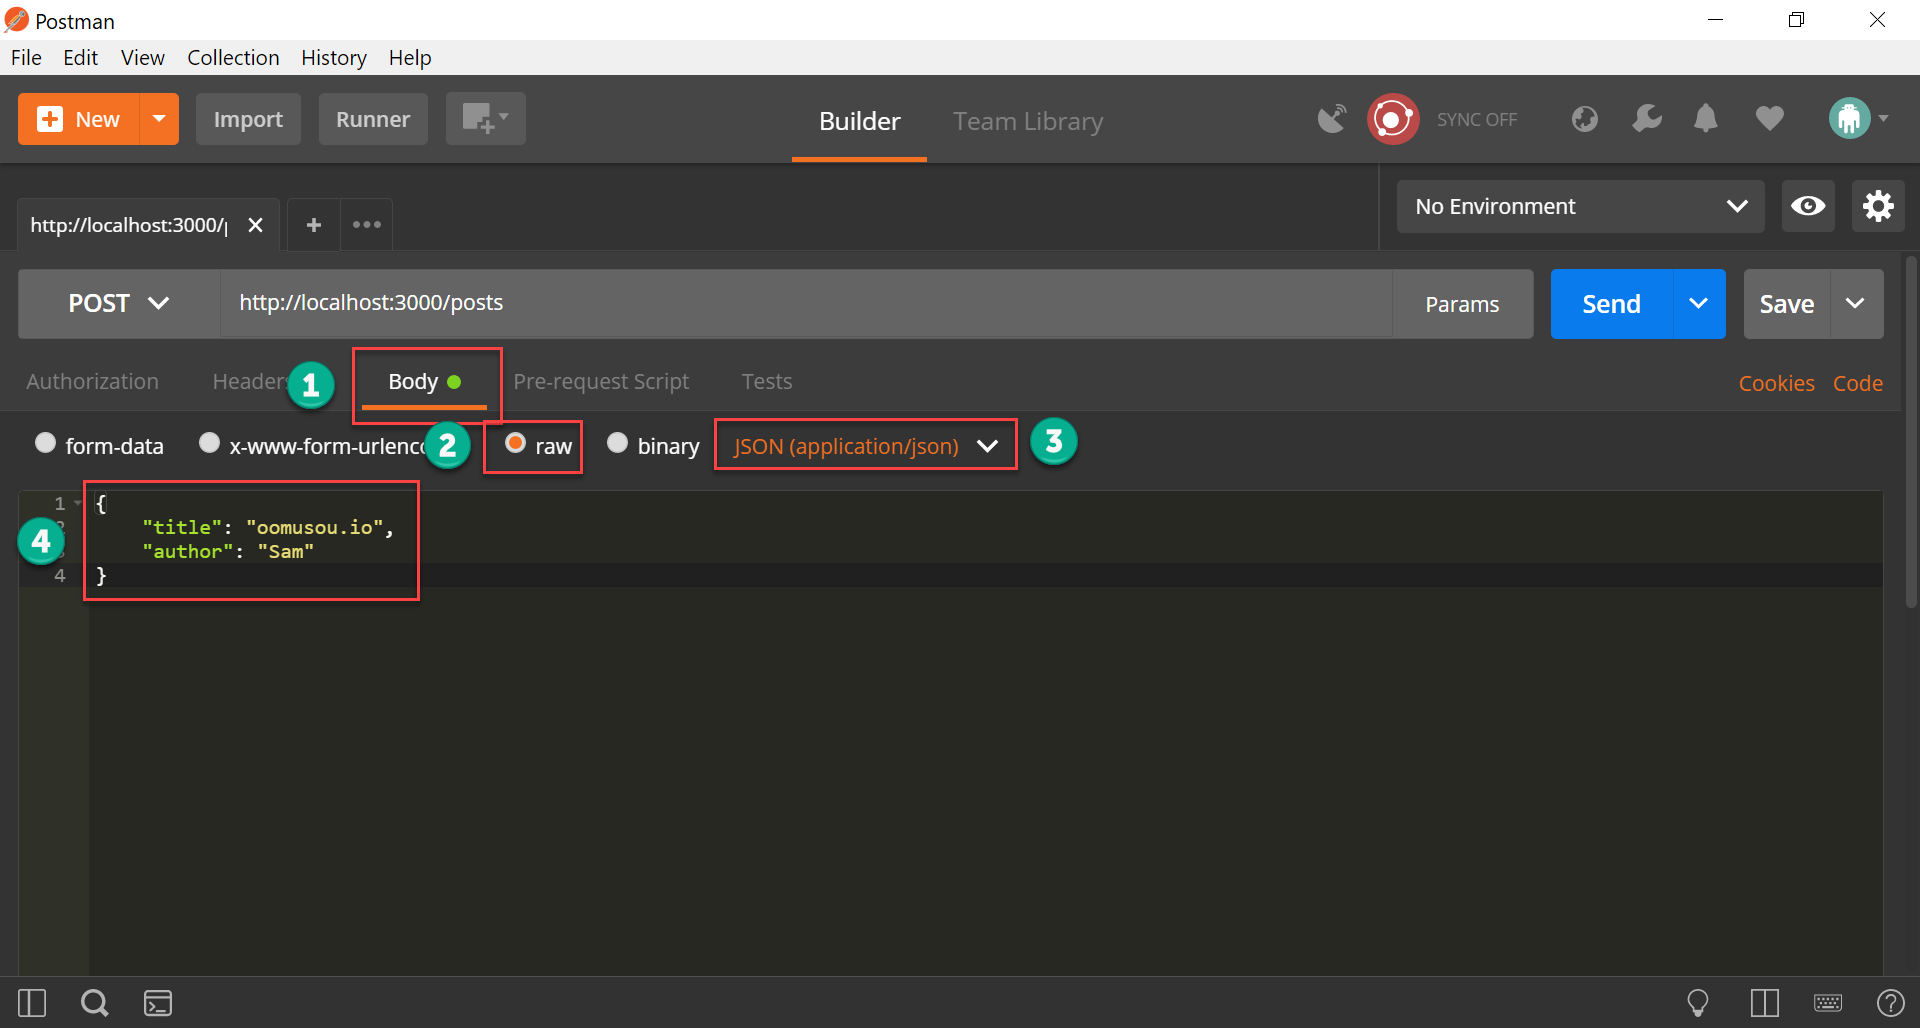
- 選擇
Body - 選擇
raw - 選擇
JSON (application/json) - 輸入要新增的 JSON 資料
不用包含
id,JSON Server 會自動幫你新增
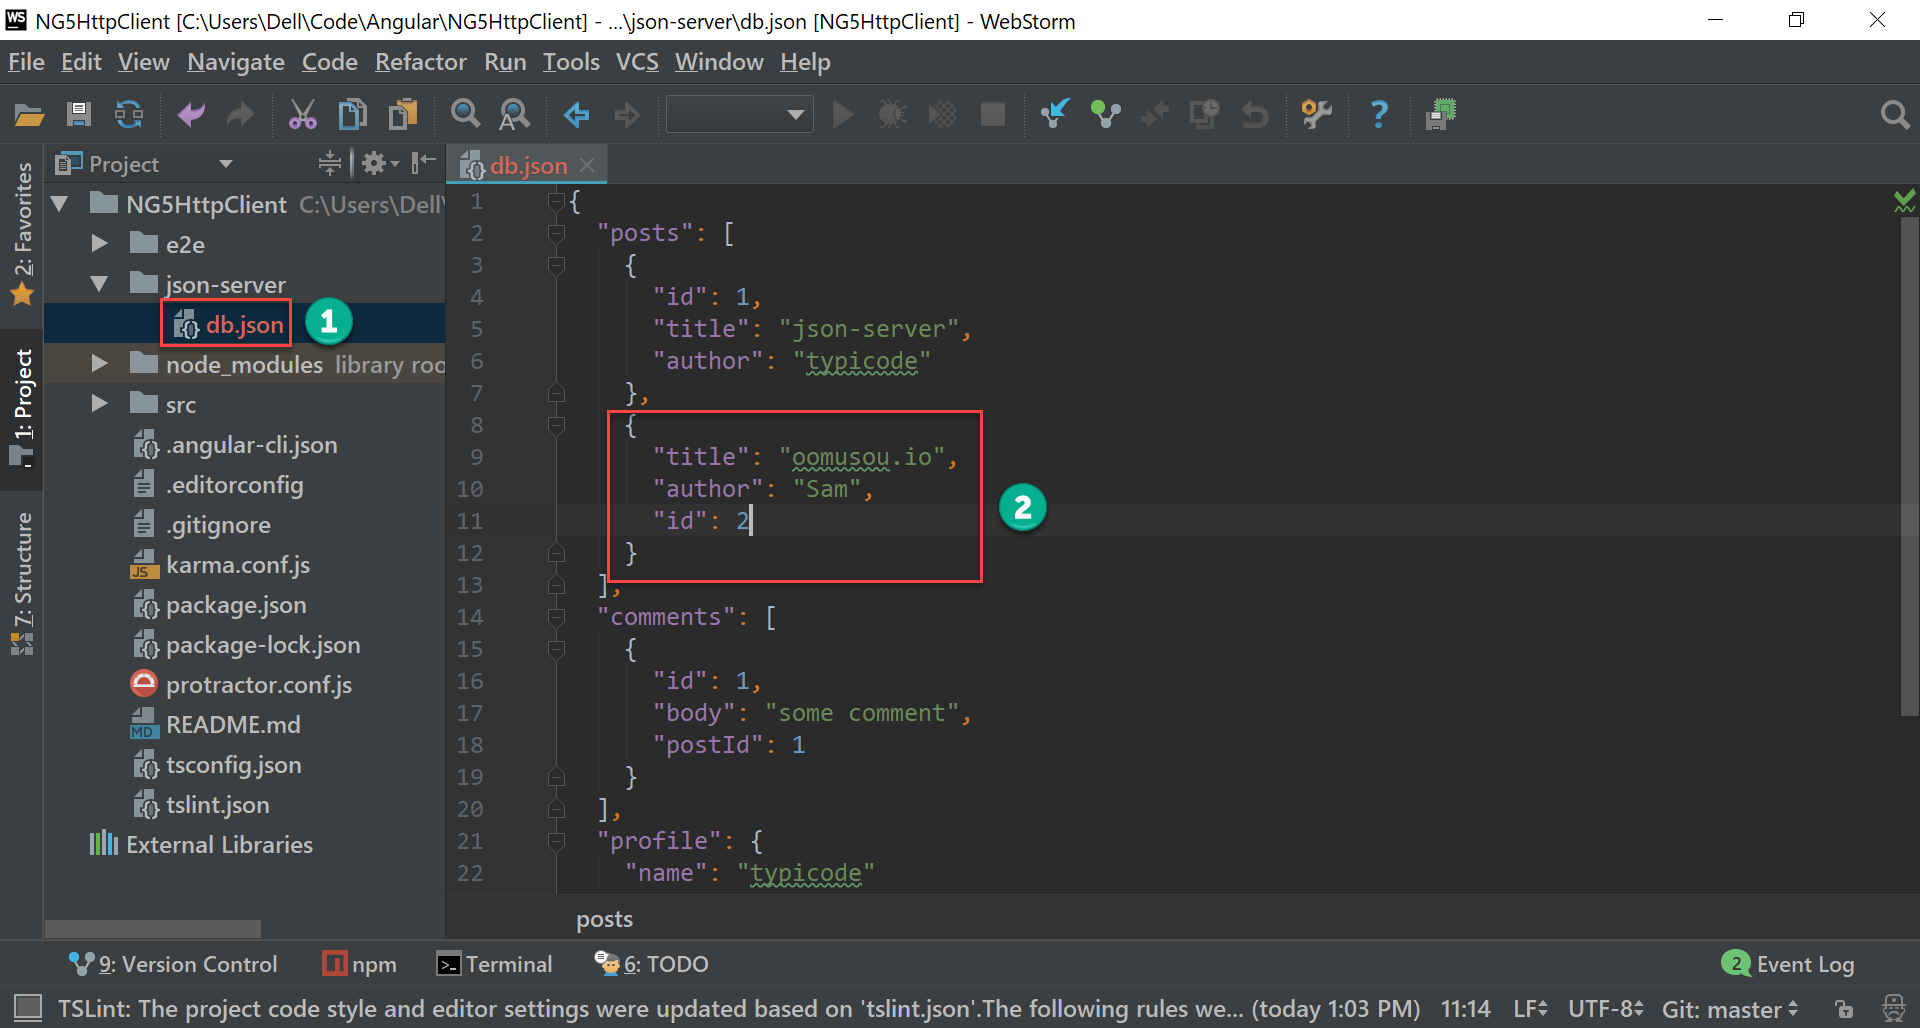
- 選擇
db.json - 剛剛由 Postman 新增的資料會寫入
db.json
建立 JSON Server Routes
我們可以自行在 db.json 建立新的 table,但預設 URI 都會在 root,可能不適合使用 (一般都會放在 /api 下,如 /api/posts),我們可自行加入 route 加以 mapping。
json-server/routes.json
1 | { |
在 json-server 目錄下新增 routes.json,將 /api/posts 對應到 JSON Server 的 /posts。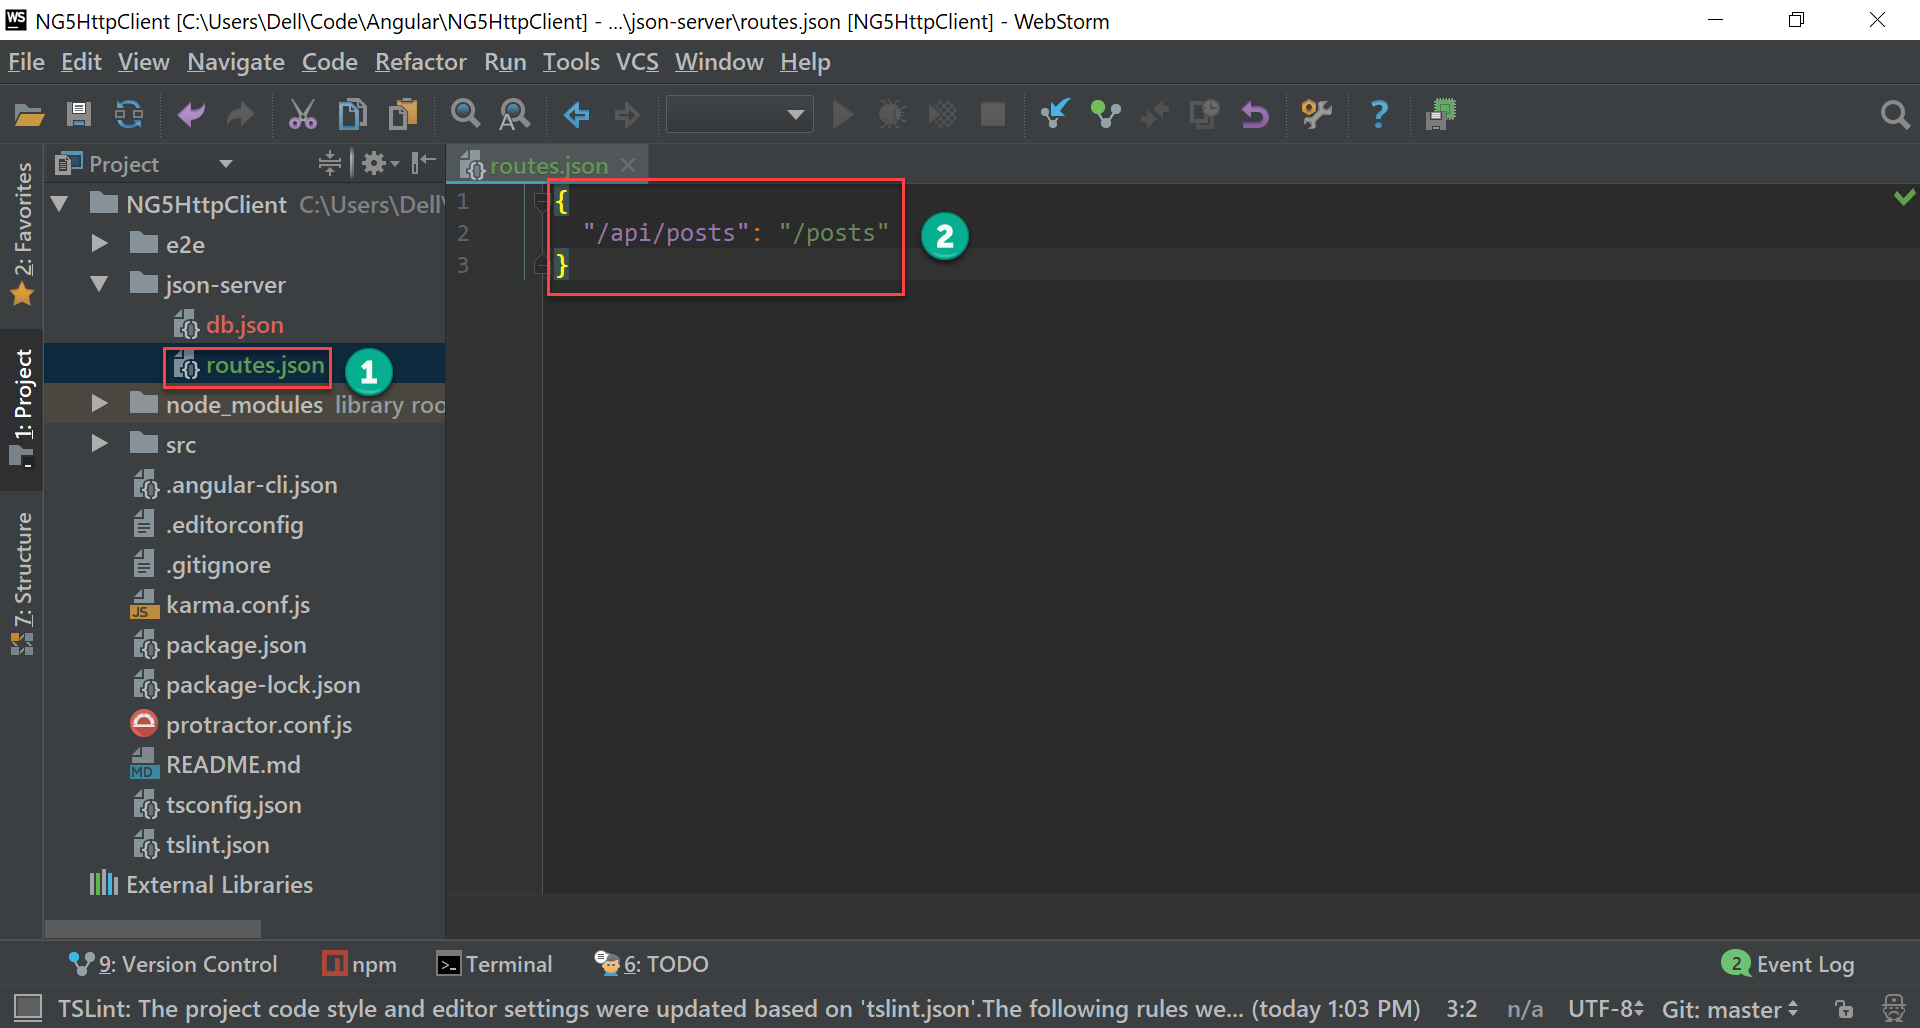
- 在
json-server目錄下新增routes.json - 將
/api/routes對應到 JSON Server 的/posts
建立 Angular CLI Proxy
Angular CLI 預設並不會使用 JSON Server,因此我們必須讓 Angular 會透過 proxy 去打 JSON Server。
proxy.conf.json
1 | { |
在專案根目錄下新增 proxy.conf.json,將 /api mapping 到 http://localhost:3000,也就是 JSON Server。
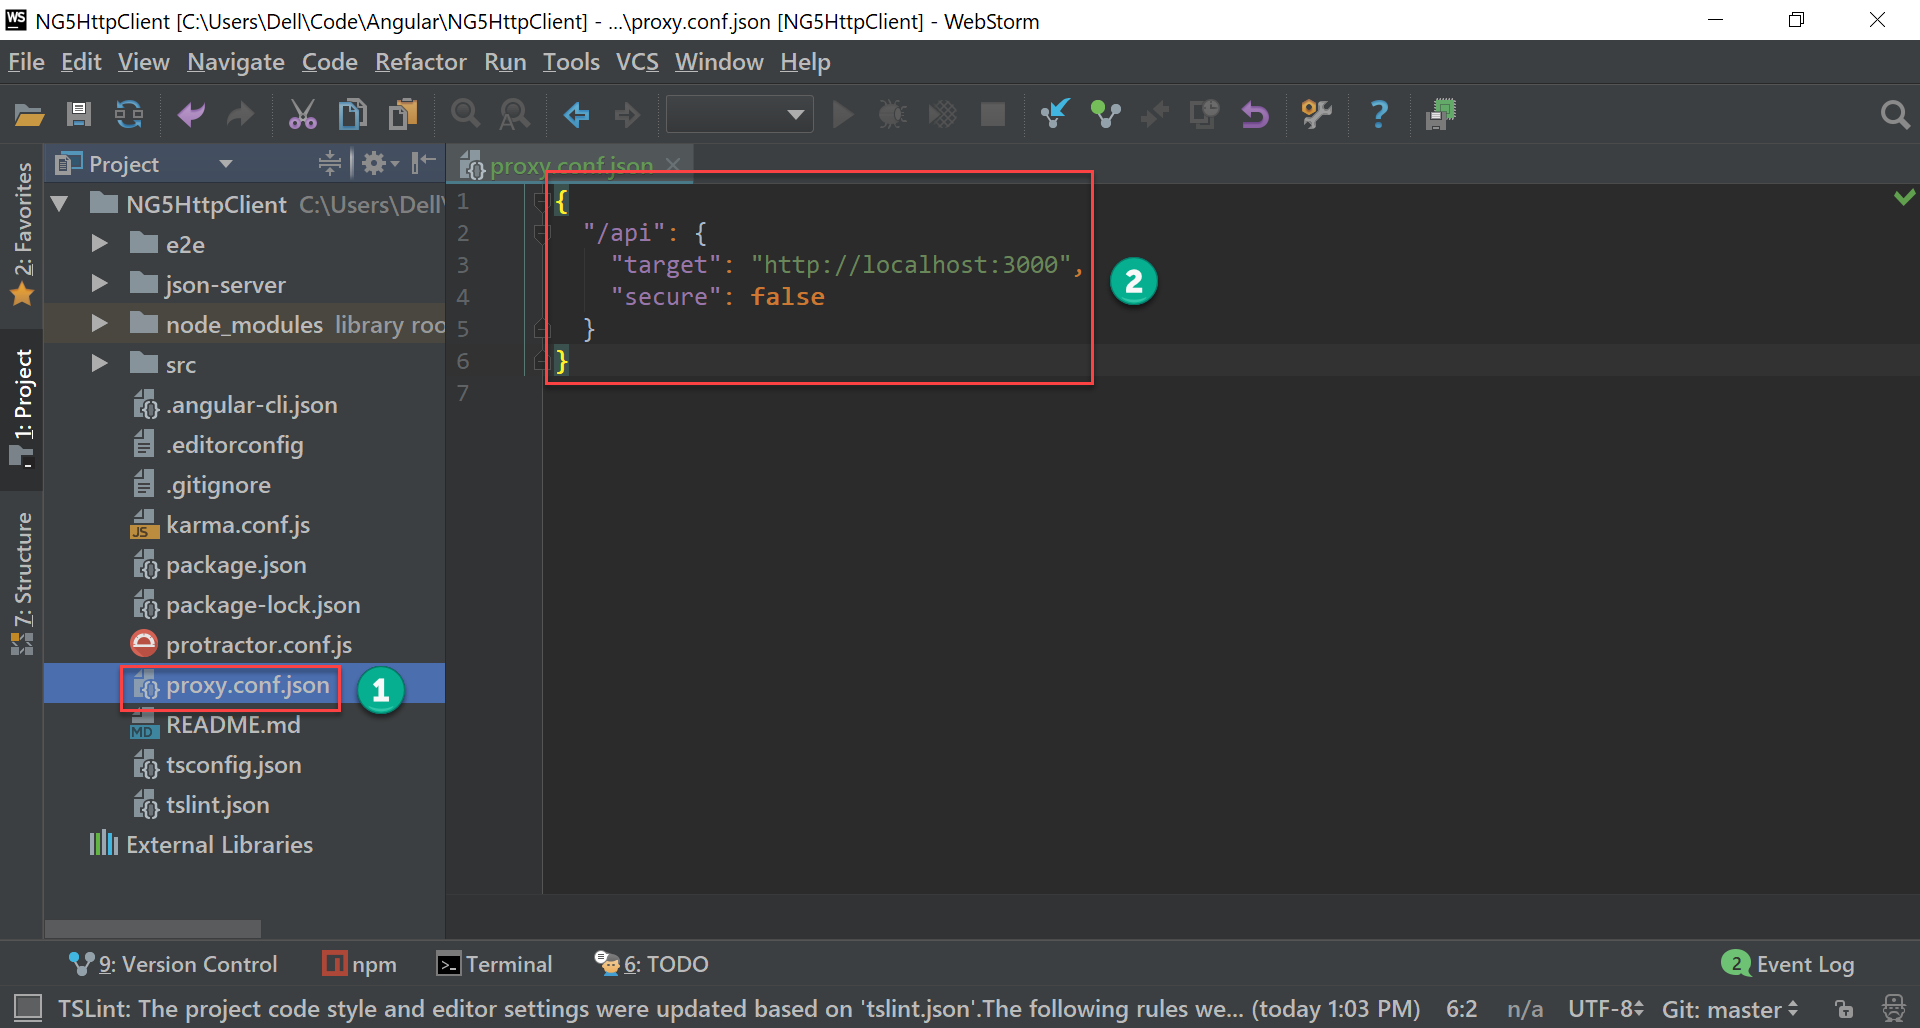
- 在專案根目錄下新增
proxy.conf.json - 將
/api對應到 JSON Server 的http://localhost:3000
由 npm 管理 JSON Server 與 Proxy
由於每次都要啟動 JSON Server 與 proxy,且參數有點繁瑣,比較好的方式是統一由 npm 來管理。
package.json
1 | { |
13 行
1 | "json-server": "json-server ./json-server/db.json --routes ./json-server/routes.json" |
新增 npm json-server,除了指定使用 db.json 外,還會使用自訂 route。
第 8 行
1 | "proxy": "ng serve --proxy-config proxy.conf.json", |
原本 npm start 得以保留,此為不透過 proxy 方式,另外新增 npm proxy,將會透過 proxy 使用 JSON Server。
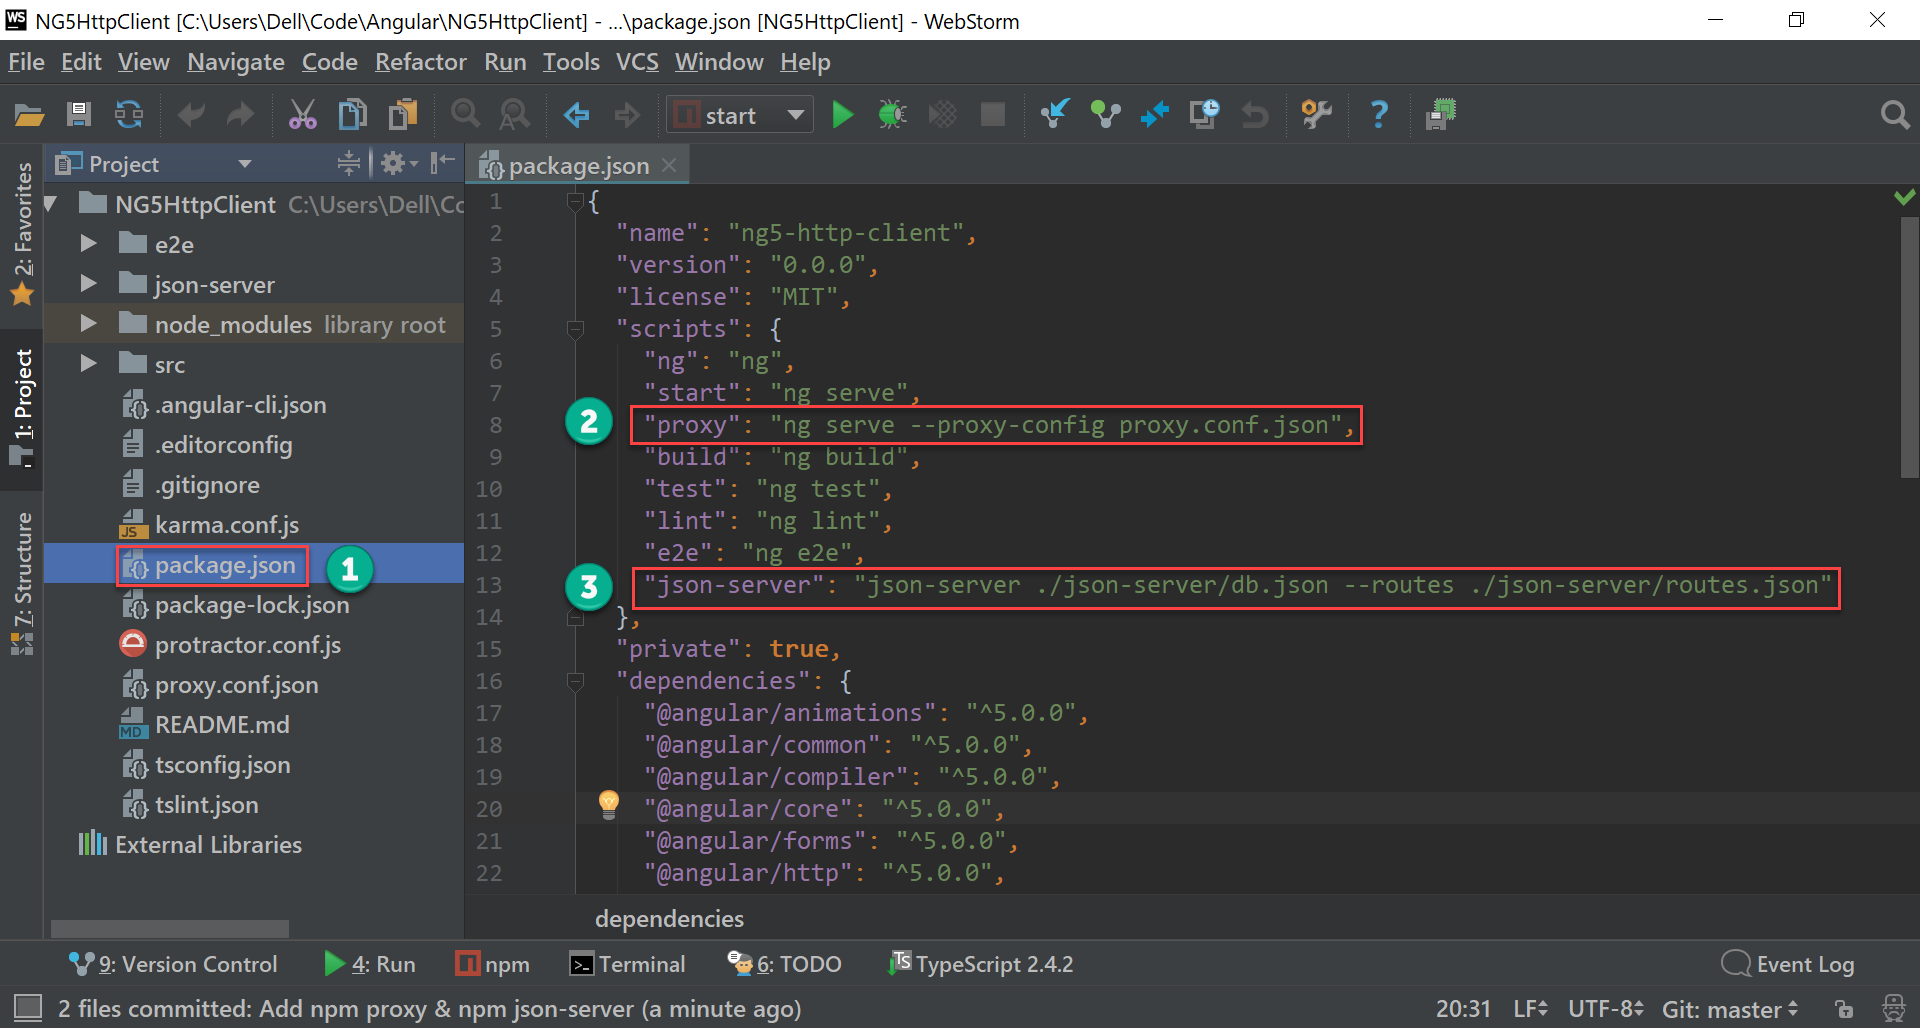
- 選擇
package.json - 新增
proxy使 Angular CLI 透過 proxy 使用 JSON Server - 新增
json-server啟動 JSON Server
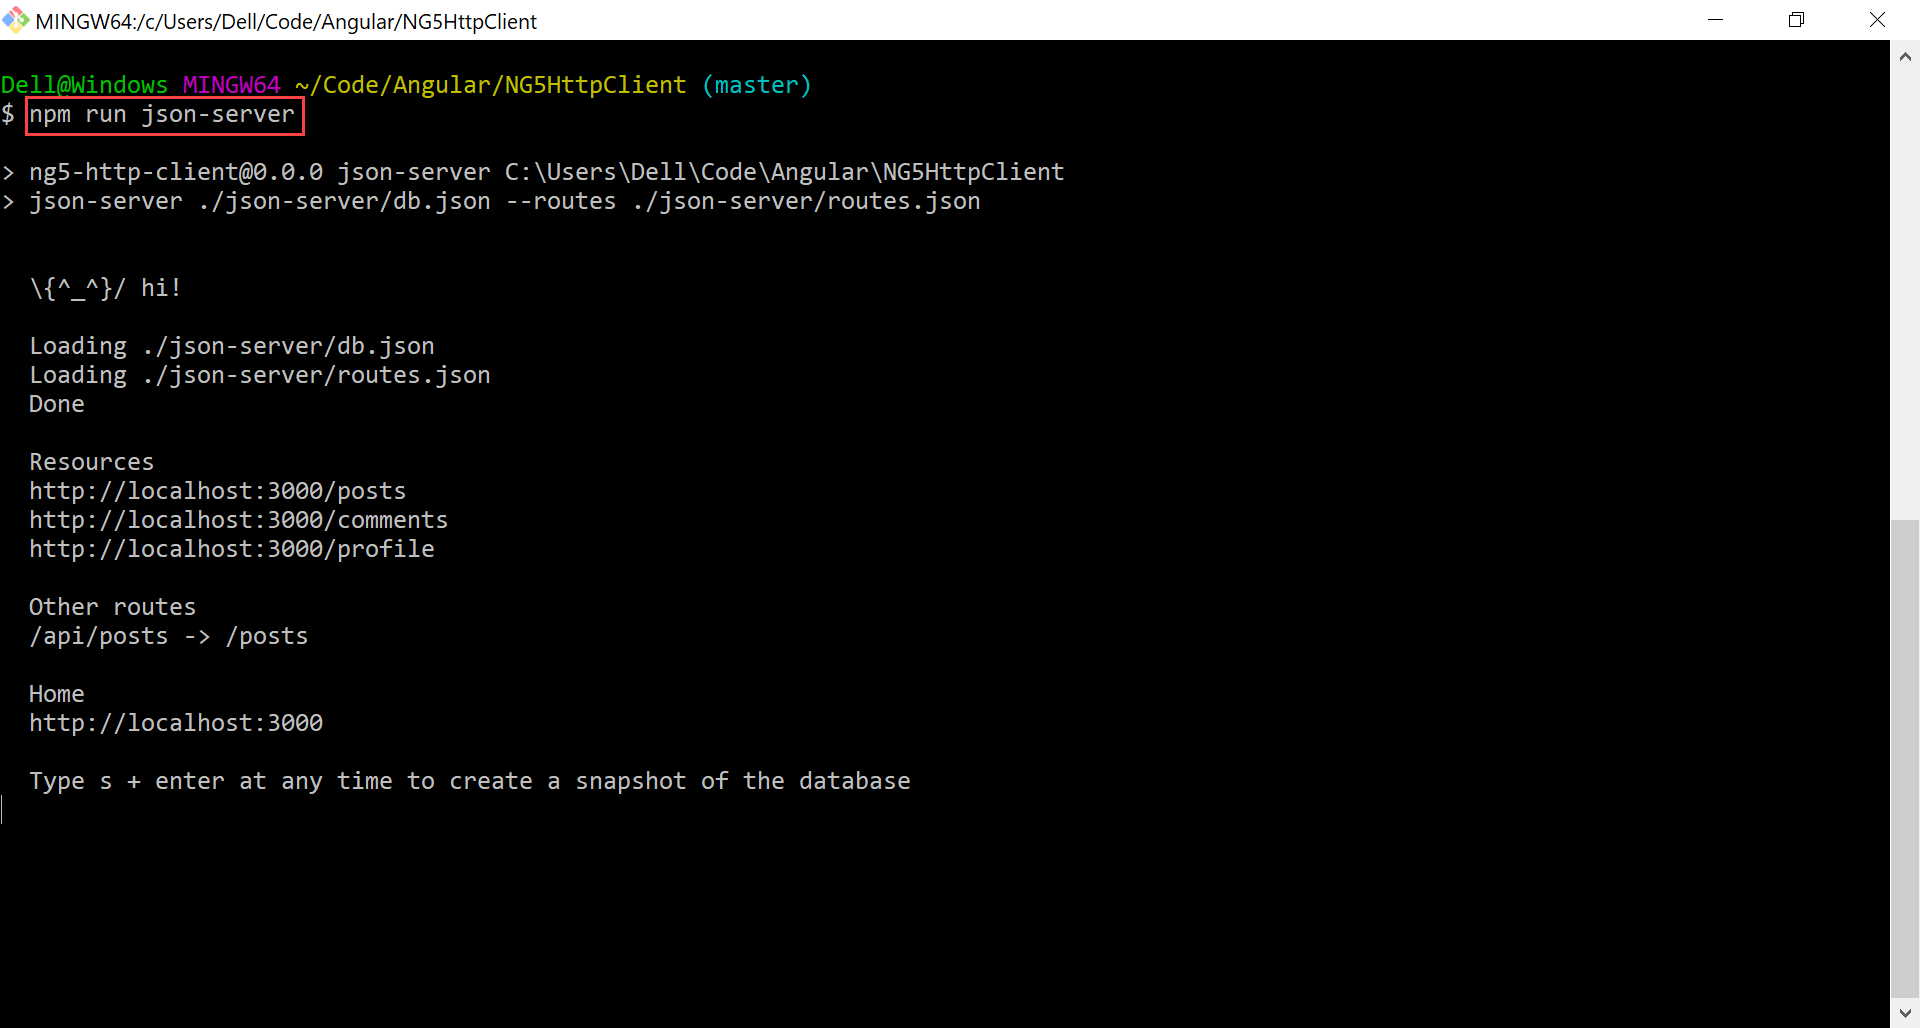
每次要開發專案時 :
1 | ~/MyProject$ npm run json-server |
先 npm run json-server 執行 JSON Server
1 | ~/MyProject$ npm run proxy |
再 npm run proxy 透過 proxy 使用 JSON Server
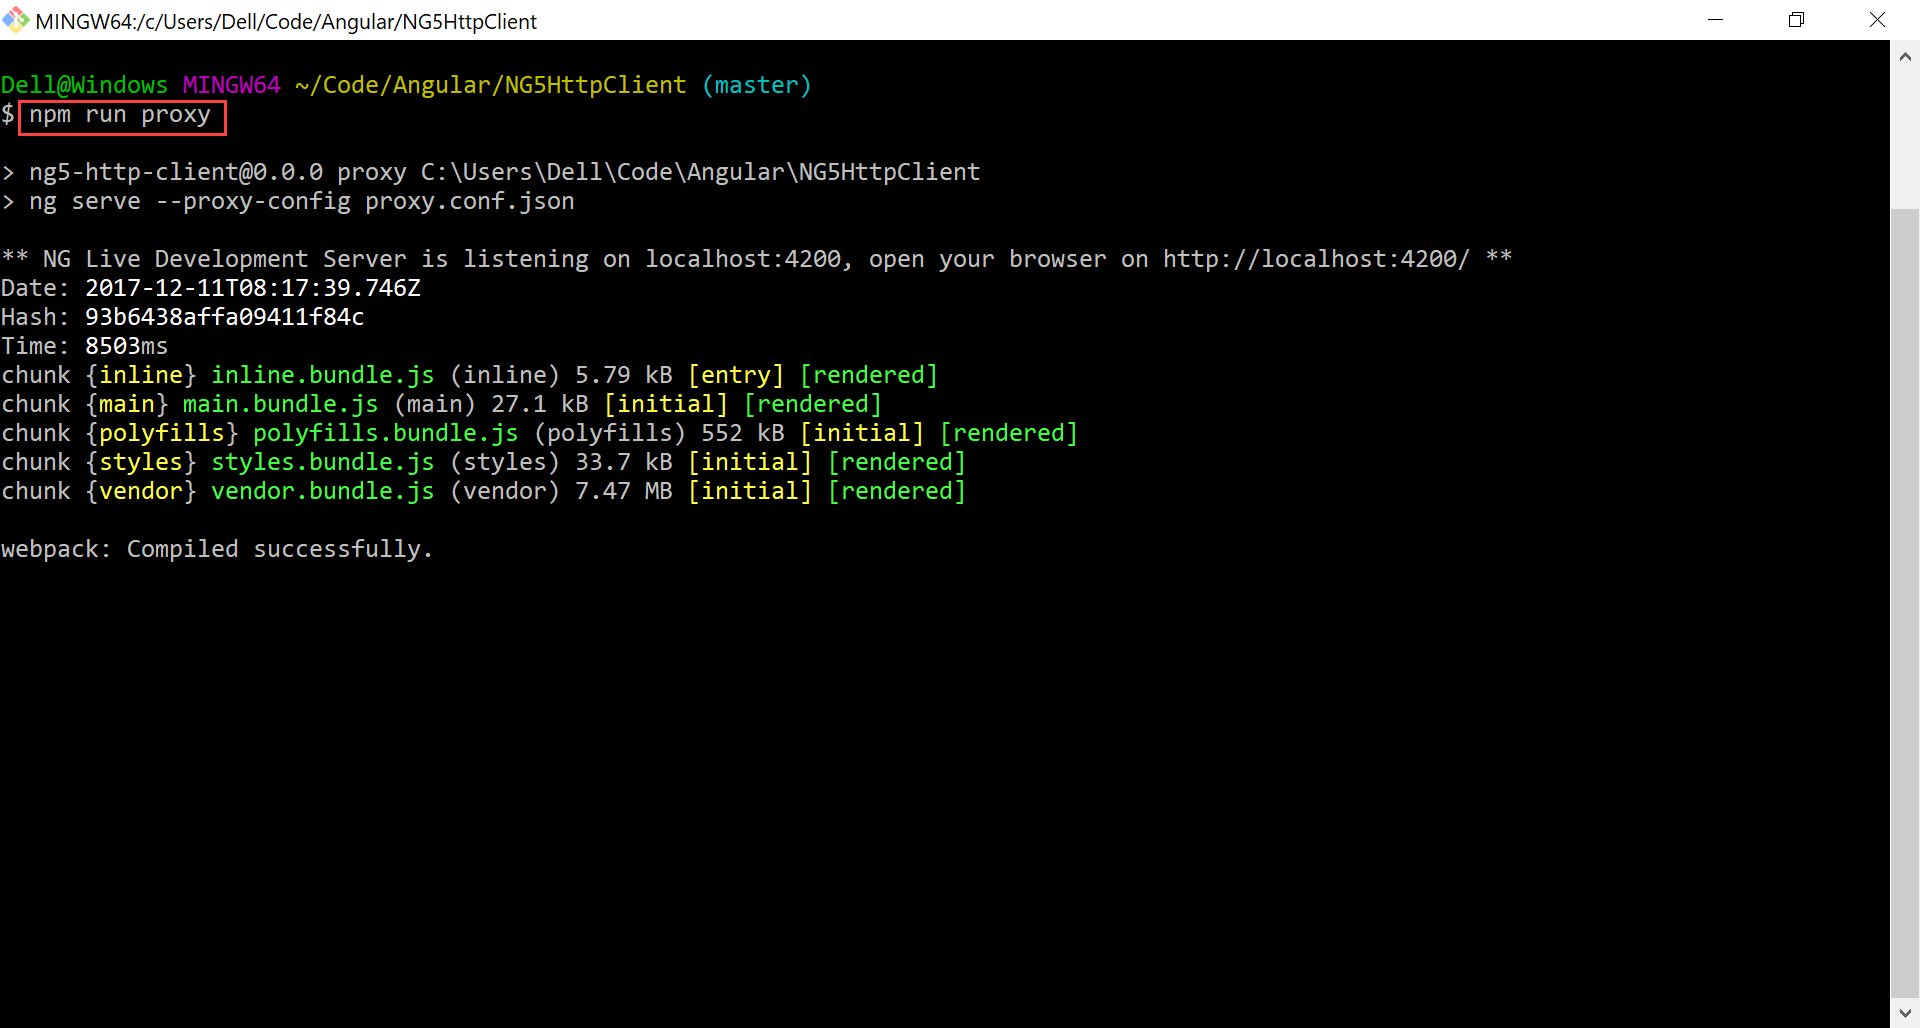
必須開兩個 terminal 分別執行
npm run json-server與npm run proxy,因為都必須同時在背景執行
JSON Schema to TypeScript
後端會以 JSON Schema 定義 JSON 格式與型別,而 Angular 亦會使用 interface 定義 JSON 的型別提供檢查。
透過 JSON Schema to TypeScript,我們可以直接將 JSON Schema 轉成 TypeScript interface,可節省時間,也可避免 typo。
安裝 JSON Schema to TypeScript
1 | $ npm install -g json-schema-to-typescript |
將 JSON schema to TypeScript 安裝在 global 環境。
JSON Schema
post.schema.json
1 | { |
定義了 id、title 與 author 3 個欄位,其中 title 與 author 為必填。
將 JSON Schema 轉 TypeScript Interface
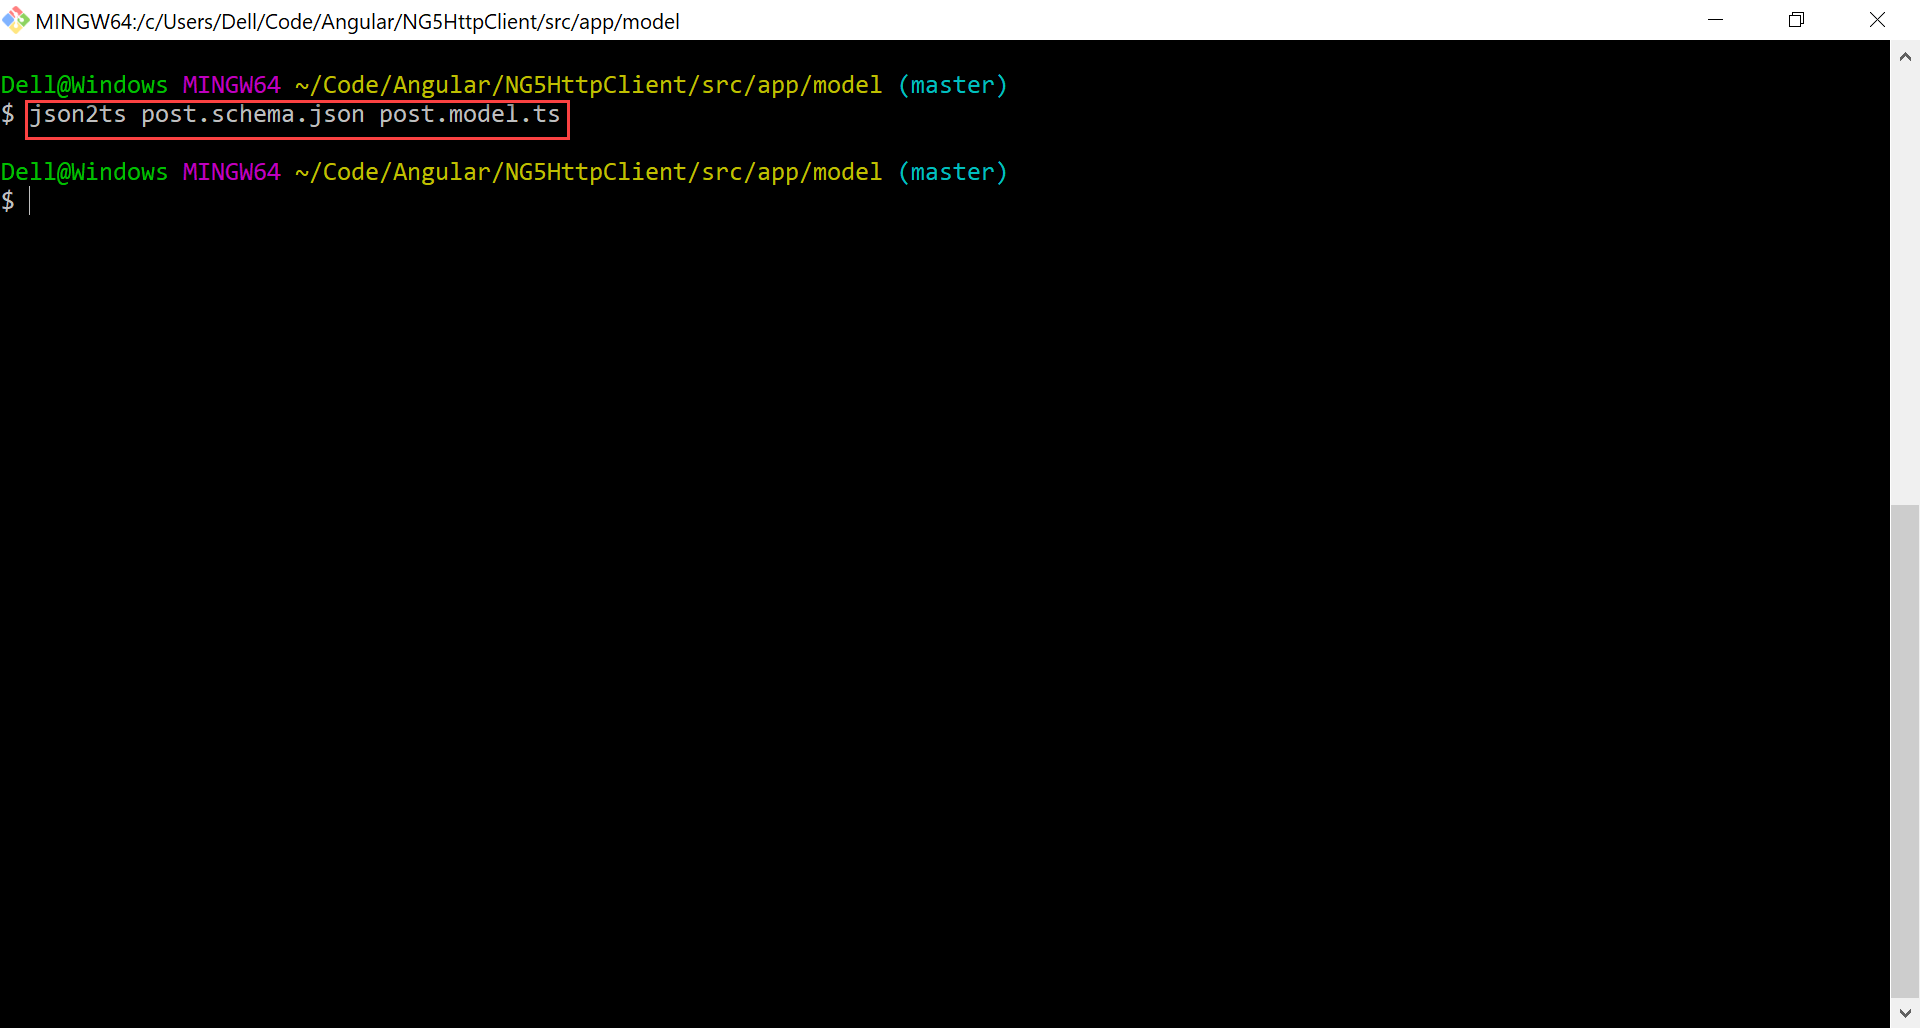
1 | ~/MyProject/src/app/model$ json2ts post.schema.json post.model.ts |
目前將 post.schema.json 放在 /src/app/model 目錄下。
使用 json2ts 將 post.schema.json 轉成 post.model.ts。
TypeScript Interface
post.model.ts
1 | /** |
由 json2ts 所轉出來的 TypeScript interface,最上面有 json2ts 所產生的註解。
將然若有 JSON 欄位異動,請不要直接修改 TypeScript interface,而應該直接去修改 JSON Schema,再由
json2ts產生 TypeScript interface
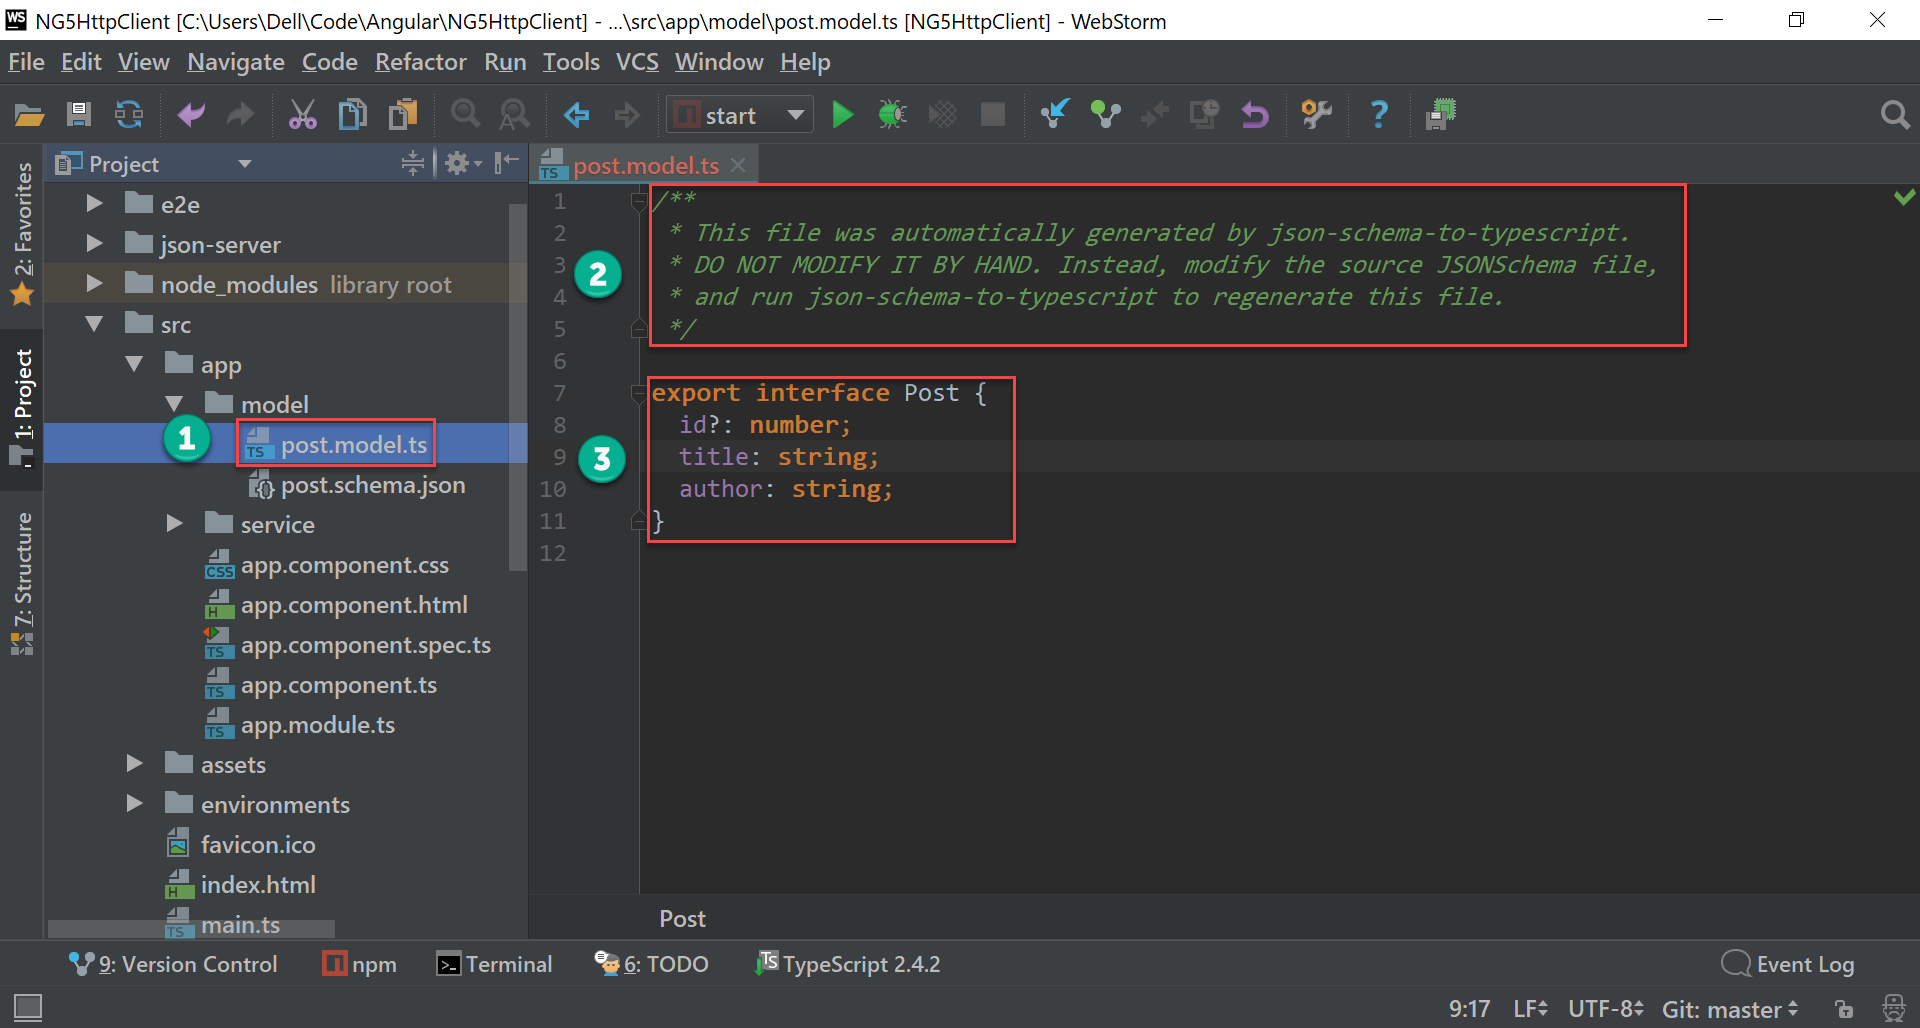
- 由
json2ts所產生的post.model.ts - 由
json2ts所產生的註解 - 由
json2ts所轉出的 TypeScript interface
AppComponent

app.component.html
1 | <input type="text" [(ngModel)]="title"> |
第 1 行
1 | <input type="text" [(ngModel)]="title"> |
title 的輸入框,直接使用 ngModel 的 two way binding 到 title field。
第 2 行
1 | <button (click)="onClick()">Add Post</button> |
Button 的 click event 對應到 AppComponent.onClick()。
第 4 行
1 | <ul> |
使用 *ngFor 將所有 posts 展開。
app.component.ts
1 | import { Component, OnInit } from '@angular/core'; |
11 行
1 | title: string; |
要與 HTML 做 data binding 的東西都會宣告在 public field。
title: 給<input type="text">做 two-way bindingposts: 給*ngFor做 data binding
14 行
1 | constructor(private postService: IPostService) { |
將 PostService 依賴注入,其型別為 IPostService interface。
依賴反轉原則
高階模組不應該依賴低階模組;兩著都應該依賴高階模組所定義的 interface
所以 AppComponent 不應該直接依賴 PostService,而應該依賴 IPostService interface,因此 PostService 的型別是 IPostService。
17 行
1 | ngOnInit(): void { |
一載入時,希望能顯示所有 Post 。
37 行
1 | private getAllPosts() { |
因為 ngOnInit() 與 onClick() 都會呼叫 PostService.getAllPosts(),基於 DRY 原則,將共用抽到 getAllPosts()。
因為呼叫 PostService 的 getAllPosts(),也因此期望 IPostService interface 有 getAllPosts()。
PostService.getAllPost() 回傳為 Observable,因此要使用 subscribe() 訂閱 Observable。
subscribe() 共有 3 個參數 :
- next : 當 service 的非同步執行完後,
下一個要執行的動作,value會傳回Post[],因此可直接指定給this.posts - error : 當
HttpClient執行錯誤時所執行的 arrow function - complete : 當
HttpClient執行完成時所執行的 arrow function
21 行
1 | onClick() { |
新增 Post 到資料庫。
因為呼叫 PostService 的 addPost(),傳入 Post model,也因此希望 IPostService interface 有 addPost()。
PostService.addPost() 也是回傳 Observable,因此要使用 subscribe() 訂閱 Observable。
IPostService

ipostservice.interface.ts1
2
3
4
5
6
7import { Post } from '../../model/post.model';
import { Observable } from 'rxjs/Observable';
export abstract class IPostService {
abstract addPost(post: Post): Observable<Post>;
abstract getAllPosts(): Observable<Post[]>;
}
根據 AppComponent 的需求,我們希望 IPostService 有 addPost() 與 getAllPosts() 兩個 method。
IPostService 觀念上是 interface,所以理想上應該這樣寫 :
1 | export interface IPostService { |
但若實際這樣寫,TypeScript 編譯沒問題,但 ng serve 時會執行錯誤。
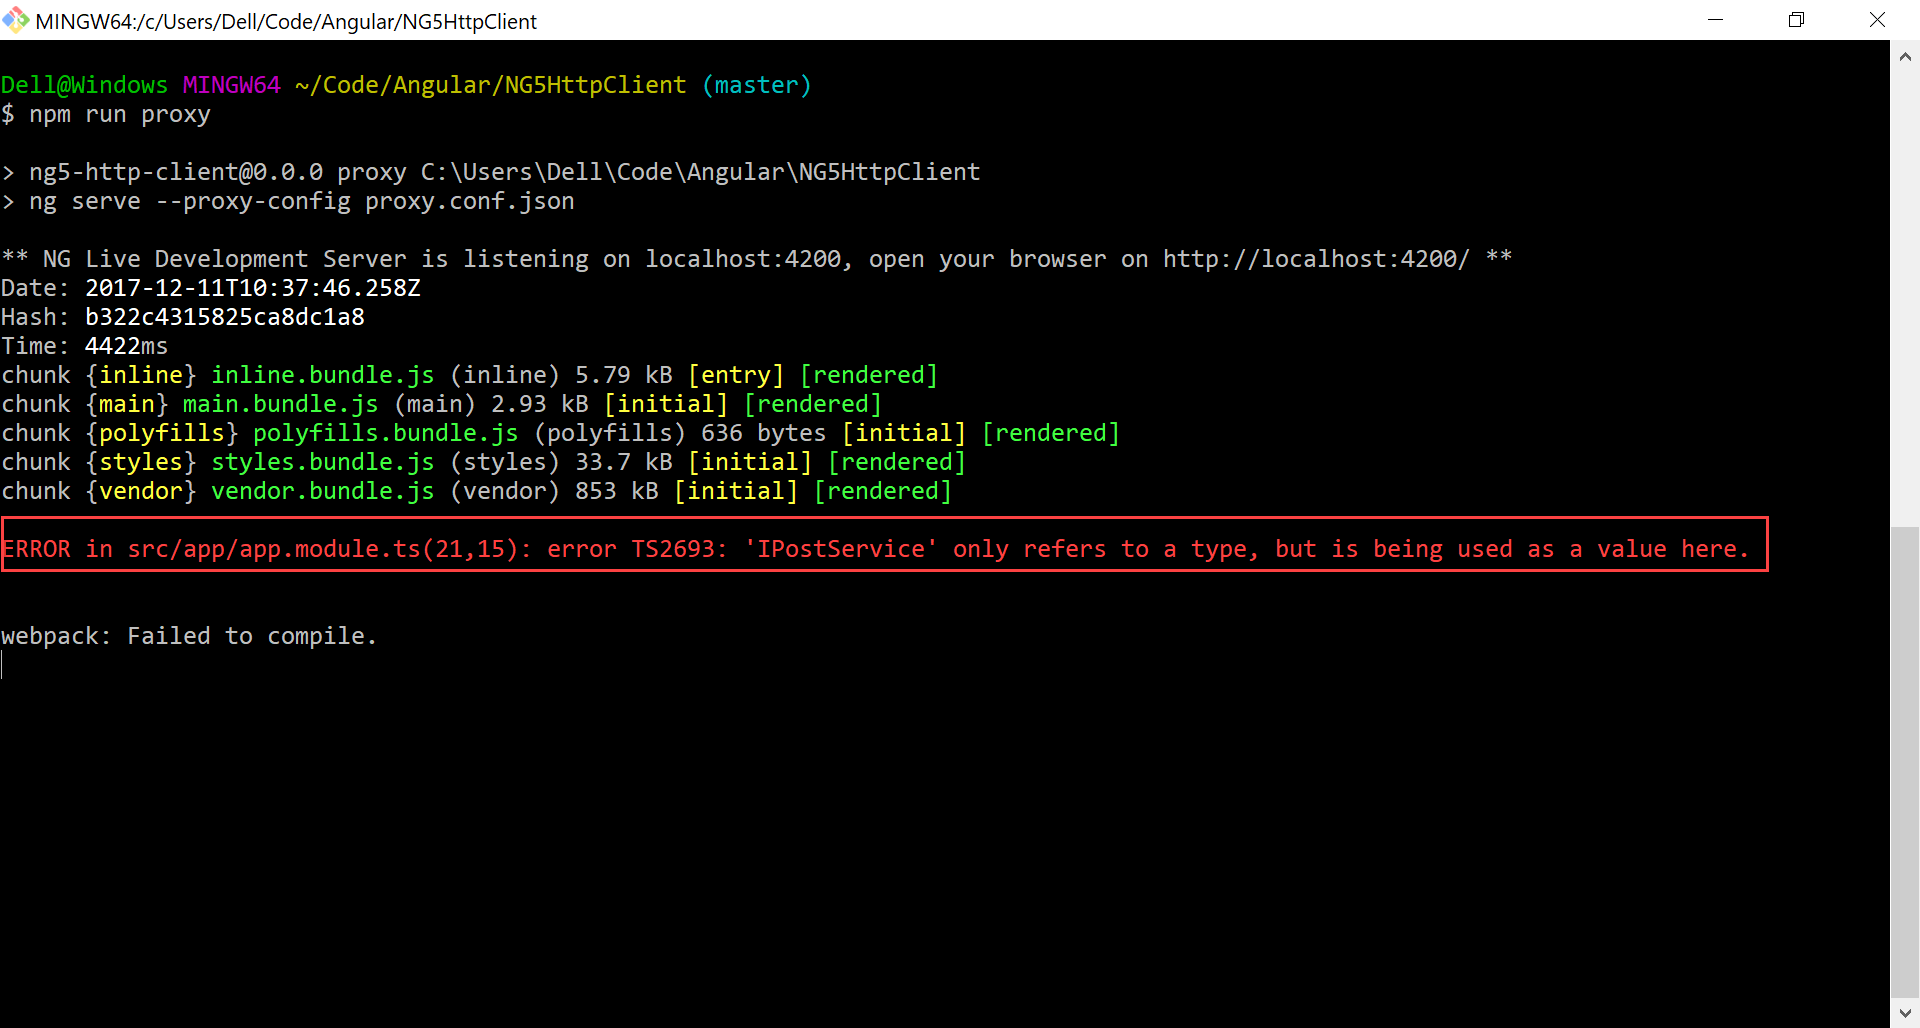
主要在於 interface 是 TypeScript 所擴充,在編譯成 JavaScript 後並沒有 interface,導致 DI container 在執行時找不到 interface 而造成 run-time 錯誤。
也就是說 interface 在 TypeScript 主要是用來 編譯檢查。
抽象 除了使用 interface 實現外,也可以使用 abstract class,在 ES6 有 abstract class,在 ES5 也有相對應的解法,所以目前必須改用 abstract class 取代 interface 實現 抽象。
在 Angular 的 DI container,觀念上是 interface,但實作上須與 JavaScript 妥協,改用
abstract class實踐interface。
PostService

post.service.ts
1 | import { Injectable } from '@angular/core'; |
第 7 行
1 | @Injectable() |
因為加了 @Injectable() decorator,所以 PostService 可以透過 DI container 依賴注入。
並不是所有的 class 都可以由 DI container 依賴注入,必須要加上
@Injectabledecorator 的 class 才可以
第 8 行
1 | export class PostService implements IPostService { |
因為 依賴反轉原則,PostService 必須實作 IPostService interface。
第 9 行
1 | constructor(private httpClient: HttpClient) { } |
因為要使用 HttpClient,將 HttpClient 注入到 PostService。
11 行
1 | addPost(post: Post): Observable<Post> { |
使用 HttpClient.post<T>() 執行 POST,將 Post model 傳入,其中 <T> 傳入 Post model 的型別 Post。
HttpClient.post<T>() 回傳的型別為 Observable,其本質為 Post model,會將傳進來的 Post 再傳回 Observable<Post>。
由於 subscribe() 最後要由 component 決定,因此將 Observale 回傳給 component 去 subscribe()。
由於在
addPost()並沒有subscribe(),因此addPost()目前為止還沒有真的執行 POST
16 行
1 | getAllPosts(): Observable<Post[]> { |
使用 HttpClient.get<T>() 執行 GET,其中 <T> 為回傳的 Post[] 型別。
HttpClient.get<T>() 回傳的型別為 Observable,其本質為 Post[]。
由於 subscribe() 最後要由 component 決定,因此將 Observale 回傳給 component 去 subscribe()。
由於在
getAllPosts()並沒有subscribe(),因此getAllPosts()目前為止還沒有真的執行 GET
在 Angular 2 所提供的 Http,至今仍可用,但用法較麻煩 :1
2return this.http.get('api/posts')
.map(response => response.json());
Angular 4.3 的 HttpClient 改用泛型後,除了在 get() 與 post() 都可以明顯看到型別,語意較佳,且寫法也教精簡,不用再透過 map() 去轉成 JSON。
實務上建議改用
HttpClient,不要再使用Http
AppModule
app.module.ts
1 | import { BrowserModule } from '@angular/platform-browser'; |
13 行
1 | imports: [ |
HttpClient須使用HttpClientModule[(ngModel)]須使用FormsModule
18 行
1 | providers: [ |
DI container 一定要提供 interface 與 class 的 mapping。
在 providers 後為 object array,每一個 object 為 interface 與 class 的 mapping。
- provide : interface 名稱
- useClass : class 名稱
為什麼要使用 Service?
或許你會認為,明明使用 $.ajax() 向後端 API 抓資料是很單純的事情,為什麼 Angular 還要大費周章透過 Service + DI container,而不是提供一個簡單的 function 就好了嗎?有幾個原因:
- 將來若其他 component 要使用 API 時,將 service 直接 DI 進 compoent 即可
- 將來若要對 API 的 service 做抽換,可直接透過 DI 換掉即可
- 將來若要對 component 做單元測試,可輕易的
spyOnAPI service 即可
簡單的說,將 API 部分獨立成 service,目的要使 component 與 API
解耦合,且讓 component 不直接相依於 service,兩者僅相依於 component 所定義的 interface,符合依賴反轉原則
Conclusion
- JSON Server : 讓我們在開發階段模擬真實的 API server
- JSON Schema to TypeScript : 將 JSON Schema 轉成 TypeScript interface,更有效率也避免 typo
- HttpClient : 語意更佳,也更簡單的寫法存取 API
- Angular DI Container : Angular 實現
依賴反傳與依賴注入的解決方案
Sample Code
完整的範例可以在我的 GitHub 上找到。