如何在 Entity Framework Core 使用 Migration ? (PostgreSQL)
透過 PostgreSQL 官方提供的 Npgsql EF Core Provider,Entity Framework Core 也能簡單地存取 PostgreSQL。
本文將使用 Code First 方式對 PostgreSQL 建立 database schema,並解釋 Migration 背後運作原理。
Version
macOS High Sierra 10.13.4
Docker for Mac 18.03-ce-mac65 (24312)
.NET Core 2.1
Entity Framework 2.1
PostgreSQL 10.3
Npgsql EF Core Provider 2.1
VS Code 1.24.0
DataGrip 2018.1.4
Definition
Code First
會先在 code 建立
DbContext與Entity,然後透過 Migration 在 database 建立 schemaQ : 為什麼要使用 Code First 與 Migration ?
A : 傳統都會使用視覺化工具建立 database schema,這種方式雖然直覺,但有以下缺點:
- Schema 建立步驟無法透過 Git 版控
- 無法很簡單的同步 development / lab / stage / production 各 server 環境的 database schema
EF Core 提供以下解決方案:
- 透過 Code First,schema 改用 Entity 描述,我們可將 Migration 檔案進行 Git 版控,明確地知道 schema 變化過程
- 透過 Migration,只要在各 server 執行
dotnet ef database update,就能確保 schema 同步
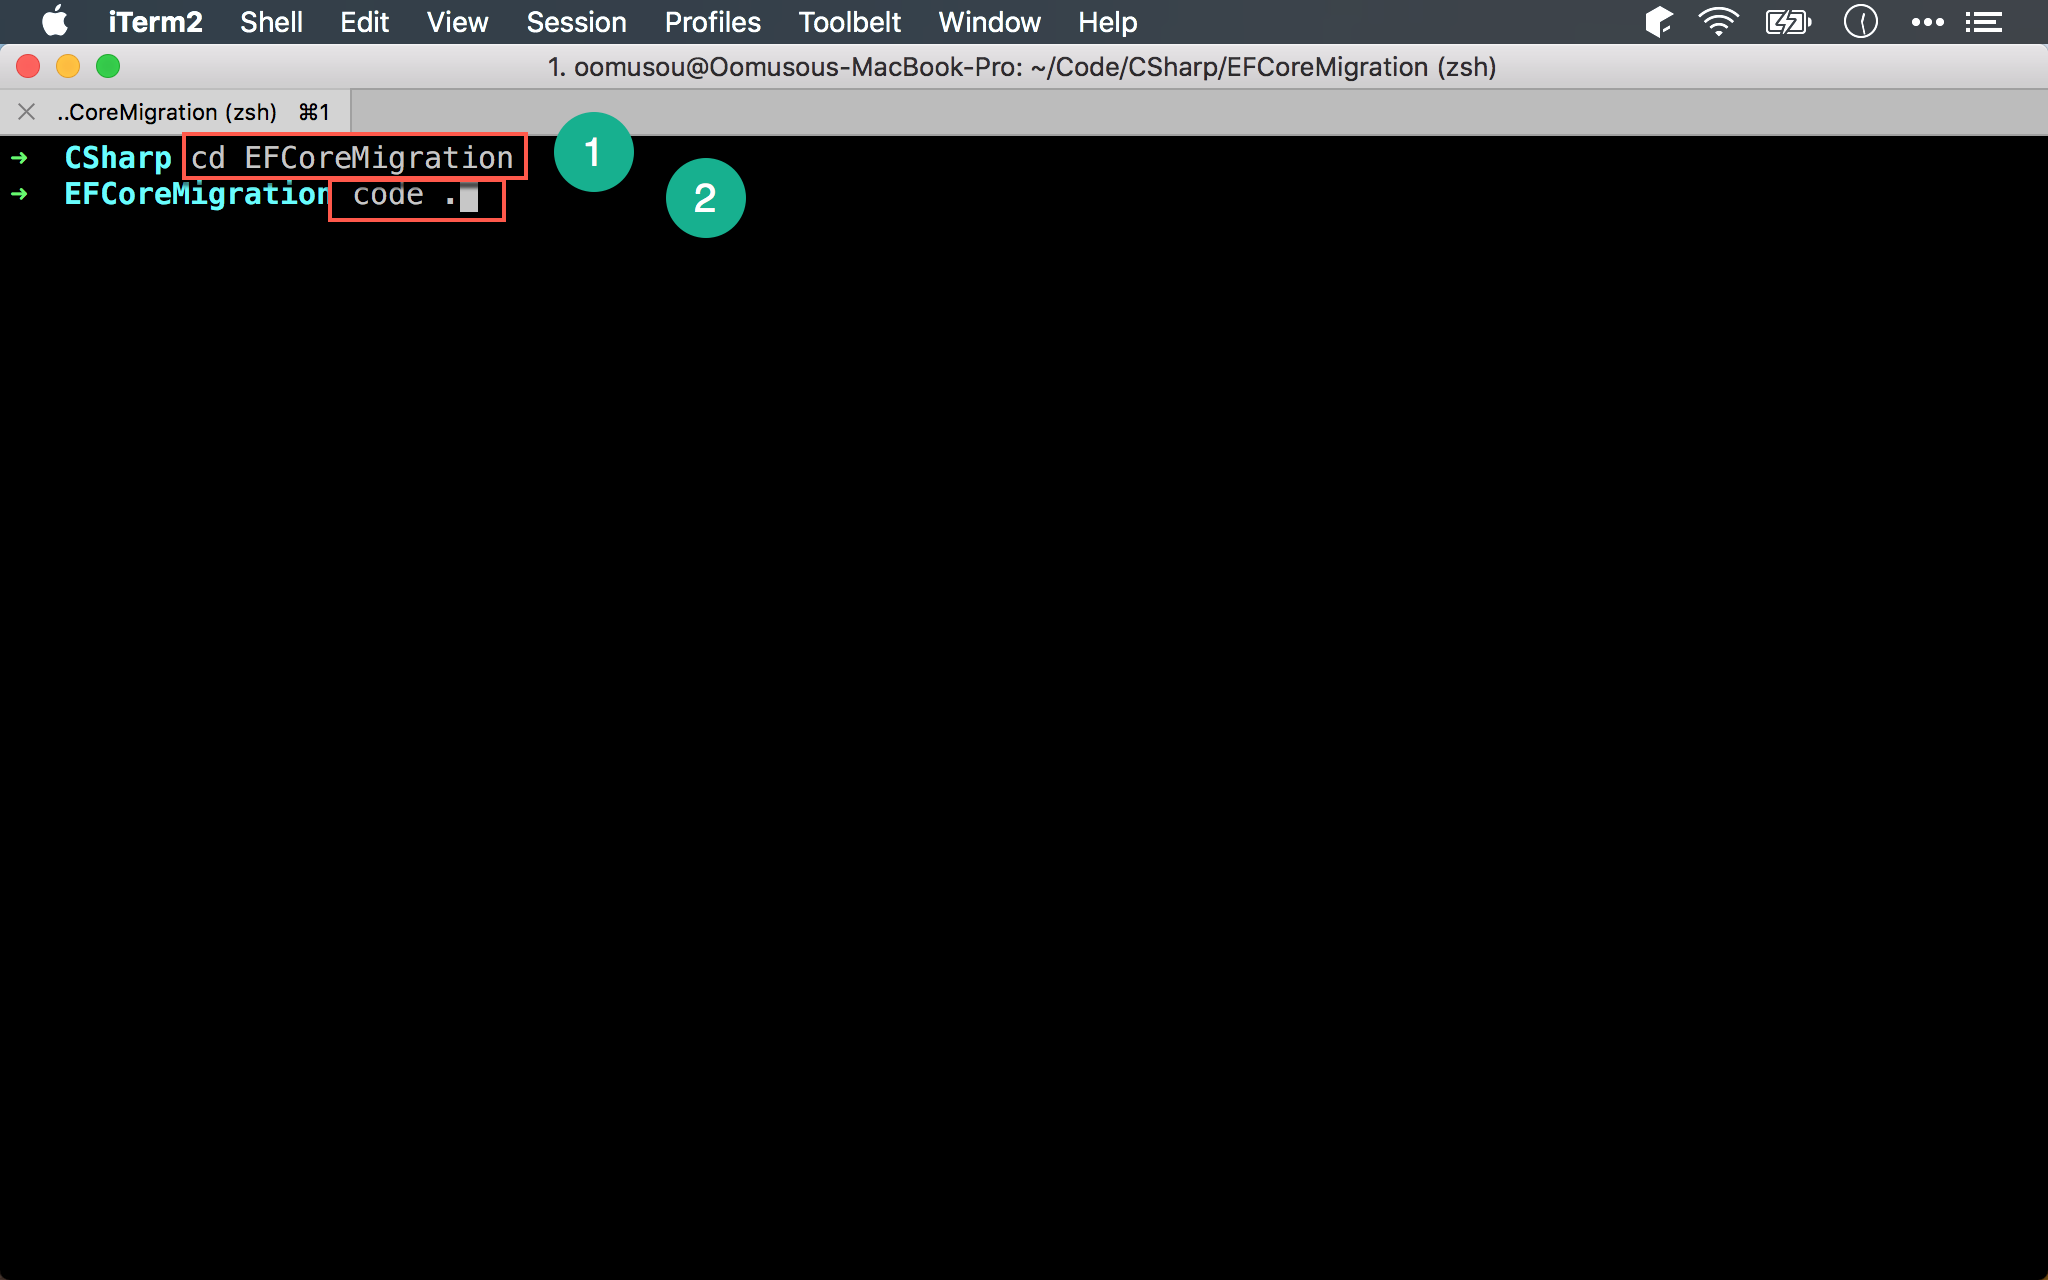
建立 Console App
1 | $ dotnet new console -o EFCoreMigration |
使用 dotnet new 建立 .NET Core App。
- new:建立 project
- console:建立 console 類型 project
- -o:以
EFCorePostgres為專案名稱並建立目錄

以 VS Code 開啟
1 | $ cd EFCoreMigration |
進入專案目錄,呼叫 VS Code 開啟。

安裝 EF Core Package
1 | ~/EFCoreMigration $ dotnet add package Microsoft.EntityFrameworkCore.Design |
將來會在 CLI 執行 migration,而 dotnet ef 必須透過 Microsoft.EntityFrameworkCore.Design 才能存取 Entity 與 DbContext,所以必須另外安裝 package。
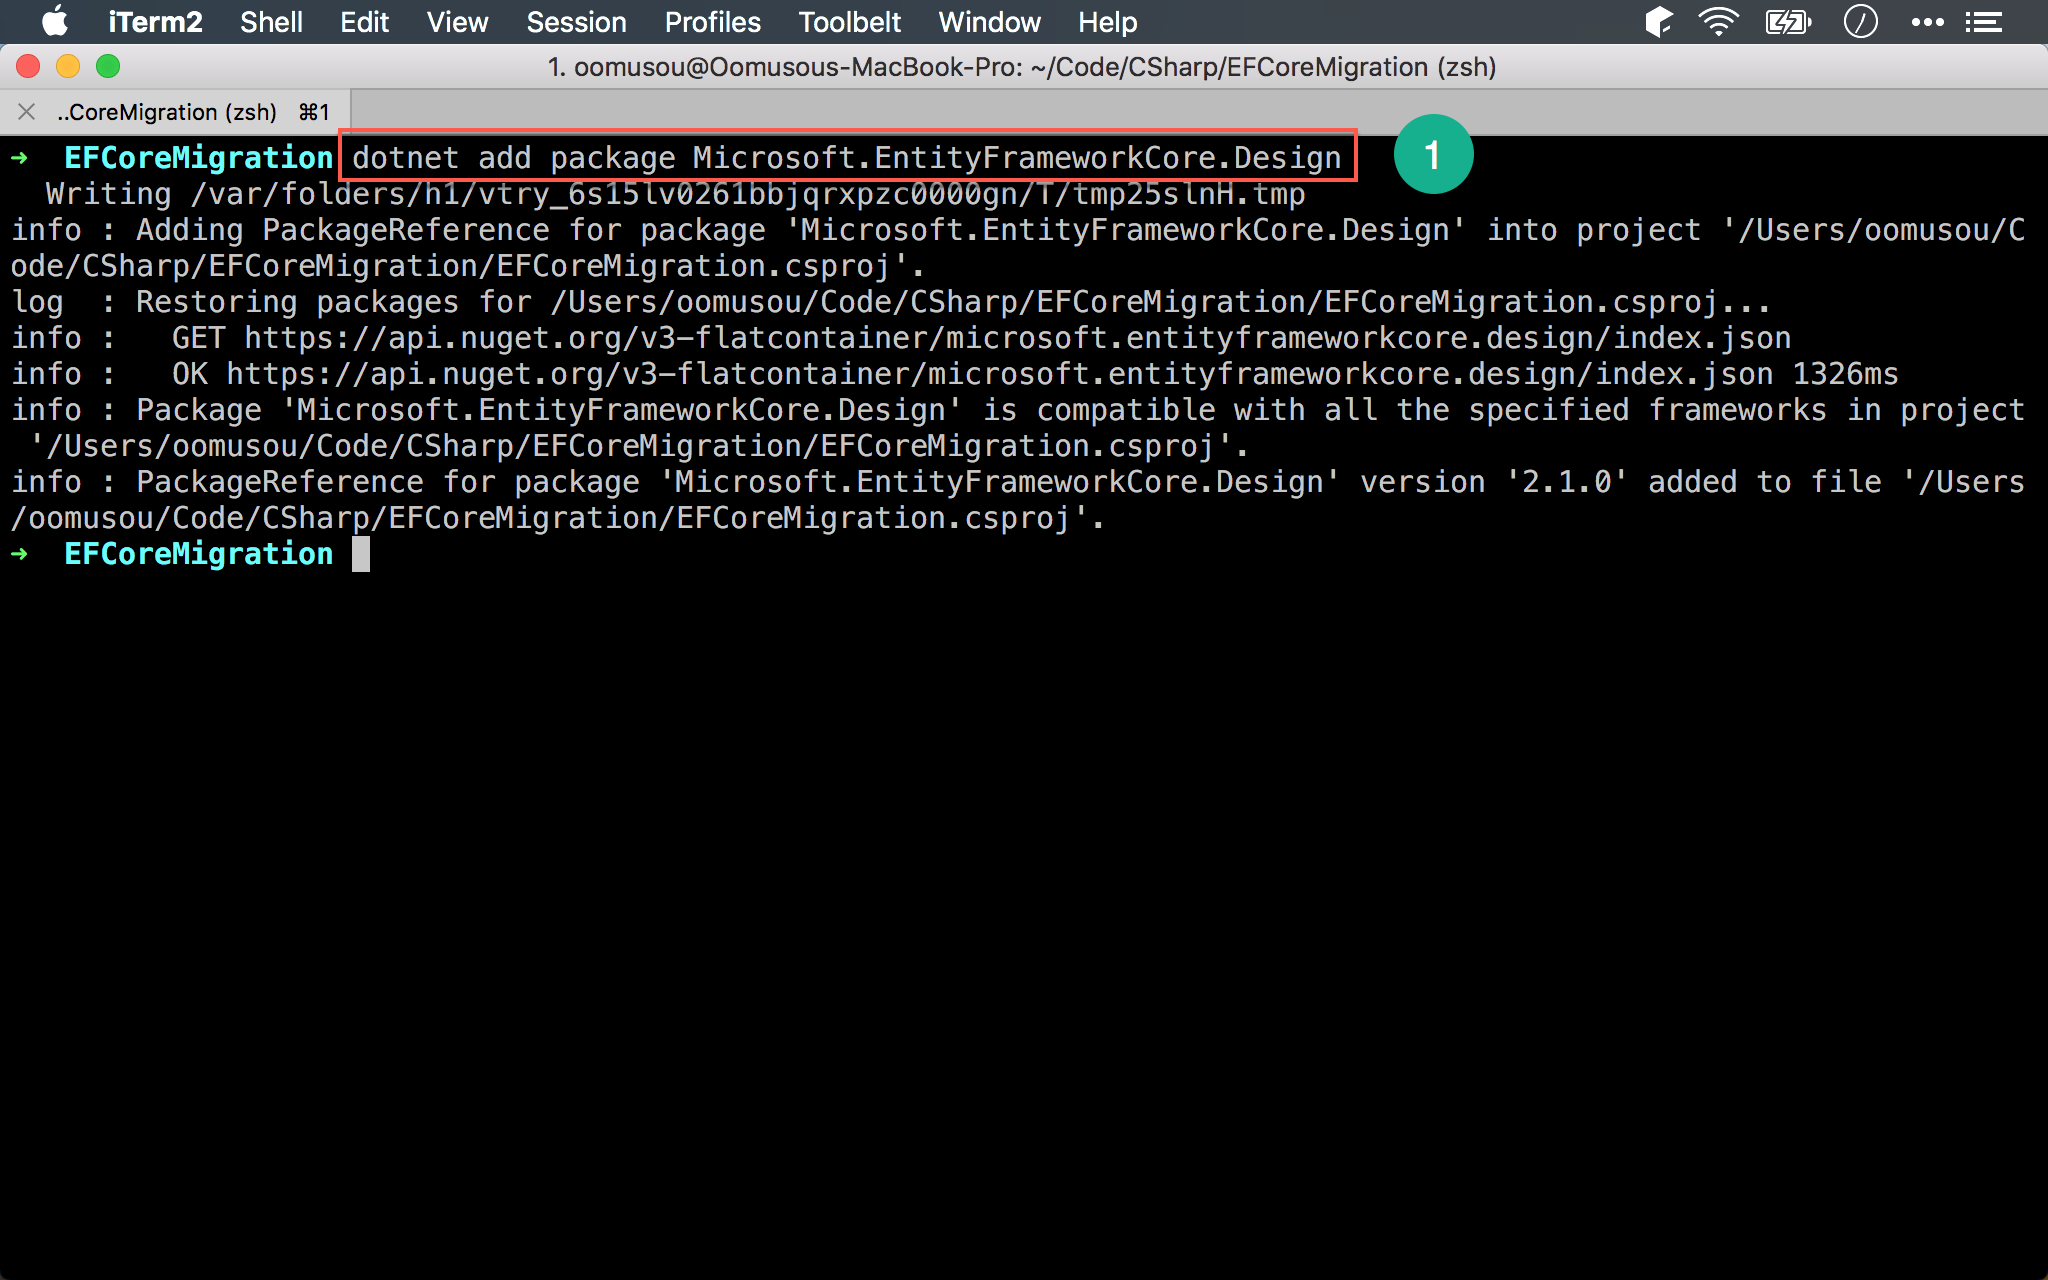
- 輸入
dotnet add package Microsoft.EntityFrameworkCore.Design安裝 package

- 安裝完 package 會在
.csproj會增加新的<PackageReference/>
安裝 PostgreSQL Database Provider
1 | ~/EFCoreMigration $ dotnet add package Npgsql.EntityFrameworkCore.PostgreSQL |
EF Core 預設提供了 MSSQL、SQLite 與 InMemory 3 個 Database Provider,其餘的 provider 則由原廠 vendor 提供。
其中 Npgsql 為 PostgreSQL 所提供的 EFCore Database Provider。
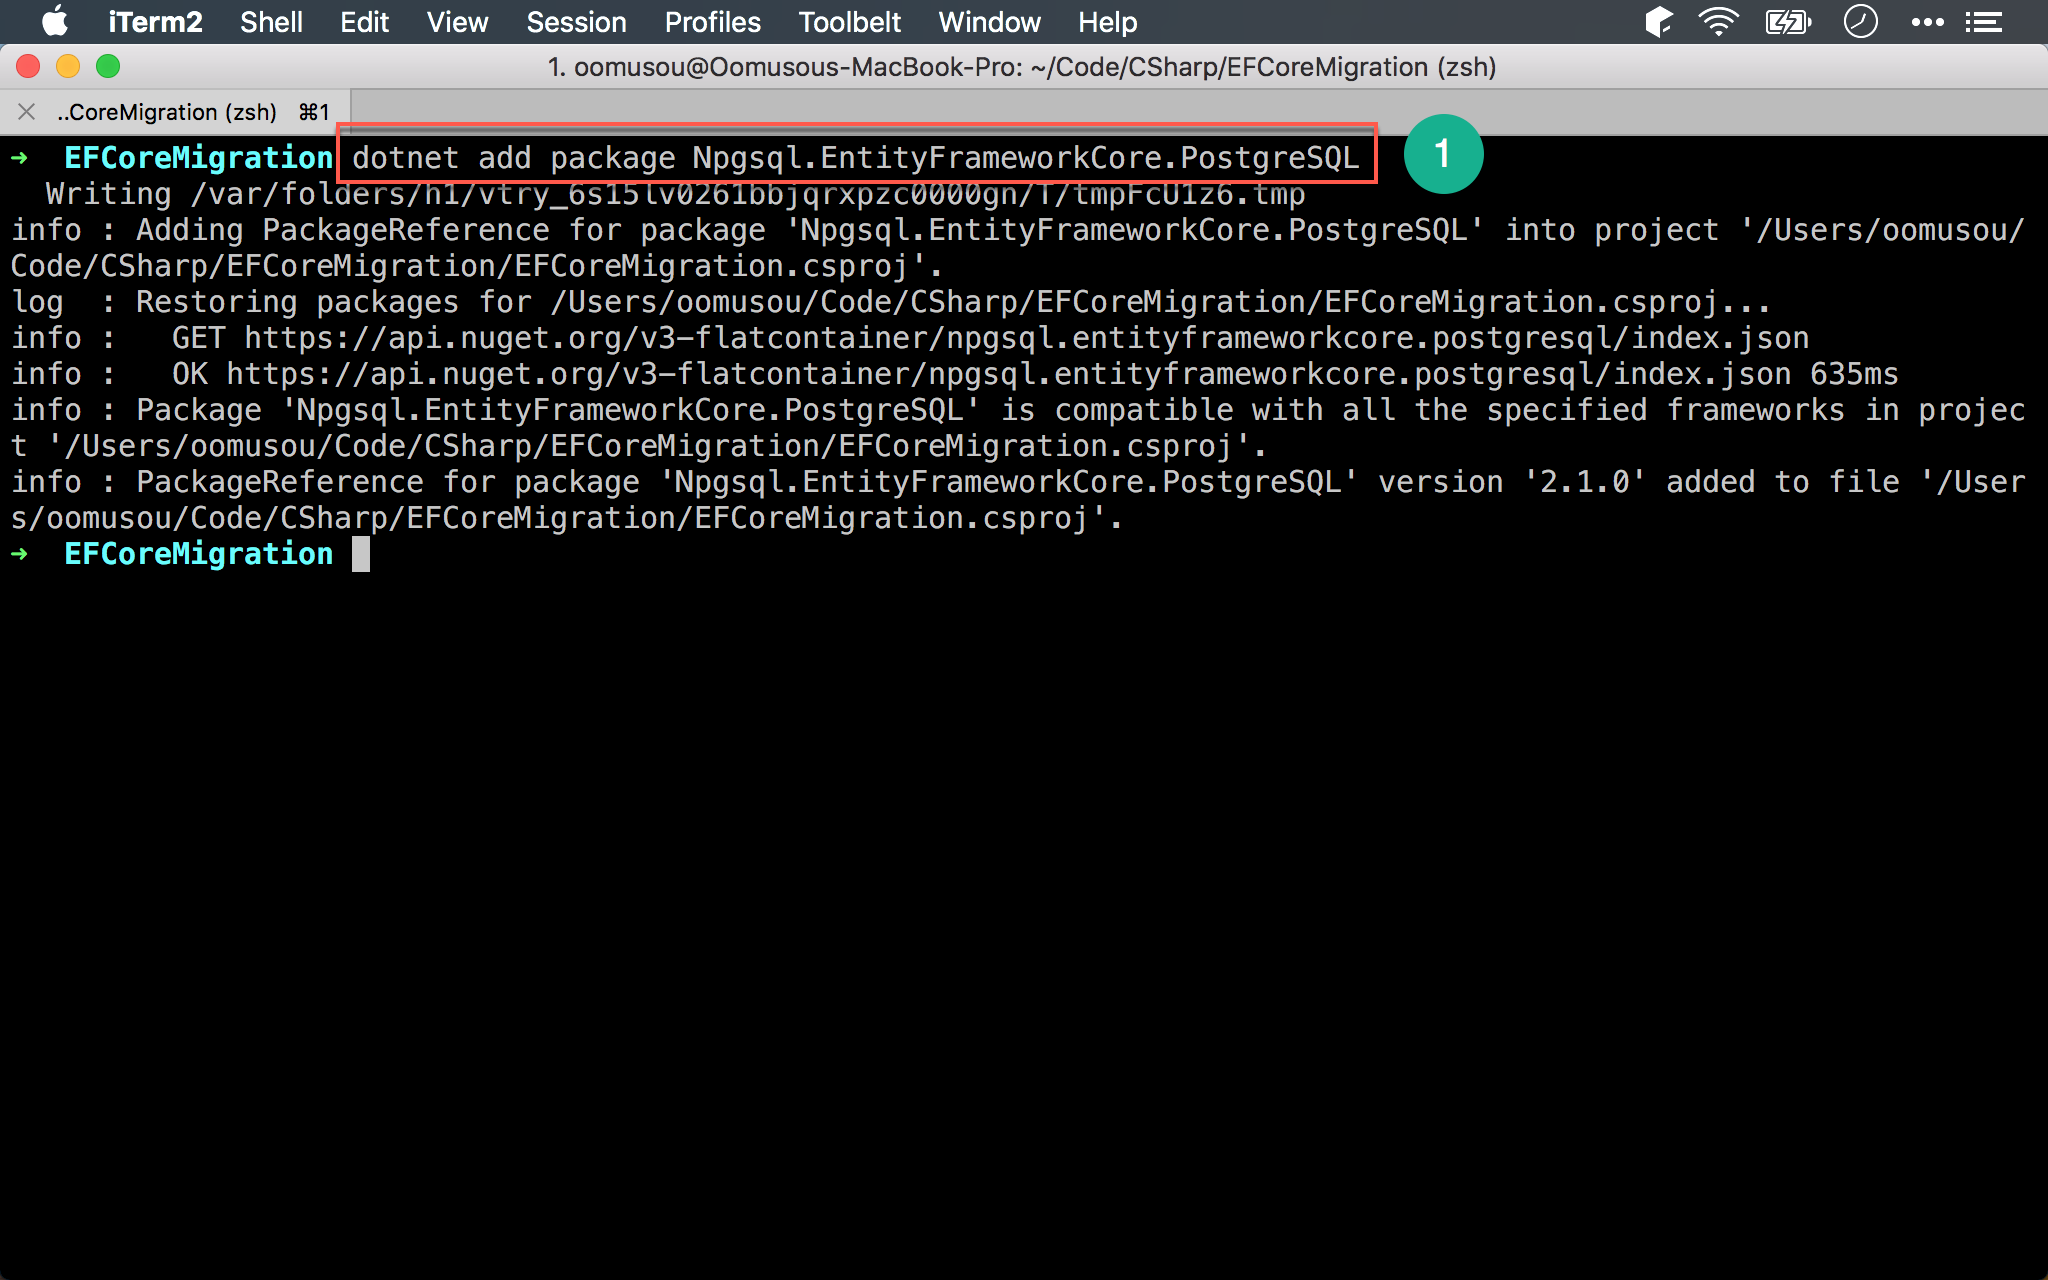
- 使用
dotnet add package安裝Npgsql.EntityFrameworkCore.PostgreSQLpackage
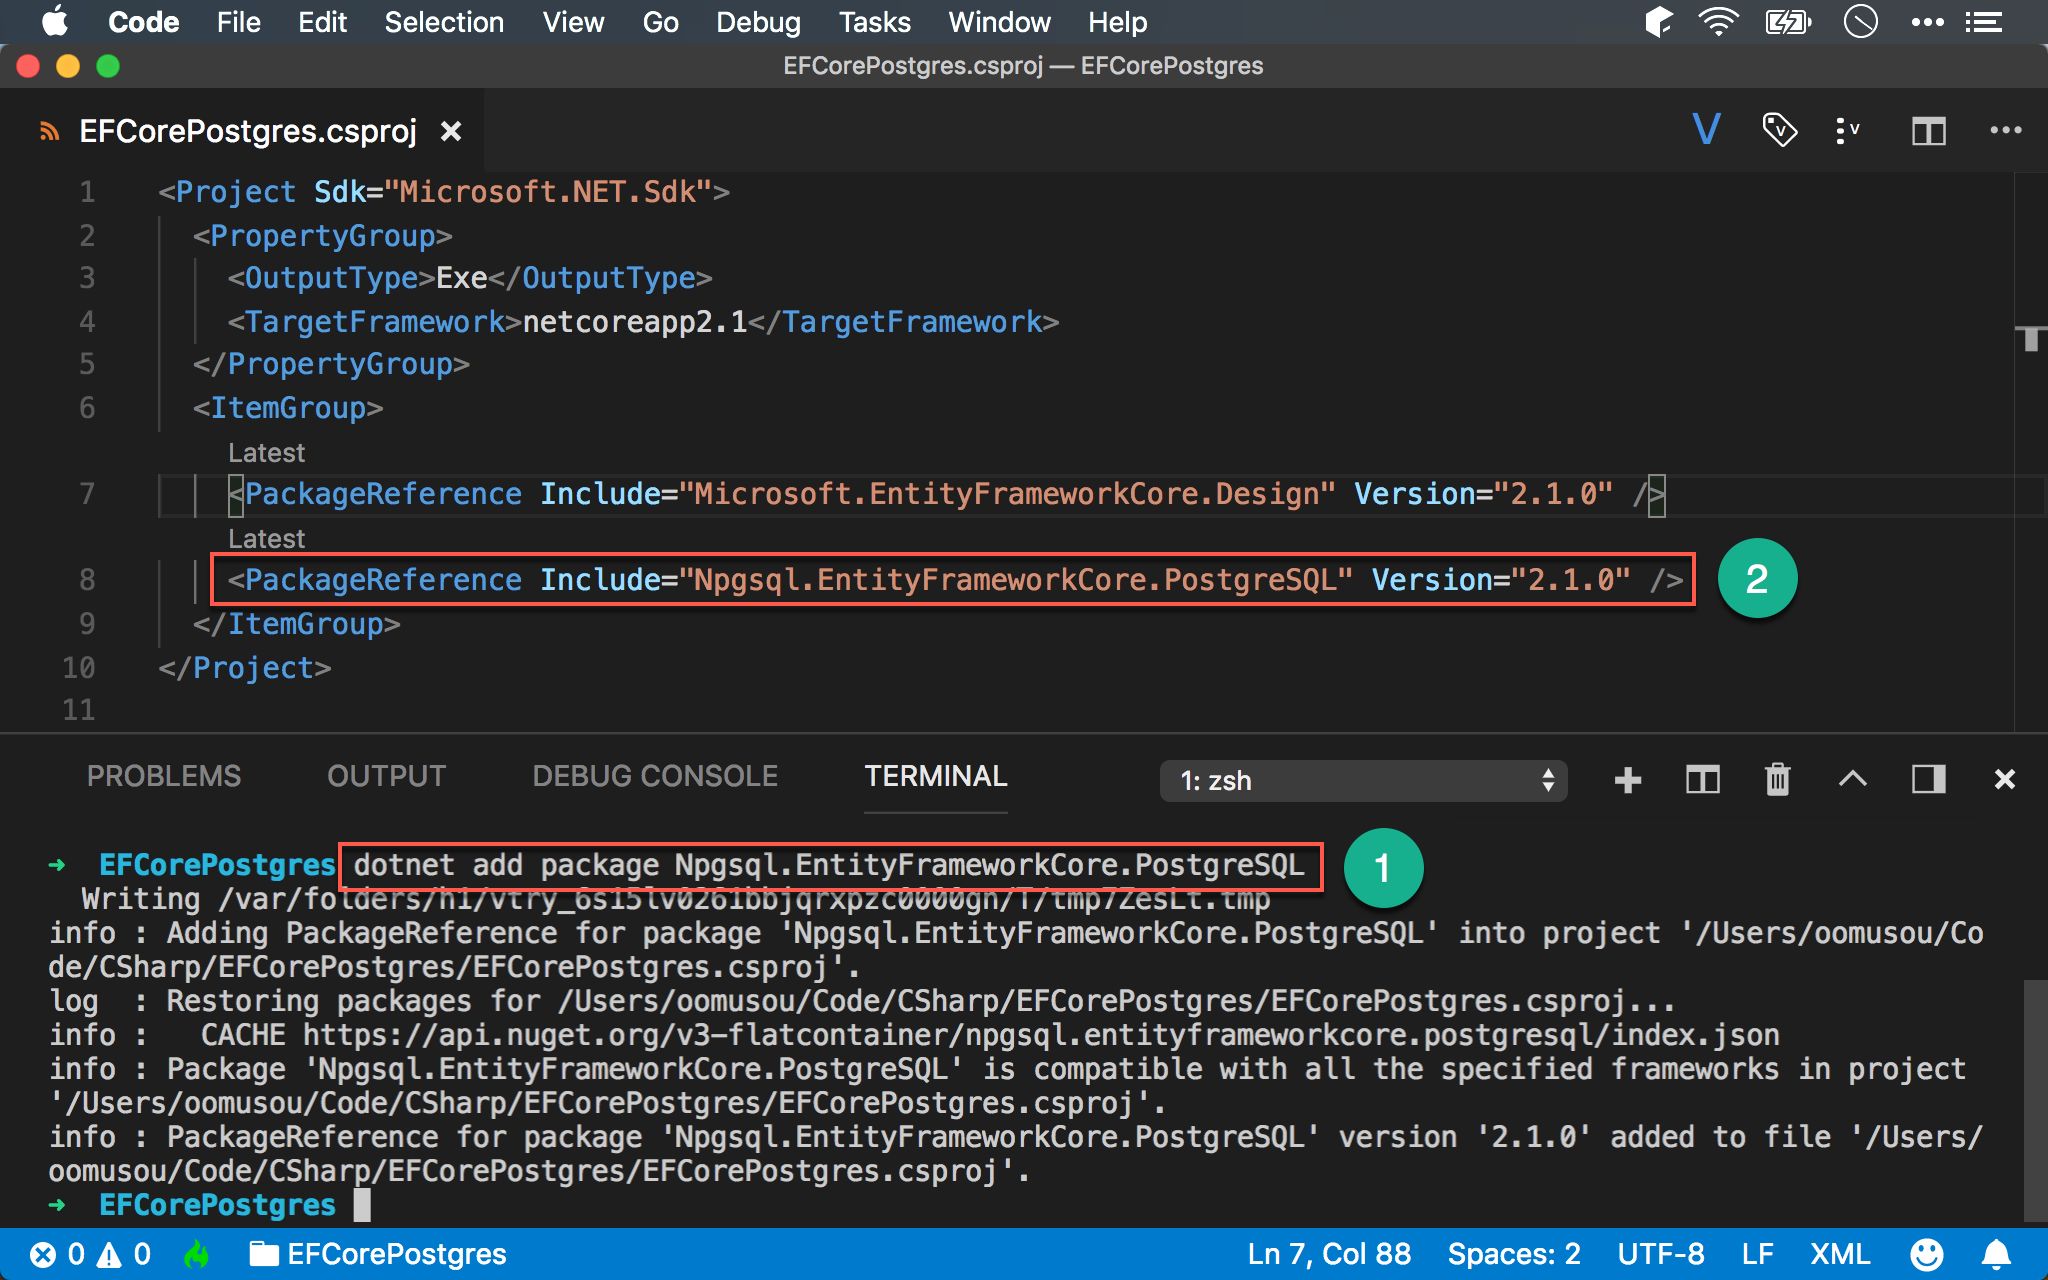
- 安裝完 package 會在
.csproj會增加新的<PackageReference/>
目前在
.csproj一共會看到Microsoft.EntityFrameworkCore.Design與Npgsql.EntityFrameworkCore.PostgreSQL兩個 package
EF Core
在 EF Core,database 在 ORM 中都有相對應的物件:
- Database:EF Core 的
DbContext - Table:EF Core 的
Entity - Column:EF Core 的
Property
我們即將在 PostgreSQL 建立 :
- Database :
eflab
- Table:
Customers - Column:
CustomerID: int (PK)Name: string
Code First
建立 Entity
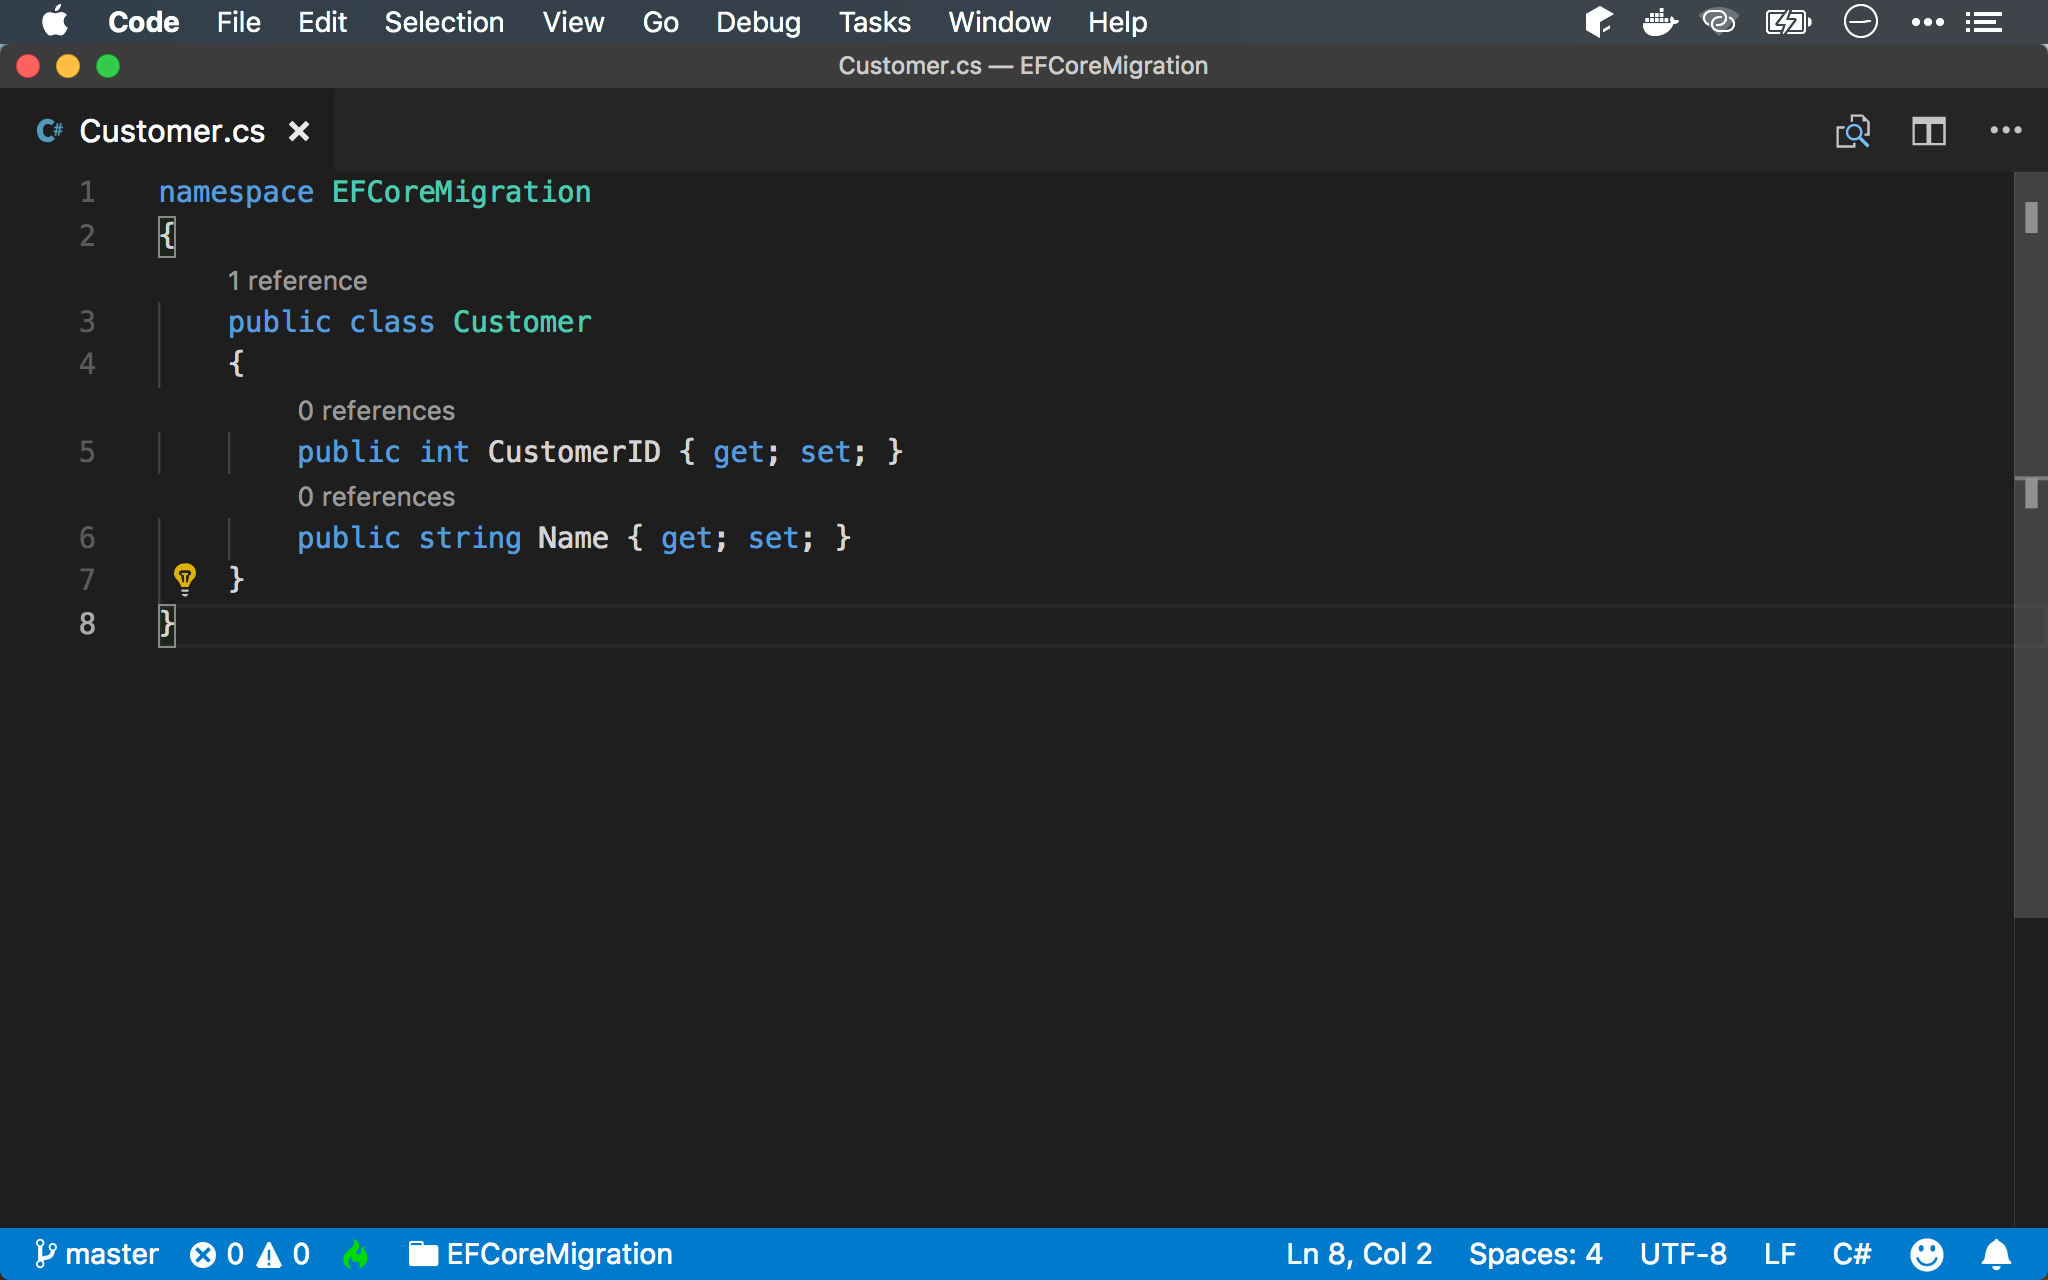
Entity 在 EF Core 中代表 table,我們將建立自己的 Entity。
其中 Customer entity 代表 Customers table。
Entity 名稱為
單數,而 table 名稱為複數
Customer.cs
1 | namespace EFCoreMigration |
第 3 行
1 | public class Customer |
Entity 為 單數,所以使用單數的 Customer。
第 5 行
1 | public int CustomerID { get; set; } |
Column 以 property 呈現。
Q : string 是否能指定長度 ?
A : EF Core 能使用 [StringLength()] 指定 string 的 column 長度,我們將在稍後改變長度,目前先不指定長度,看看不指定長度下的 string,在 PostgreSQL 會如何 ?
第 5 行
1 | public int CustomerID { get; set; } |
Table 的 PK,EF Core 規定要以 table name + ID 表示,則 migration 時會自動將該欄位建立成 PK,不需要額外 attribute。
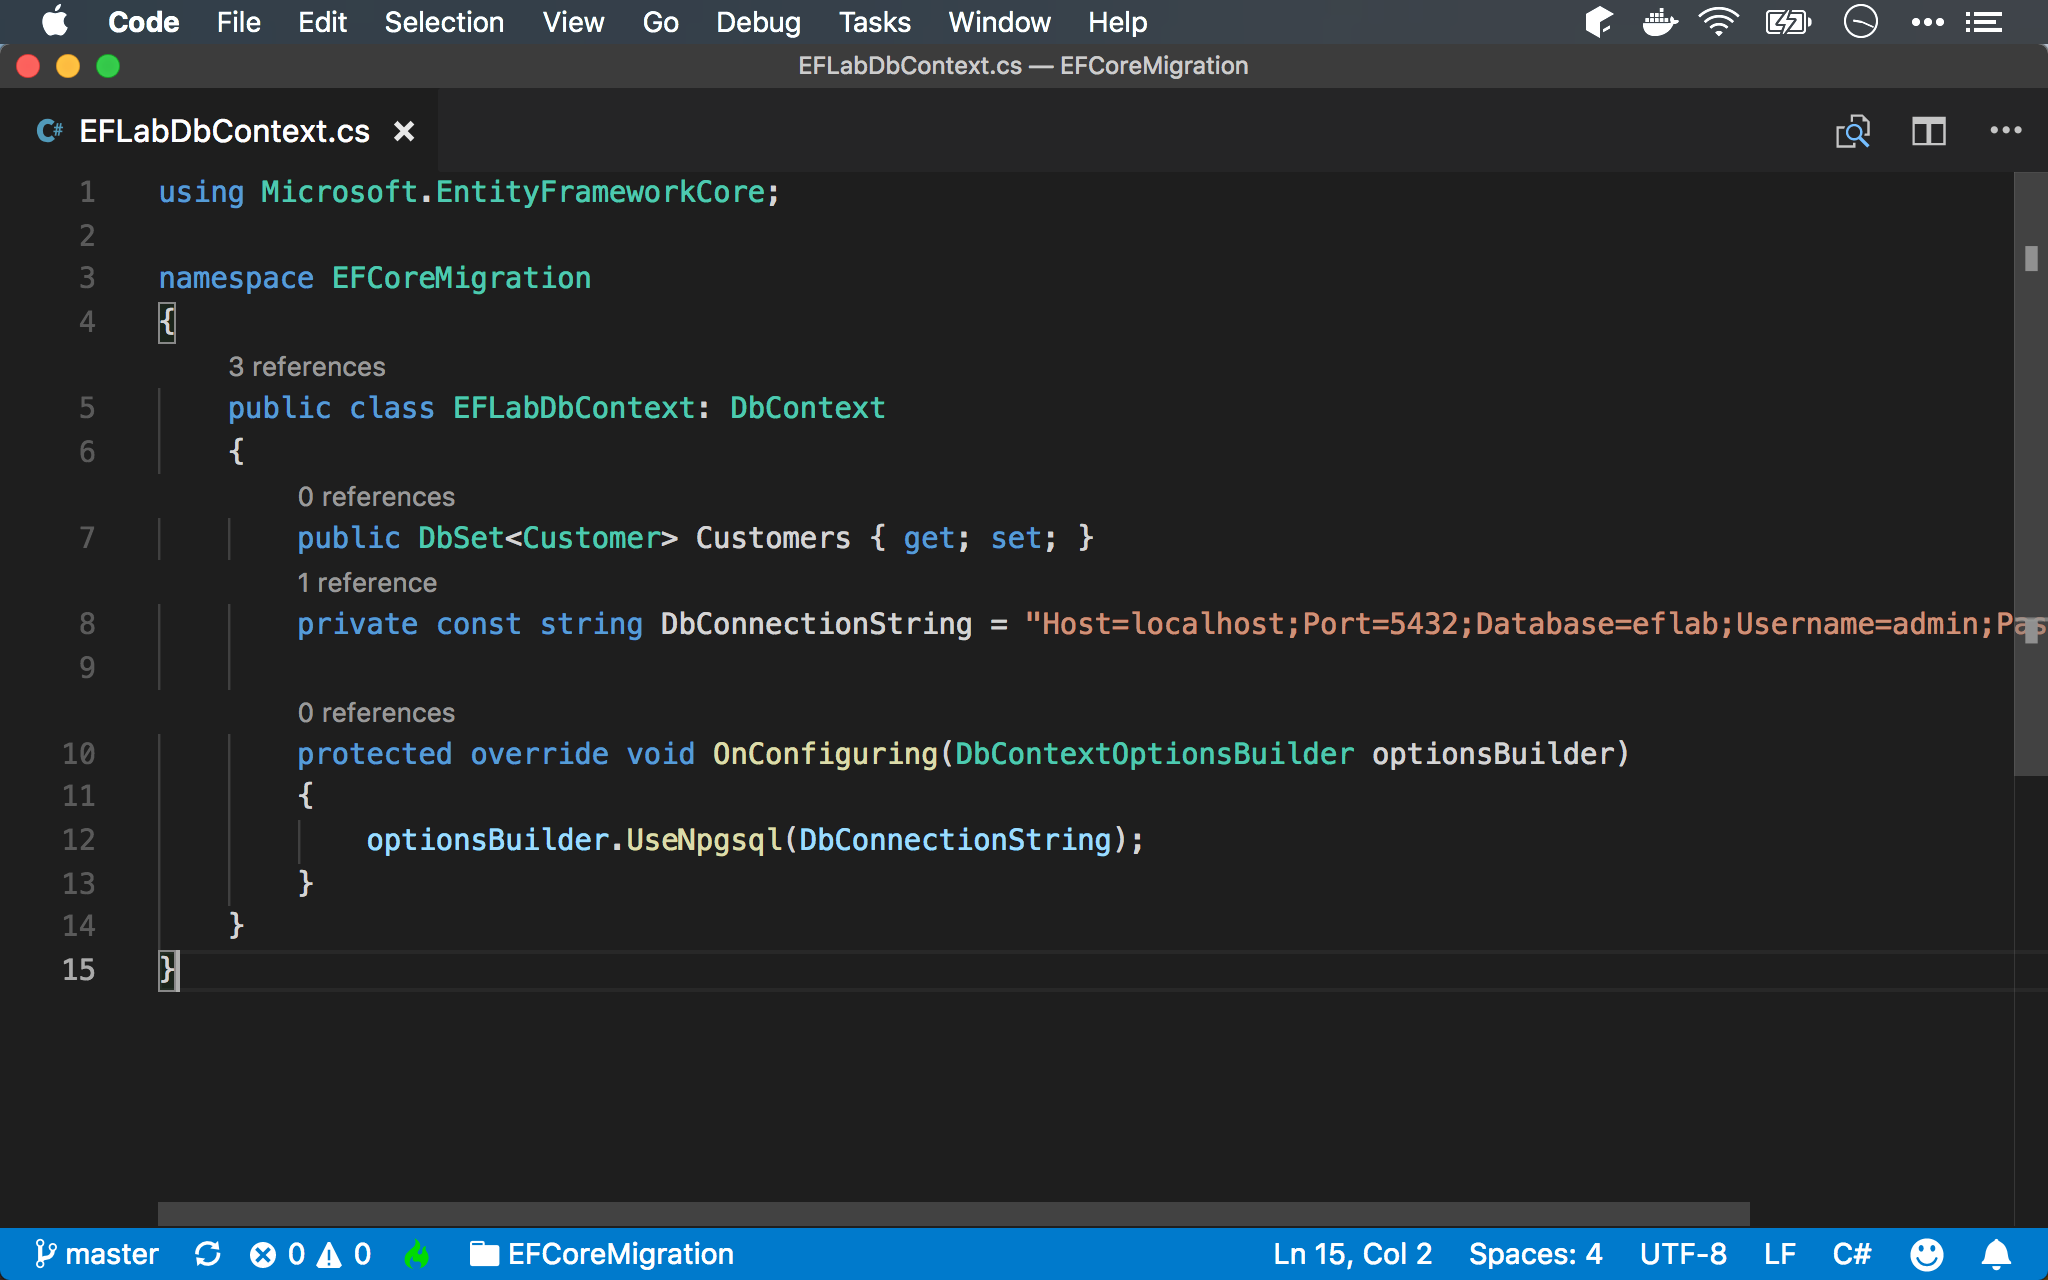
建立 DbContext
DbContext 在 EF Core 中代表 database,我們將繼承 DbContext 建立自己的 database context。
其中 EFLabDbContext DbContext 代表 eflab database。
EFLabDbContext.cs
1 | using Microsoft.EntityFrameworkCore; |
第 5 行
1 | public class EFLabDbContext: DbContext |
建立自己的 EFLabDbContext,繼承自 DbContext。
第 7 行
1 | public DbSet<Customer> Customers { get; set; } |
使用 property 宣告 table,其型別為 DbSet<Customer>,這表示其在 EF Core 為 Customer entity,而在 database 為 Customers table。
Entity 名稱為
單數,而 table 名稱為複數
第 8 行
1 | private const string DbConnectionString = "Host=localhost;Port=5432;Database=eflab;Username=admin;Password=12345"; |
連接 database server 需要基本的資訊,統稱為 database connection string,包含以下資料:
- Host : 設定 PostgreSQL server 的名稱
- Port : 設定 PostgreSQL 對外的 port
- Database : 設定要連接的 database
- Username : 設定 user name
- Password : 設定 password
這些資訊在建立 PostgreSQL 的
docker-compose.yml時,都已經在.env建立
第 10 行
1 | protected override void OnConfiguring(DbContextOptionsBuilder optionsBuilder) |
Override OnConfiguring() 設定 database。
EF Core 會傳入 DbContextOptionBuider,因為我們要連接的是 PostgreSQL,其 database provider 為 Npgsql, 所以將 connection string 傳入 OptionBuilder.UseNpgsql() 。
Migration
Migration 分兩個階段:
- 建立 Migration
- 執行 Migration
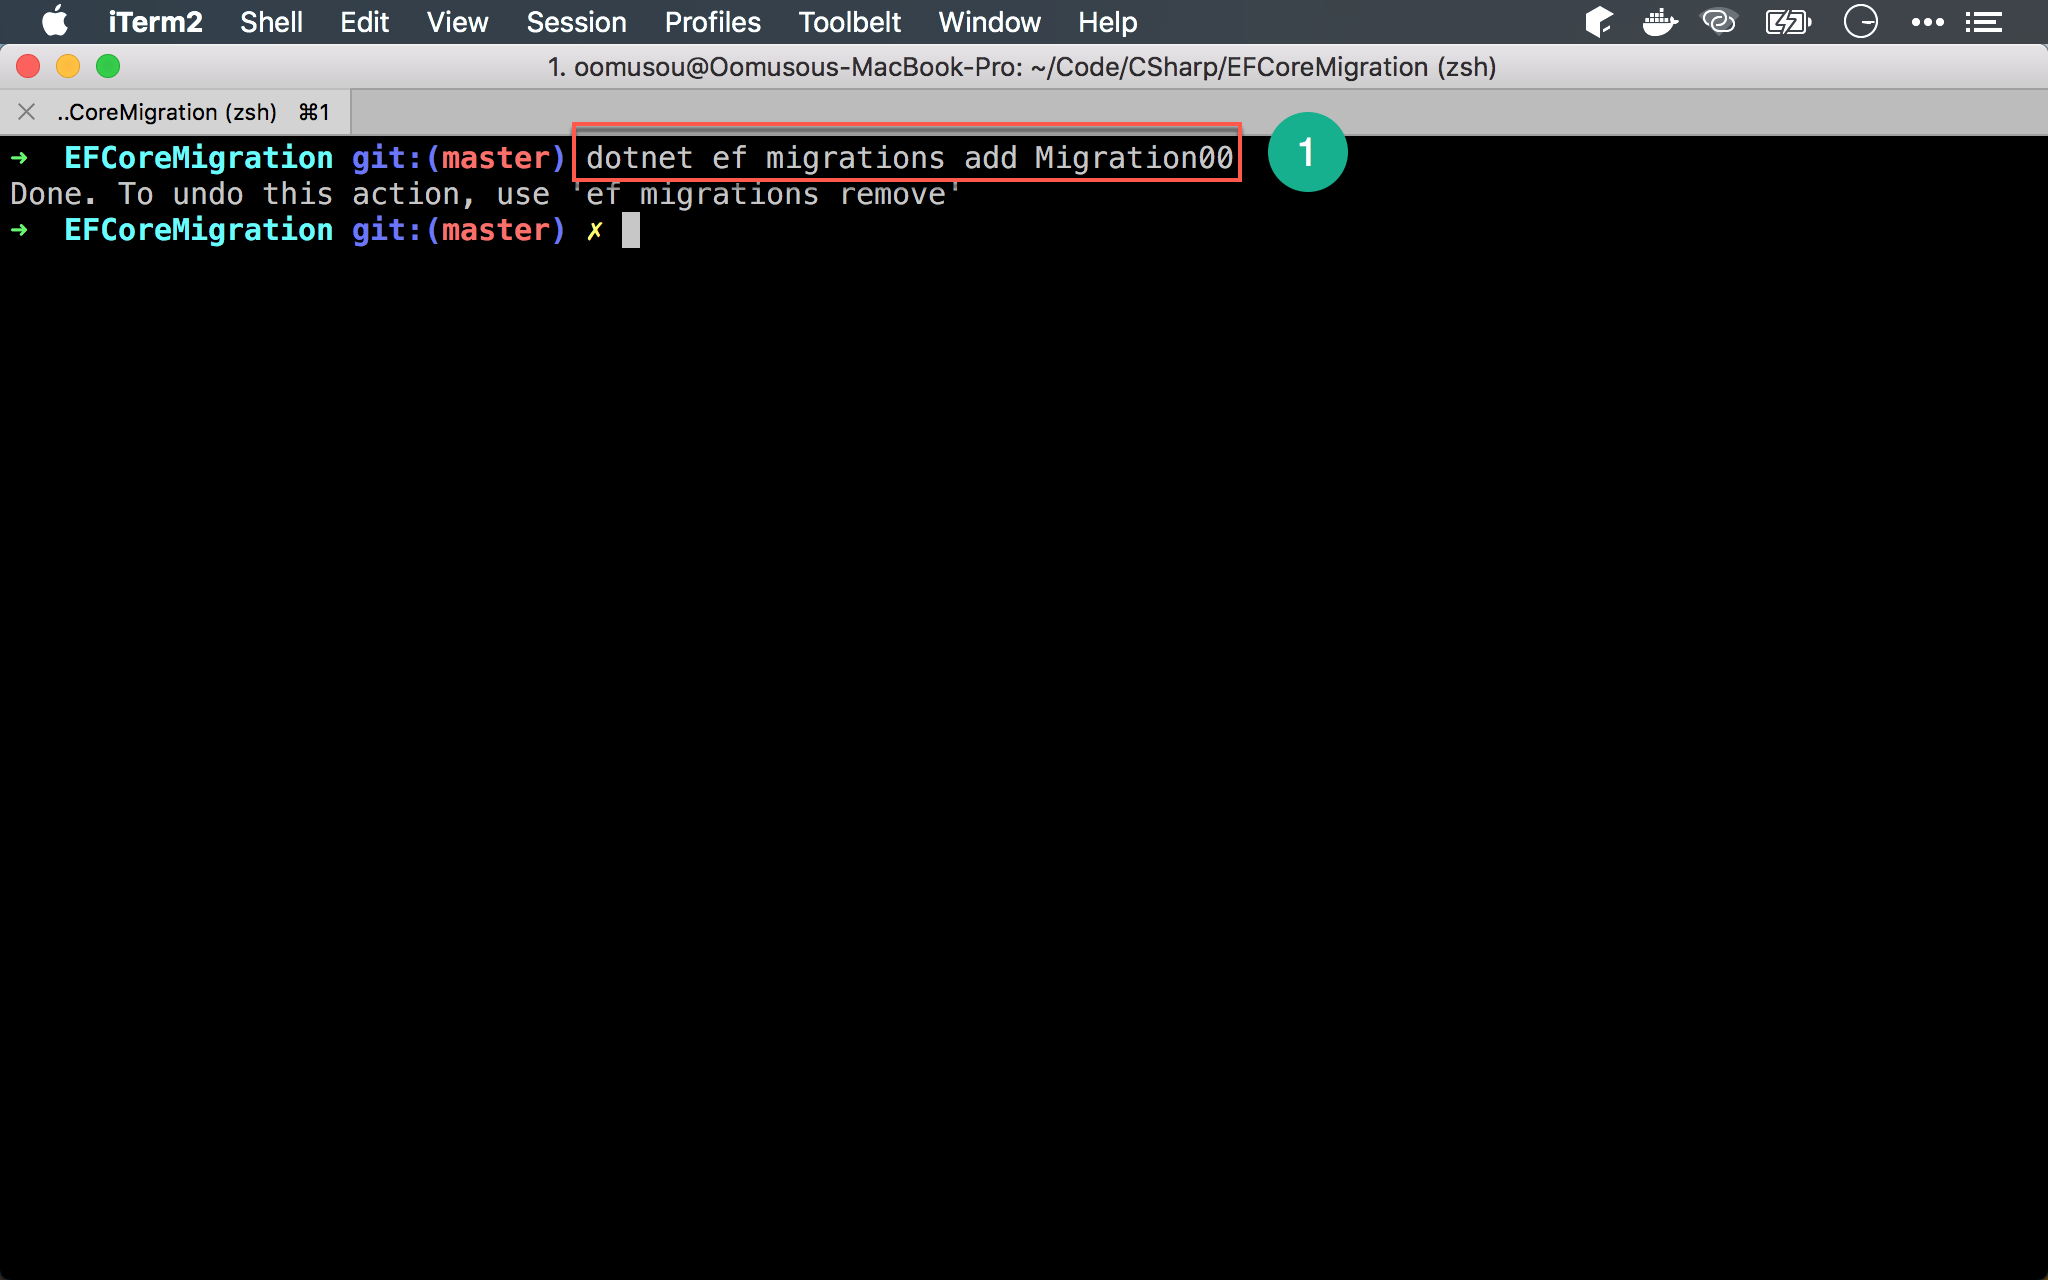
建立 Migration
1 | ~/EFCoreMigration $ dotnet ef migrations add Migration00 |
輸入 dotnet ef migrations add 建立 Migration,其中 Migration00 為 Migration 名稱,請自行建立不重複的名稱。
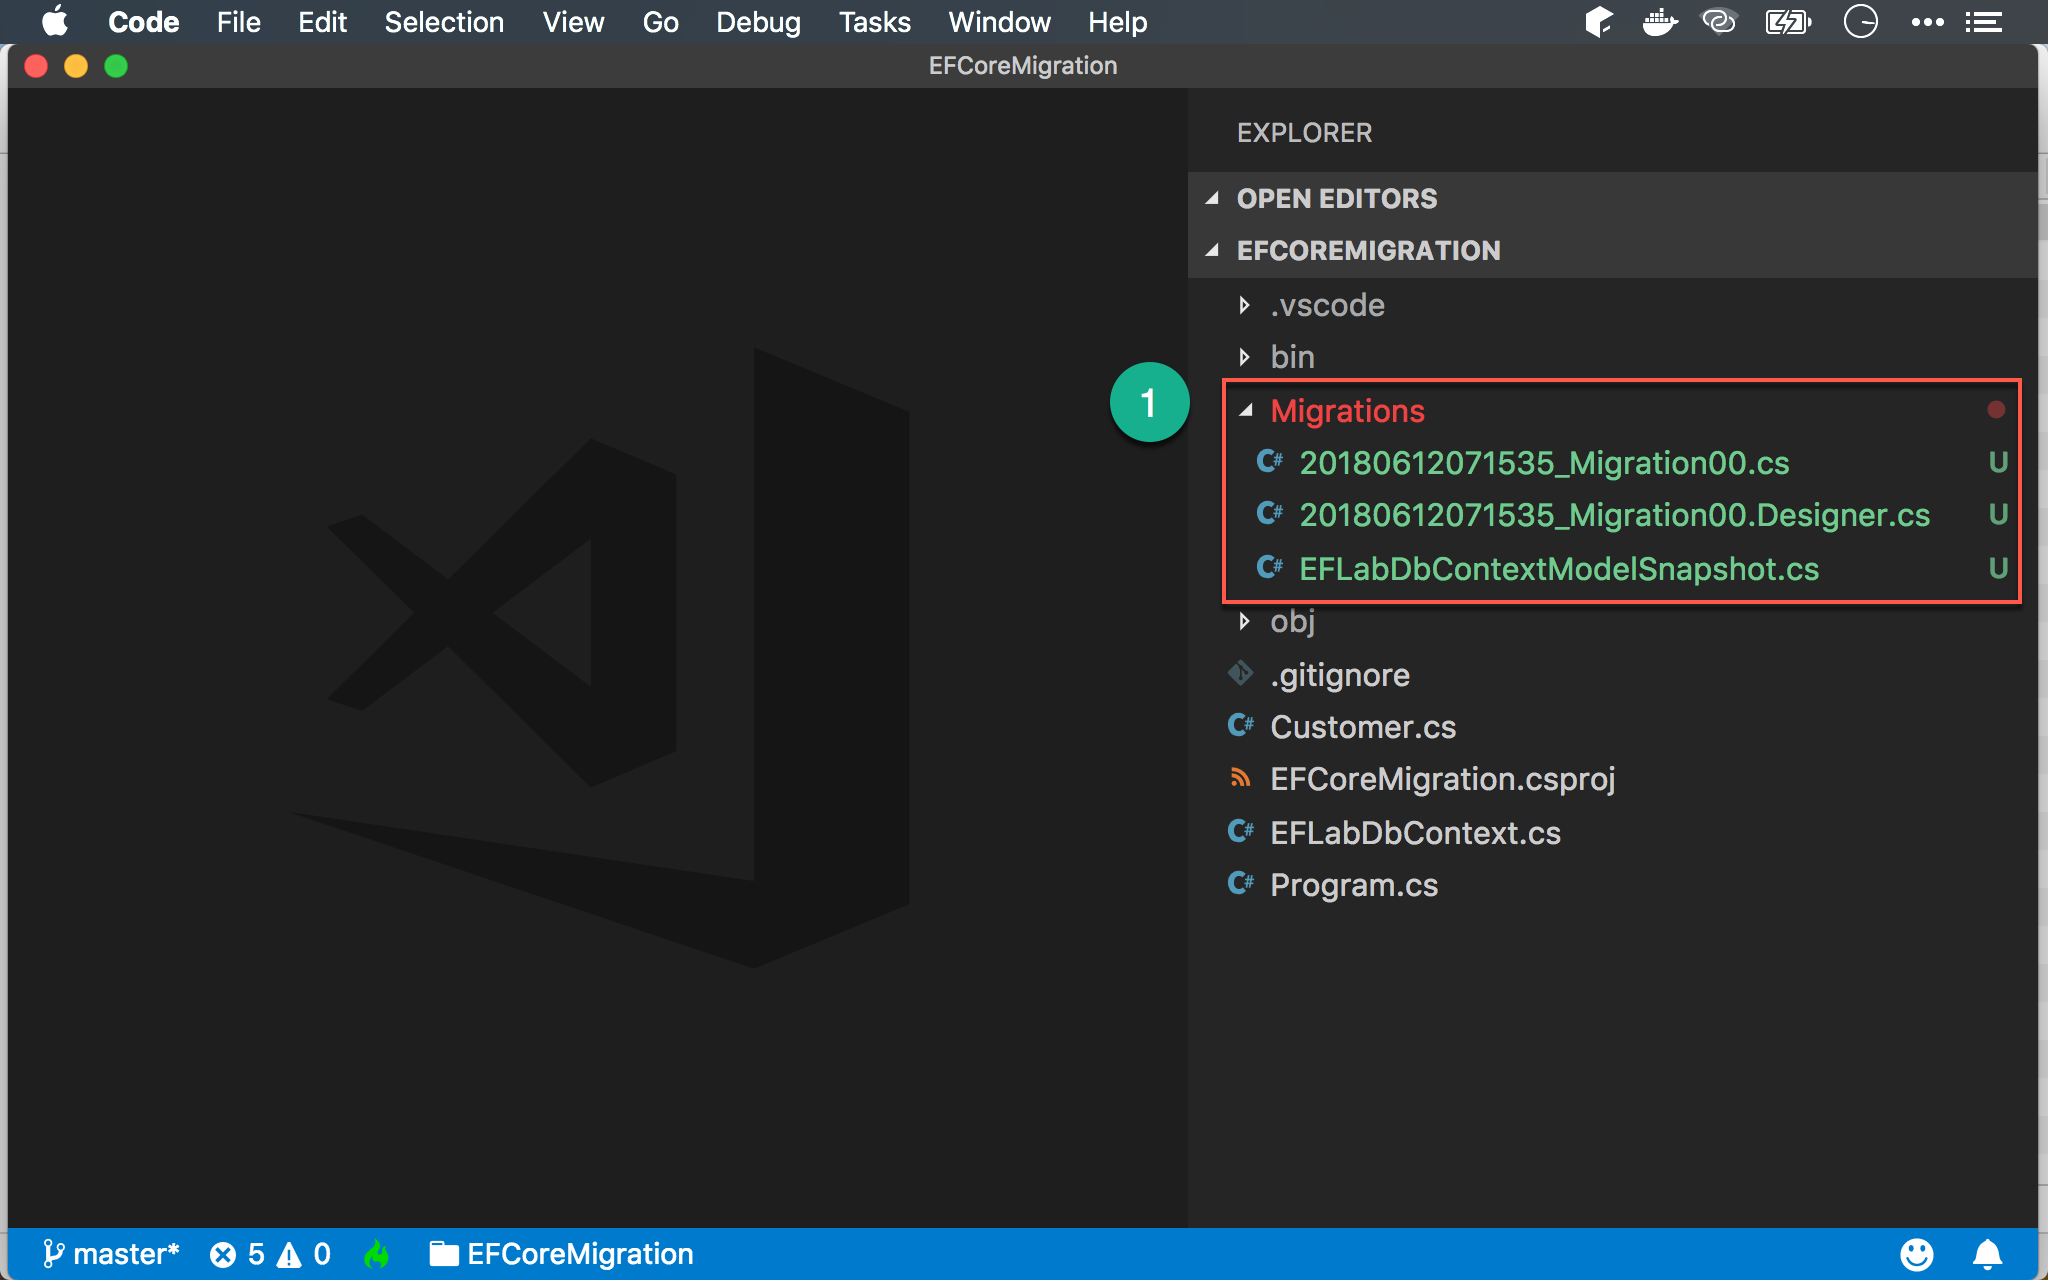
- 執行完
dotnet ef migrations add Migration00,會發現新增了Migrations目錄,並增加了3個檔案
Q : 為什麼需要這 3 個 Migration 檔案 ?
A : 稍後在 Migration 工作原理 會一併並解釋。
執行 Migration
1 | ~/EFCoreMigration $ dotnet ef database update |
輸入 dotnet ef database update 執行 Migration。
EF Core 將根據剛剛在
Migrations所建立的 3 個檔案,與DbContext.OnConfiguration()的設定,對 PostgreSQL 進行 Migration
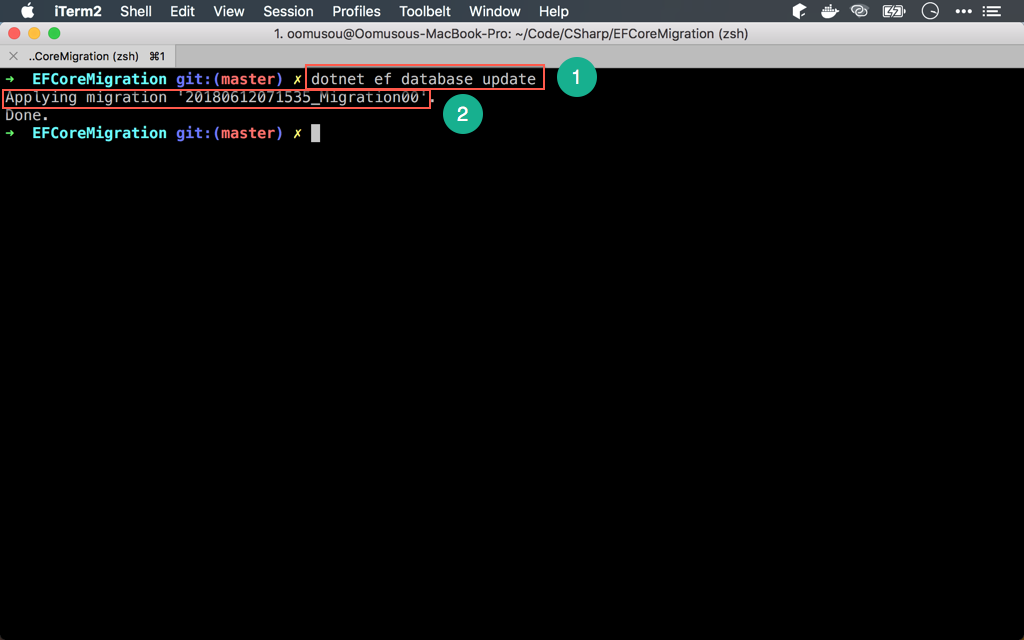
- 執行了
Migration00
確認 Database
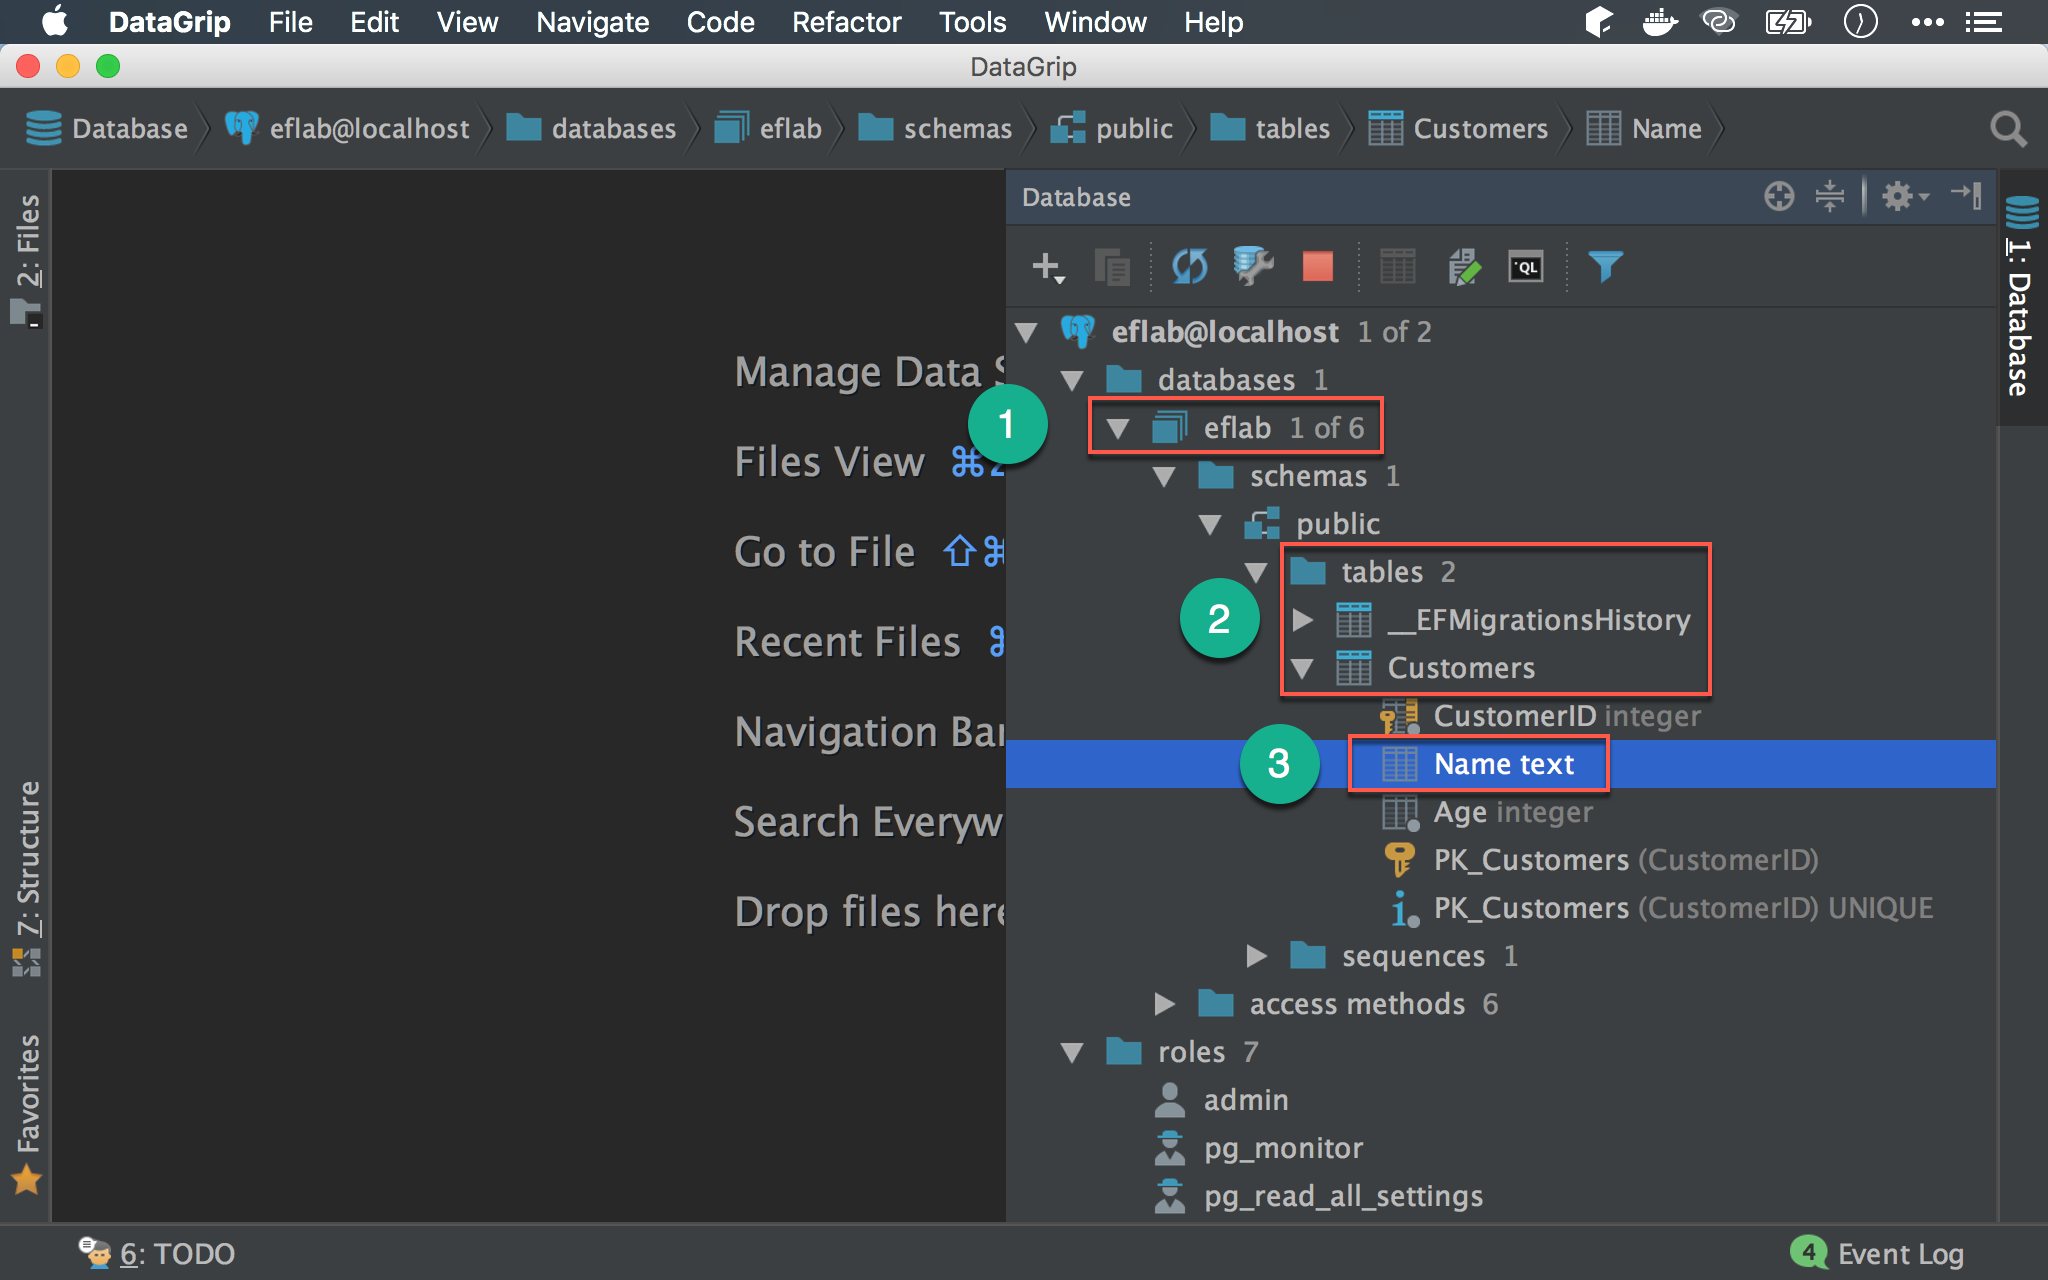
- 展開
eflabdatabase - EF Core 的 Migration 在
eflab建立了__EFMigrationHistory與Customers兩個 table Customers則建立CustomerID與Name兩個 column,並有PK_Customers
注意 Name 的型別為 text,也就是在 Entity 的 string,預設在 PostgreSQL 為 text,而不是 varchar。
若 Migration 沒有建立成功,請確認 Docker 與 PostgreSQL container 已經正常執行
Q : 為什麼會多了
__EFMigrationHistorytable 呢 ?
A : 稍後在 Migration 工作原理 會一併並解釋。
Code First
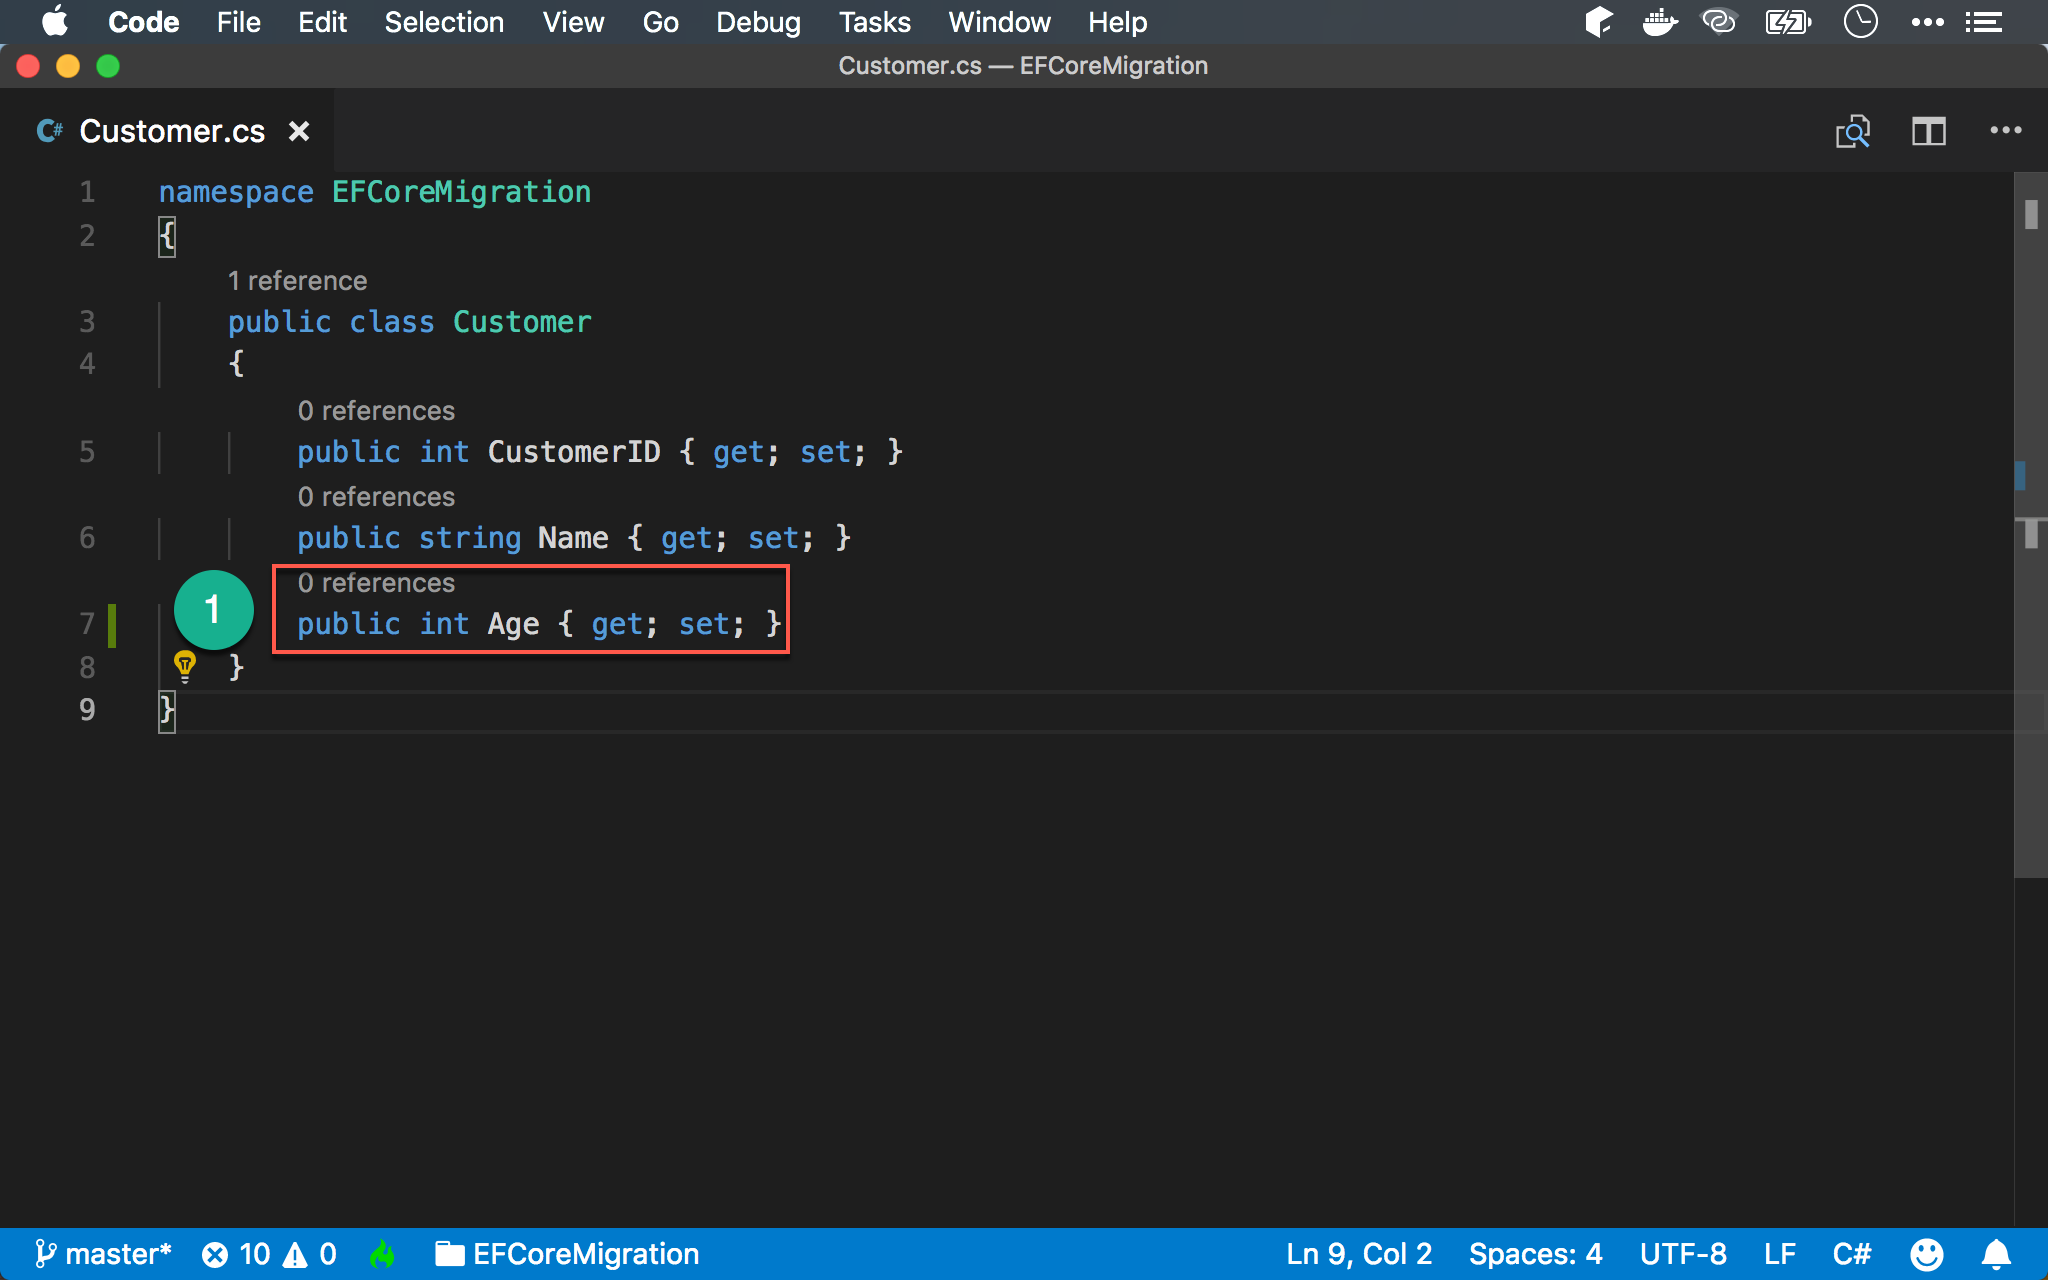
新增 Field
若只是單純將 Entity 建立成 table,還顯不出 Migration 的威力。
實務上因為需求的變動,我們會想在 table 新增 column,我們只要繼續在 Entity 新增 property 即可。
Customer.cs
1 | namespace EFCoreMigration |
第 7 行
1 | public int Age { get; set; } |
新增 Age property。
Migration
建立 Migration
1 | ~/EFCoreMigration $ dotnet ef migrations add Migration01 |
輸入 dotnet ef migrations add 建立 Migration,其中 Migration01 為 Migration 名稱,有別於剛剛建立的 Migration00。
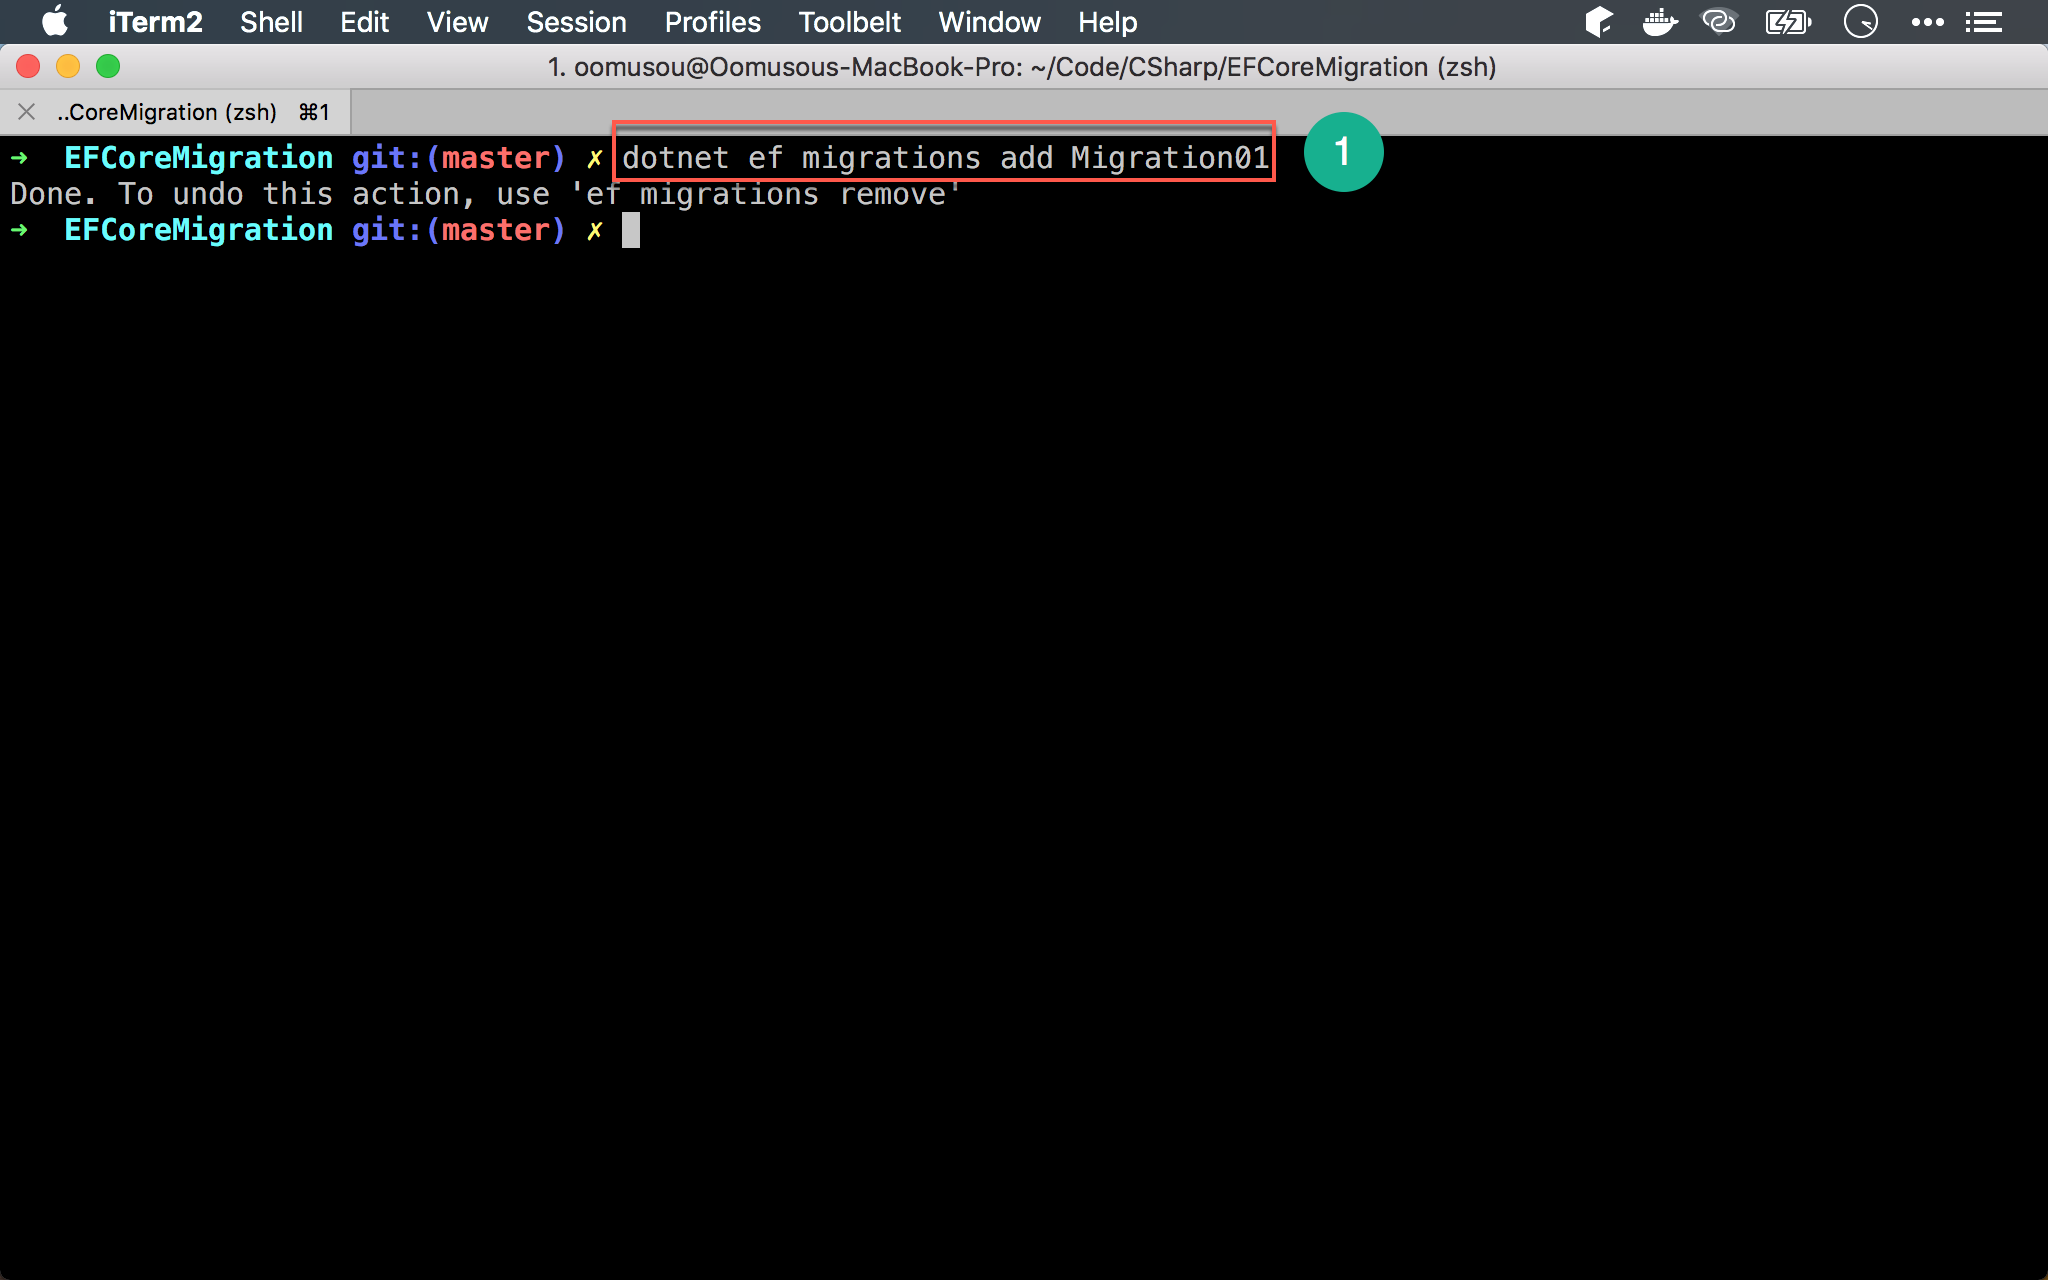
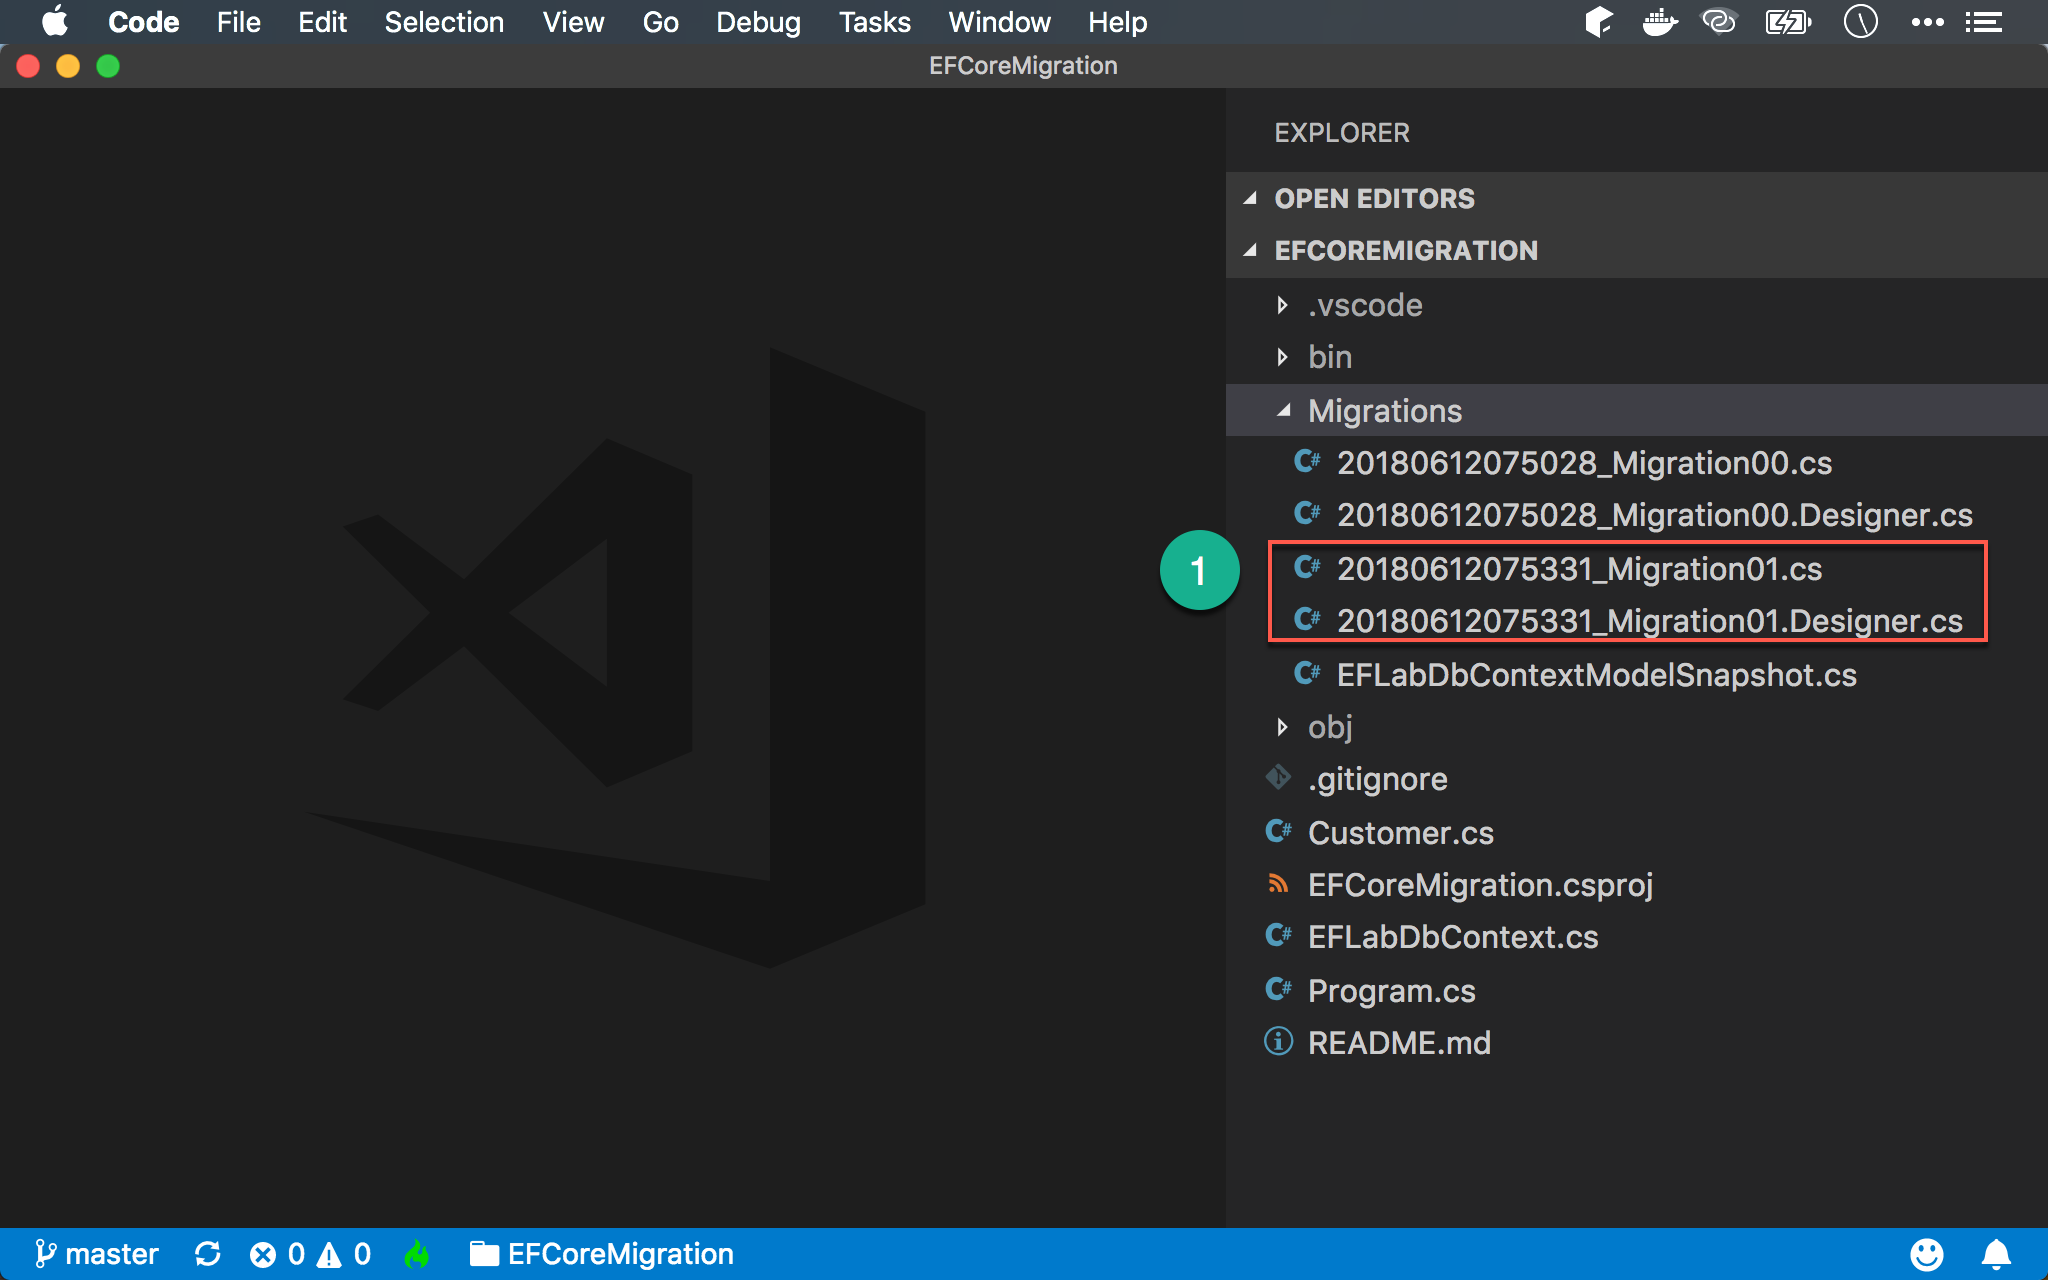
- 新增兩個 Migration 檔案
Q : 為什麼第二次 Migration 只新增了兩個檔案 ?
A : 稍後在 Migration 工作原理 會一併並解釋。
執行 Migration1
~/EFCoreMigration $ dotnet ef database update
輸入 dotnet ef database update 執行 Migration。
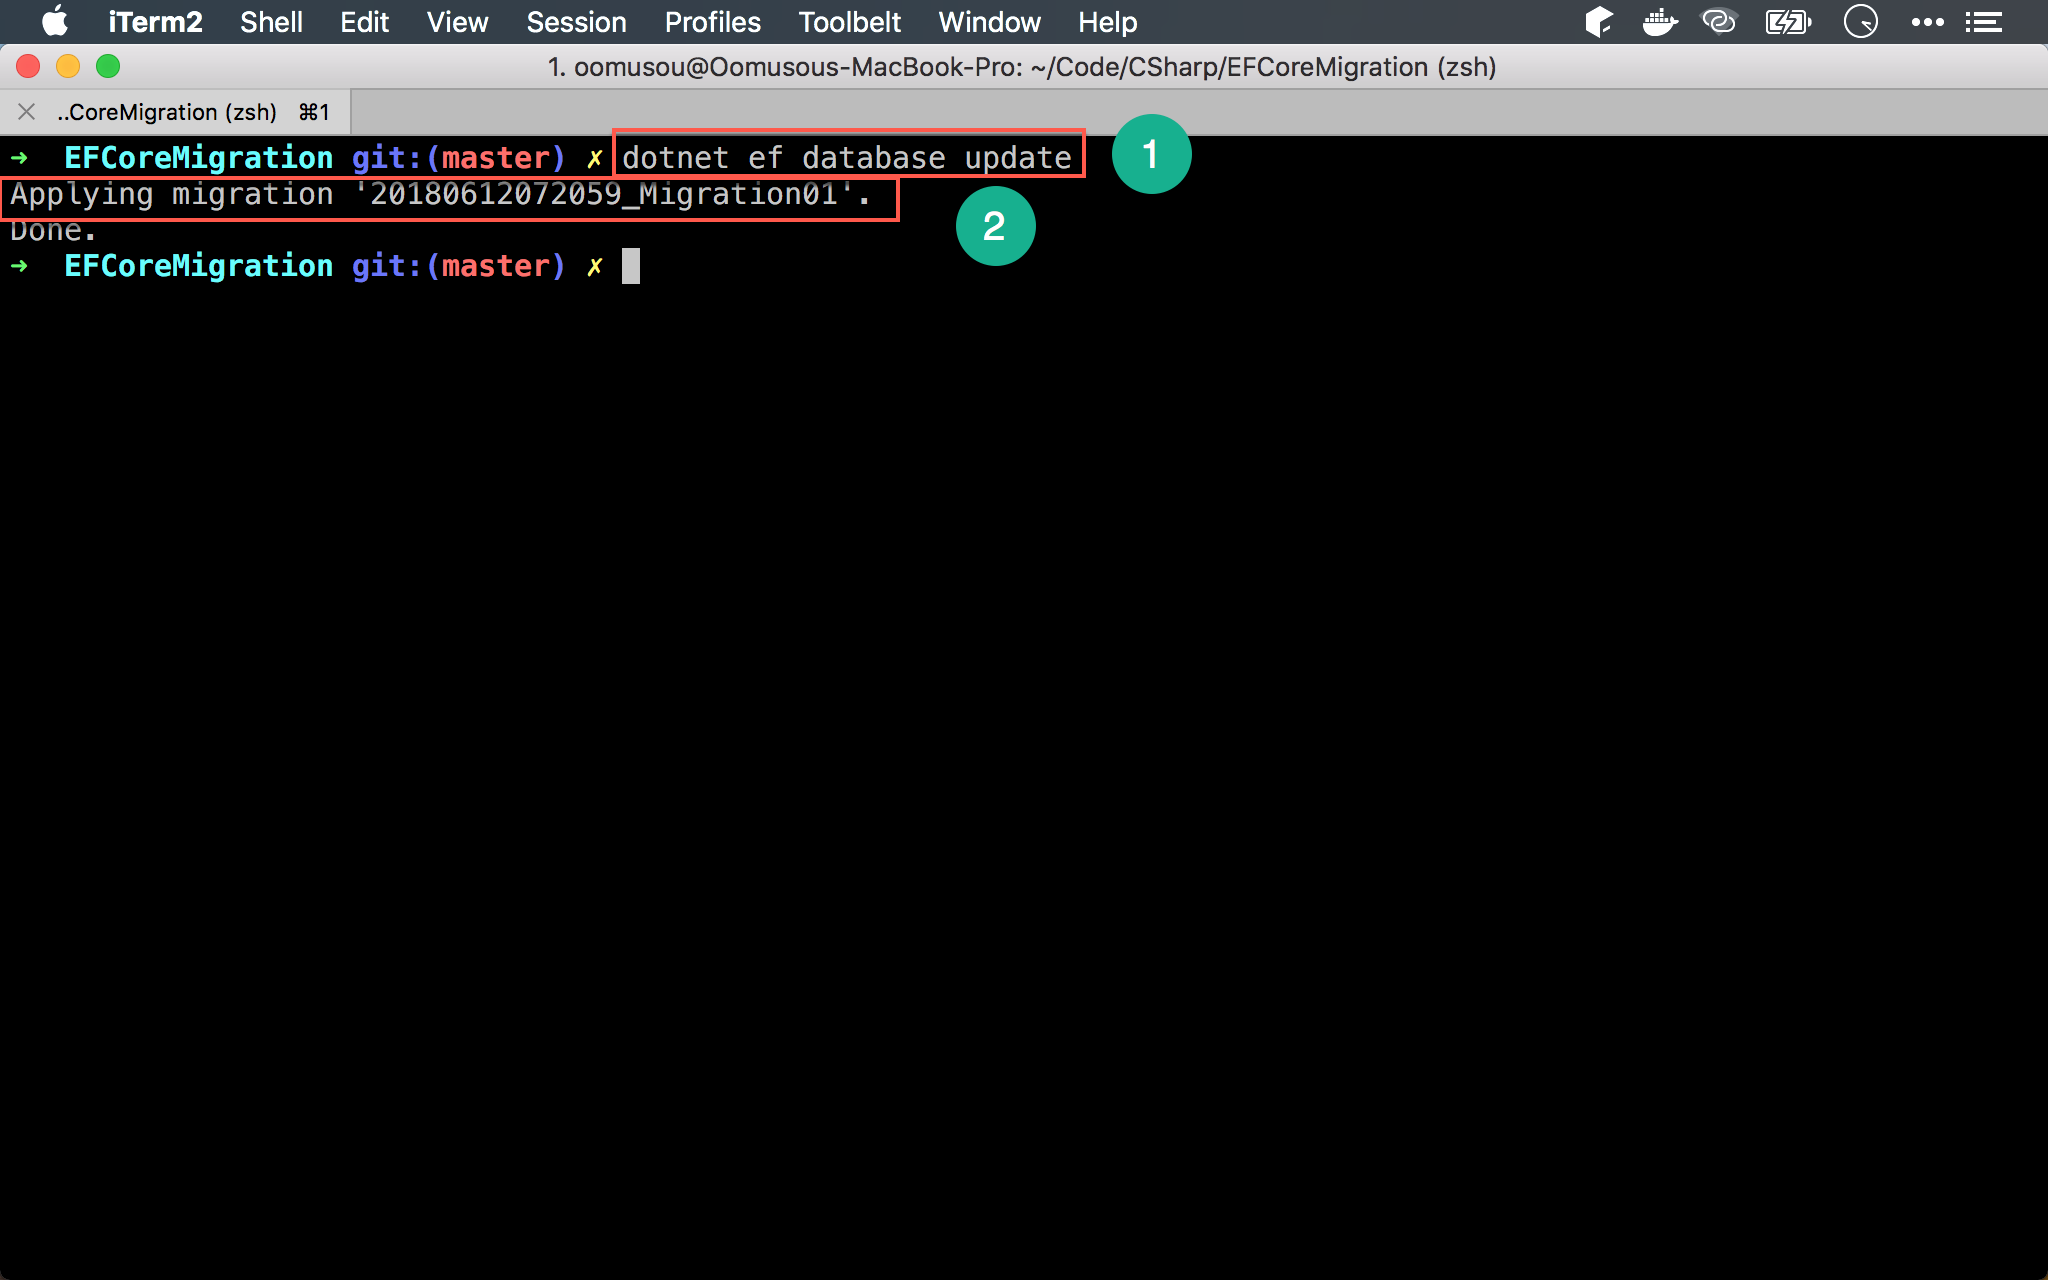
- 只執行了
Migration01,並沒有執行Migration00
Q : 為什麼 EF Core 知道只執行新的 Migration,而不是全部 Migration 重跑一次 ?
A : 稍後在 Migration 工作原理 會一併並解釋。
確認 Database
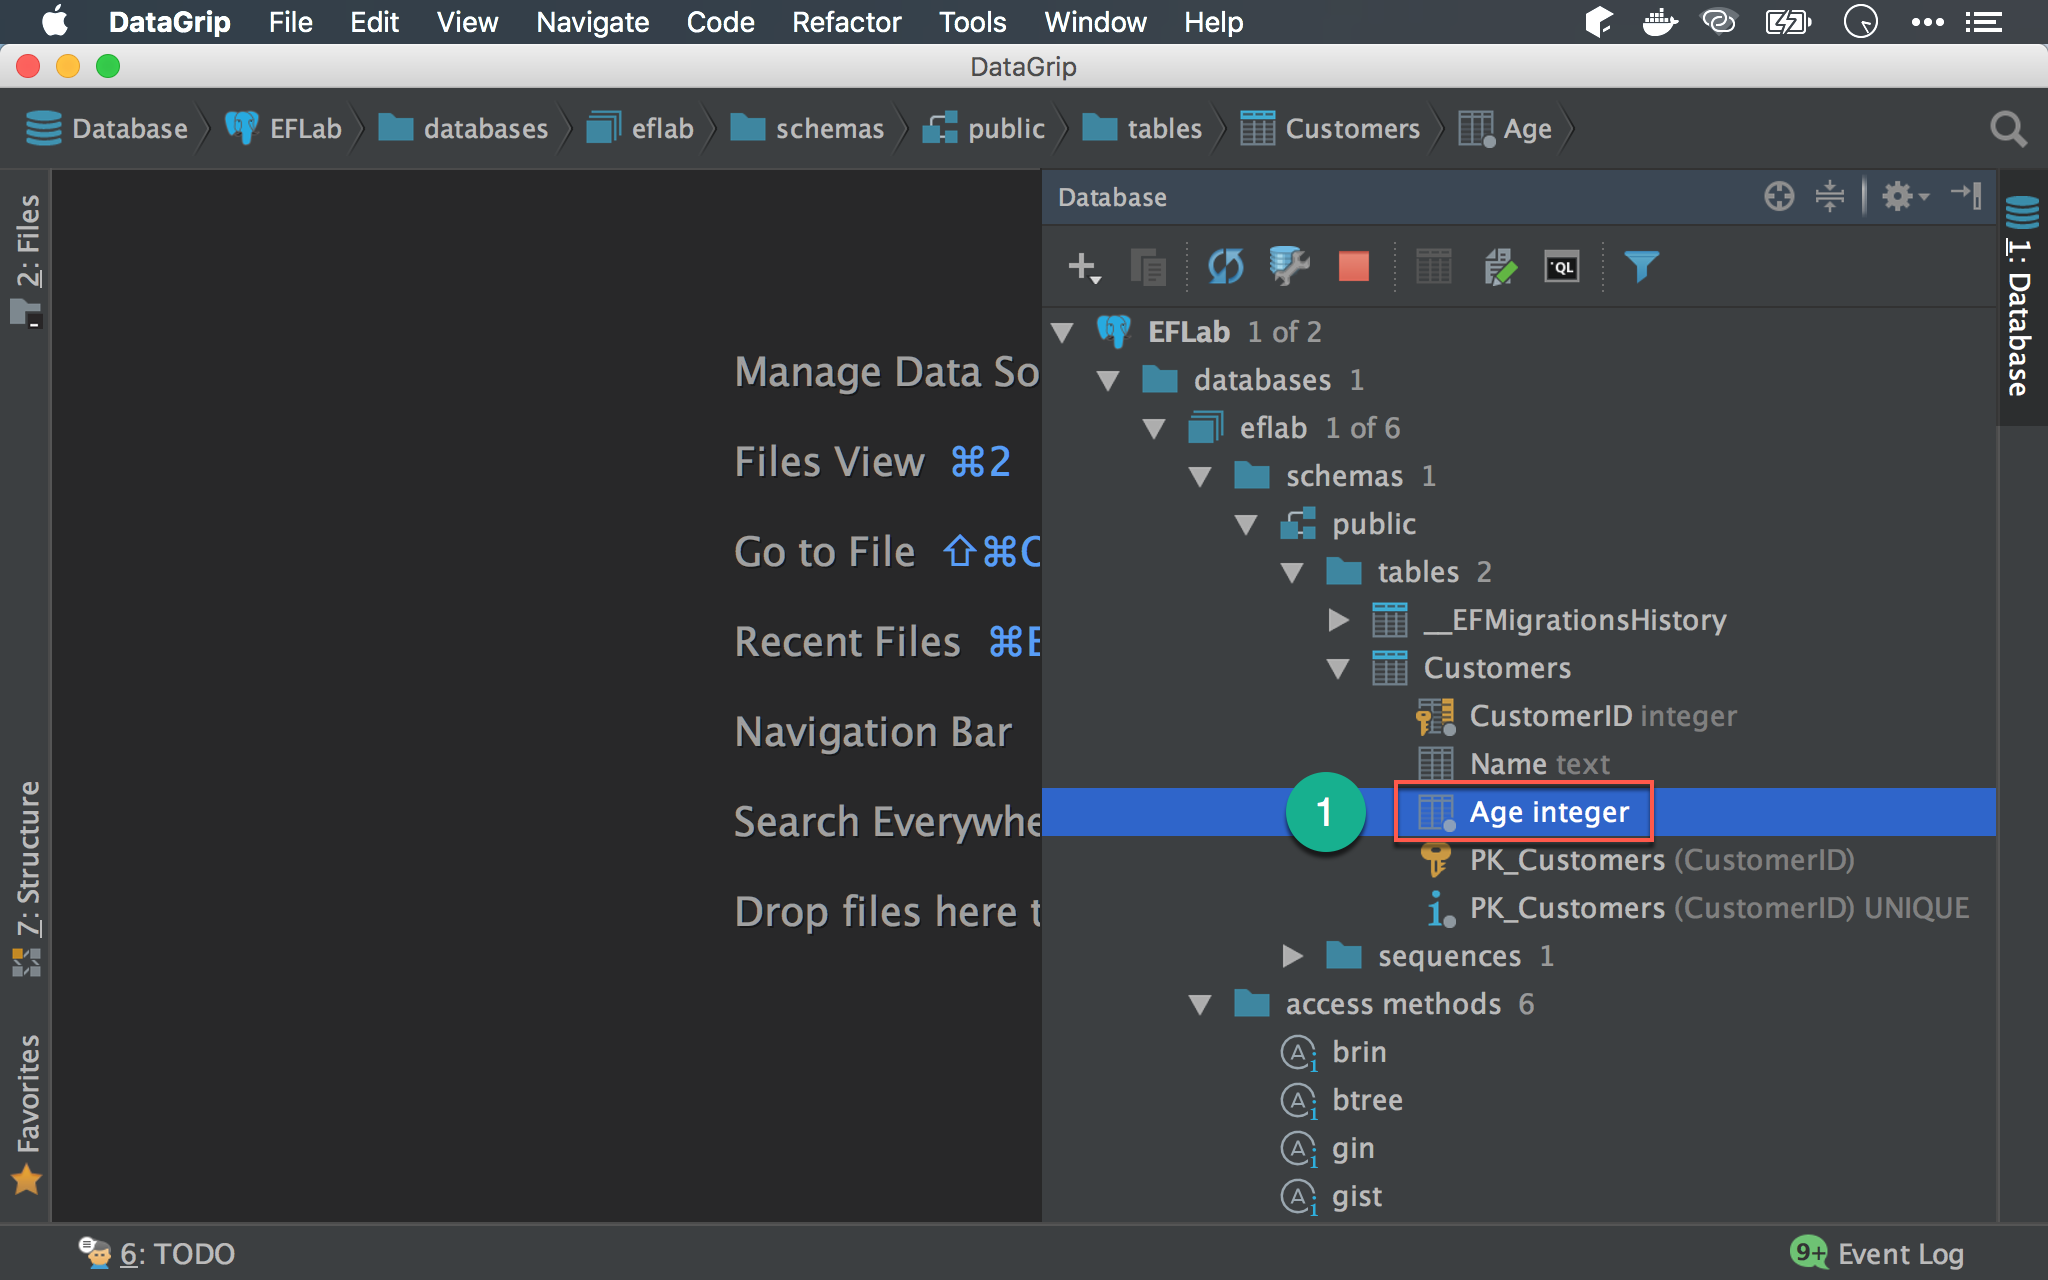
Customers只新增了Agecolumn
Code First
指定 Column 長度
Customer.cs
1 | using System.ComponentModel.DataAnnotations; |
實務上也常會有改變欄位長度的需求,目前我們將 Name 加上 StringLength() attribute,指定長度為 20。
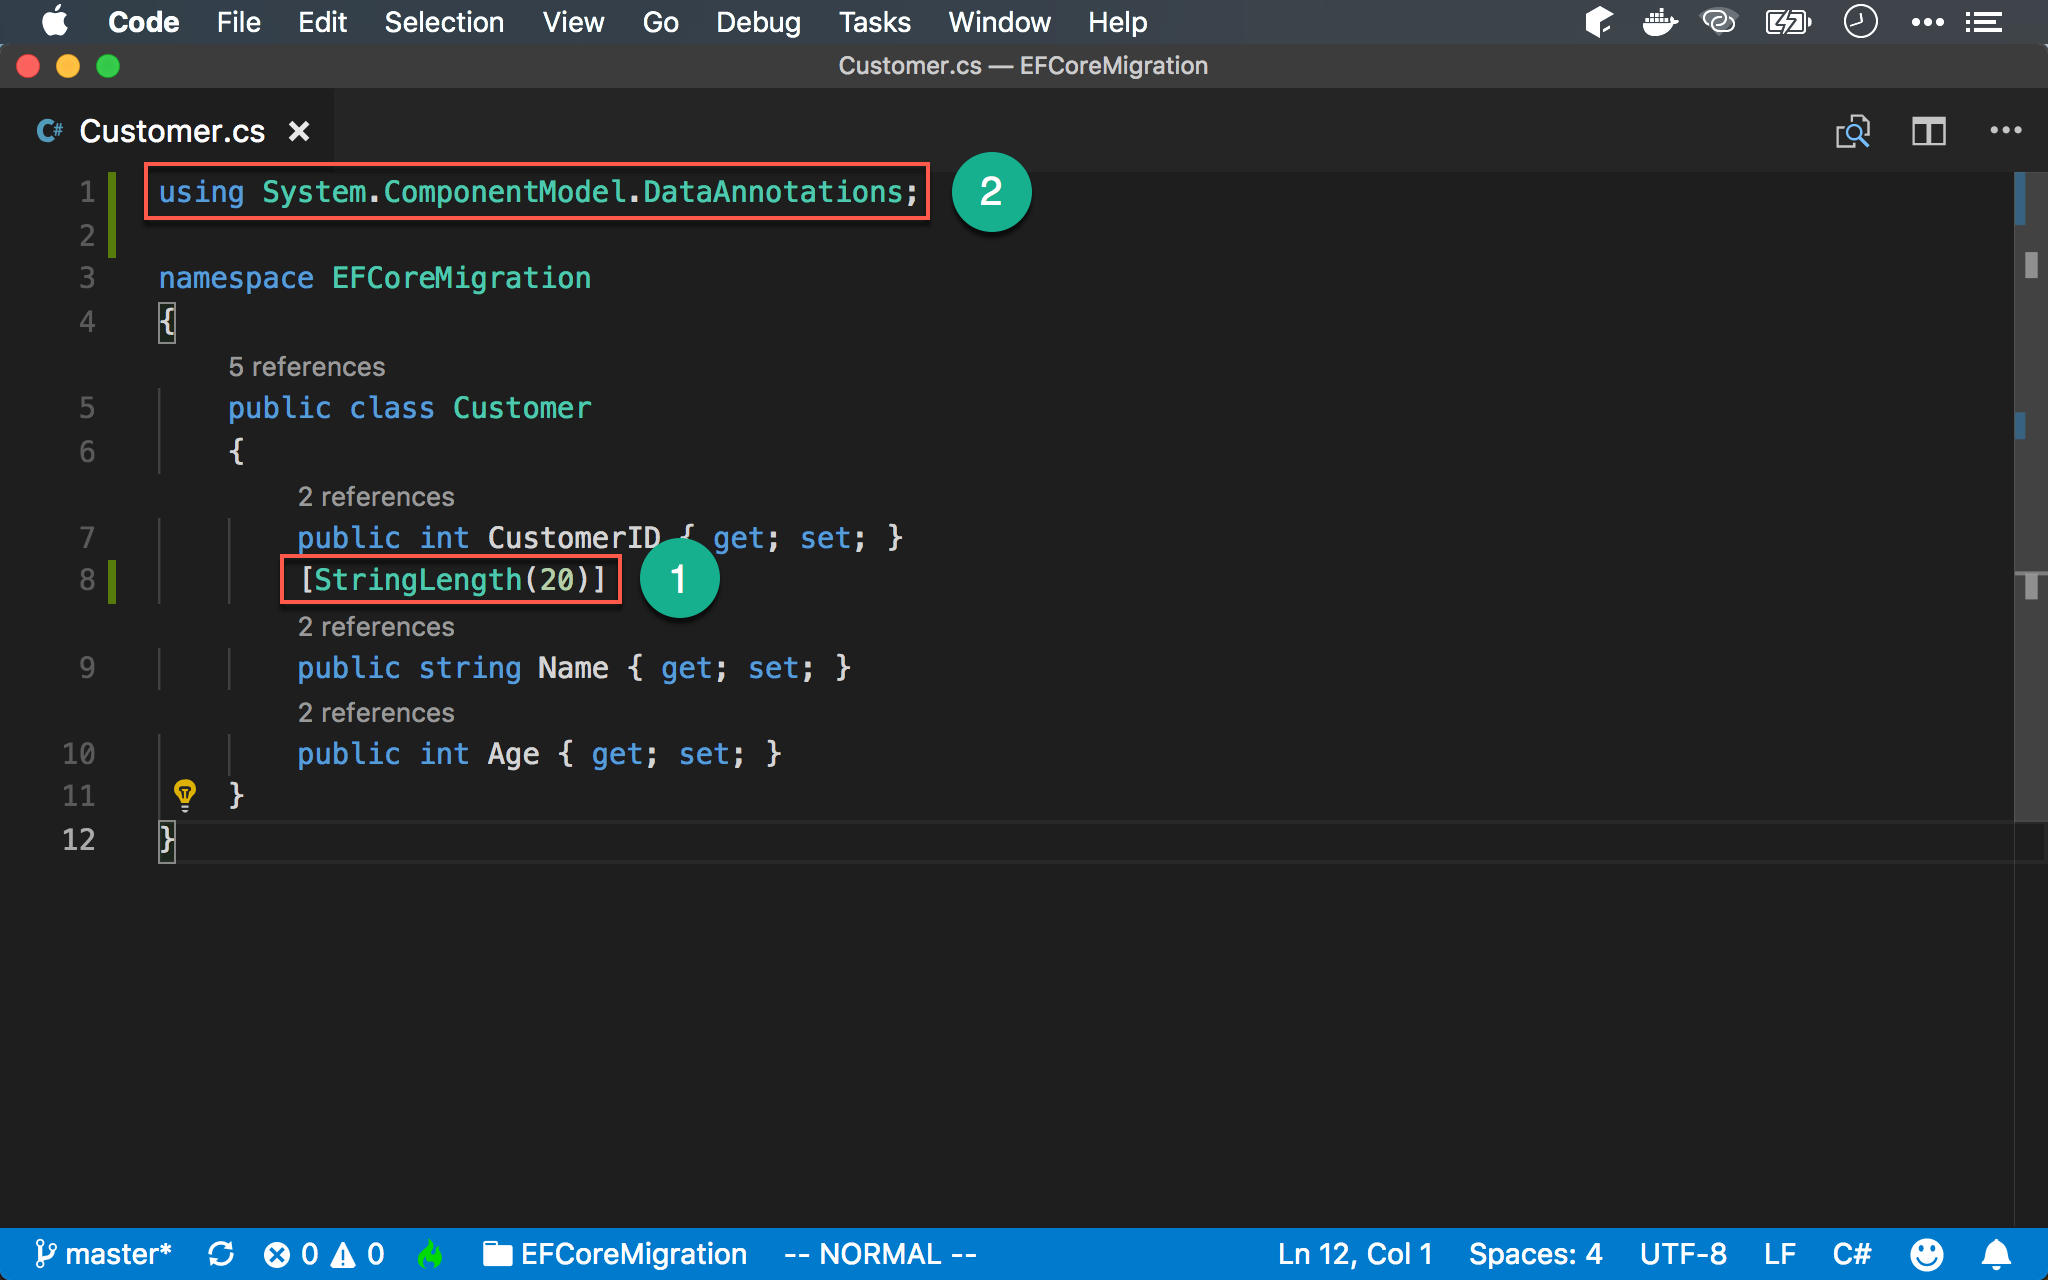
- 在
Name加上StringLength()attribute - 加上
using System.ComponentModel.DataAnnotations;namespace
Migration
建立 Migration
1 | ~/EFCoreMigration $ dotnet ef migrations add Migration02 |
由於 Customer entity 被修改,因此必須建立新的 Migration。
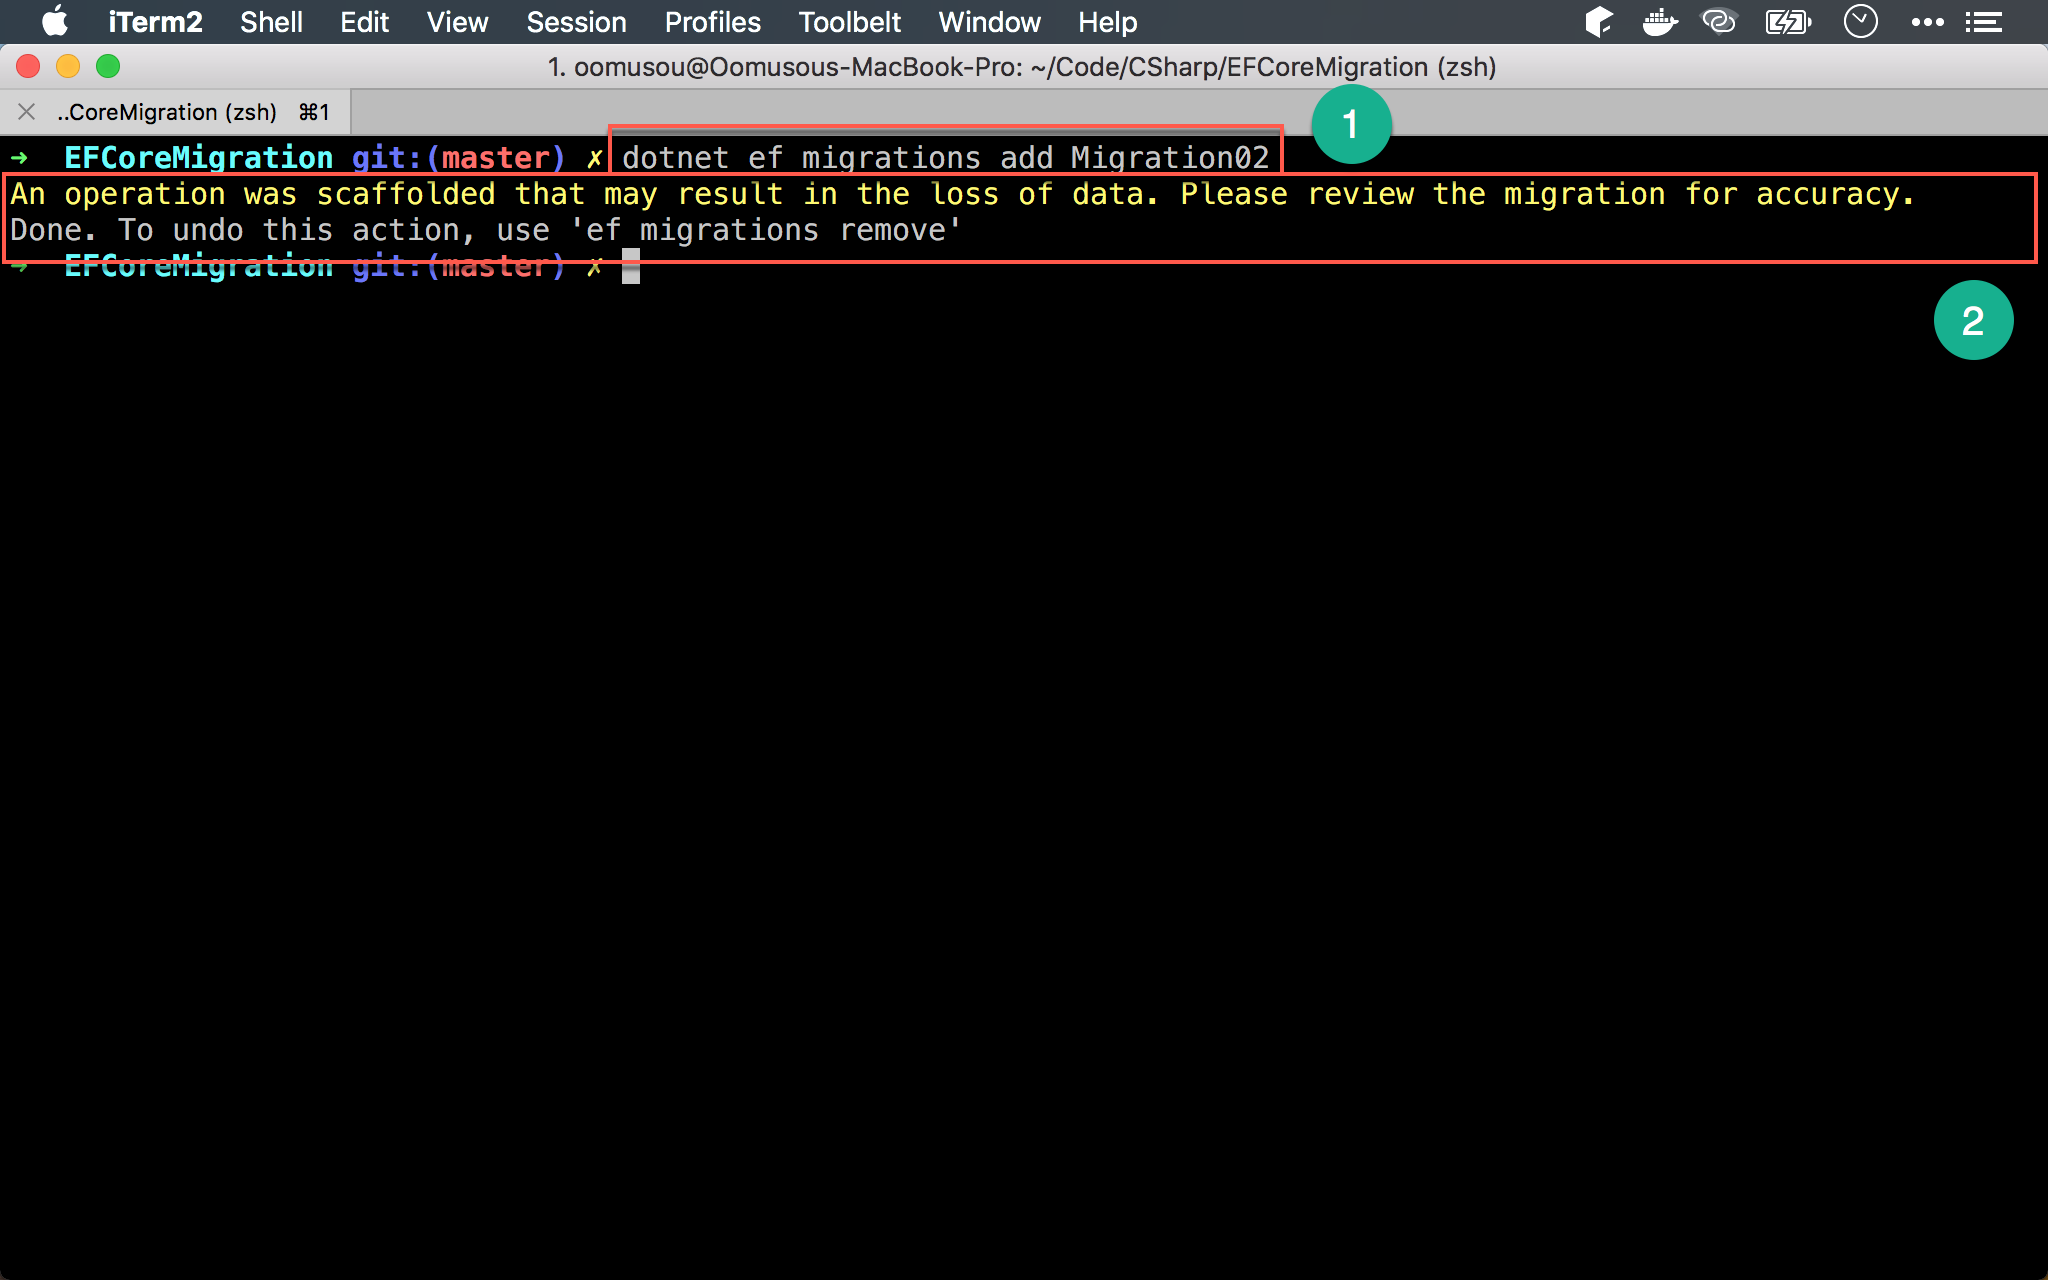
- 由於我們是將
text改成varchar(20),因此有可能會 loss 資料,EF Core 特別提出警告
執行 Migration
1 | $ dotnet ef database update |
輸入 dotnet ef database update 執行 Migration。
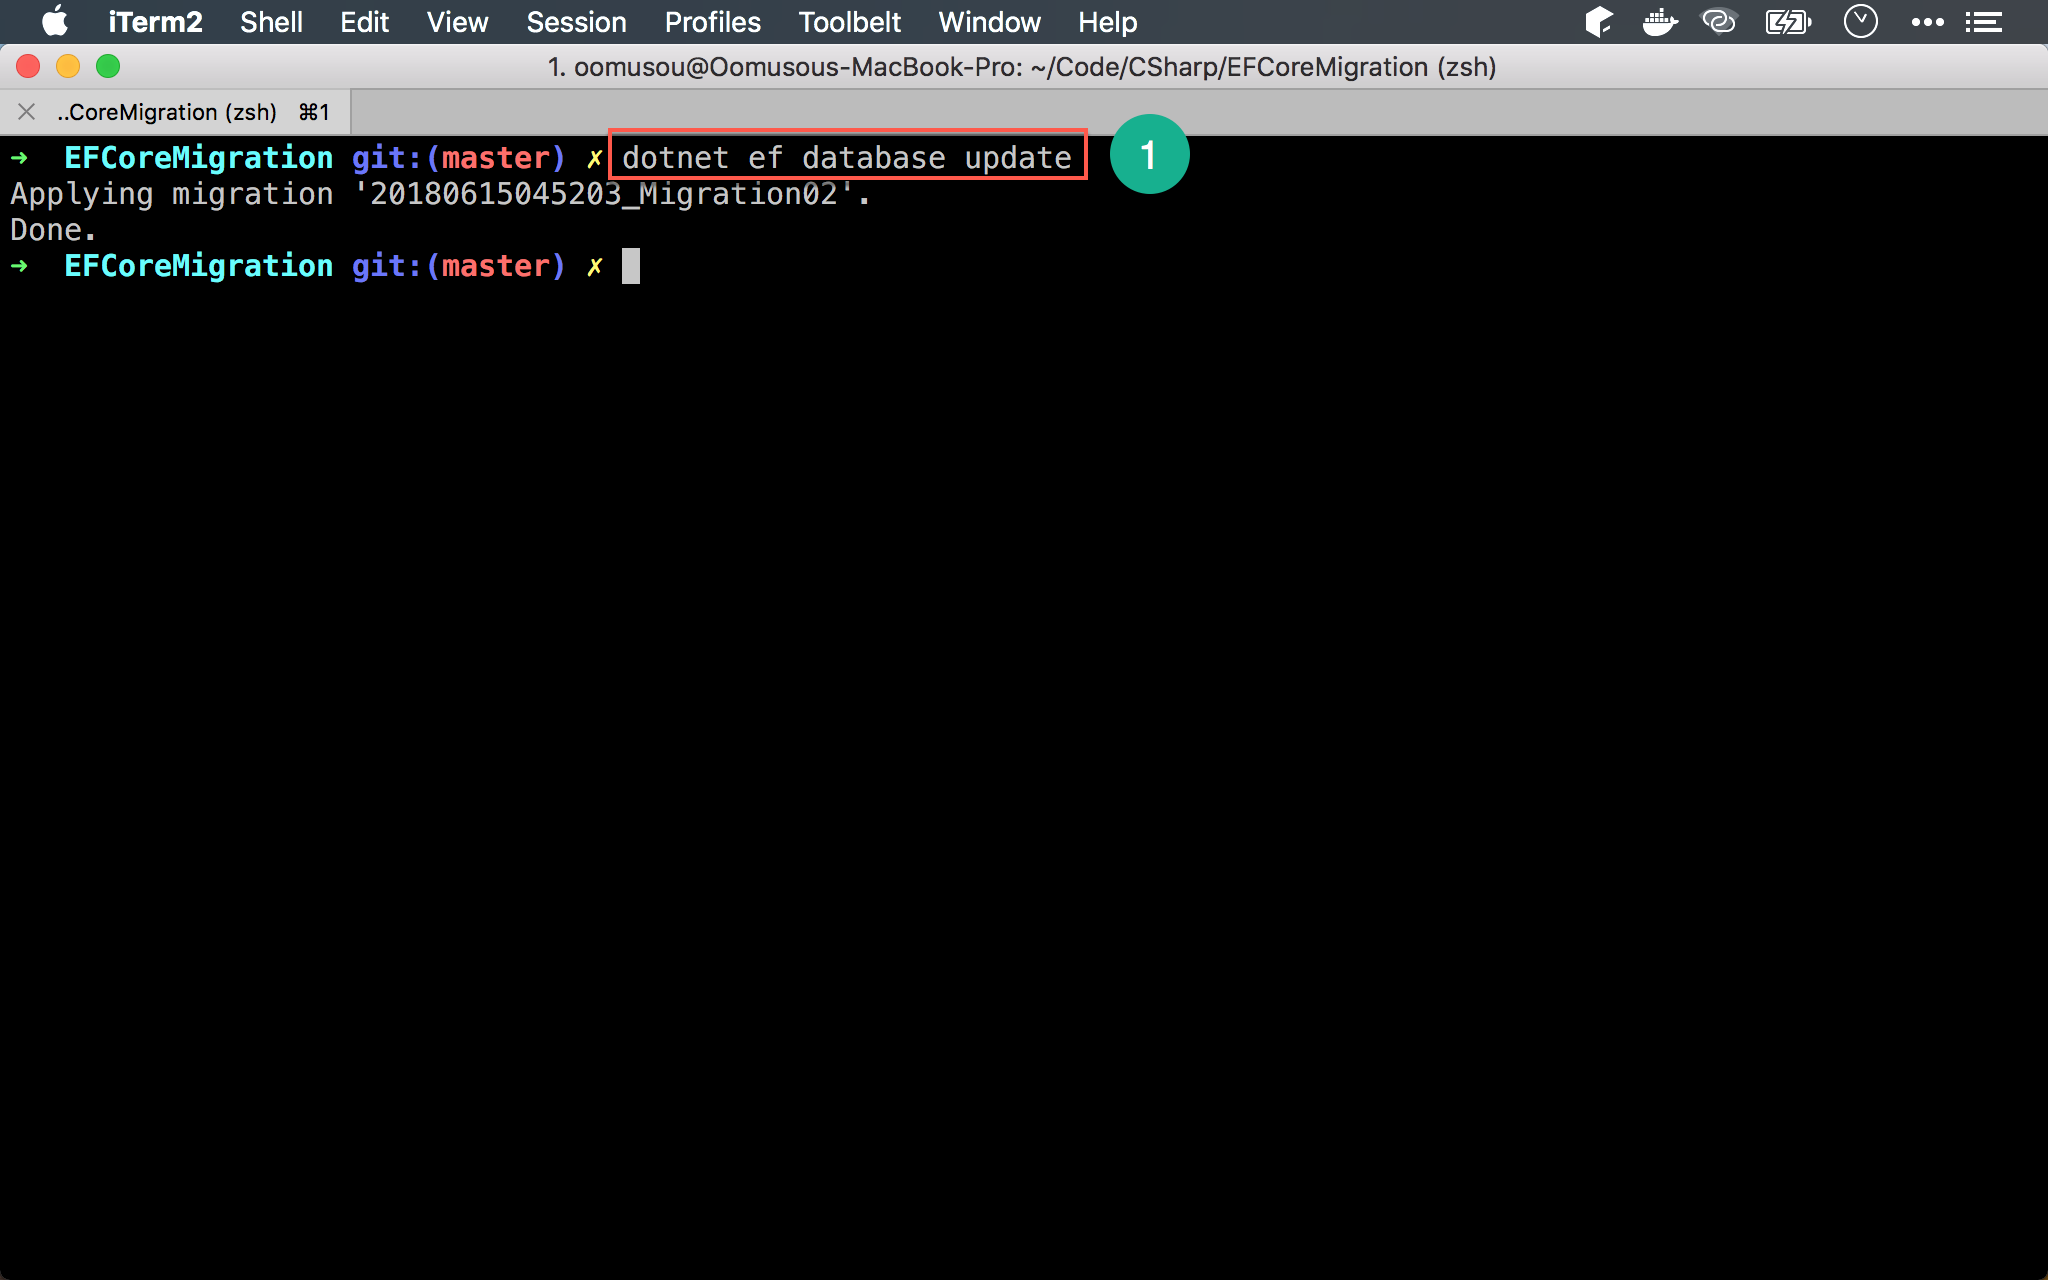
- 只執行了
Migration02,並沒有執行其他 Migration
確認 Database
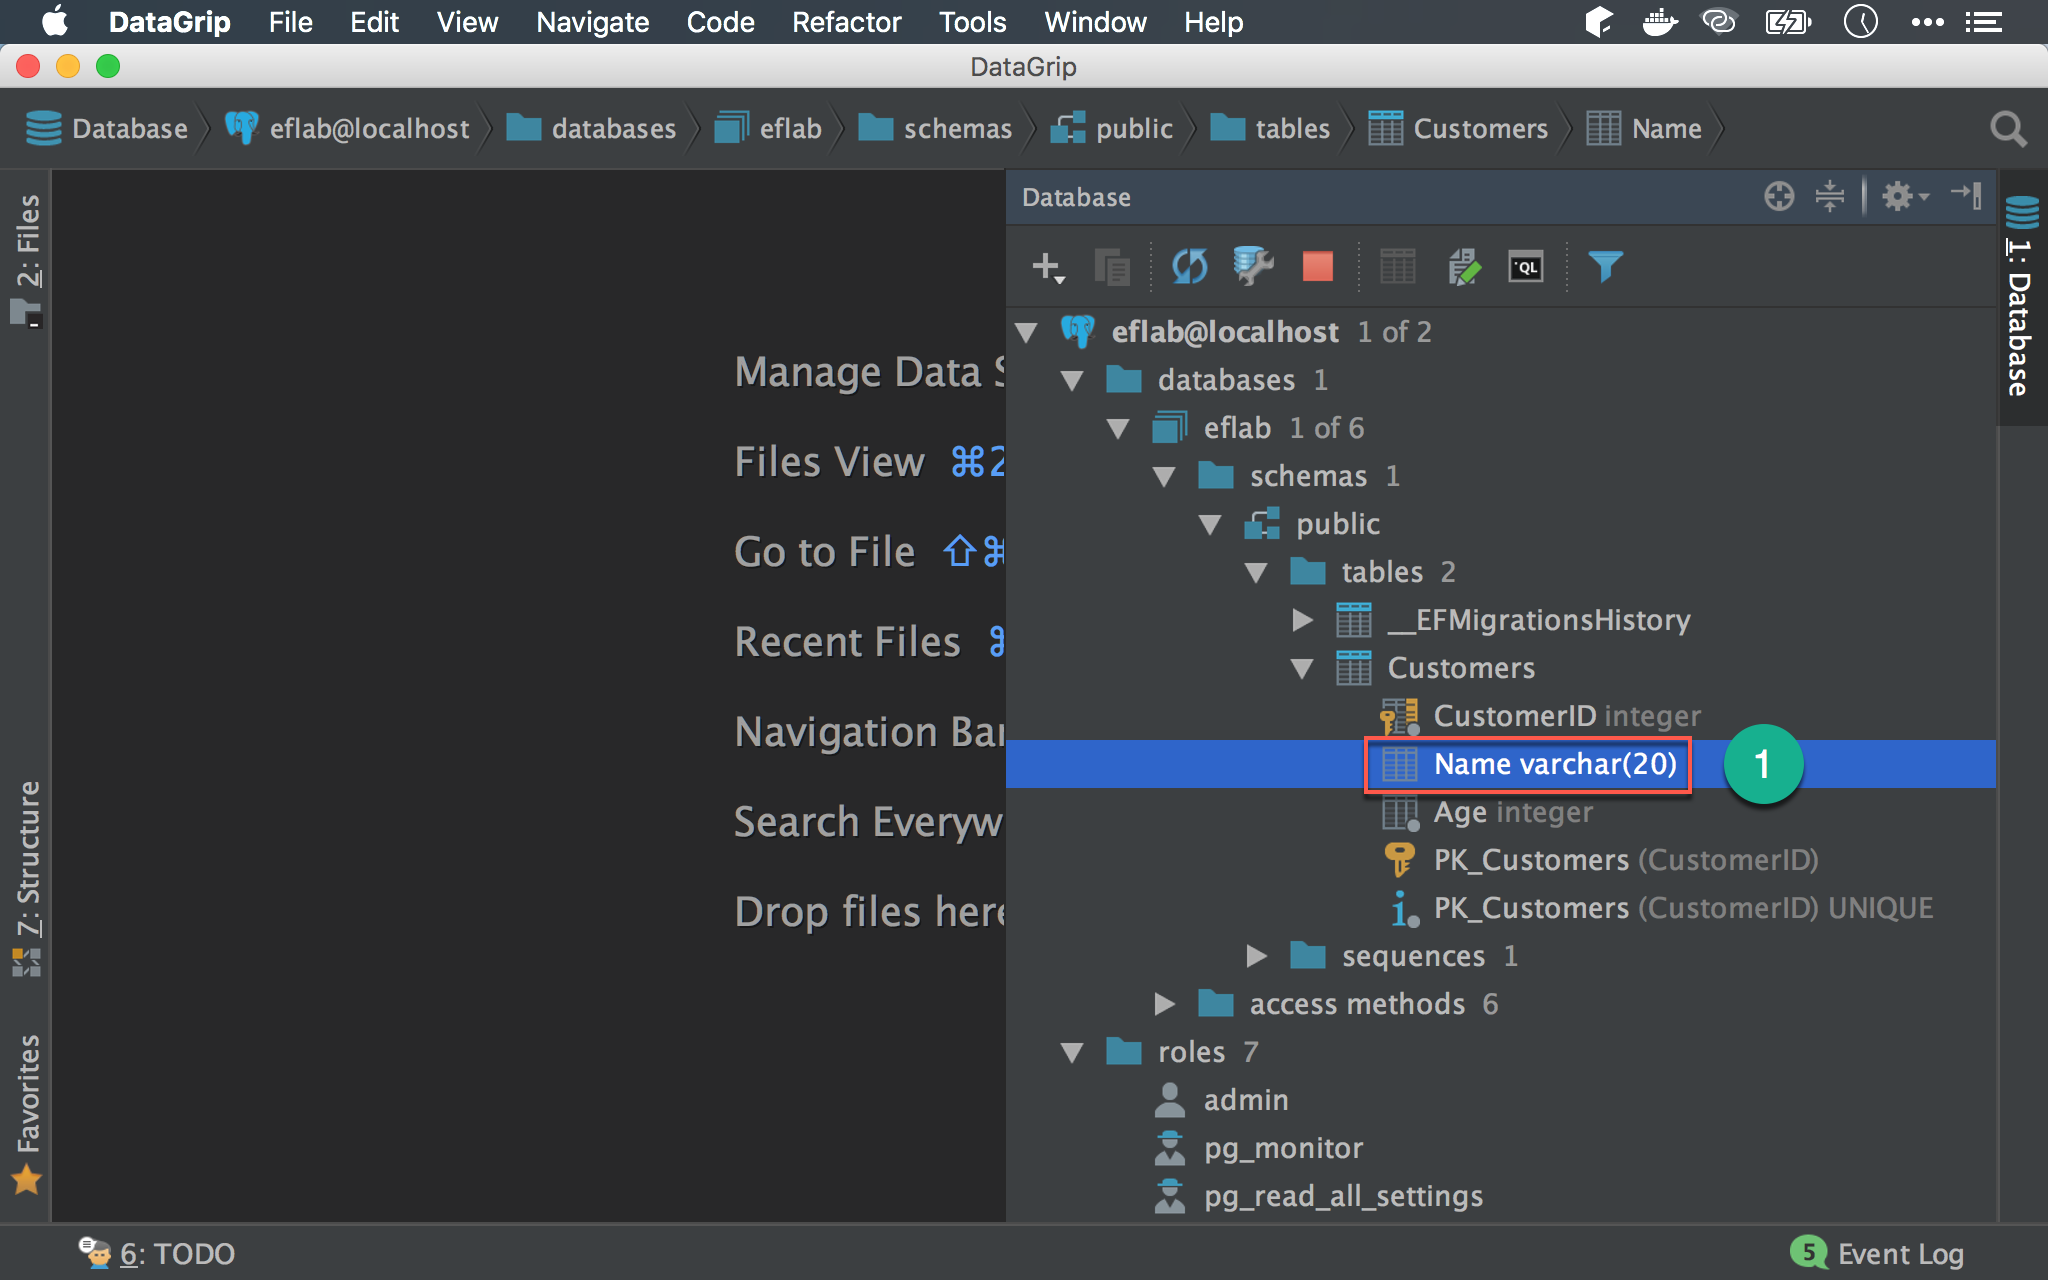
Name由text變成varchar(20)
Migration 工作原理
目前 Migration 已經正常執行,Table 與 Column 也都如預期建立在 PostgreSQL,但我們累積了很多疑問:
- Q : 為什麼需要這 3 個 Migration 檔案 ?
- Q : 為什麼會多了
__EFMigrationHistorytable 呢 ? - Q : 為什麼第二次 Migration 只有兩個檔案 ?
- Q : 為什麼 EF Core 知道只執行新的 Migration,而不是全部 Migration 重跑一次 ?
這些都是 Migration 的黑魔法,我們必須從 EF Core 的 Migration 工作原理談起。
建立 Migration1
$ dotnet ef migrations add

- 根據
DbContext與Entity蒐集要建立 Migration 的資訊 - 比對
ModelSnapshot.cs與DbContext與Entity的差異,決定 Migration 檔案要如何建立 MyMigrate.Designer.cs與MyMigrate.cs就是實際的 Migration 檔案- 將新增異動的 schema 寫入
ModelSnapshot.cs
ModelSnapshot.cs1
2
3
4
5
6
7
8
9
10
11
12
13
14
15
16
17
18
19
20
21
22
23
24
25
26
27
28
29
30
31
32
33
34
35
36
37
38// <auto-generated />
using EFCoreMigration;
using Microsoft.EntityFrameworkCore;
using Microsoft.EntityFrameworkCore.Infrastructure;
using Microsoft.EntityFrameworkCore.Storage.ValueConversion;
using Npgsql.EntityFrameworkCore.PostgreSQL.Metadata;
namespace EFCoreMigration.Migrations
{
[DbContext(typeof(EFLabDbContext))]
partial class EFLabDbContextModelSnapshot : ModelSnapshot
{
protected override void BuildModel(ModelBuilder modelBuilder)
{
#pragma warning disable 612, 618
modelBuilder
.HasAnnotation("Npgsql:ValueGenerationStrategy", NpgsqlValueGenerationStrategy.SerialColumn)
.HasAnnotation("ProductVersion", "2.1.0-rtm-30799")
.HasAnnotation("Relational:MaxIdentifierLength", 63);
modelBuilder.Entity("EFCoreMigration.Customer", b =>
{
b.Property<int>("CustomerID")
.ValueGeneratedOnAdd();
b.Property<int>("Age");
b.Property<string>("Name")
.HasMaxLength(20);
b.HasKey("CustomerID");
b.ToTable("Customers");
});
#pragma warning restore 612, 618
}
}
}
描述了 database schema 該有哪些 table 與 column。
ModelSnapshot.cs可視為前一次 Migration 所產生 database schema 的 golden sample,因此可用目前的DbContext、Entity與ModelSnapshot做比對,產生新的 Migration 檔案
Migration02.Designer.cs
1 | // <auto-generated /> |
描述了這次 Migration 建立後最終的 schema。
Migration02.cs
1 | using Microsoft.EntityFrameworkCore.Migrations; |
描述了 dotnet ef database update 與 dotnet ef migrations remove 要執行的動作。
第 7 行
1 | protected override void Up(MigrationBuilder migrationBuilder) |
當執行 dotnet ef datebase update 時,就會執行 Up(),包含如何建立 schema。
以 Migration02 為例,這次 migration 的目的就是將 Name 的 text 改成 varchar(20),因此在 Up 只看到 AlterColumn<T>()。
18 行
1 | protected override void Down(MigrationBuilder migrationBuilder) |
當執行 dotnet ef migrations remove 時,就會執行 Down(),包含如何還原此次 Migration 所需要的動作。
由於 Migration02 主要動作就是將 Name 由 text 改成 varchar(20),因此 Down() 就是反過來由 varchar(20) 改成 text。
由於
MyMigrate.Designer.cs與MyMigrate.cs都是 C# 檔案,因此可以進入 Git 版控,可藉由 Migration 檔案的變化,得知 database schema 變化的歷程,且若真的 Migration 錯誤,還可以透過dotnet ef migrations remove還原 Migration 所變動的 database schema
MyMigrate.Designer.cs與MyMigrate.cs雖然是由 CLI 產生,但並非不能修改,一些進階的Migration 功能,就得自行修改才能實現,如想利用 Migration 建立 Stored Procedure,就必須自行修改MyMigrate.cs的Up()但
ModelSnapshot.cs則不應該修改,應該交由 Migration 去維護,否則會發生錯亂
這解釋了 :
- Q : 為什麼需要這 3 個 Migration 檔案 ?
- Q : 為什麼第二次 Migration 只有兩個檔案 ?
執行 Migration1
$ dotnet ef database update

- 檢查是否有
__EFMigrationHistorytable,若沒有,表示是第一次執行 Migration - 若是第一次執行 Migration,會建立
__EFMigrationHistorytable - 若已經有
__EFMigrationHistory,表示已經執行過 Migration,因此在__EFMigrationHistory會有 Migration 紀錄,可查詢已經執行過哪些 Migration - 執行尚未執行過的 Migration
- 將執行過的 Migration
名稱寫進__EFMigrationHistory
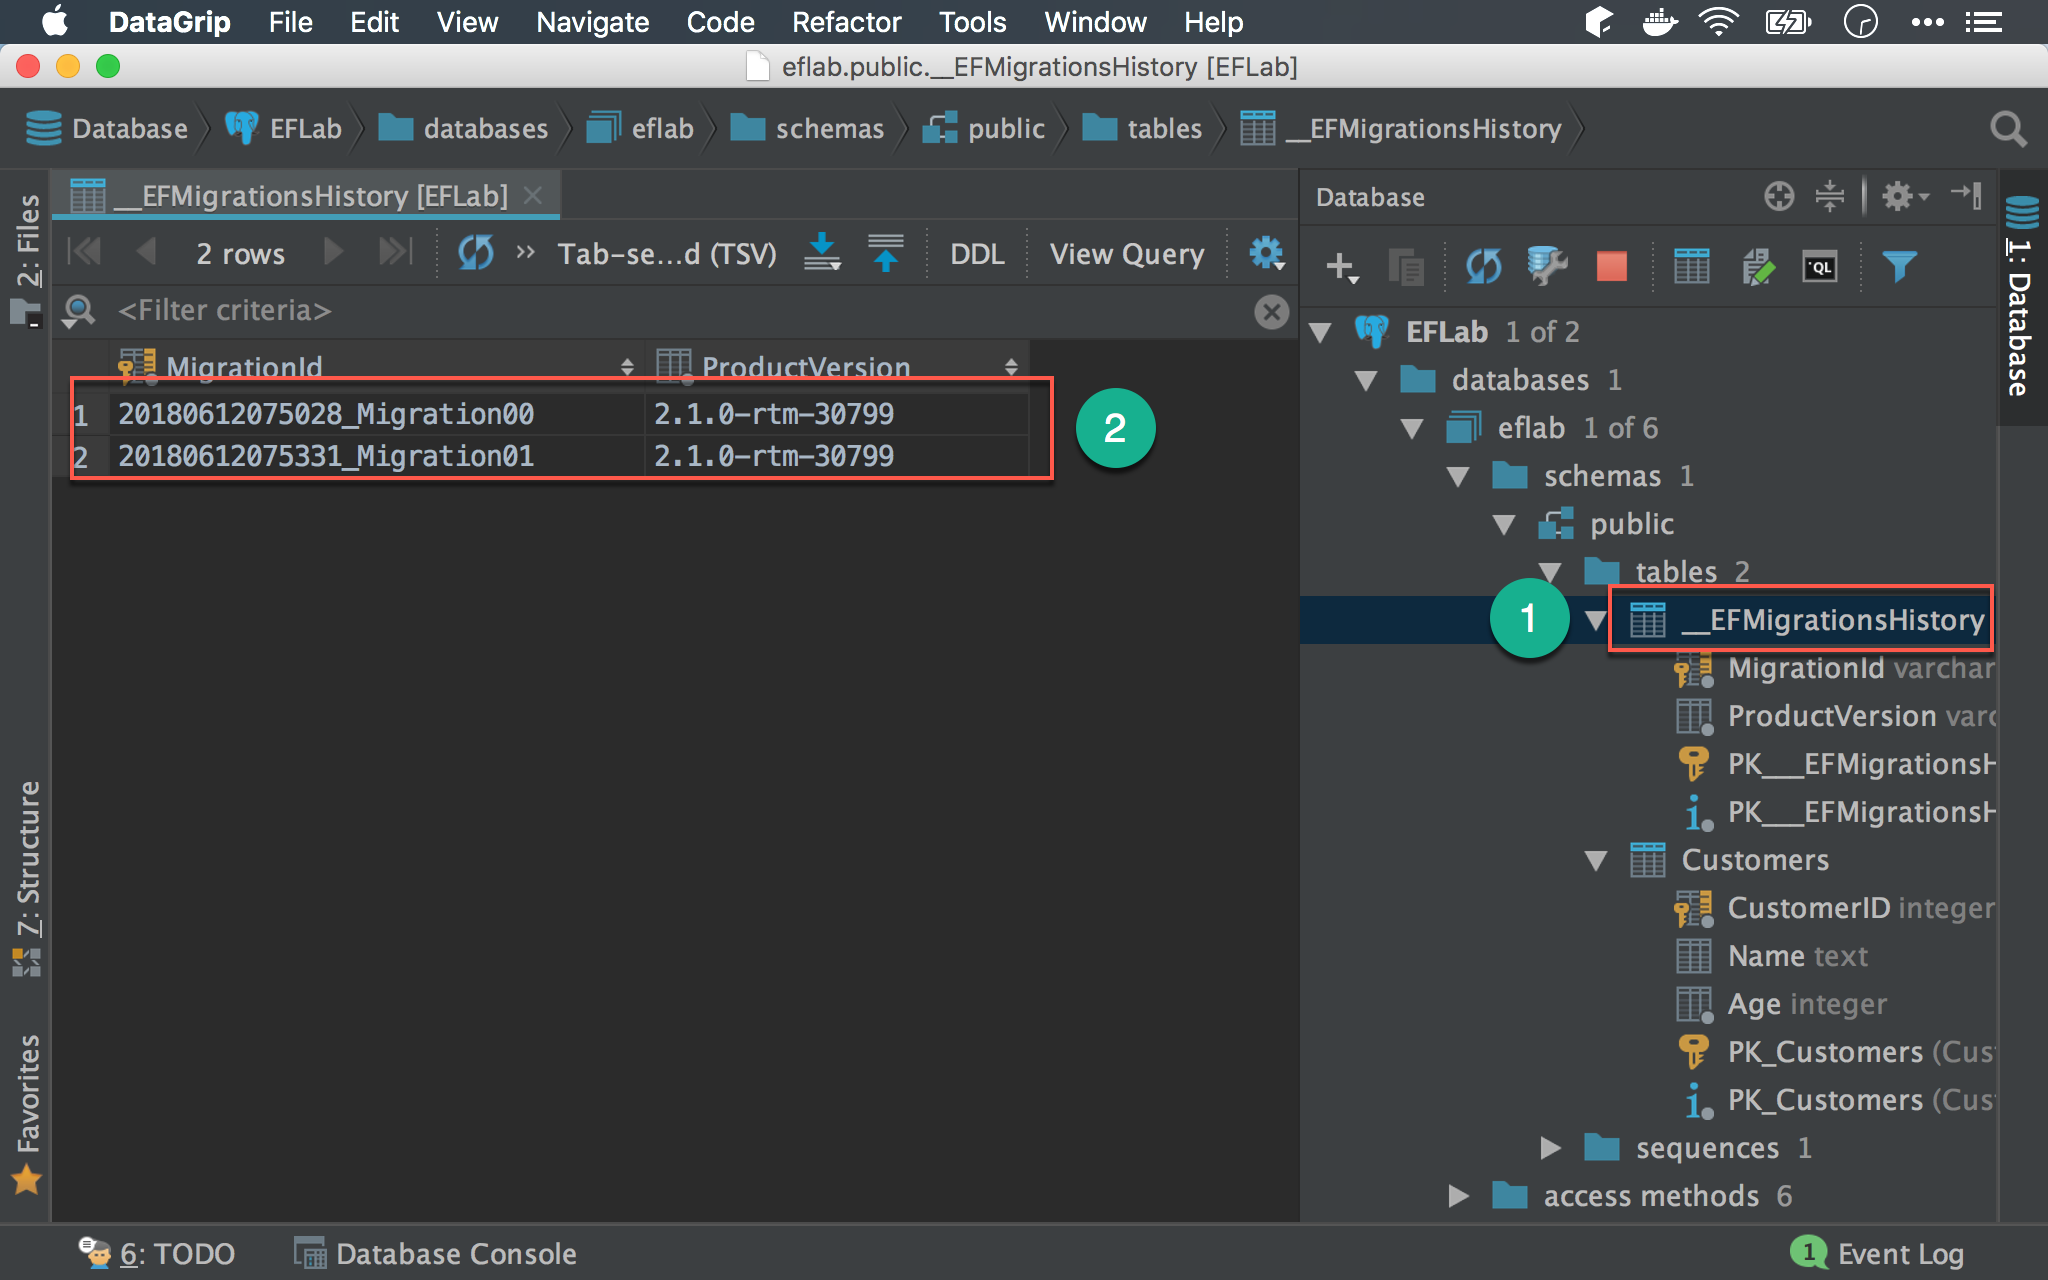
__EFMigrationHistory 記載了執行過的 Migration 名稱。
透過 __EFMigrationHistory,dotnet ef database update 就知道每次該執行哪些沒執行過的 Migration,且在不同環境下,如 development / lab / stage / production,因為各自有各自的 __EFMigrationHistory,也能根據不同環境執行不同的 Migration。
這解釋了 :
- Q : 為什麼會多了 __EFMigrationHistory table 呢 ?
- Q : 為什麼 EF Core 知道只執行新的 Migration,而不是全部 Migration 重跑一次 ?
Conclusion
- Code First 與 Migration 解決了 database schema 無法 Git 版控與 schema 同步問題,且完全使用開發端技術,而不是資料庫端技術
- Migration 另外一個優點就是用在
整合測試,當配合 Docker 時,每個測試案例在執行前先docker-compose up建立 PostgreSQL container,接著跑 Migration 建立 schema,然後跑整合測試讀寫 PostgreSQL, 測試完畢後再docker-compose down刪除 PostgreSQL container,所有在 PostgreSQL 的測試資料也跟著刪除,下一個測試案例再重新docker-compose up建立新的 container,重新跑 Migration …,如此能確保每個整合測試都是全新乾淨的 database,完全沒有任何 side effect - 因為不了解 Migration,所以很多人在實務上不敢用 Migration,事實上對於新的技術,只要能充分了解其背後原理與機制,就不再是黑魔法了
Sample Code
完整的範例可以在我的 GitHub 上找到
Reference
Npgsql, Entity Framework Core
John P Smith, Entity Framework Core in Action