如何在 .NET Core 使用 DI ?
.NET Core 已經內建 DI,讓我們可以享受 DI container 實現 依賴注入 的方便,Visual Studio 2017 在 ASP.NET Core Web Application 的 template 中,預設已經可直接使用 DI,若要在 console app 也使用 DI,則需另外設定。
Version
Visual Studio 2017 15.4.5
.NET Core SDK 2.1.101
Microsoft.Extensions.DependencyInjection 2.0.0
User Story
一個常見的分層架構,除了 OrderController 外,常見我們還會依 職責 拆分 OrderService 與 PaymentService … 等。
OrderController.Index() 呼叫 OrderService.CreateOrder(),然後 OrderService.CreateOrder() 再去呼叫 PaymentService.PayCreditCard()。
傳統我們會這樣寫 code :
OrderController.cs
1 | class OrderController |
OrderService.cs
1 | class OrderService |
PaymentService.cs
1 | class PaymentService |
這是傳統 OOP 寫法,但這有幾個問題 :
PaymentService直接被OrderServicenew在裡面,因此OrderController只要用了OrderService就必須得用PaymentService,完全沒有改變PaymentService的空間,也就是OrderController直接耦合PaymentService,無法替換PaymentService- 無法對
OrderService做單元測試,因為PaymentService直接new在OrderService內,無法對PaymentService做 mock
這就是典型的
耦合,也就是 高階模組 直接相依於低階模組,然後高階模組就被低階模組綁死了,無法抽換,也無法單元測試。
Task
目前 OrderController 與 PaymentService 直接偶合在一起,也就是用戶端只要用了 OrderController,就一定得使用 PaymentService,別無選擇。
現在用戶端希望使用 OrderController 時,還能決定 OrderController 的相依物件,不見的一定要 PaymentService,完全由用戶端決定,也就是對用戶端與 PaymentService 解耦合。
Architecture
OrderController、OrderService 與 PaymentService 已經符合 依賴反轉原則,也使用了 依賴注入,但用戶端要注入相依物件還是很複雜,因此要使用 依賴注入容器 簡化 依賴注入。
Implementation
安裝 DependencyInjnection 套件
DI 主要是在 Microsoft.Extensions.DependencyInjection 套件裡,console app 預設沒有安裝,需要手動自行安裝。
GUI 安裝
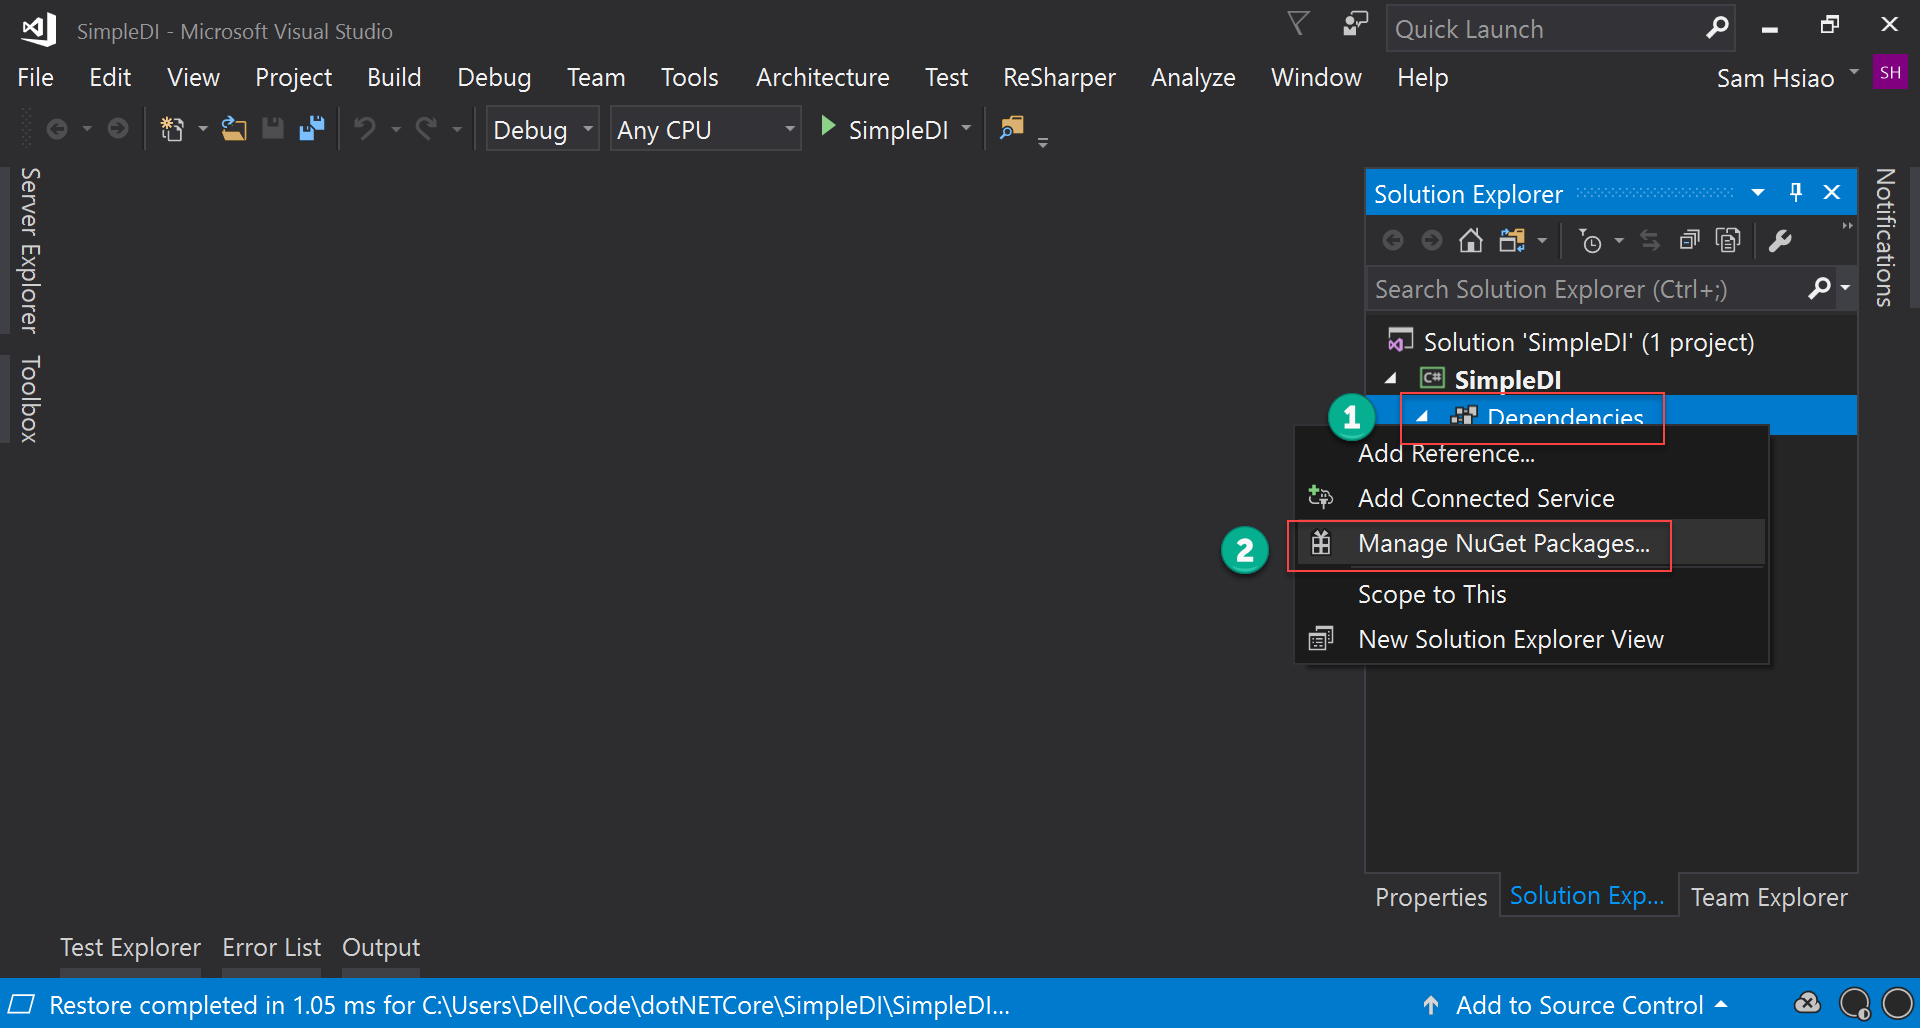
- 在 project 選擇
Dependencies - 按滑鼠右鍵選擇
Manage NuGet Packages...
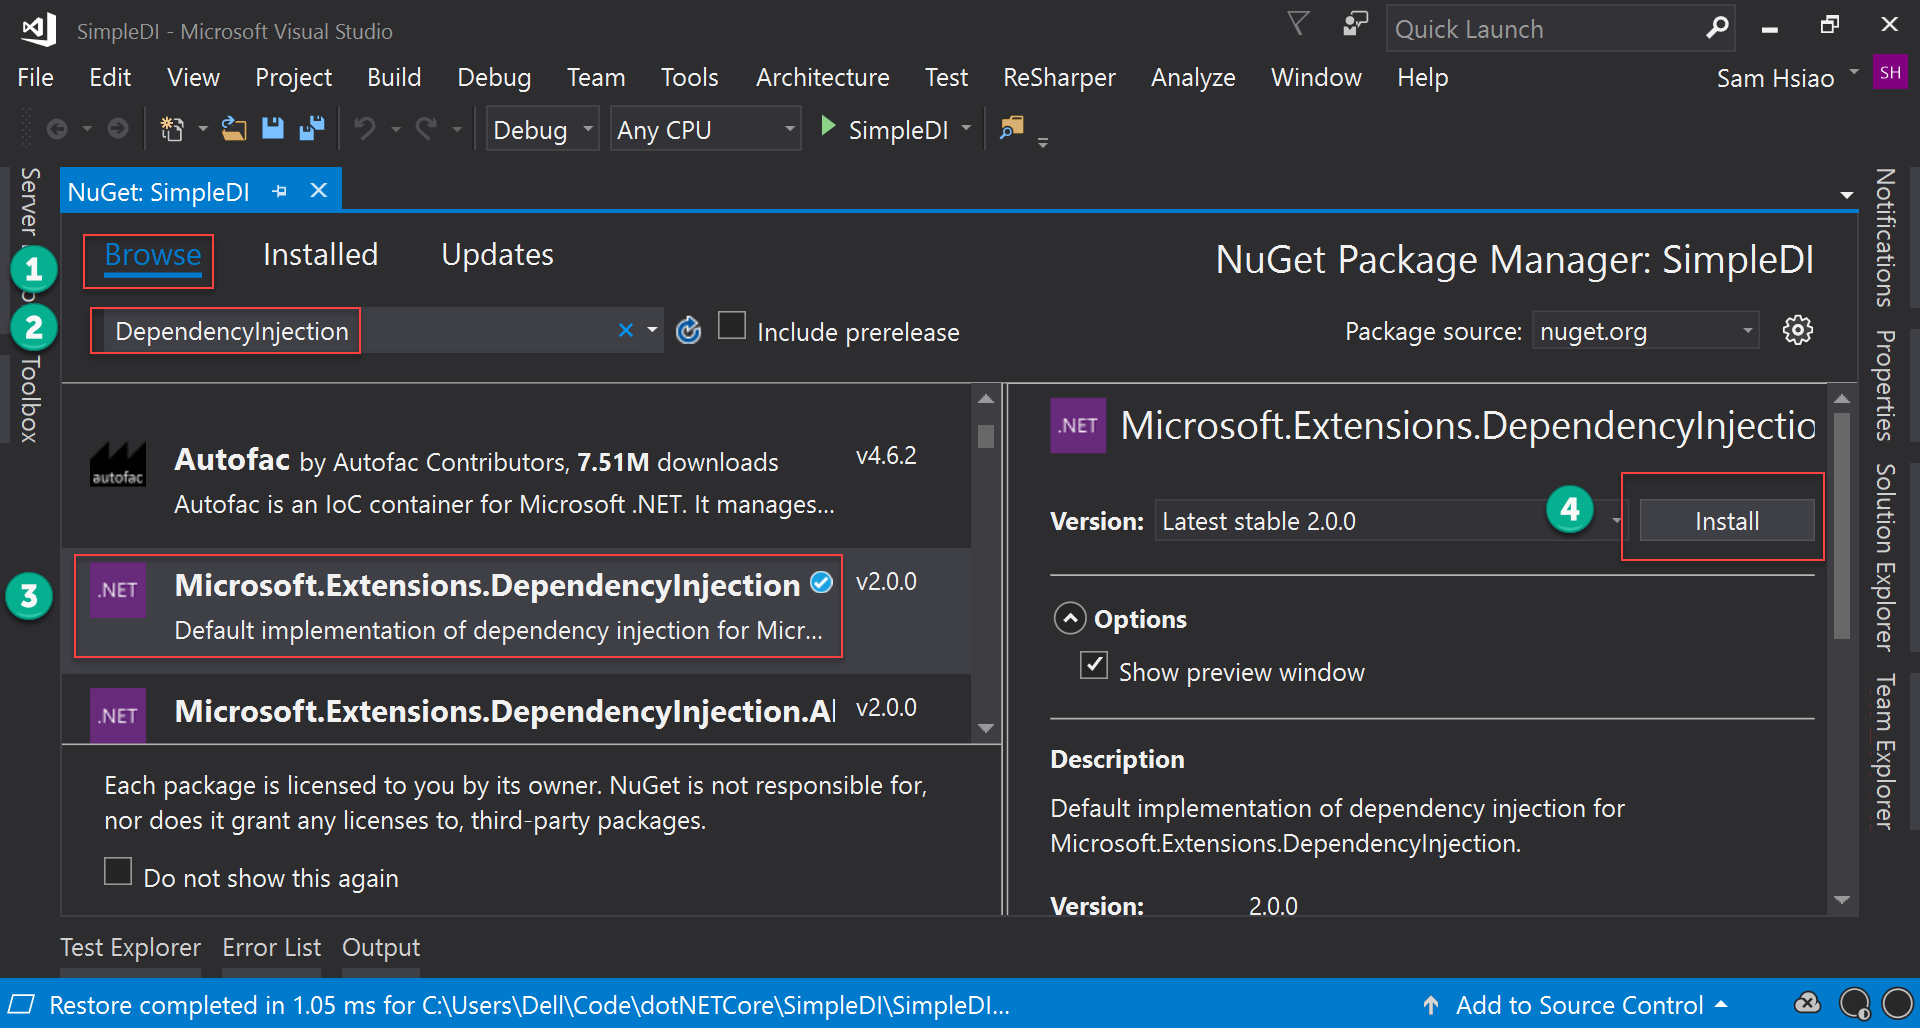
- 選擇
Browse - 輸入
DependencyInjection - 選擇
Microsoft.Extensions.DependencyInjection套件 - 按
Install安裝套件
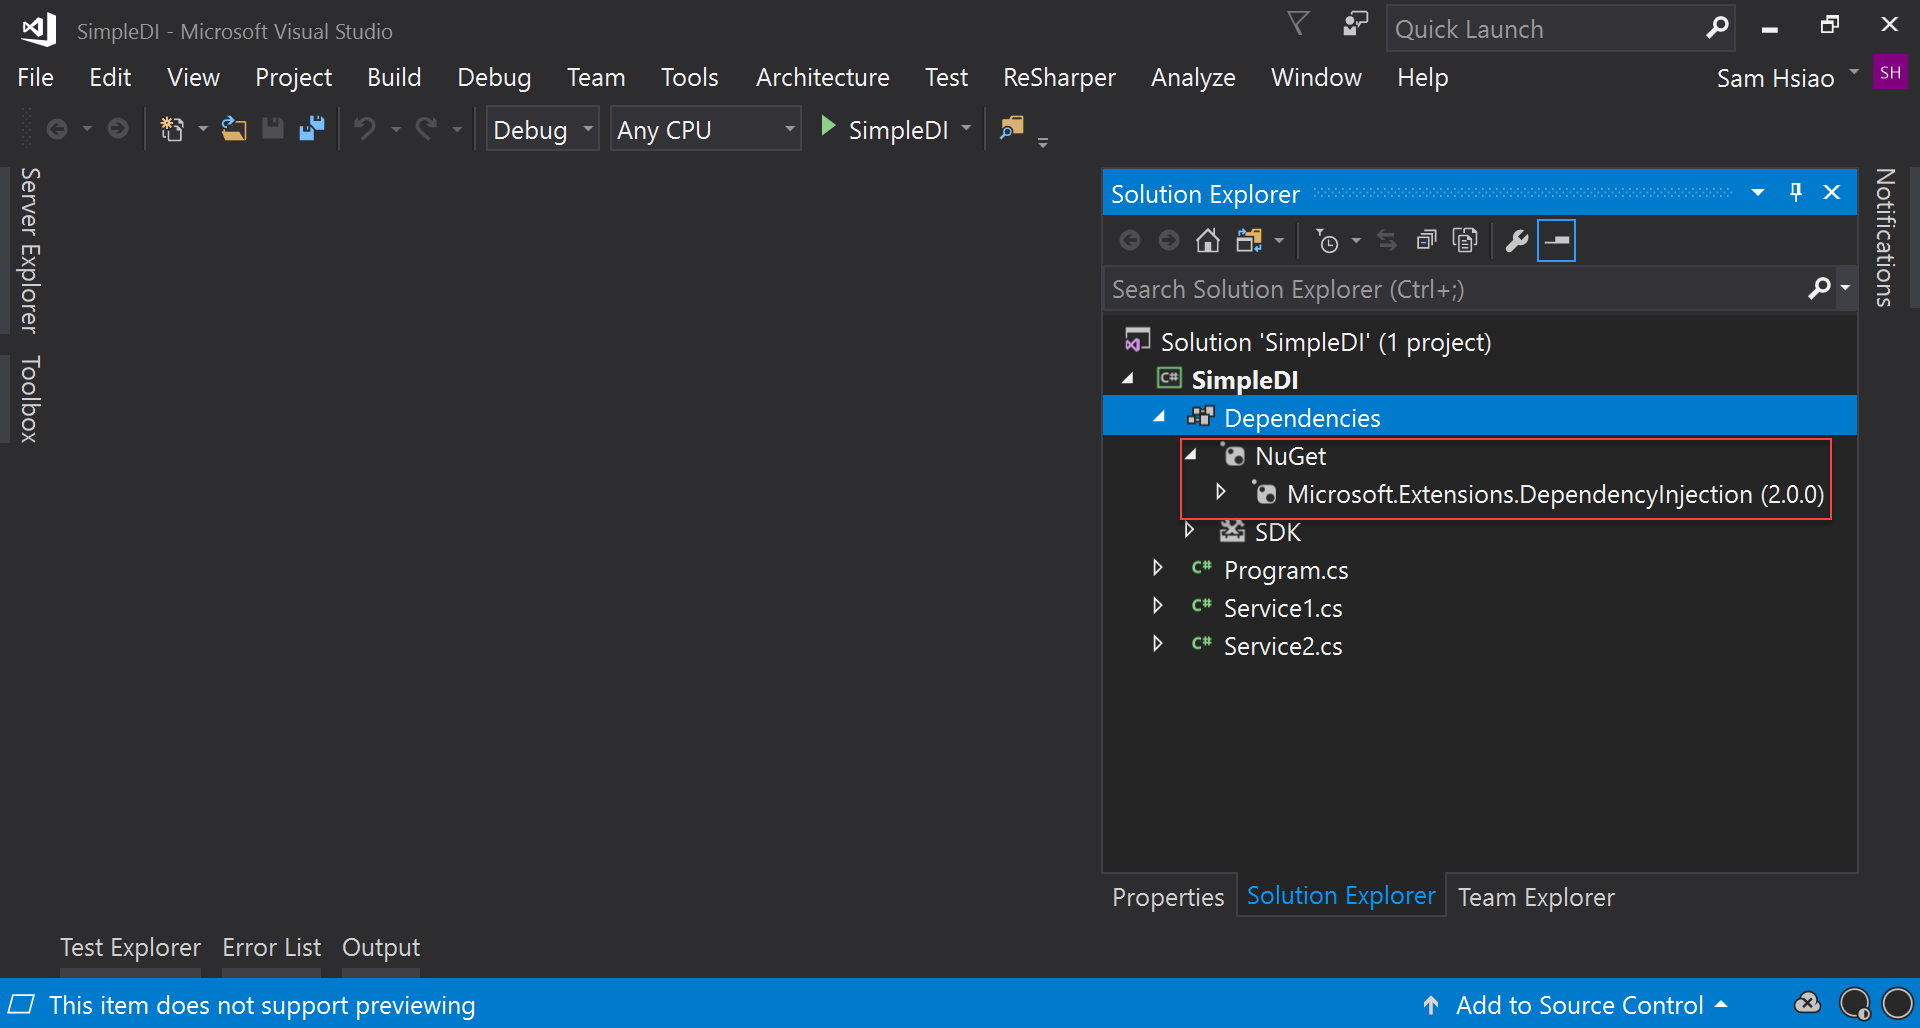
安裝完成後,在 Dependencies 下的 NuGet 會看到 Microsoft.Extensions.DependencyInjection 套件。
指令安裝
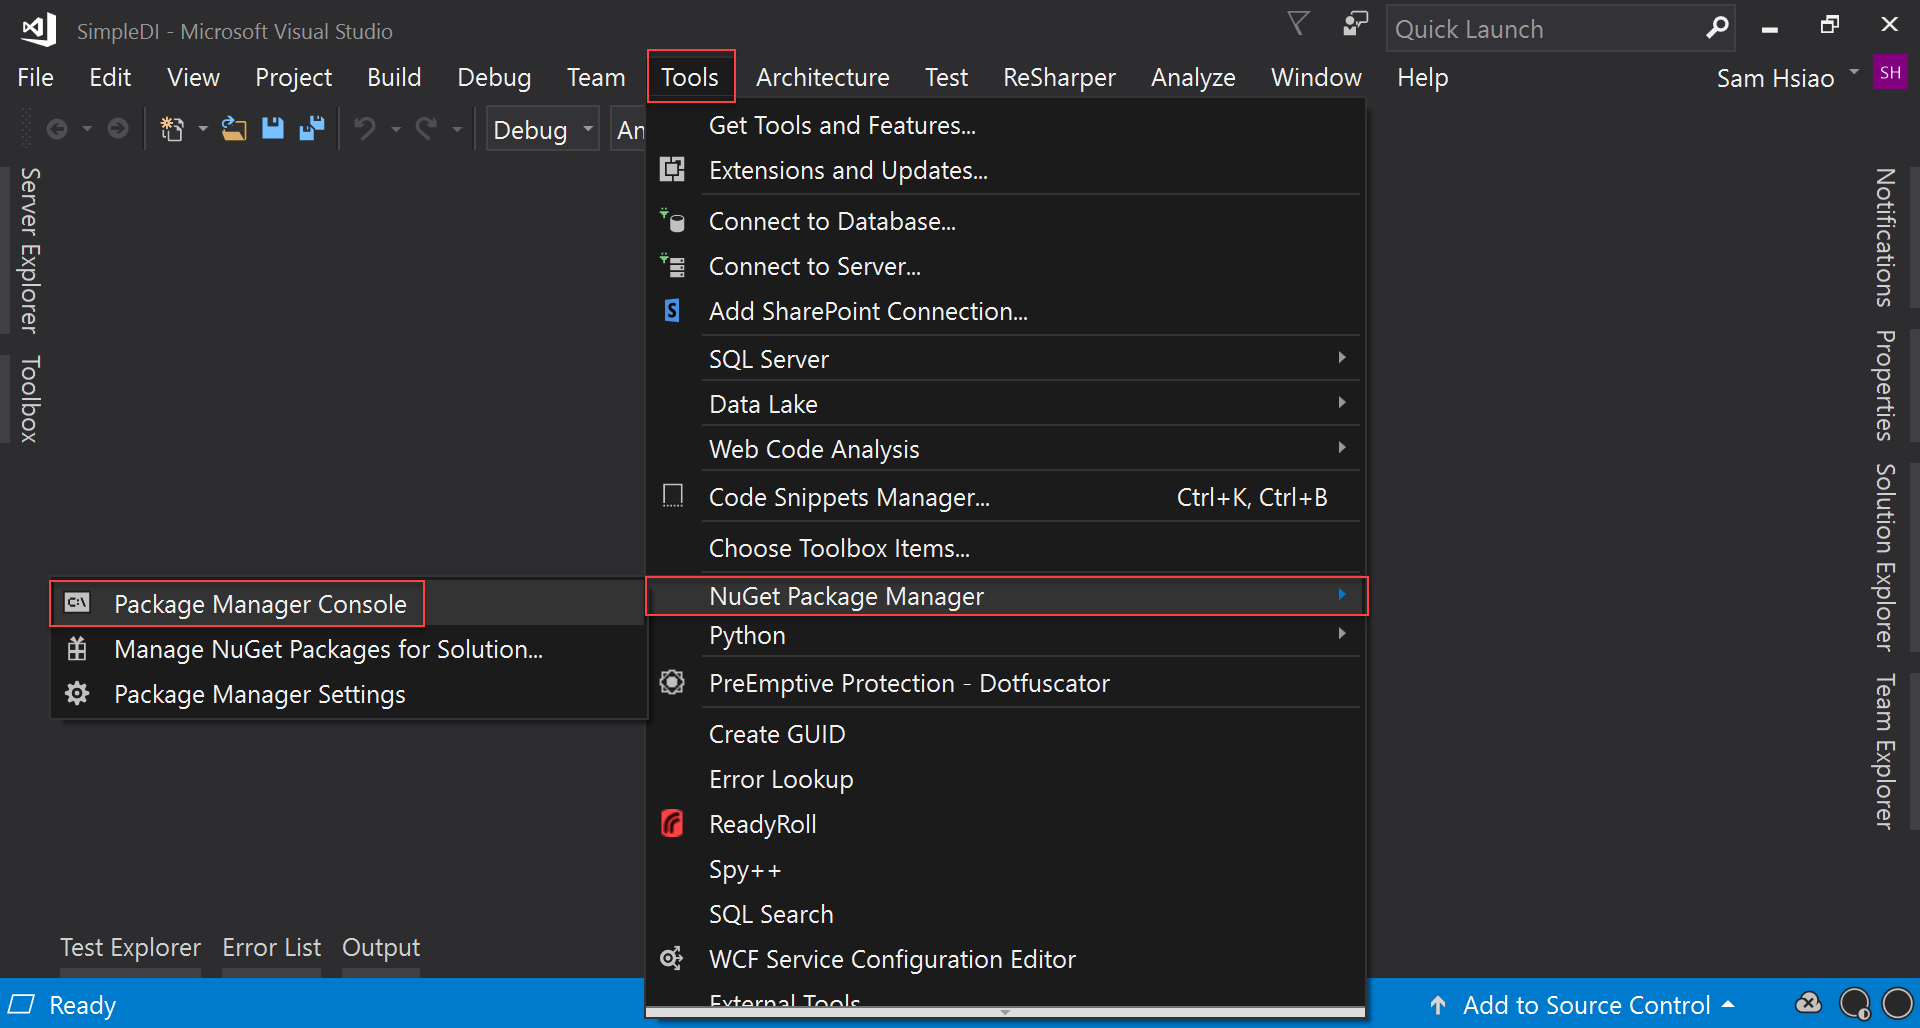
Tools -> NuGet Package Manager -> Package Manager Console
啟動 package manager console
1 | PM> Install-Package Microsoft.Extensions.DependencyInjection |
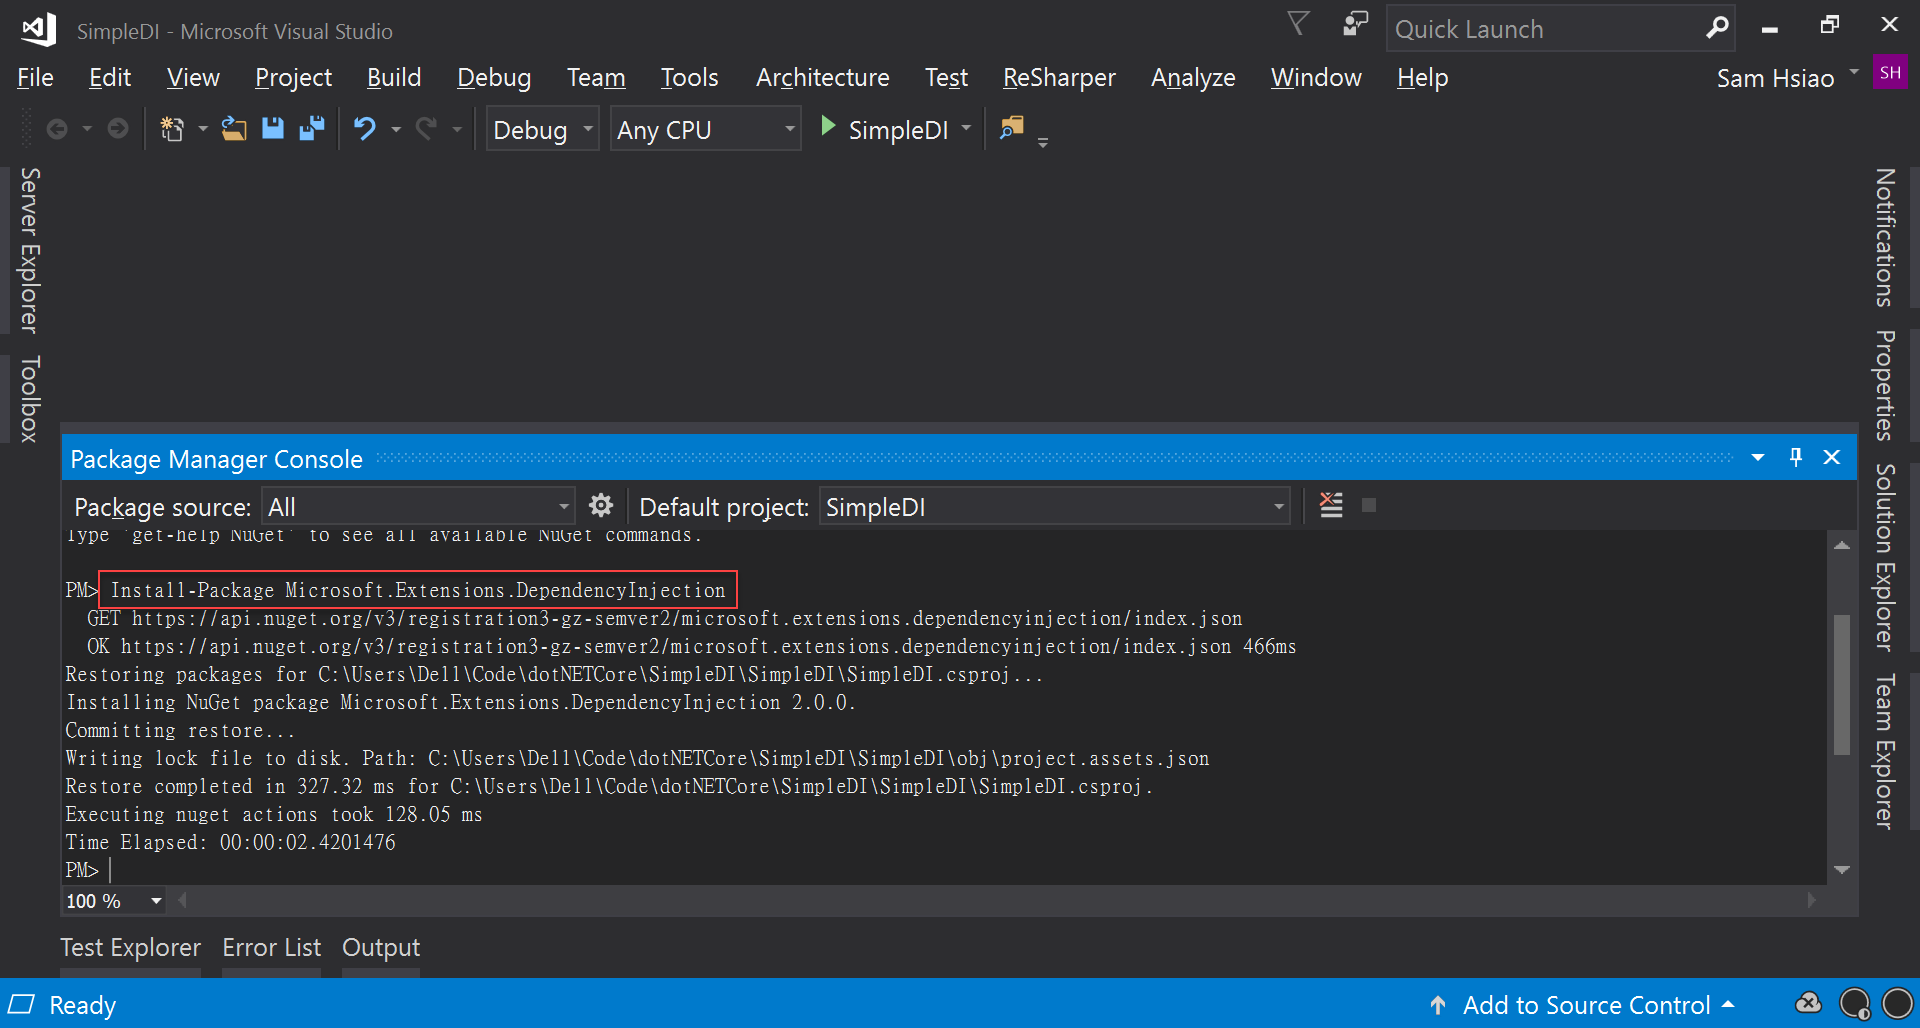
使用 Install-Package 指令安裝 Microsoft.Extensions.DependencyInjection 套件。

安裝完成後,在 Dependencies 下的 NuGet 會看到 Microsoft.Extensions.DependencyInjection 套件。
IPaymentService
IPaymentService.cs
1 | interface IPaymentService |
因為 OrderService 為 PaymentService 的高階模組,由 OrderService 定義出 IPaymentService,由 PaymentService 所依賴。
PaymentService
PaymentService.cs
1 | class PaymentService : IPaymentService |
低階模組 PaymentService 實現 (依賴) IPaymentService。
IOrderService
IOrderService.cs
1 | interface IOrderService |
因為 OrderController 為 OrderService 的高階模組,由 OrderController 定義出 IOrderService,由 OrderService 所依賴。
OrderService
OrderService.cs
1 | class OrderService: IOrderService |
低階模組 OrderService 實現 (依賴) IOrderService。
第 3 行
1 | private readonly IPaymentService paymentService; |
我們宣告了 IPaymentService 型別的 field,注意此為抽象型別 interface,而非具體型別,所以 OrderService 不會直接依賴 PaymentService,而是依賴 IPaymentService,符合 依賴反轉原則 : 高階模組不直接依賴低階模組,而是依賴抽象。
第 5 行
1 | public OrderService(IPaymentService paymentService) |
PaymentService 由 constructor 的參數傳進來,而不是直接 new 在 constructor 內。
如此 OrderService 的相依物件,就可透過 constructor 傳進來,從此高階模組 OrderService 就不再直接相依於低階模組 PaymentService,而是由更高階模組 OrderController 決定 OrderService 該依賴什麼物件,再由 constructor 參數傳進來,這就是 依賴注入。
注意 constructor 參數的型別是 IPaymentService,而不是 PaymentService,如此才會符合 依賴反轉原則 : 高階模組不直接依賴低階模組,而是依賴抽象。
我們改用 依賴注入 後有幾個優點 :
- 由原本相依於
PaymentService,改相依於IPaymentServiceinterface,符合依賴反轉原則 - 原本直接在 constructor 去
new,高階模組無法抽換低階模組,現在高階模組可透過 constructor 直接換掉低階模組,原來的OrderService程式碼不用變動,符合開放封閉原則 - 單元測試時,可直接透過 constructor 注入 mock 物件隔離測試
OOP 心法
若使用 DI 寫法,則不須再使用
new,讓程式碼更為乾淨,類似 static class 只要一行程式碼就可解決
10 行
1 | public void CreateOrder() |
由 CreateOrder() 去呼叫 PaymentService.PayCreditCard(),其中也因為要呼叫 PaymentService 的 PayCreditCard(),根據 界面隔離原則,因此 IPaymentService 有 PayCreditCard()。
OrderController
OrderController.cs
1 | class OrderController |
第 3 行
1 | private readonly IOrderService orderService; |
我們宣告了 IOrderService 型別的 field,注意此為抽象型別 interface,而非具體型別,所以 OrderController 不會直接依賴 OrderService,而是依賴 IOrderService,符合 依賴反轉原則 : 高階模組不直接依賴低階模組,而是依賴抽象。
第 5 行
1 | public OrderController(IOrderService orderService) |
OrderController 由 constructor 的參數傳進來,而不是直接 new 在 constructor 內。
如此 OrderController 的相依物件,就可透過 constructor 傳進來,從此高階模組 OrderController 就不再直接相依於低階模組 OrderService,而是由更高階模組 Program 決定 OrderController 該依賴什麼物件,再由 constructor 參數傳進來,這就是 依賴注入。
注意 constructor 參數的型別是 IOrderService,而不是 OrderService,如此才會符合 依賴反轉原則 : 高階模組不直接依賴低階模組,而是依賴抽象。
第 10 行
1 | public void Index() |
由 Index() 去呼叫 OrderService.CreateOrder(),其中也因為要呼叫 OrderService 的 CreateOrder(),根據 界面隔離原則,因此 IOrderService 有 CreateOrder()。
Program
Program.cs
1 | class Program |
OrderController 與 OrderService 都已經用了 依賴注入,讓我們可以在 constructor 注入相依的 OrderService 與 PaymentService,傳統我們會這樣建立 OrderController :
1 | class Program |
由於 OrderController 與 OrderService 都使用了 依賴注入,所以必須使用巢狀的 new 才能將 低階模組 的相依物件一一注入。
目前只是很簡單的 3 個 service,用戶端就已經出現很複雜的寫法,實務上的 低階模組 會多,new 的寫法會更加複雜。
此時我們需要使用 依賴注入容器 (DI Container / IoC Container)。
第 5 行
1 | var services = new ServiceCollection(); |
要讓 DI container 幫我們 new,首先必須告訴 DI container :
當遇到 xxx interface 時,請幫我注入 yyy class
.NET 提供了 ServiceCollection,由它負責蒐集所有 interface 與 class 的 mapping。
AddTrasient(): 每次注入時,都重新new一個新的 instanceAddScoped(): 每個 request 都重新new一個新的instanceAddSingleton(): 程式啟動後會new一個 instance,之後會重複使用,也就是運行期間只有一個 instance
泛型參數部份 :
- 若只有 class,沒有 interface,如
OrderController:- 只須傳入第一個參數為 class
- 若有 interface 與對應 class
- 第一個參數為 interface
- 第二個參數為 class
也就是告訴 ServiceCollection,當 constructor 的型別為此 interface 時,請幫我 new 這個 class。
1 | public static IServiceCollection AddTransient<TService, TImplementation>(this IServiceCollection services) |
其中 TImplementation 的 constraint 為 TService,也就是若你這樣寫
1 | services.AddTransient<IPaymentService, OrderService>(); |
因為 OrderService 根本沒有實作 IPaymentService,編譯會錯誤。
OOP 心法
在使用泛型時,一定要搭配 constraint,才會發揮泛型的威力
10 行
1 | var serviceProvider = services.BuildServiceProvider(); |
DI container 要靠 service provider 來建立 object,所以下一步要靠 ServiceCollection.BuildServiceProvider() 先產生 ServiceProvider。
12 行
1 | OrderController orderController = serviceProvider.GetService<OrderController>(); |
之後就可用 ServiceProvider.GetService() 來建立 object,而不須使用巢狀 new。
DI 常犯錯誤
- 若只有 class,則
GetService()泛型參數傳入 class- 若有 interface,則
GetService()泛型參數要傳的是 interface,而不是 class,因為 constructor 宣告的是 interface 型別,不是 class 型別。Q : 使用 service provider 建立 object,與自己
newobject,差別在哪裡 ?
A : 你只須用 service provider 建立最外層的 object 即可,剩下相依物件,DI container 會幫你建立;但若你使用 new,怎每一層的相依物件都要自己處理。
13 行
1 | orderController.Index(); |
orderController 已經被 DI container 建立,就可以使用一般的方式使用 method。
Q : 依賴注入與 DI container 除了讓我們不用複雜的
new,還有其他優點嗎 ?
1 | class Program |
在沒有使用 依賴注入 與 DI container 之前,Program 只能去 new OrderController(),至於 OrderController 用了哪些相依物件,高階模組 Program 無法決定,也就是高階模組已經被低階模組綁死了,無從決定低階模組到底用了什麼相依物件。
1 | class Program |
第 5 行
1 | var services = new ServiceCollection(); |
高階模組 Program 可以決定低階模組 OrderController 與 OrderService 相依什麼物件,只要在 ServiceCollection 加以定義即可。
也就是高階模組不再相依於低階模組,而是高階模組可以自行定義低階模組的相依物件,符合 依賴反轉原則。
Q : 高階模組能決定低階模組有什麼意義呢 ?
一旦高階模組可以決定低階模組,就可以在程式一開始 if else 就決定使用那些低階模組,決定之後,程式就可以很簡單的執行,不須再 if else 判斷。
但若高階模組無法決定低階模組,則在低階模組勢必增加很多 if else 判斷,判斷在什麼條件下,使用什麼低階模組,而且 if else 會分散在各低階模組,程式複雜度會提高。
Conclusion
- Console app 無法使用 DI container,須自行安裝
Microsoft.Extensions.DependencyInjection,可使用 GUI 安裝,可以使用指令安裝 - DI 可以讓程式碼更乾淨,用起來類似 static 只要一行
- DI container 讓
依賴注入更容易實現,尤其在用戶端可以完全掌握低階模組的相依物件,完全符合依賴反轉原則
Sample Code
完整的範例可以在我的 GitHub 找到。
Reference
John Wu, ASP.NET Core 教學 - Dependency Injection
Microsoft, Introduction to Dependency Injection in ASP.NET Core
Joonas W, ASP.NET Core Dependency Injection Deep Dive
ASP.NET Hacker, Using Dependency Injection in .NET Core Console Apps


