如何測試 Repository 模式 (使用 SQLite)?
一般我們會把資料庫邏輯寫在 repository,只要有邏輯,就需要去寫測試,畢竟我們寫的程式,可能跟我們想的不一樣。由於 repository 寫的是資料庫邏輯,所以勢必要真的去讀寫資料庫。但若真的去讀寫 MySQL,速度會比較慢,且資料庫本來就有一些資料,可能會影響測試的結果,因此比較理想的方式是測試時改讀寫 SQLite In-Memory Database。
Version
Laravel 5.2.29
PHPUnit 4.8.24
PhpStorm 2016.1
Repository 模式
初學者常會商業邏輯與資料庫邏輯同時寫在 controller 內,如我們想將最新的 3 筆文章顯示在 view。1
2
3
4
5
6
7
8
9
10class PostsController extends Controller {
{
$posts = Post::orderBy('id', 'desc')
->take(3)
->get();
$data = compact($posts);
return View('posts.index', $data);
}
這段程式碼在執行上沒有問題,但在設計上有幾個問題 :
違反 SOLID 的單一職責原則,controller 原本該有的職責應該是商業邏輯,但現在卻將資料庫邏輯直接寫在 controller 內,這已經超出原本 controller 的職責,將會導致日後 controller 過於肥大而難以維護。1 1單一職責原則 : 應該且僅有一個原因引起 class 的變更。
將資料庫邏輯直接寫在 controller 內,將來若有不同 controller 使用相同的資料庫邏輯,將無法重複使用。
由於 controller 內直接使用 Eloquent,表示 controller 直接相依於
Postmodel,若我們要對 controller 做單元測試,必須直接存取資料庫,這違反了隔離測試 ( isolated test ) 原則。2 2Isolated Test : 1.執行速度快 2.關注點分離 3.單一職責 4.可測試性 5.測試程式的健壯性為了隔離測試,我們會希望 mock 掉資料庫邏輯,然後透過依賴注入將 mock 物件注入 contoller,但在 controller 直接使用 model,導致無法使用依賴注入,因此無法執行單元測試。
比較好的方式是使用 repository 模式,將資料庫邏輯從 controller 中獨立出來寫在 repository,透過依賴注入將 repository注入controller。3 3詳細請參考如何使用 Repository 模式?
使用 repository 模式有以下好處 :
Repository 專心負責資料庫邏輯,符合單一職責原則,可避免 controller 過於肥大而難以維護。
資料庫邏輯從 controller 搬到 repository,因此不同的 controller 可以重複使用。
controller 不再直接相依於 model,而是透過依賴注入將 repository 注入 controller,符合依賴反轉原則,且測試時不用直接存取資料庫,達到隔離測試要求。4 4依賴反轉原則 : 高階模組不該依賴低階模組,兩者都該依賴其抽象。抽象不要依賴細節,細節要依賴抽象。
單元測試時直接 mock 掉 repository 即可,並透過依賴注入將 repository 注入到 controller,不用特別去 mock Eloquent model。
將資料庫邏輯從 controller 搬到 repository 之後,本文的重點就是討論該如何測試 repository 內的資料庫邏輯。
Test Factory Generator
Laravel 5 提出了 model factory,直接整合了 faker,讓我們在 seeding 與 testing 時更為方便,而 Test Factory Generator 會自動根據 migration 產生 model factory,讓我們連 model factory 都不用寫。
安裝套件
1 | oomusou@mac:~/MyProject$ composer require mpociot/laravel-test-factory-helper --dev |
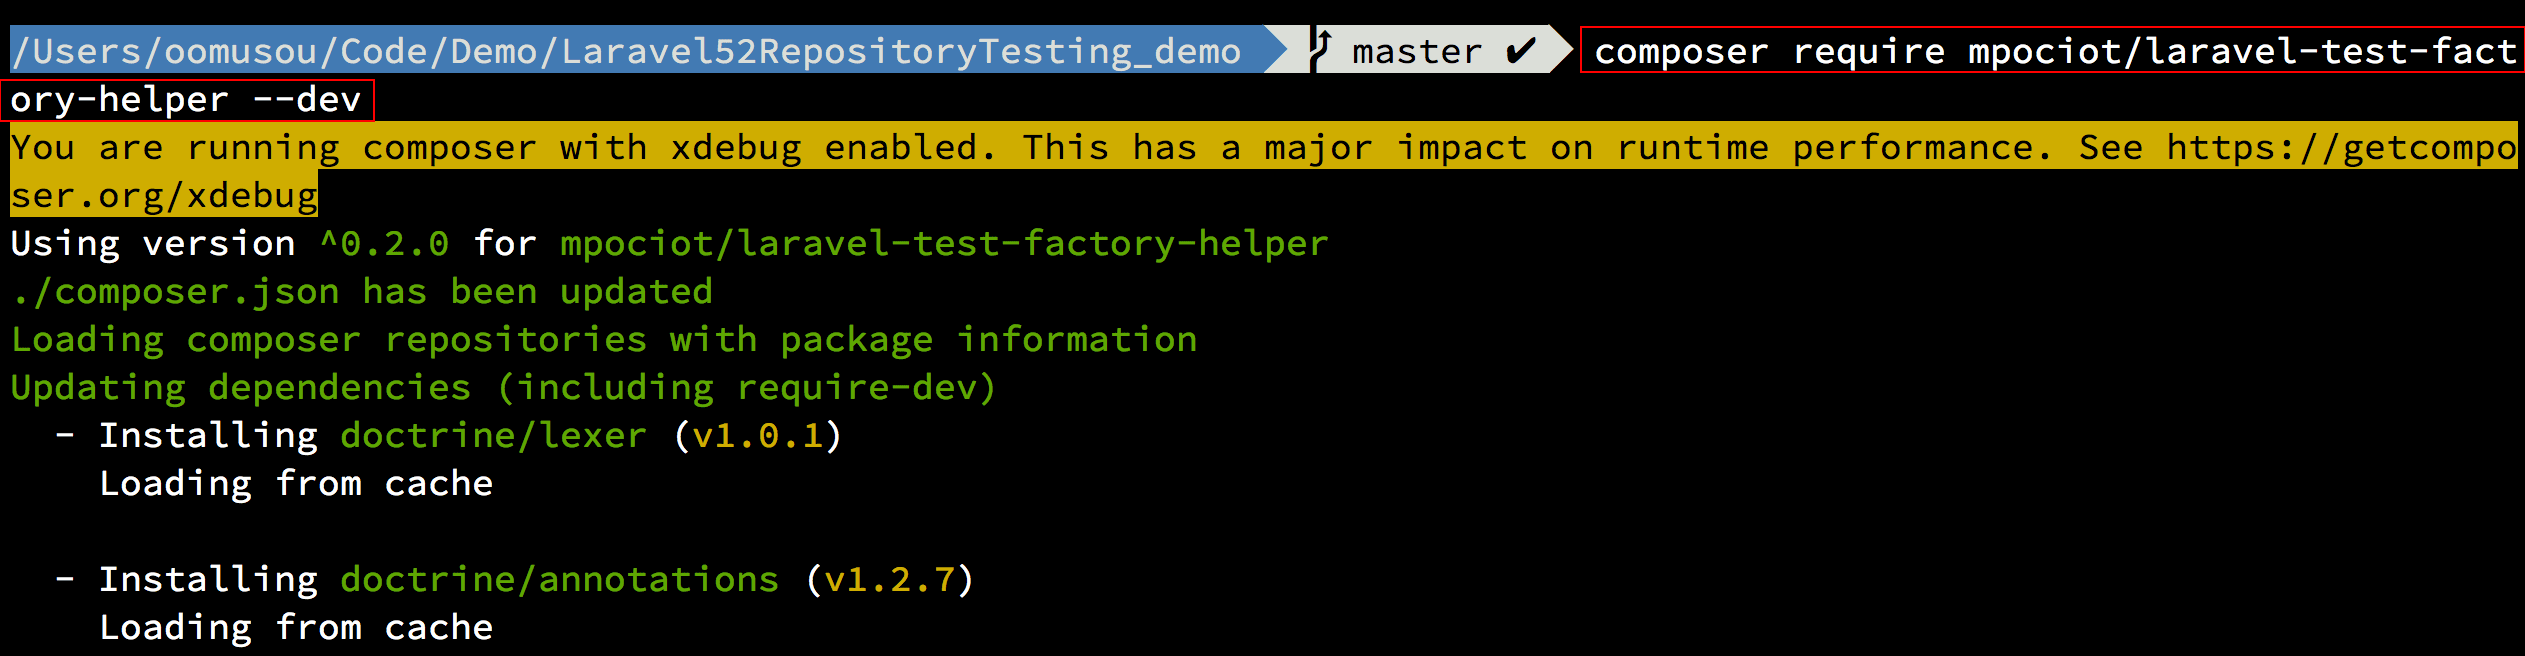
使用 composer 安裝 Test Factory Generator,因為此套件只會在開發使用,可以加上 --dev 參數。5 5關於 --dev 參數,詳細請參考如何使用 Laravel Debugbar #使用 Composer 安裝
新增 Service Provider
1 | Mpociot\LaravelTestFactoryHelper\TestFactoryHelperServiceProvider::class, |

在 config/app.php 中加入 TestFactoryHelperServiceProvider。6 6GitHub Commit : 安裝 Laravel Test Factory Generator
建立 Model 與 Migration
1 | oomusou@mac:~/MyProject$ php artisan make:model Post -m |
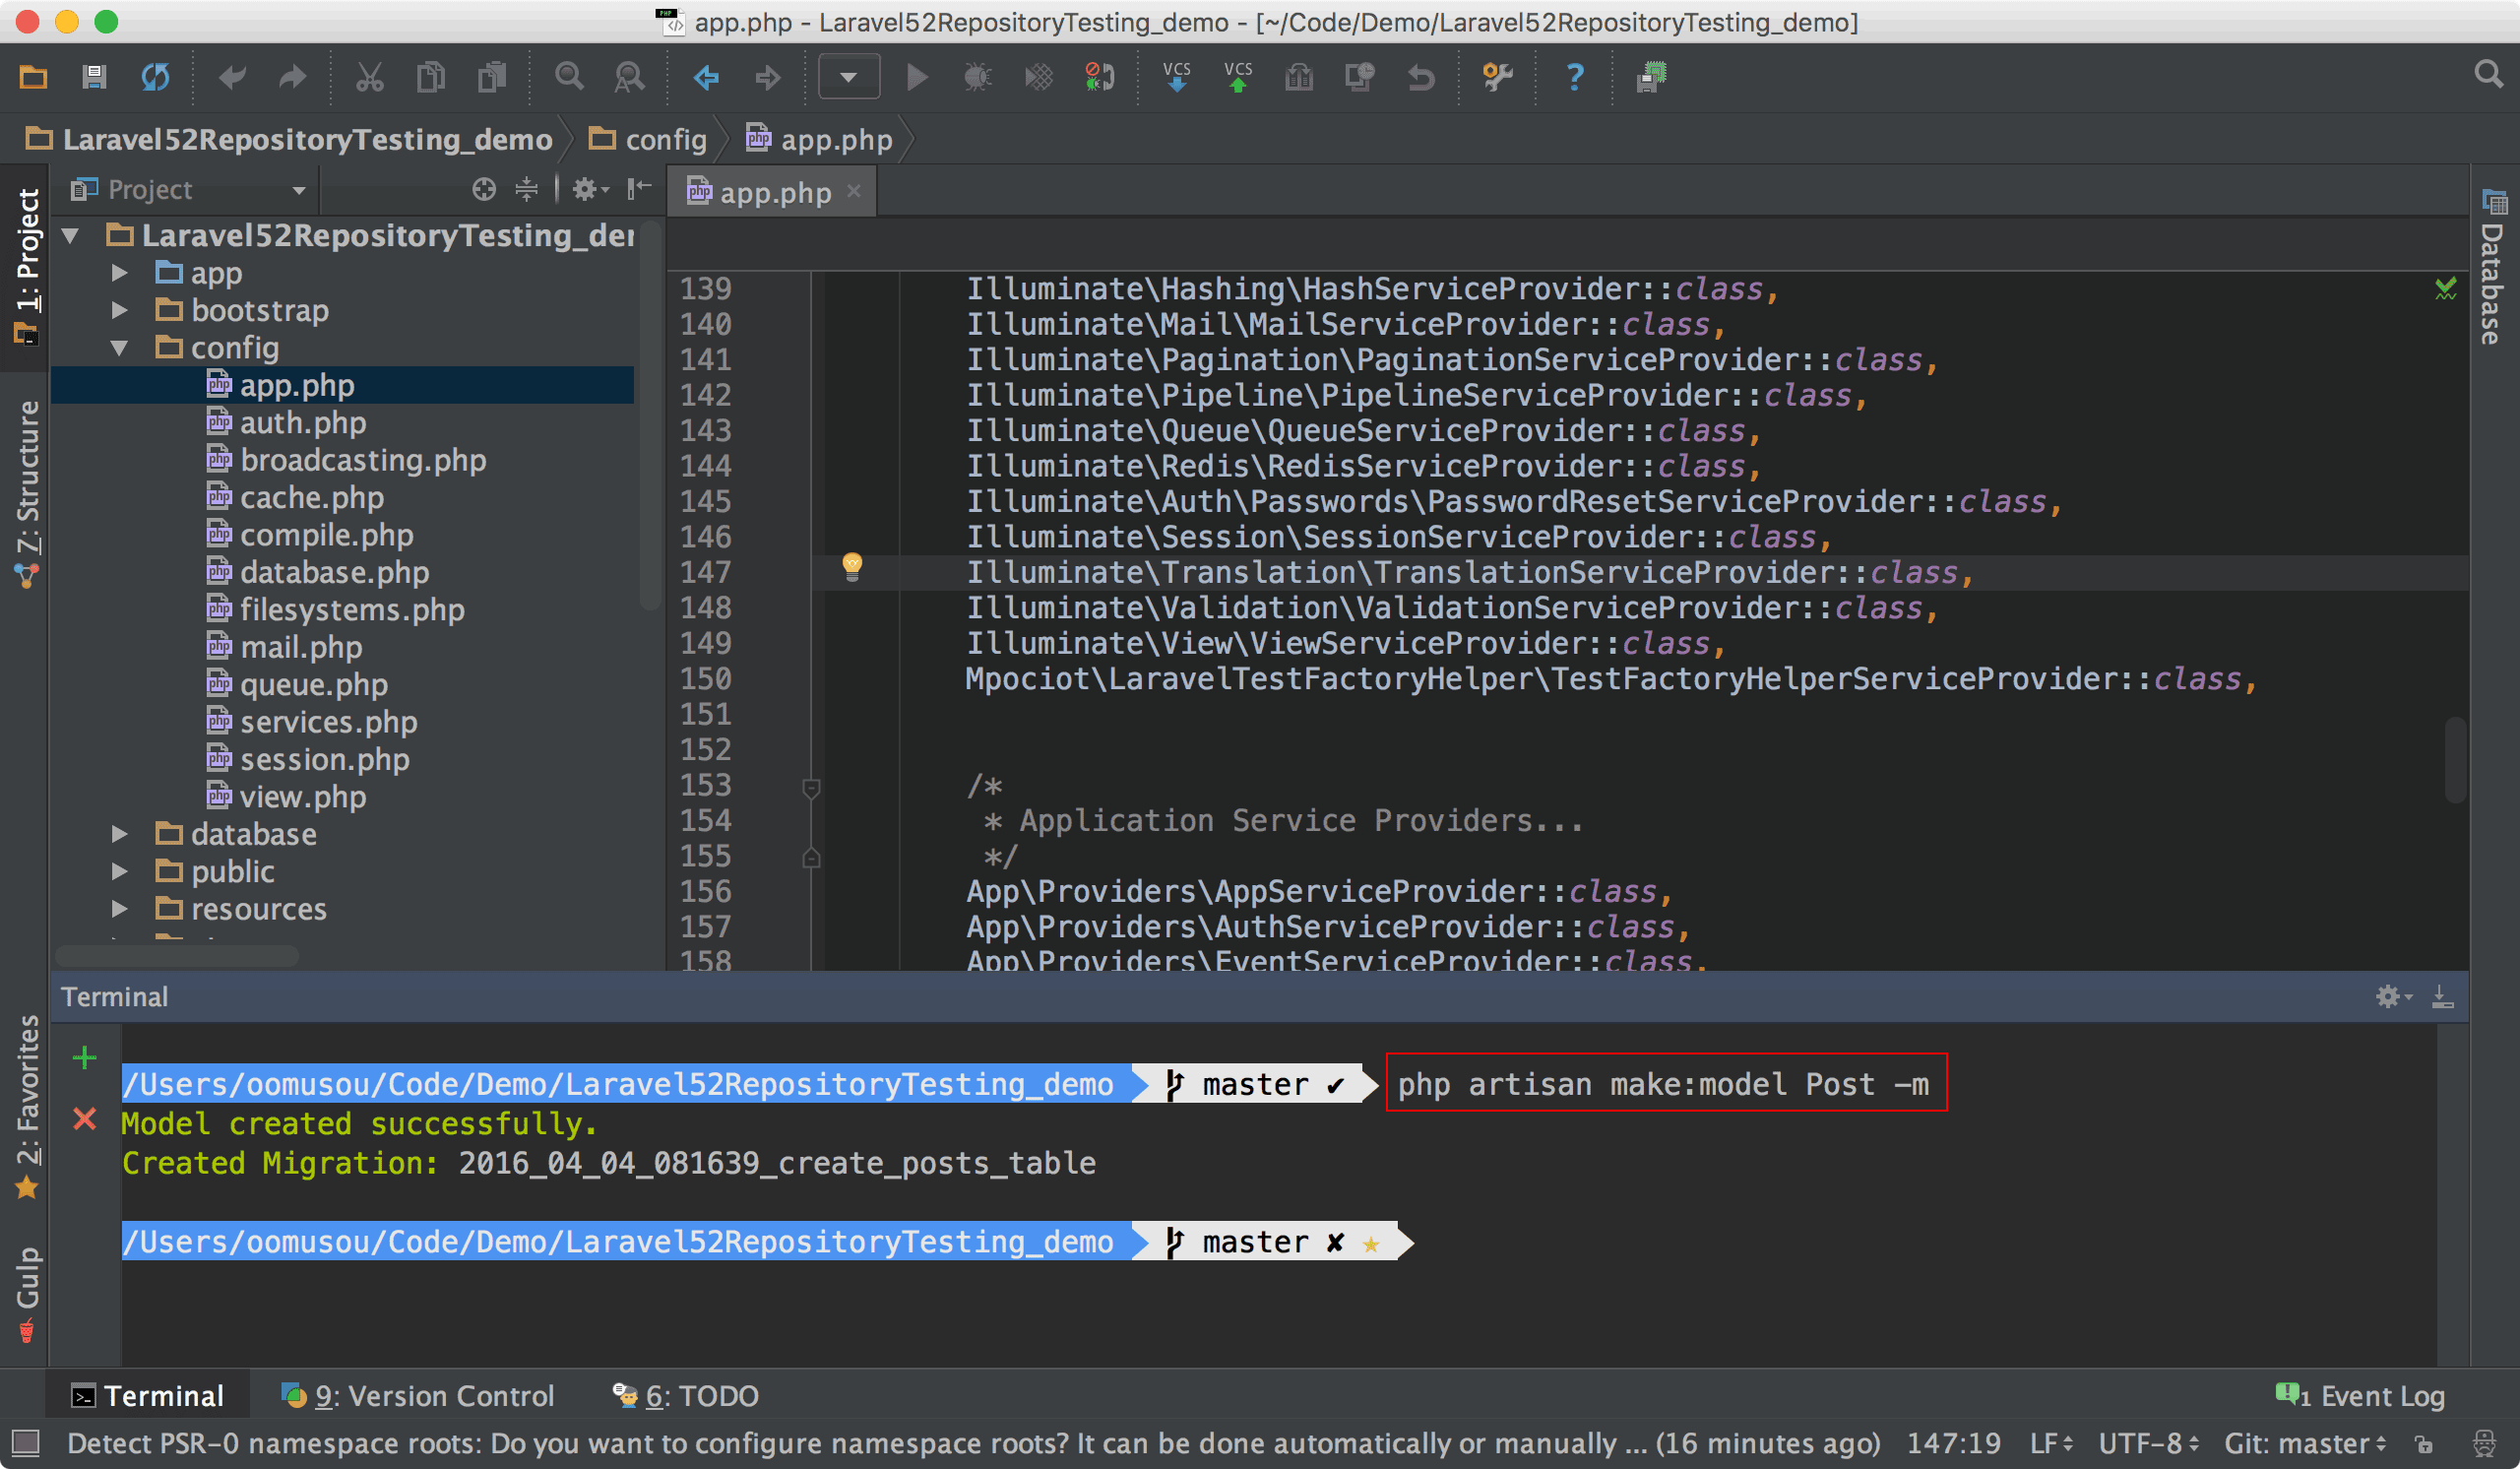
建立 Post model 與 migration,-m 讓我們在建立 model 時一併建立 migrarion。
會在 app 目錄下建立 Post.php,並在 database/migrations 目錄建立 migration 檔。
Post.php 7 7GitHub Commit : 建立Post.php
1 | namespace App; |
第7行1
2
3
4
5protected $fillable = [
'title',
'description',
'content'
];
定義當使用 mass assignment 時可以被修改的欄位,進而保護其他欄位不被修改。
create_posts_table.php 8 8GitHub Commit : 建立create_posts_table.php
1 | use Illuminate\Database\Schema\Blueprint; |
13行1
2
3
4
5
6
7 Schema::create('posts', function (Blueprint $table) {
$table->increments('id');
$table->string('title');
$table->string('description');
$table->text('content');
$table->timestamps();
});
加入 title、description 與 content 3 個欄位。
確認資料庫連線
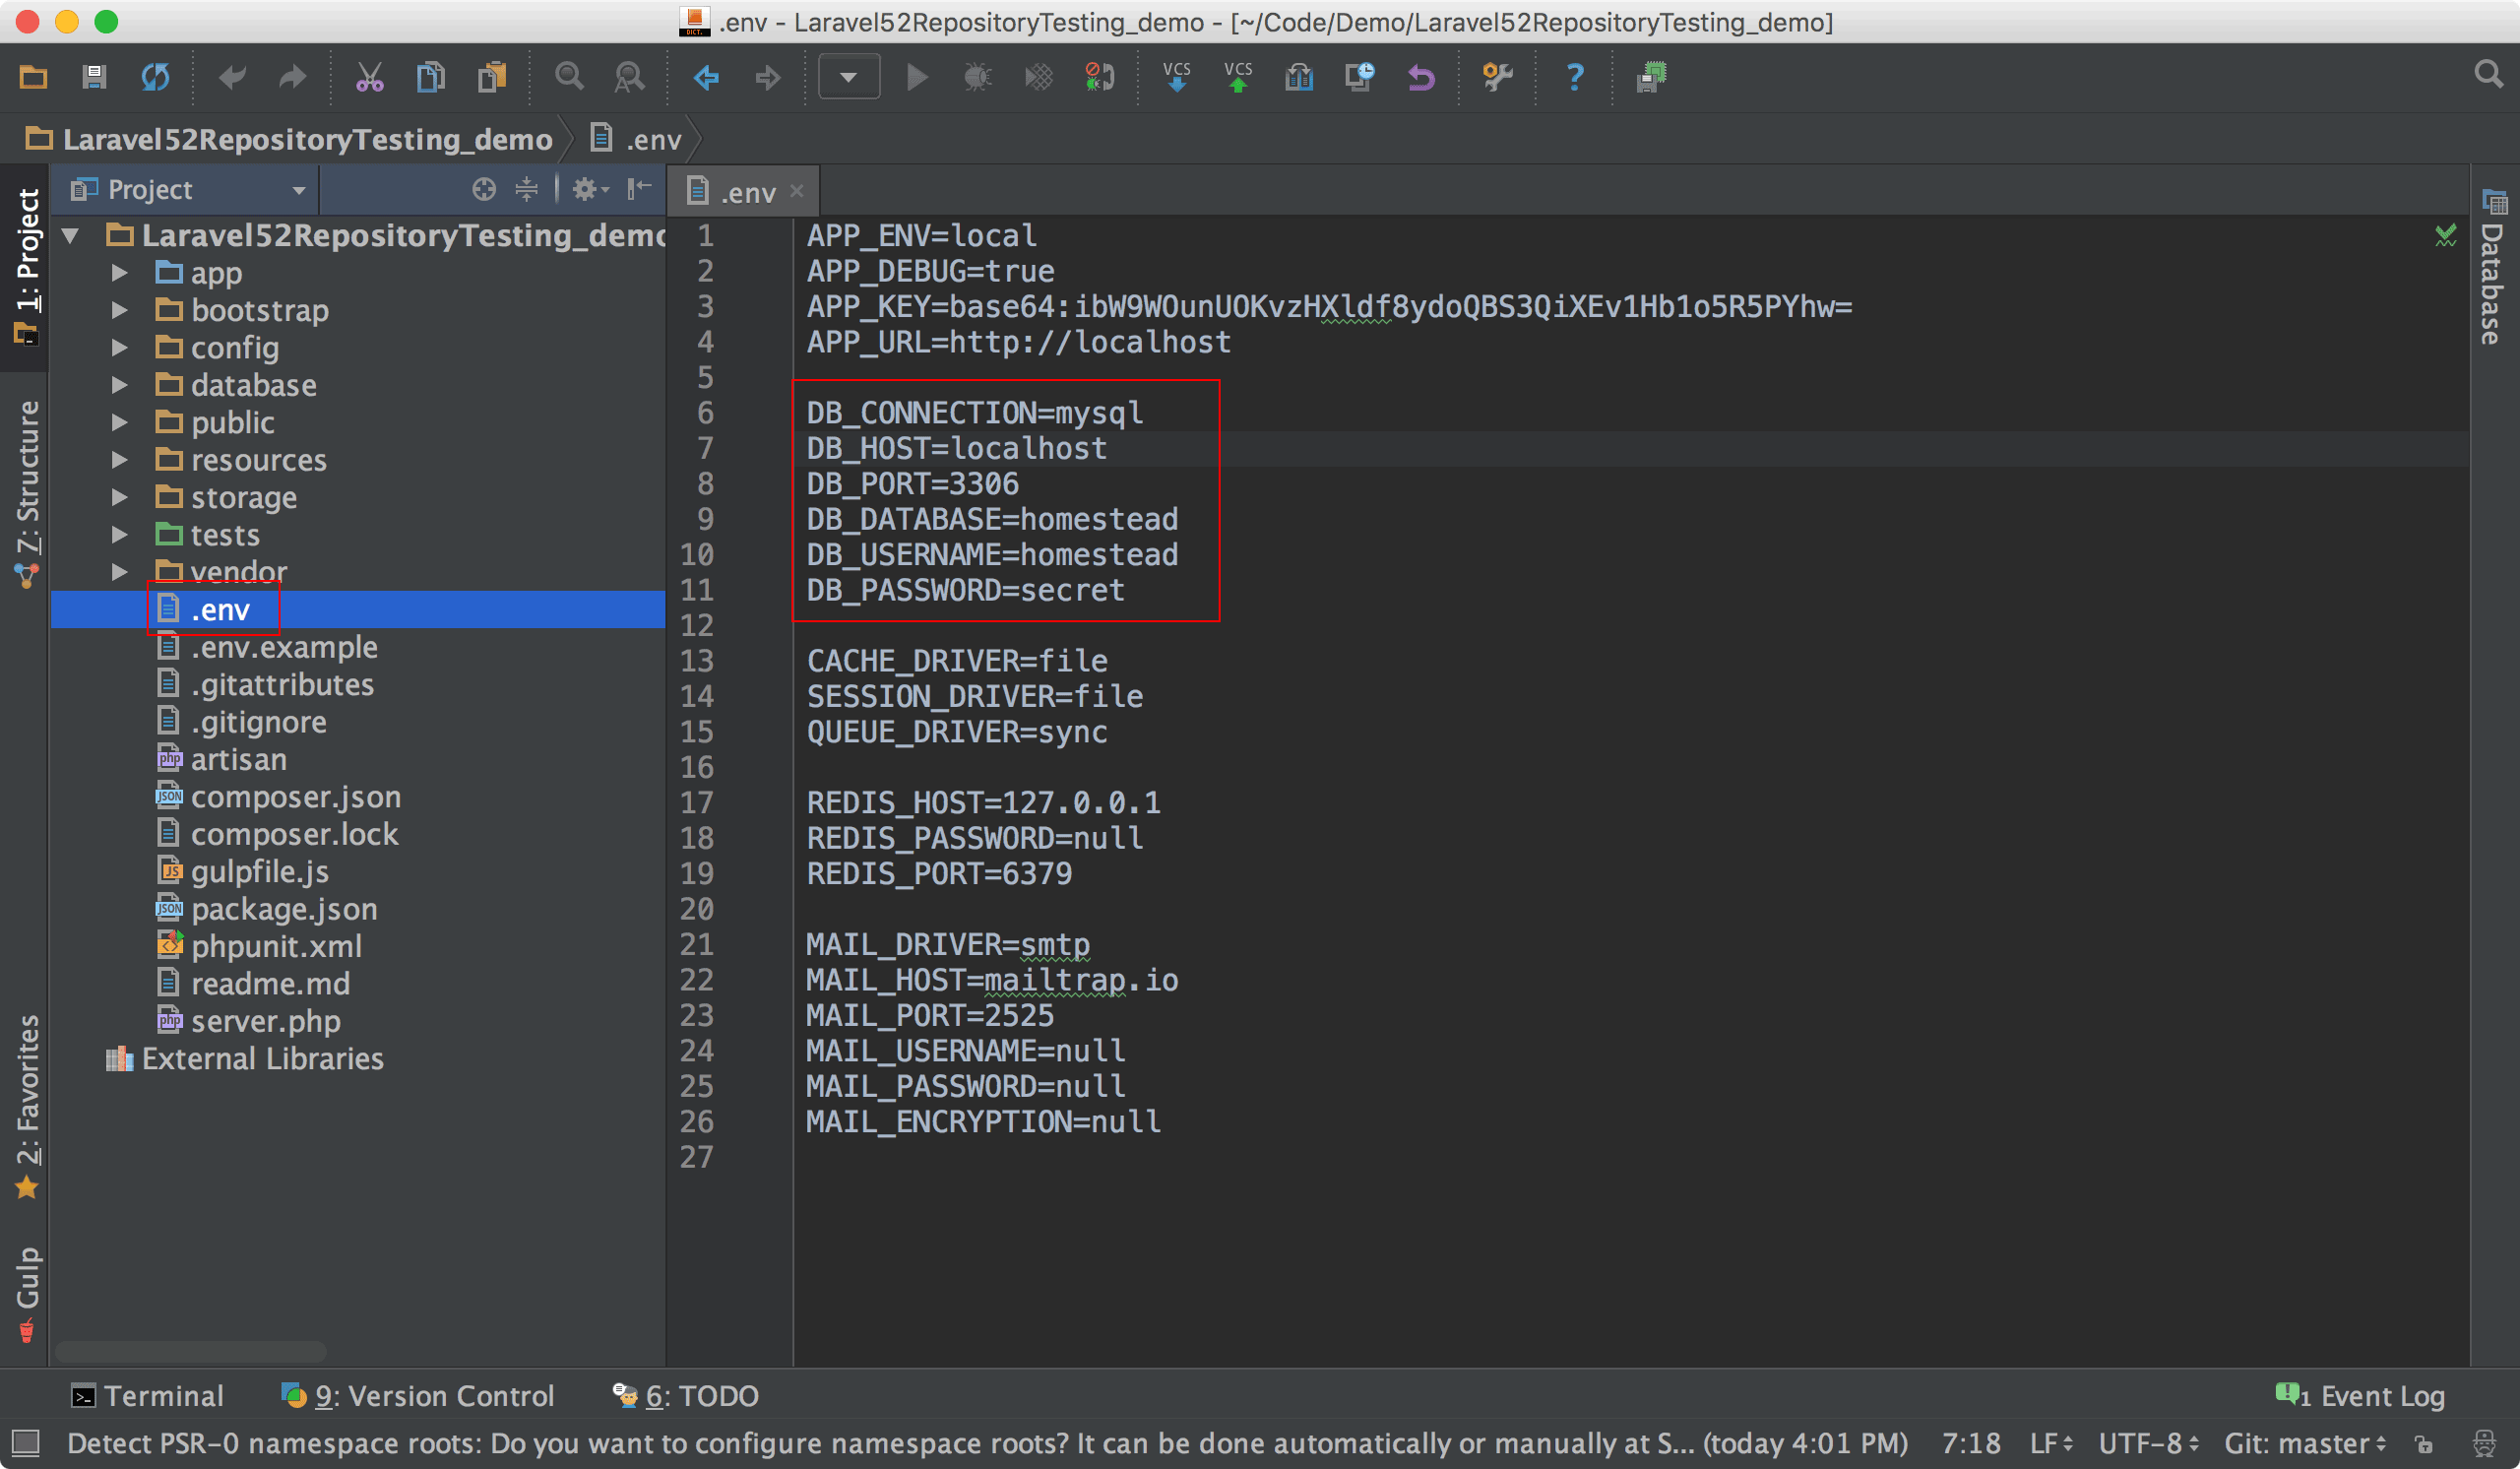
將來 Test Factory Generator 必須連上資料庫才能產生 model factory,必須西確定專案已經與資料庫順利連線。
執行 Migrate 1
oomusou@mac:~/MyProject$ php artisan migrate

執行 migrate 將 table 建立在 MySQL。
建立 Model Factory
測試 repository 時,將使用 model factory 幫我們建立測試資料。1
oomusou@mac:~/MyProject$ php artisan test-factory-helper:generate
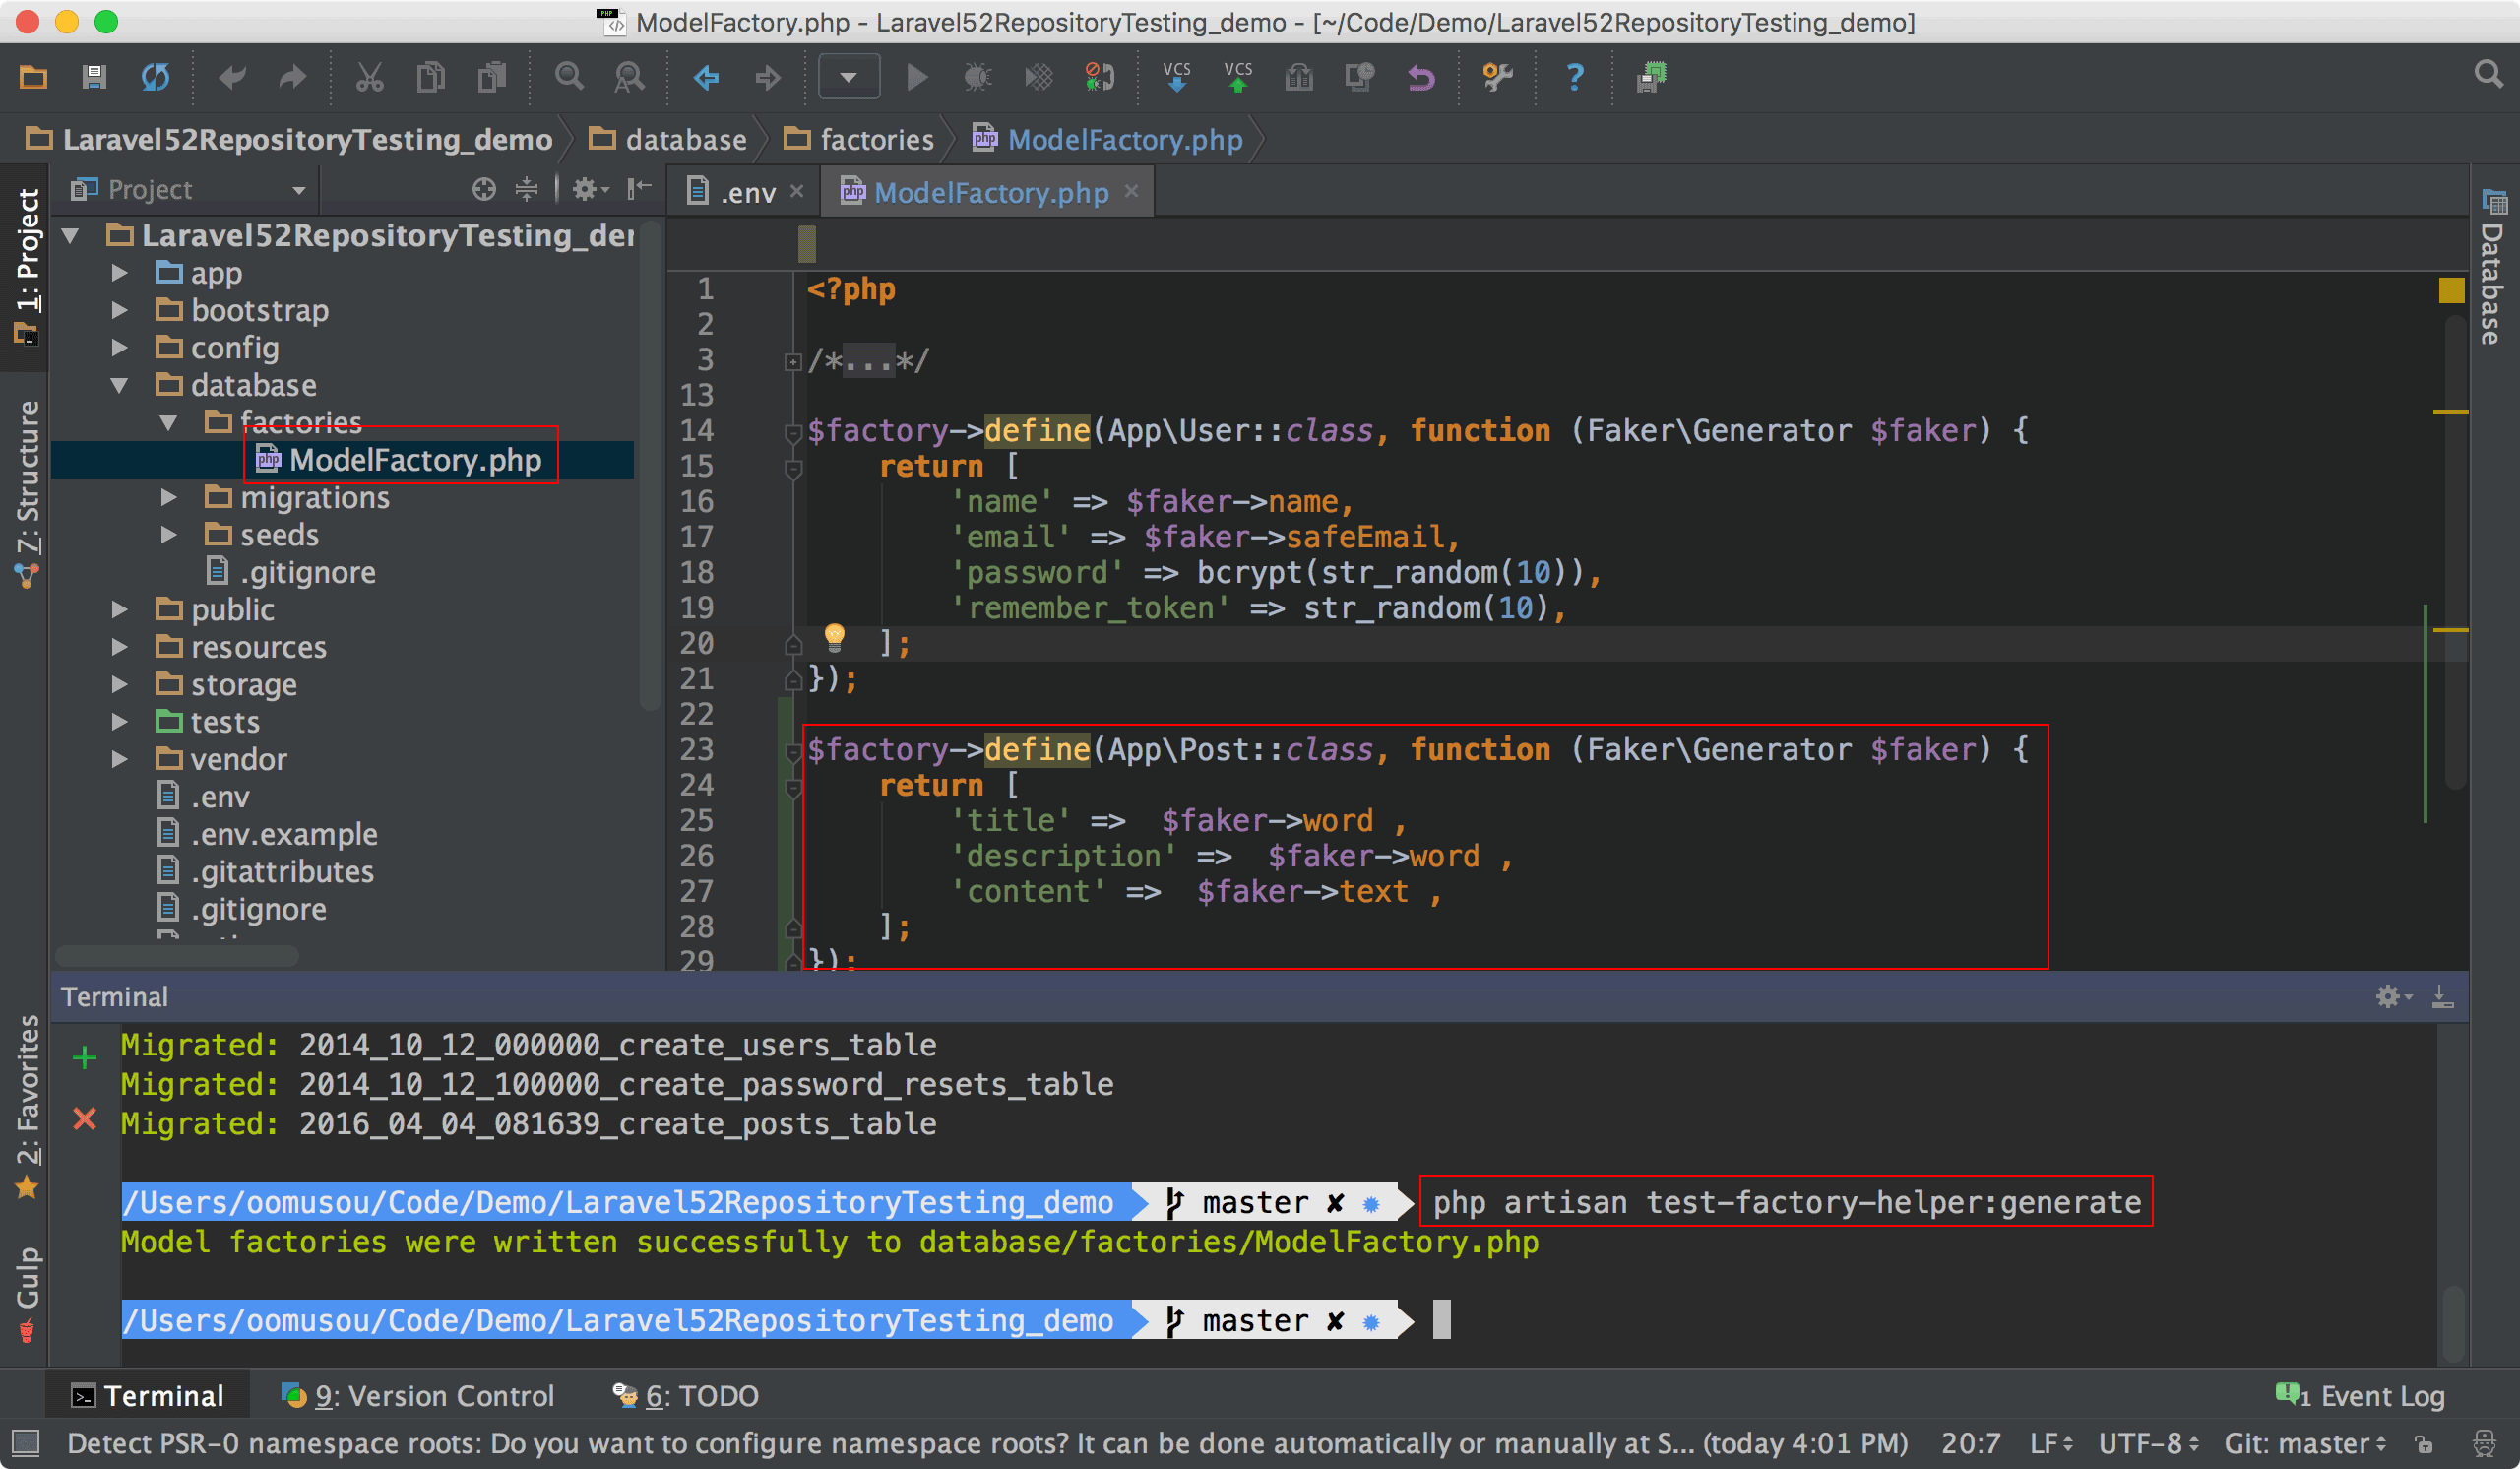
Test Factory Generator 幫我們自動建立 model factory。9 9GitHub Commit : 建立Model Factory
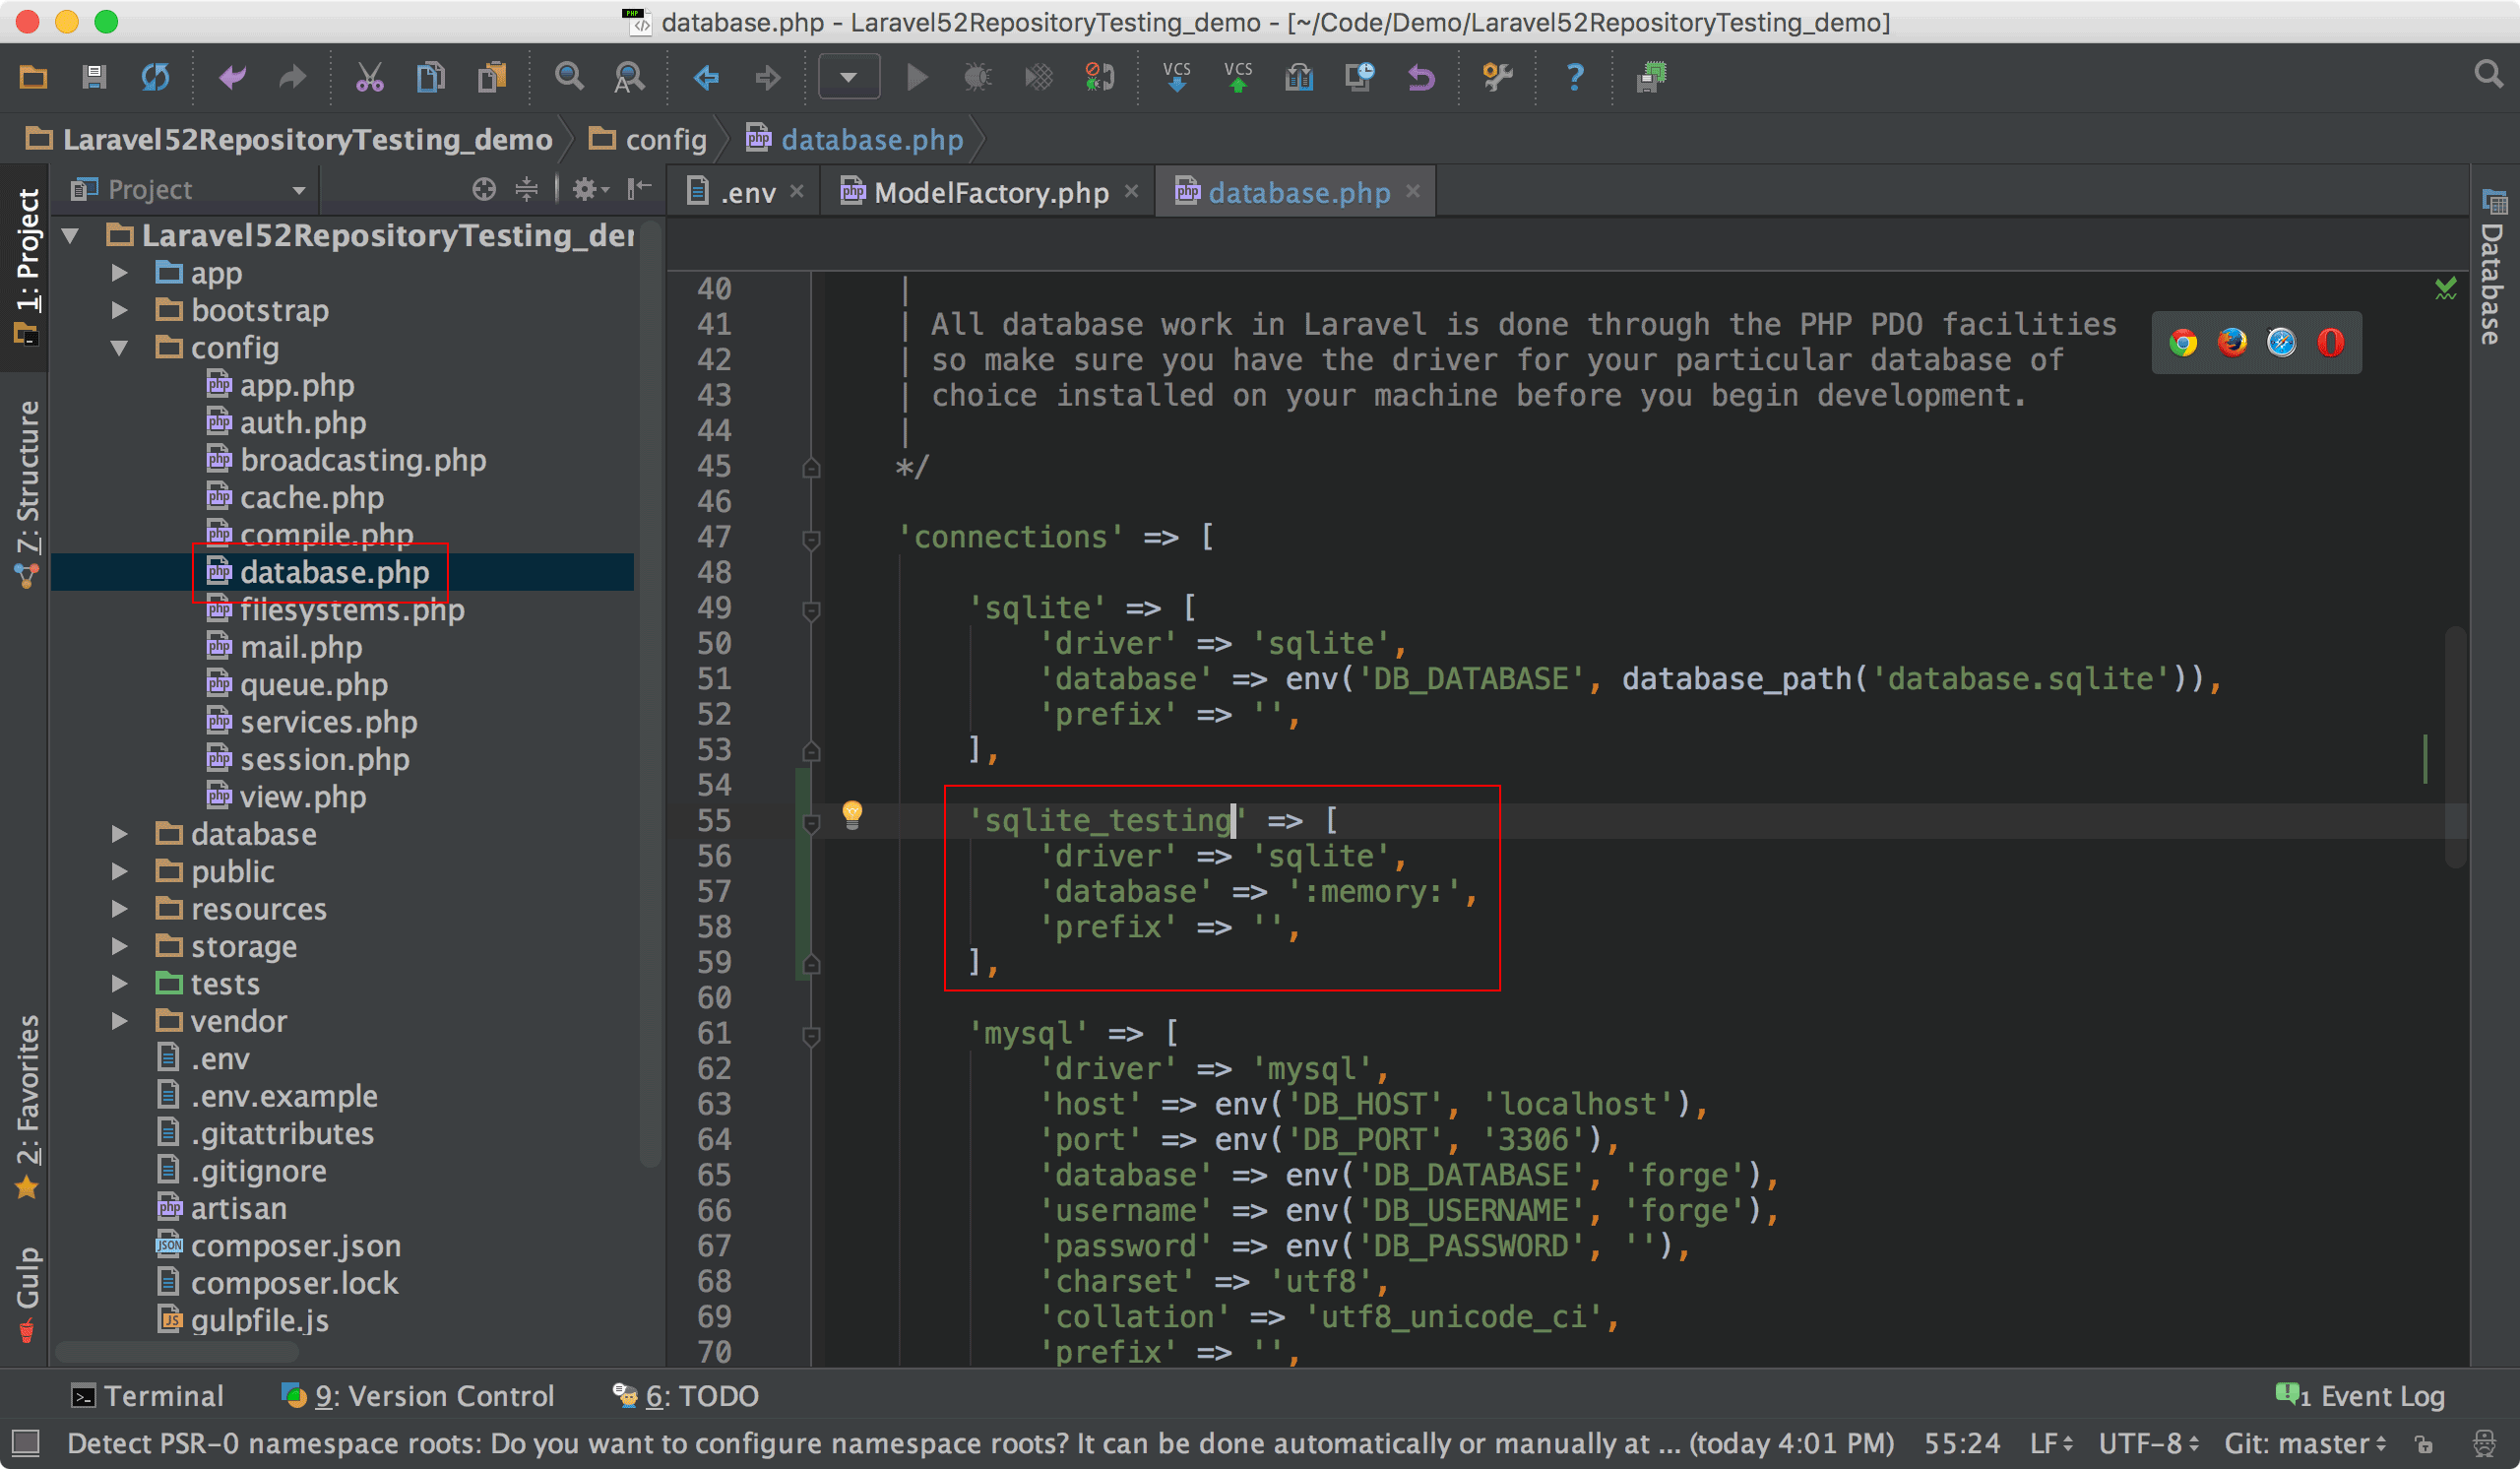
新增 SQLite In-Memory 連線
因為實際讀寫 MySQL 較慢,所以在單元測試時,會改用 SQLite In-Memory,速度快很多。
新增資料庫連線
database.php10 10GitHub Commit : 新增sqlite_testing資料庫連線1
2
3
4
5'sqlite_testing' => [
'driver' => 'sqlite',
'database' => ':memory:',
'prefix' => '',
],
修改phpunit.xml
phpunit.xml11 11GitHub Commit : 在 phpunit.xml 新增 DB_CONNECTION1
2
3
4
5
6
7
8
9
10
11
12
13
14
15
16
17
18
19
20
21
22
23
24
25
26
27
28
29
30
31<?xml version="1.0" encoding="UTF-8"?>
<phpunit backupGlobals="false"
backupStaticAttributes="false"
bootstrap="bootstrap/autoload.php"
colors="true"
convertErrorsToExceptions="true"
convertNoticesToExceptions="true"
convertWarningsToExceptions="true"
processIsolation="false"
stopOnFailure="false">
<testsuites>
<testsuite name="Application Test Suite">
<directory suffix="Test.php">./tests</directory>
</testsuite>
</testsuites>
<filter>
<whitelist processUncoveredFilesFromWhitelist="true">
<directory suffix=".php">./app</directory>
<exclude>
<file>./app/Http/routes.php</file>
</exclude>
</whitelist>
</filter>
<php>
    <env name="APP_ENV" value="testing"/>
    <env name="CACHE_DRIVER" value="array"/>
    <env name="SESSION_DRIVER" value="array"/>
    <env name="QUEUE_DRIVER" value="sync"/>
    <env name="DB_CONNECTION" value="sqlite_testing"/>
</php>
</phpunit>
24行1
2
3
4
5
6
7<php>
<env name="APP_ENV" value="testing"/>
<env name="CACHE_DRIVER" value="array"/>
<env name="SESSION_DRIVER" value="array"/>
<env name="QUEUE_DRIVER" value="sync"/>
<env name="DB_CONNECTION" value="sqlite_testing"/>
</php>
可在此建立 APP_ENV 為 testing 時的全域變數。
設定 DB_CONNECTION 為 sqlite_testing,當跑測試時,將會使用 sqlite_testing 資料庫連線。
測試 SQLite In-Memory 連線
ExampleTest.php 為 Laravel 預設的測試範例,其中包含了 testBasicExample(),示範了如何測試預設的 welcome.blade.php 是否正確執行。
DatabaseMigration Trait
ExampleTest.php12 12GitHub Commit : 測試 SQLite In-Memory 連線1
2
3
4
5
6
7
8
9
10
11
12
13
14
15
16
17
18
19
20
21
22
23
24
25
26
27
28
29
30
31
32
33use App\Post;
use Illuminate\Foundation\Testing\DatabaseMigrations;
class ExampleTest extends TestCase
{
use DatabaseMigrations;
/**
* A basic functional test example.
*
* @return void
*/
public function testBasicExample()
{
$this->visit('/')
->see('Laravel 5');
}
/**
 * @test
 */
public function 測試SQLiteInMemory連線()
{
    /** arrange */
    $expected = 0;

    /** act */
    $actual = Post::all();

    /** assert */
    $this->assertCount($expected, $actual);
}
}
第6行1
use DatabaseMigrations;
因為目前測試使用的是 SQLite In-Memory,每個測試案例行完後,SQLite 就會釋放在記憶體中的資料庫,因此每個測試案例執行前,都必須重新執行一次 migration。
以前 Laravel 4.2 時代,需要寫在 setUp() 去執行 Artisan::call('migrate')。
但在 Laravel 5 提供了很方便的 trait,只要在 class 內加上 use DatabaseMigrations; 即可,Laravel 會自動幫你執行 migration。
24行1
2
3
4
5
6
7
8
9
10
11
12
13
14/**
* @test
*/
public function 測試SQLiteInMemory連線()
{
/** arrange */
$expected = 0;
/** act */
$actual = Post::all();
/** assert */
$this->assertCount($expected, $actual);
}
由於只是測試連線是否成功,尚未跑 model factory,因此預期 Post model 的資料筆數為 0。
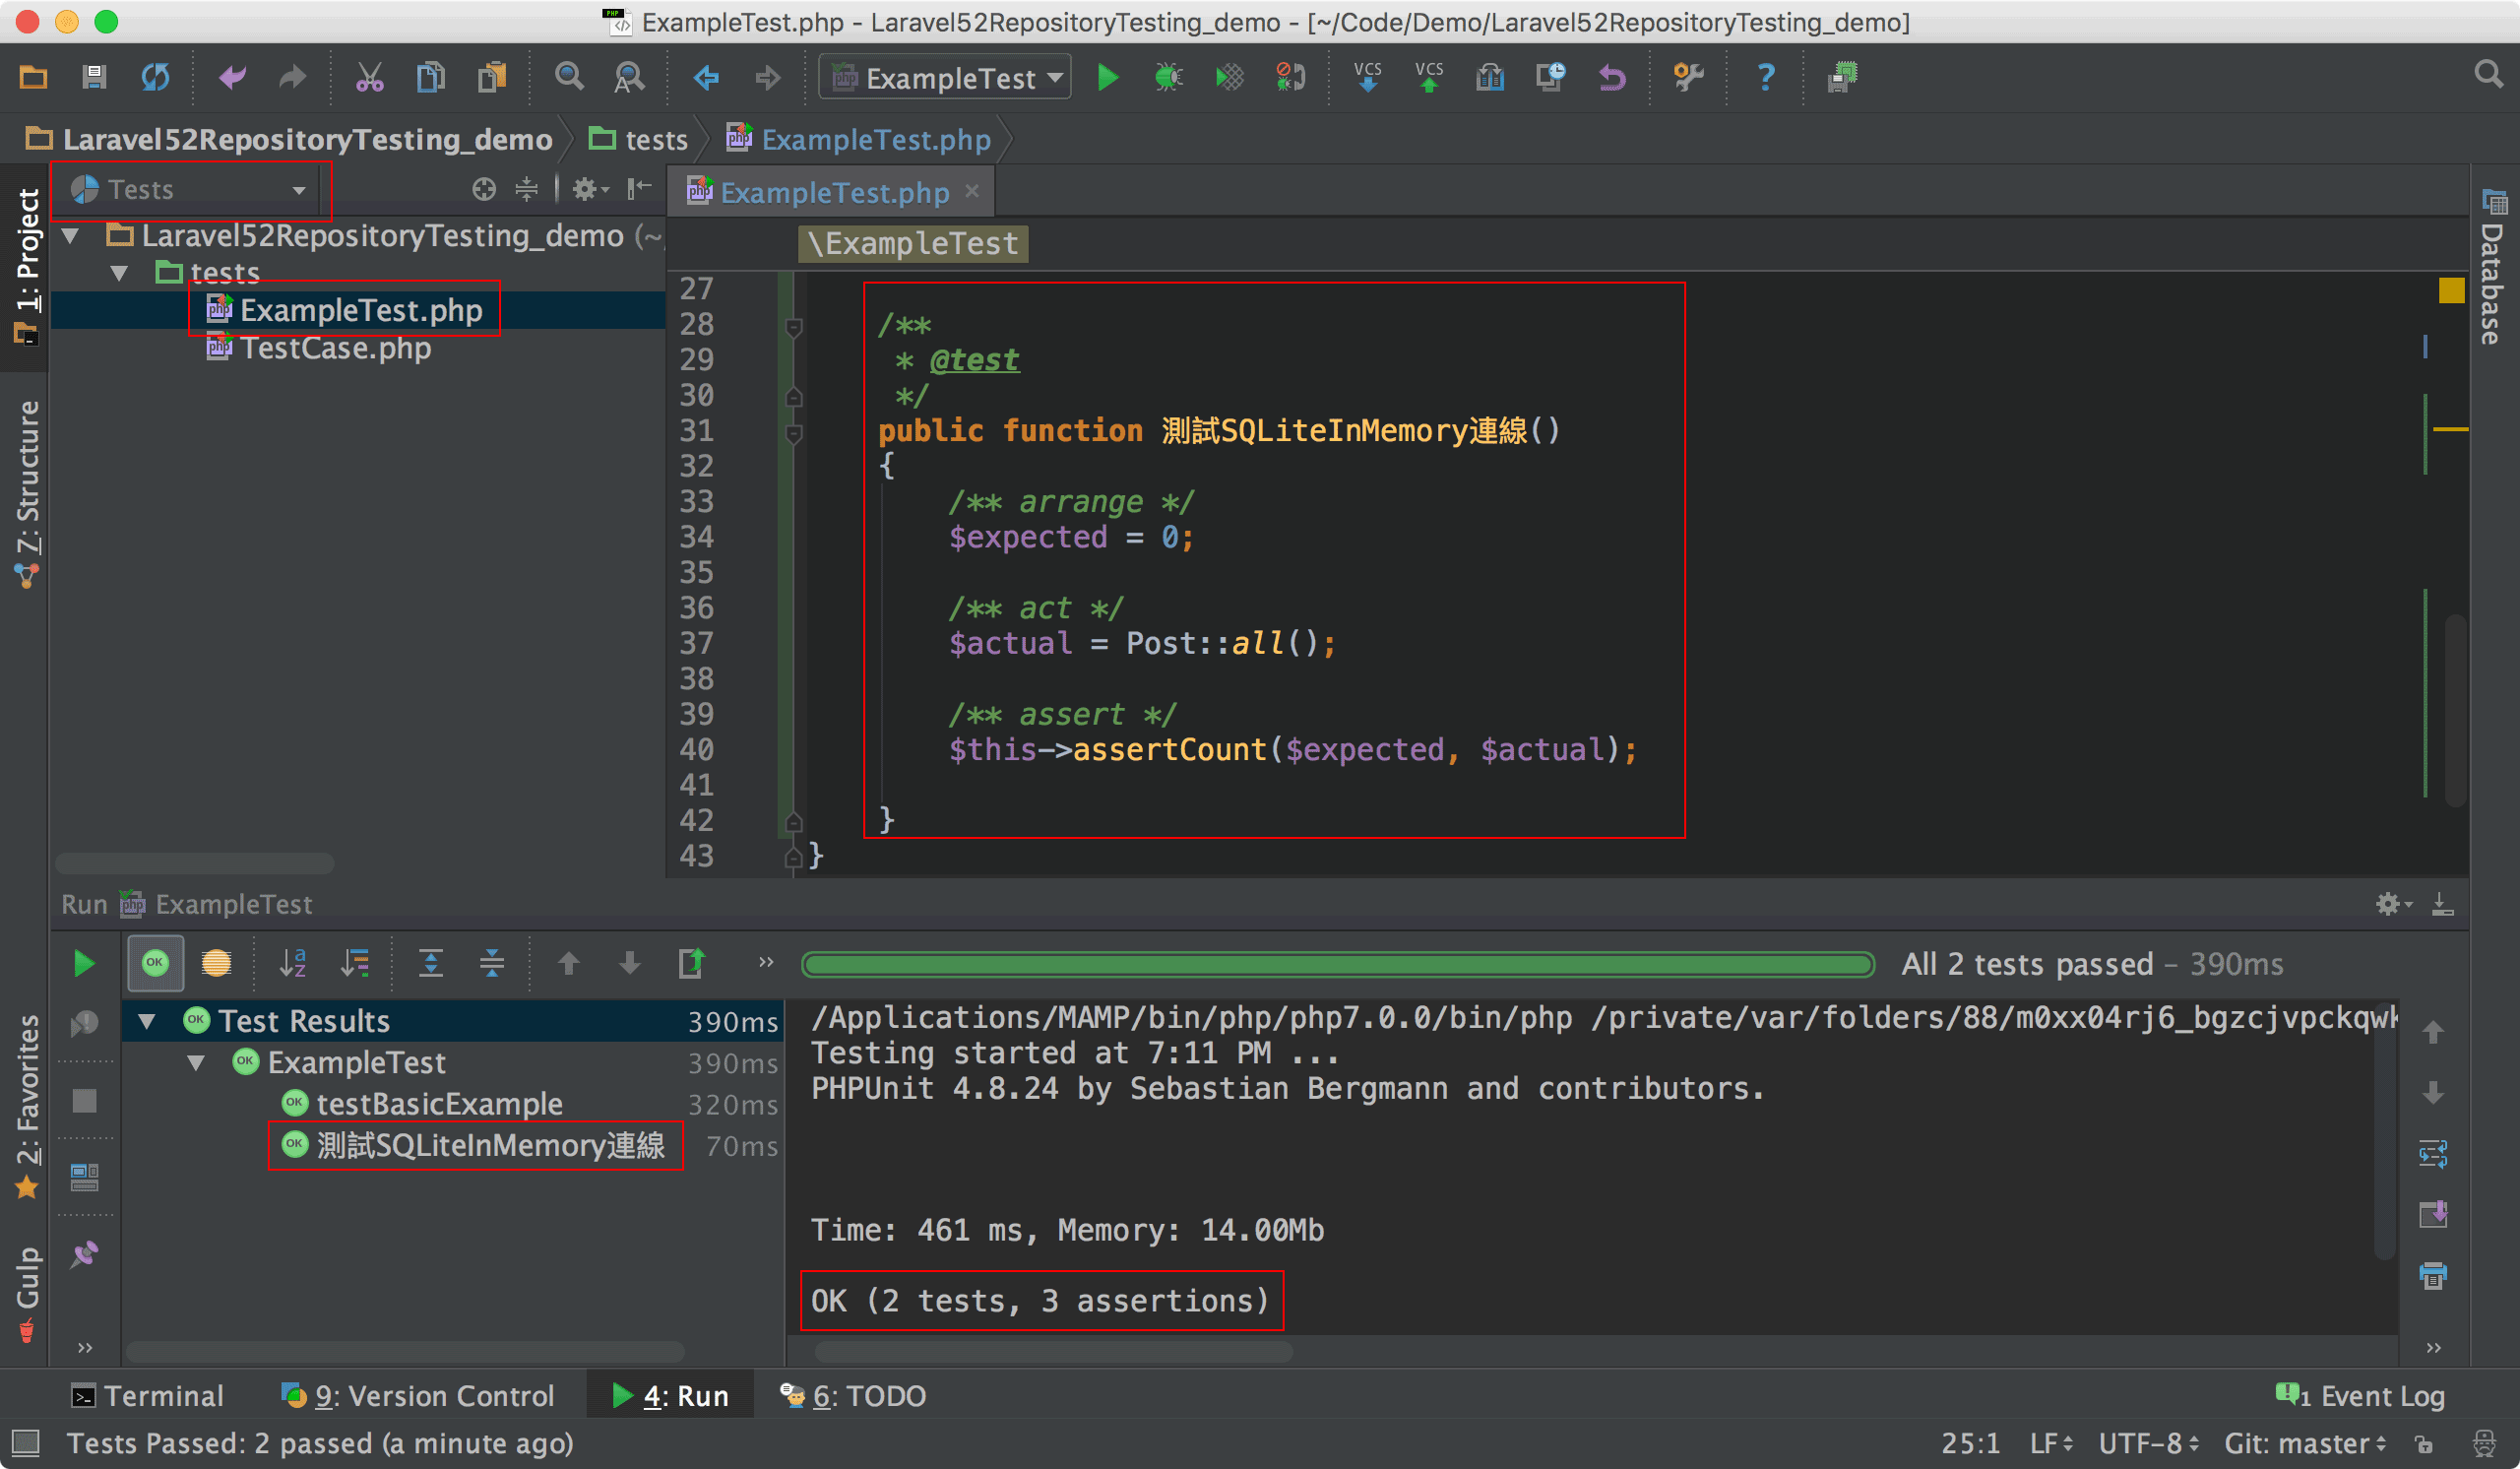
實際跑測試,綠燈 表示連線成功。13 13關於如何在 PhpStorm 跑單元測試,詳細請參考如何使用 PhpStorm 測試與除錯?
以 TDD 建立 Repository
之前的所有動作都只是為了建立 repository 的測試環境,接下來將以 TDD 的方式建立 PostRepository。
建立單元測試
1 | oomusou@mac:~/MyProject$ php artisan make:test Unit/Repositories/PostRepositoryTest |
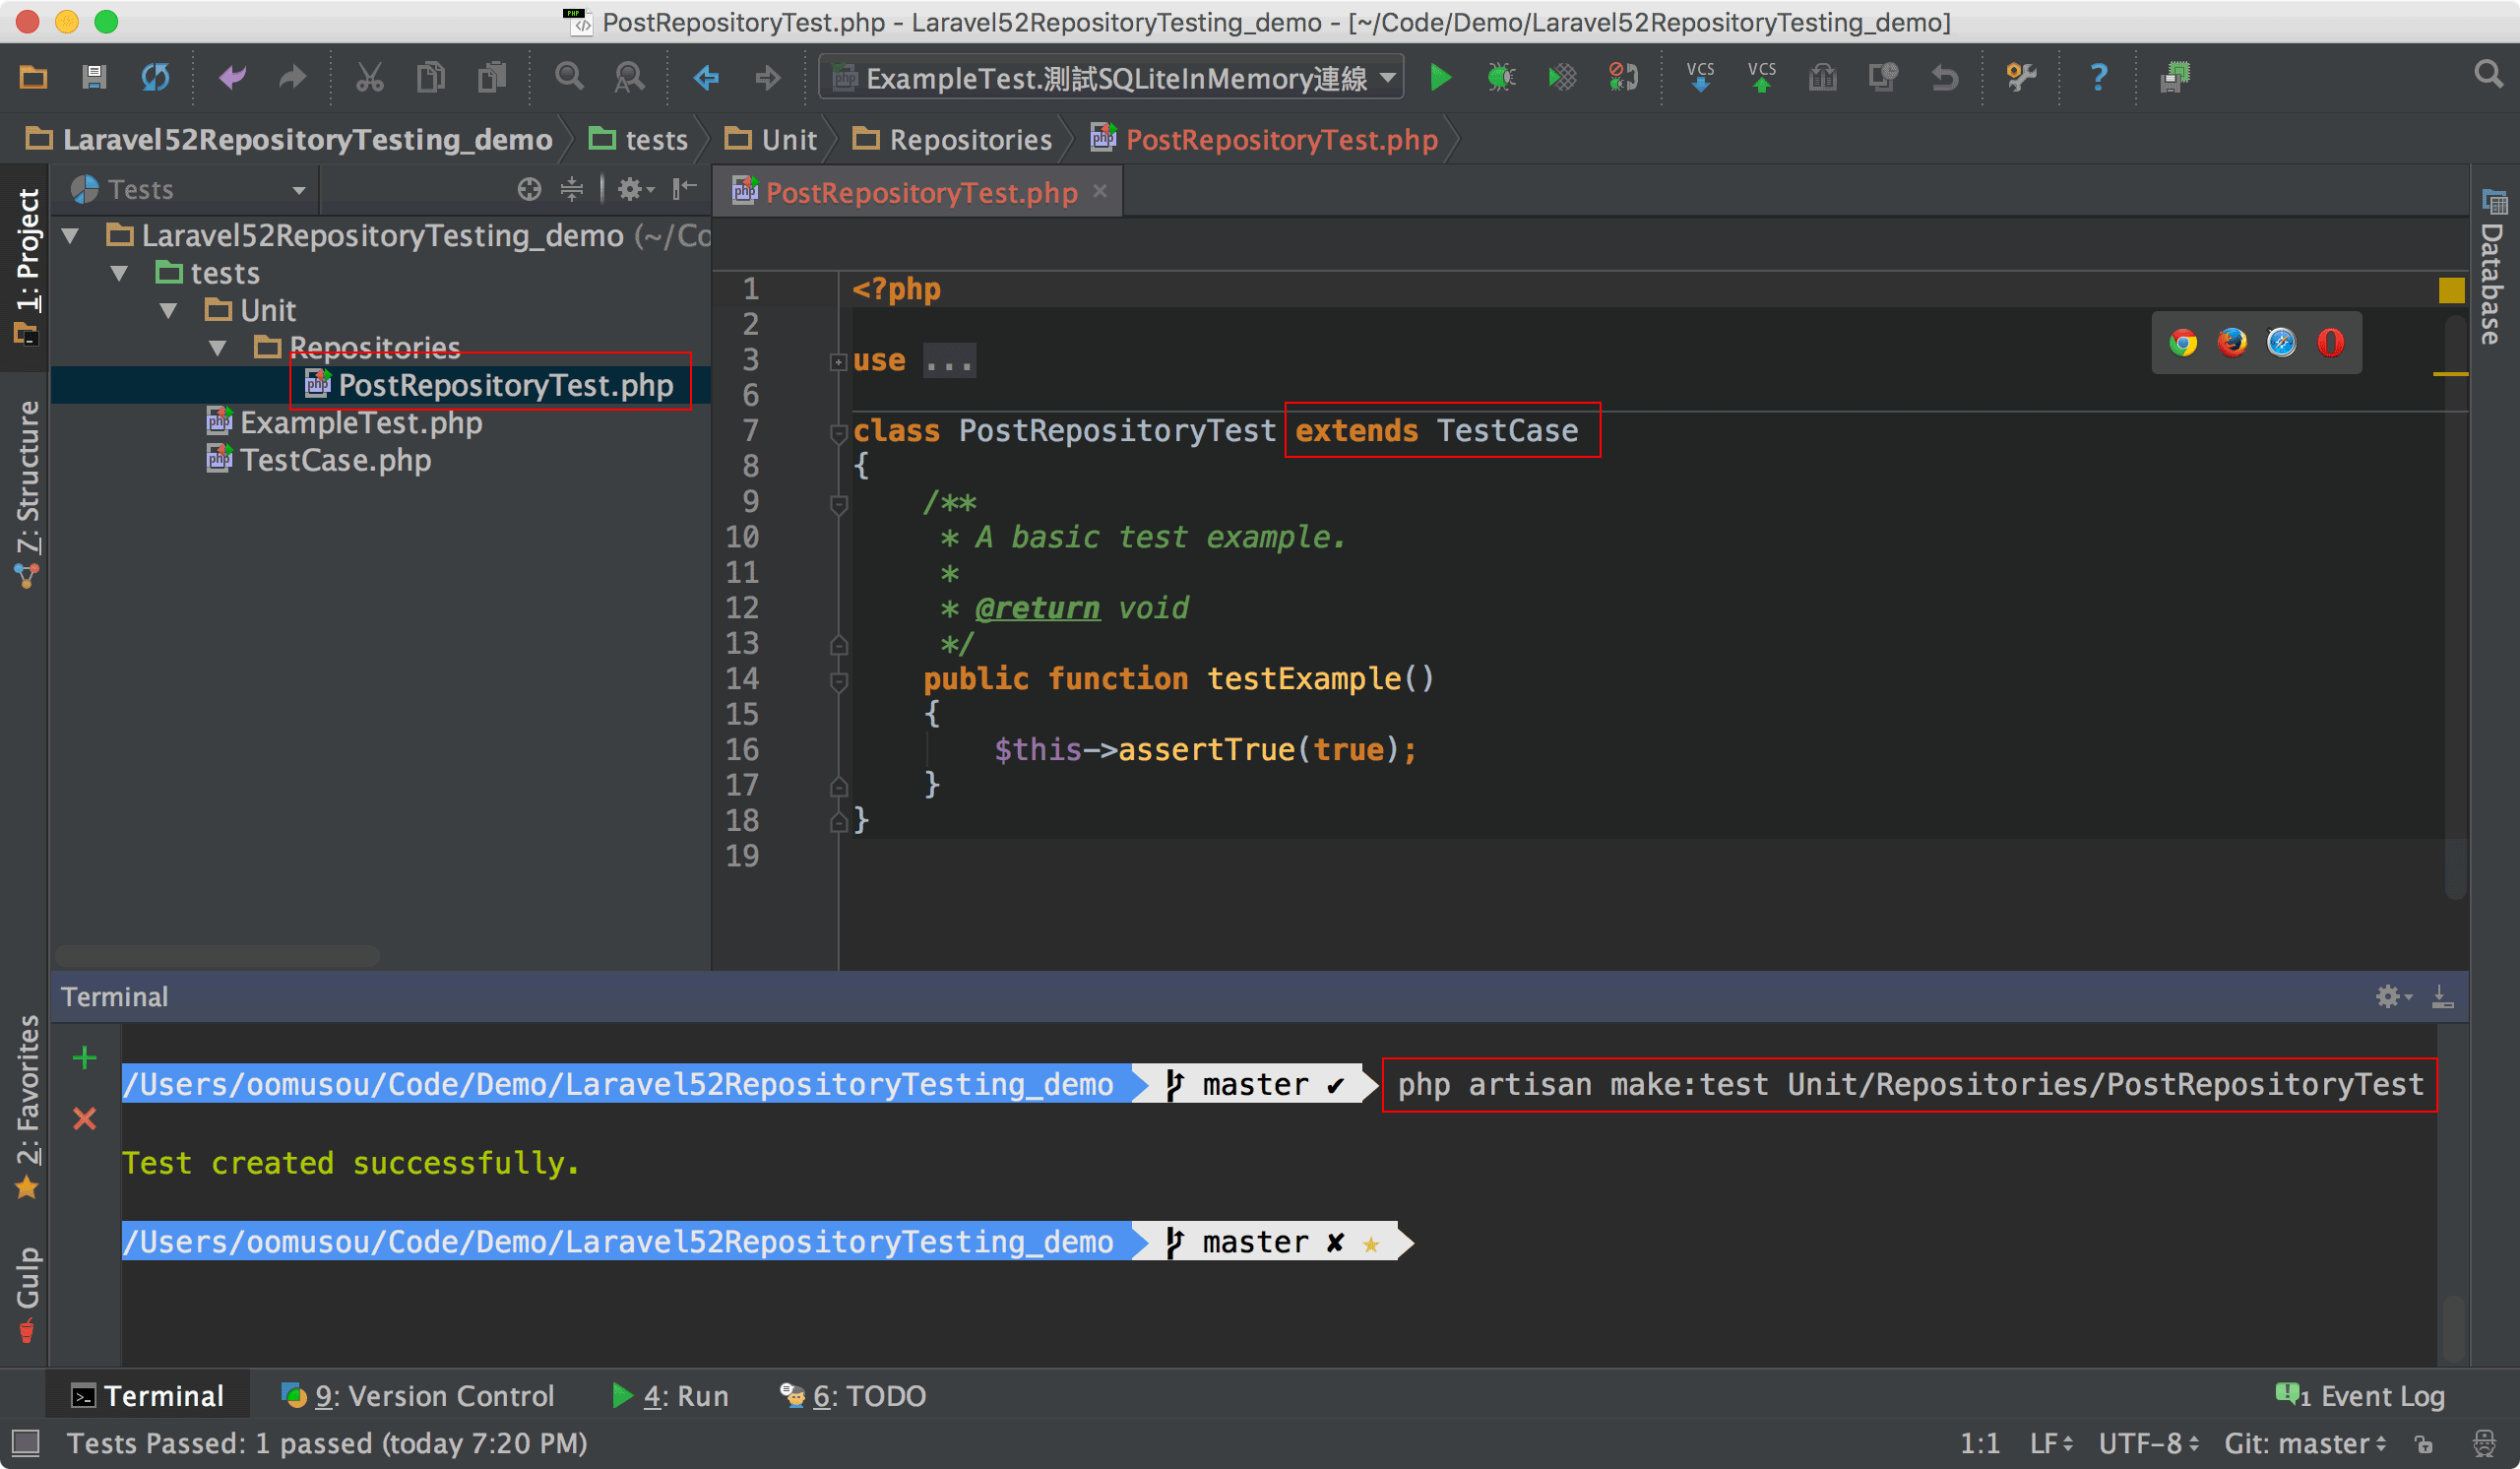
PostRepositoryTest.php14 14GitHub Commit : 建立PostRepositoyTest.php1
2
3
4
5
6
7
8
9
10
11
12
13
14
15
16use Illuminate\Foundation\Testing\WithoutMiddleware;
use Illuminate\Foundation\Testing\DatabaseMigrations;
use Illuminate\Foundation\Testing\DatabaseTransactions;
class PostRepositoryTest extends TestCase
{
/**
* A basic test example.
*
* @return void
*/
public function testExample()
{
$this->assertTrue(true);
}
}
將 PostRepositoryTest.php 建立在 tests/Unit/Repositories 目錄下。
實務上測試分 3 種,有單元測試,整合測試與驗收測試。
Repository 測試屬於單元測試,故建立在 Unit 目錄下,將來還有 Integration 目錄放整合測試,與 Acceptance 放驗收測試。
所建立的 PostRepositoryTest 也繼承於 TestCase。
測試案例
TDD 要我們先寫測試再寫程式,在 PostRepository 實作抓最新的 3 筆文章前,必須先將其測試先寫好。
PostRepositoryTest.php15 15GitHub Commit : 建立最新3筆文章
1 | use App\Post; |
第6行1
use DatabaseMigrations;
一樣使用 DatabaseMigrations trait,讓 Laravel 自動幫我們執行 migration。
Arrange
負責建立要測試的資料,因為我們想要抓最新 3 筆文章,所以先使用 model factory 新增 100 筆測試資料進 SQLite in-Memory。
建立 $target 待測物件,一律使用 App::make() 建立物件,不再使用new建立物件。
建立 $expected,也就我們預期會傳回最新 3 筆文章的結果,因為要測試的重點在於最新 3 筆文章,其他欄位如 title、sub_title 與 content 因為都是使用 faker 建立,無法測試,所以我們只在乎 id 欄位是否如我們預期。
Act
實際執行 $target 的 getLatest3Posts(),由於我們只想測試 id 欄位的值,所以使用 pluck() 只傳回 id 欄位的資料進 $actual。
Assert
使用 PHPUnit 的 assertEquals(),判斷 $expected 與 $actual 是否相等,若相等則 綠燈,不相等則 紅燈。
執行測試
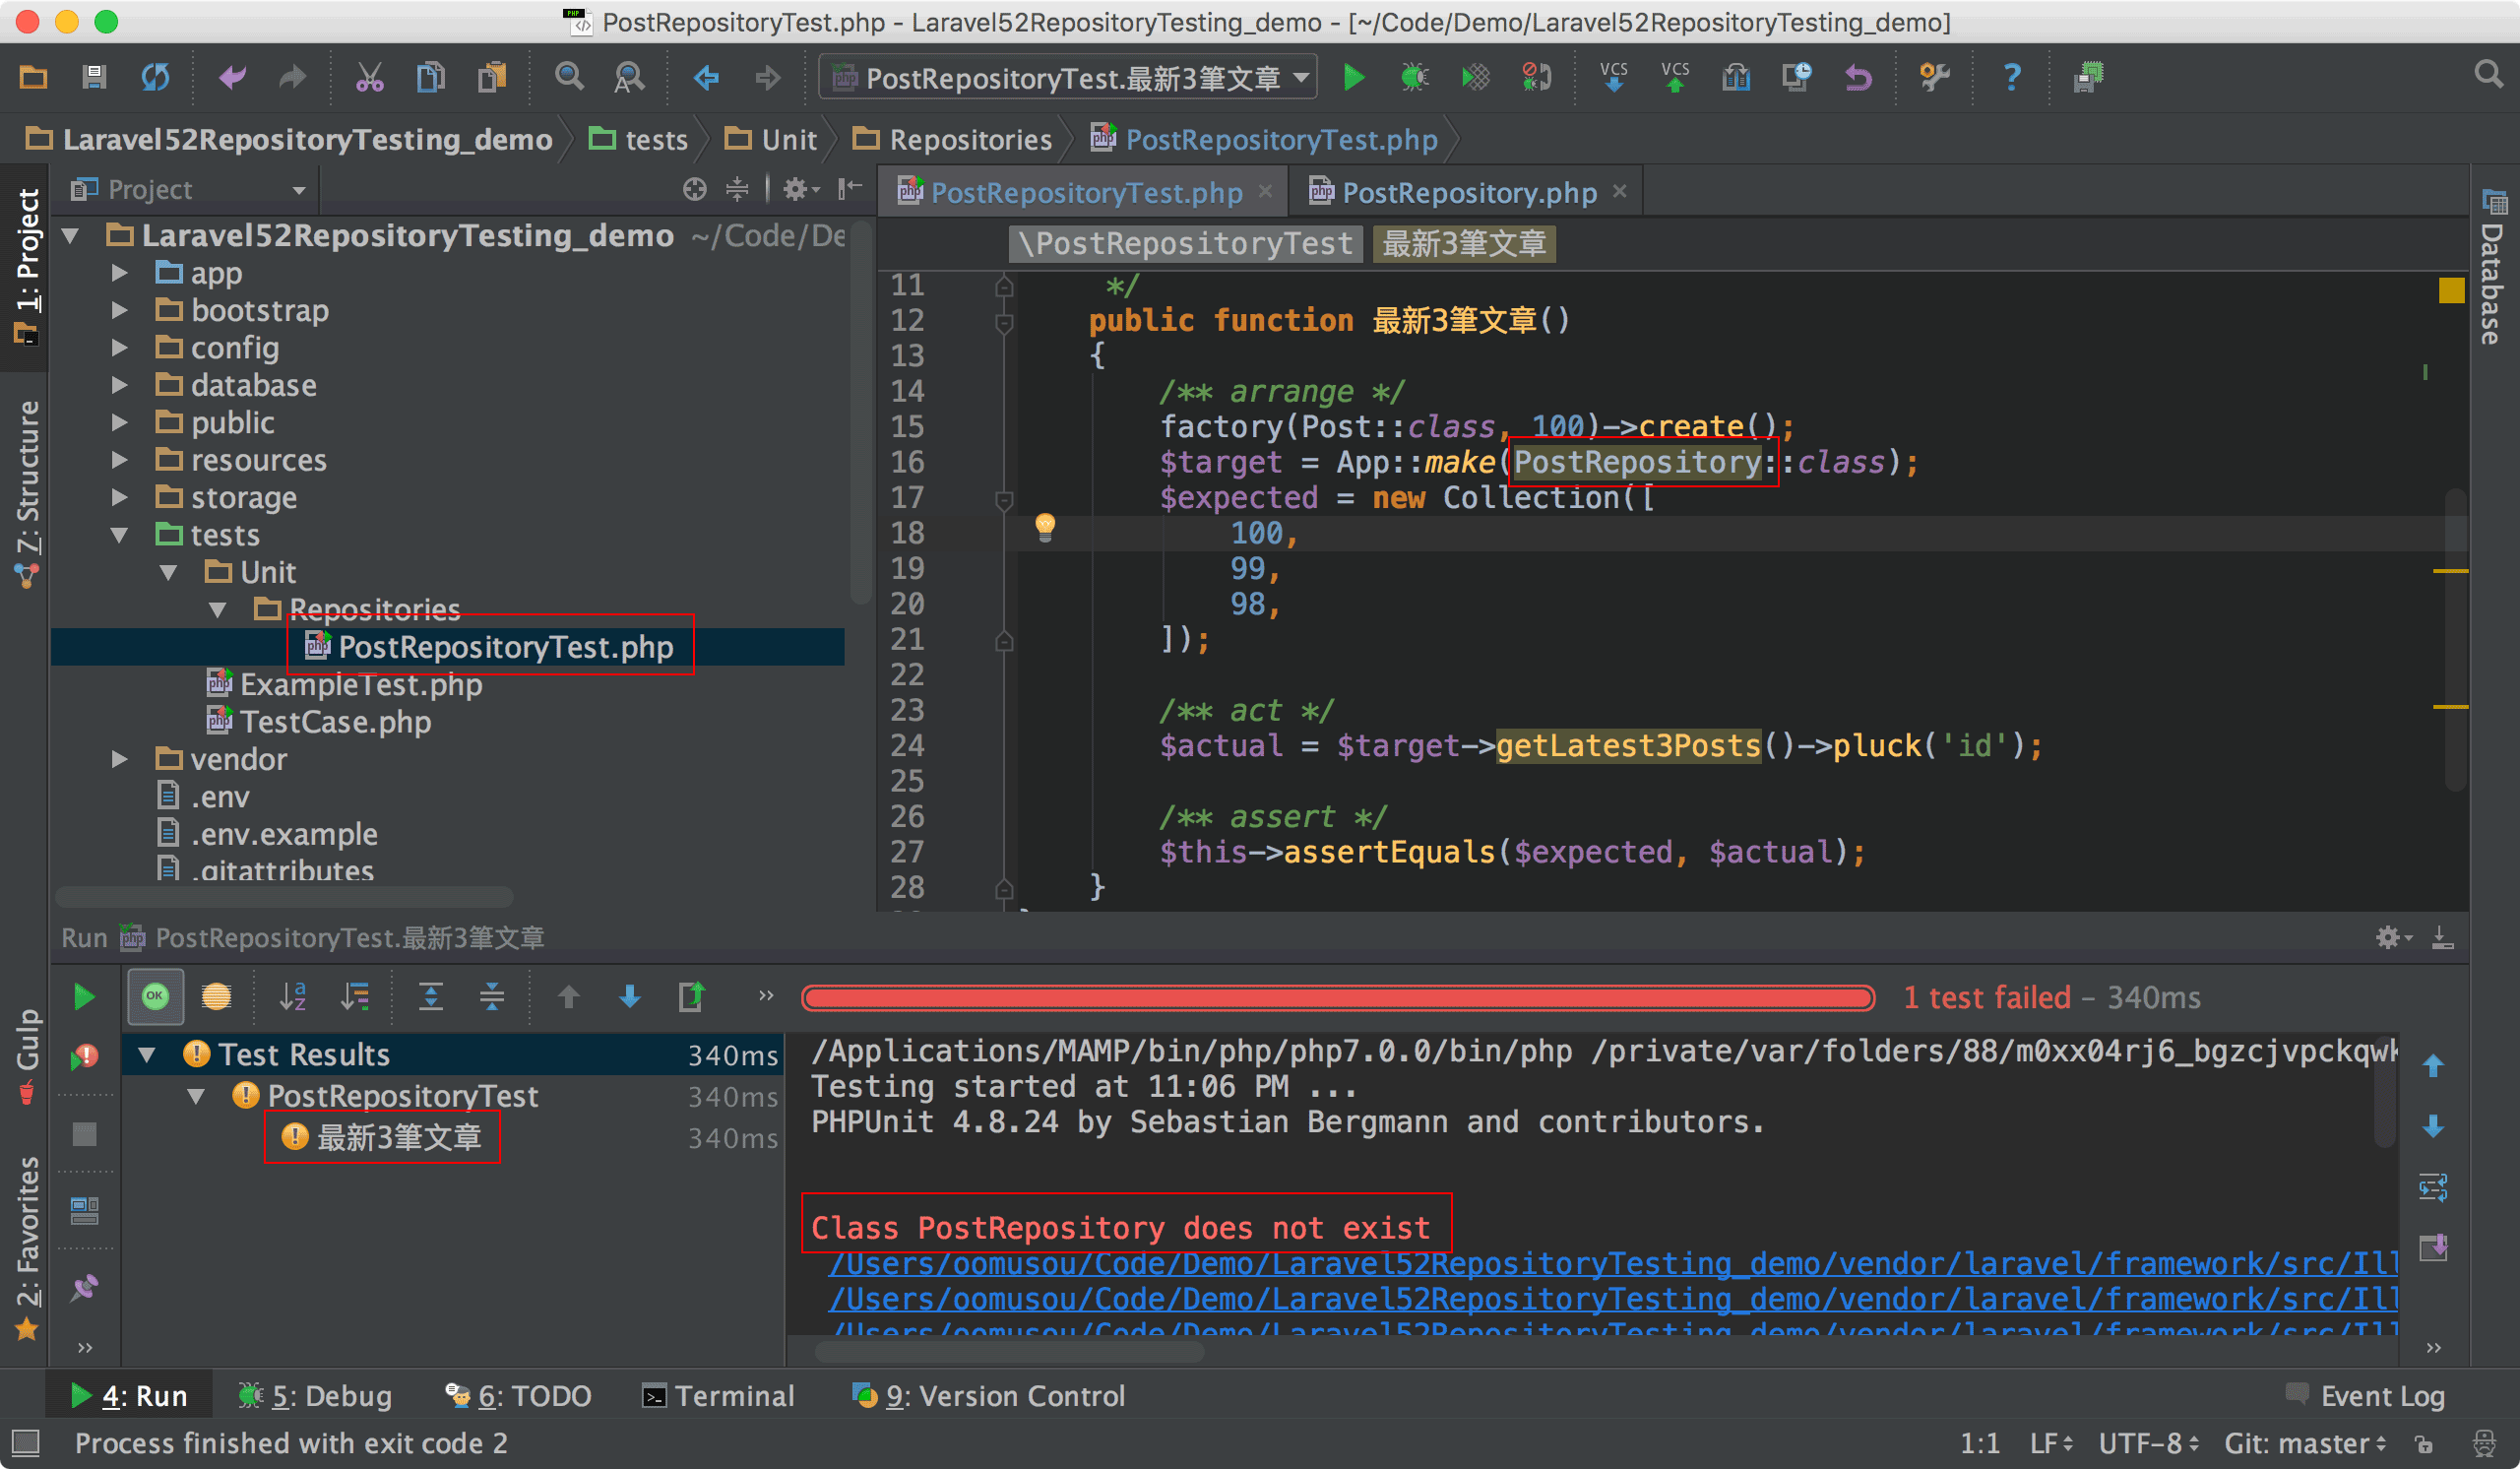
得到第 1 個 紅燈 : PostRepository 不存在,因為我們還沒有建立。
事實上 PhpStorm 也將 PostRepository 反白,警告我們 PostRepository 並不存在。
PostRepository.php16 16GitHub Commit : 建立PostRepository.php1
2
3
4
5
6namespace App\Repositories;
class PostRepository
{
}
補上 PostRepository.php 後,繼續執行測試。
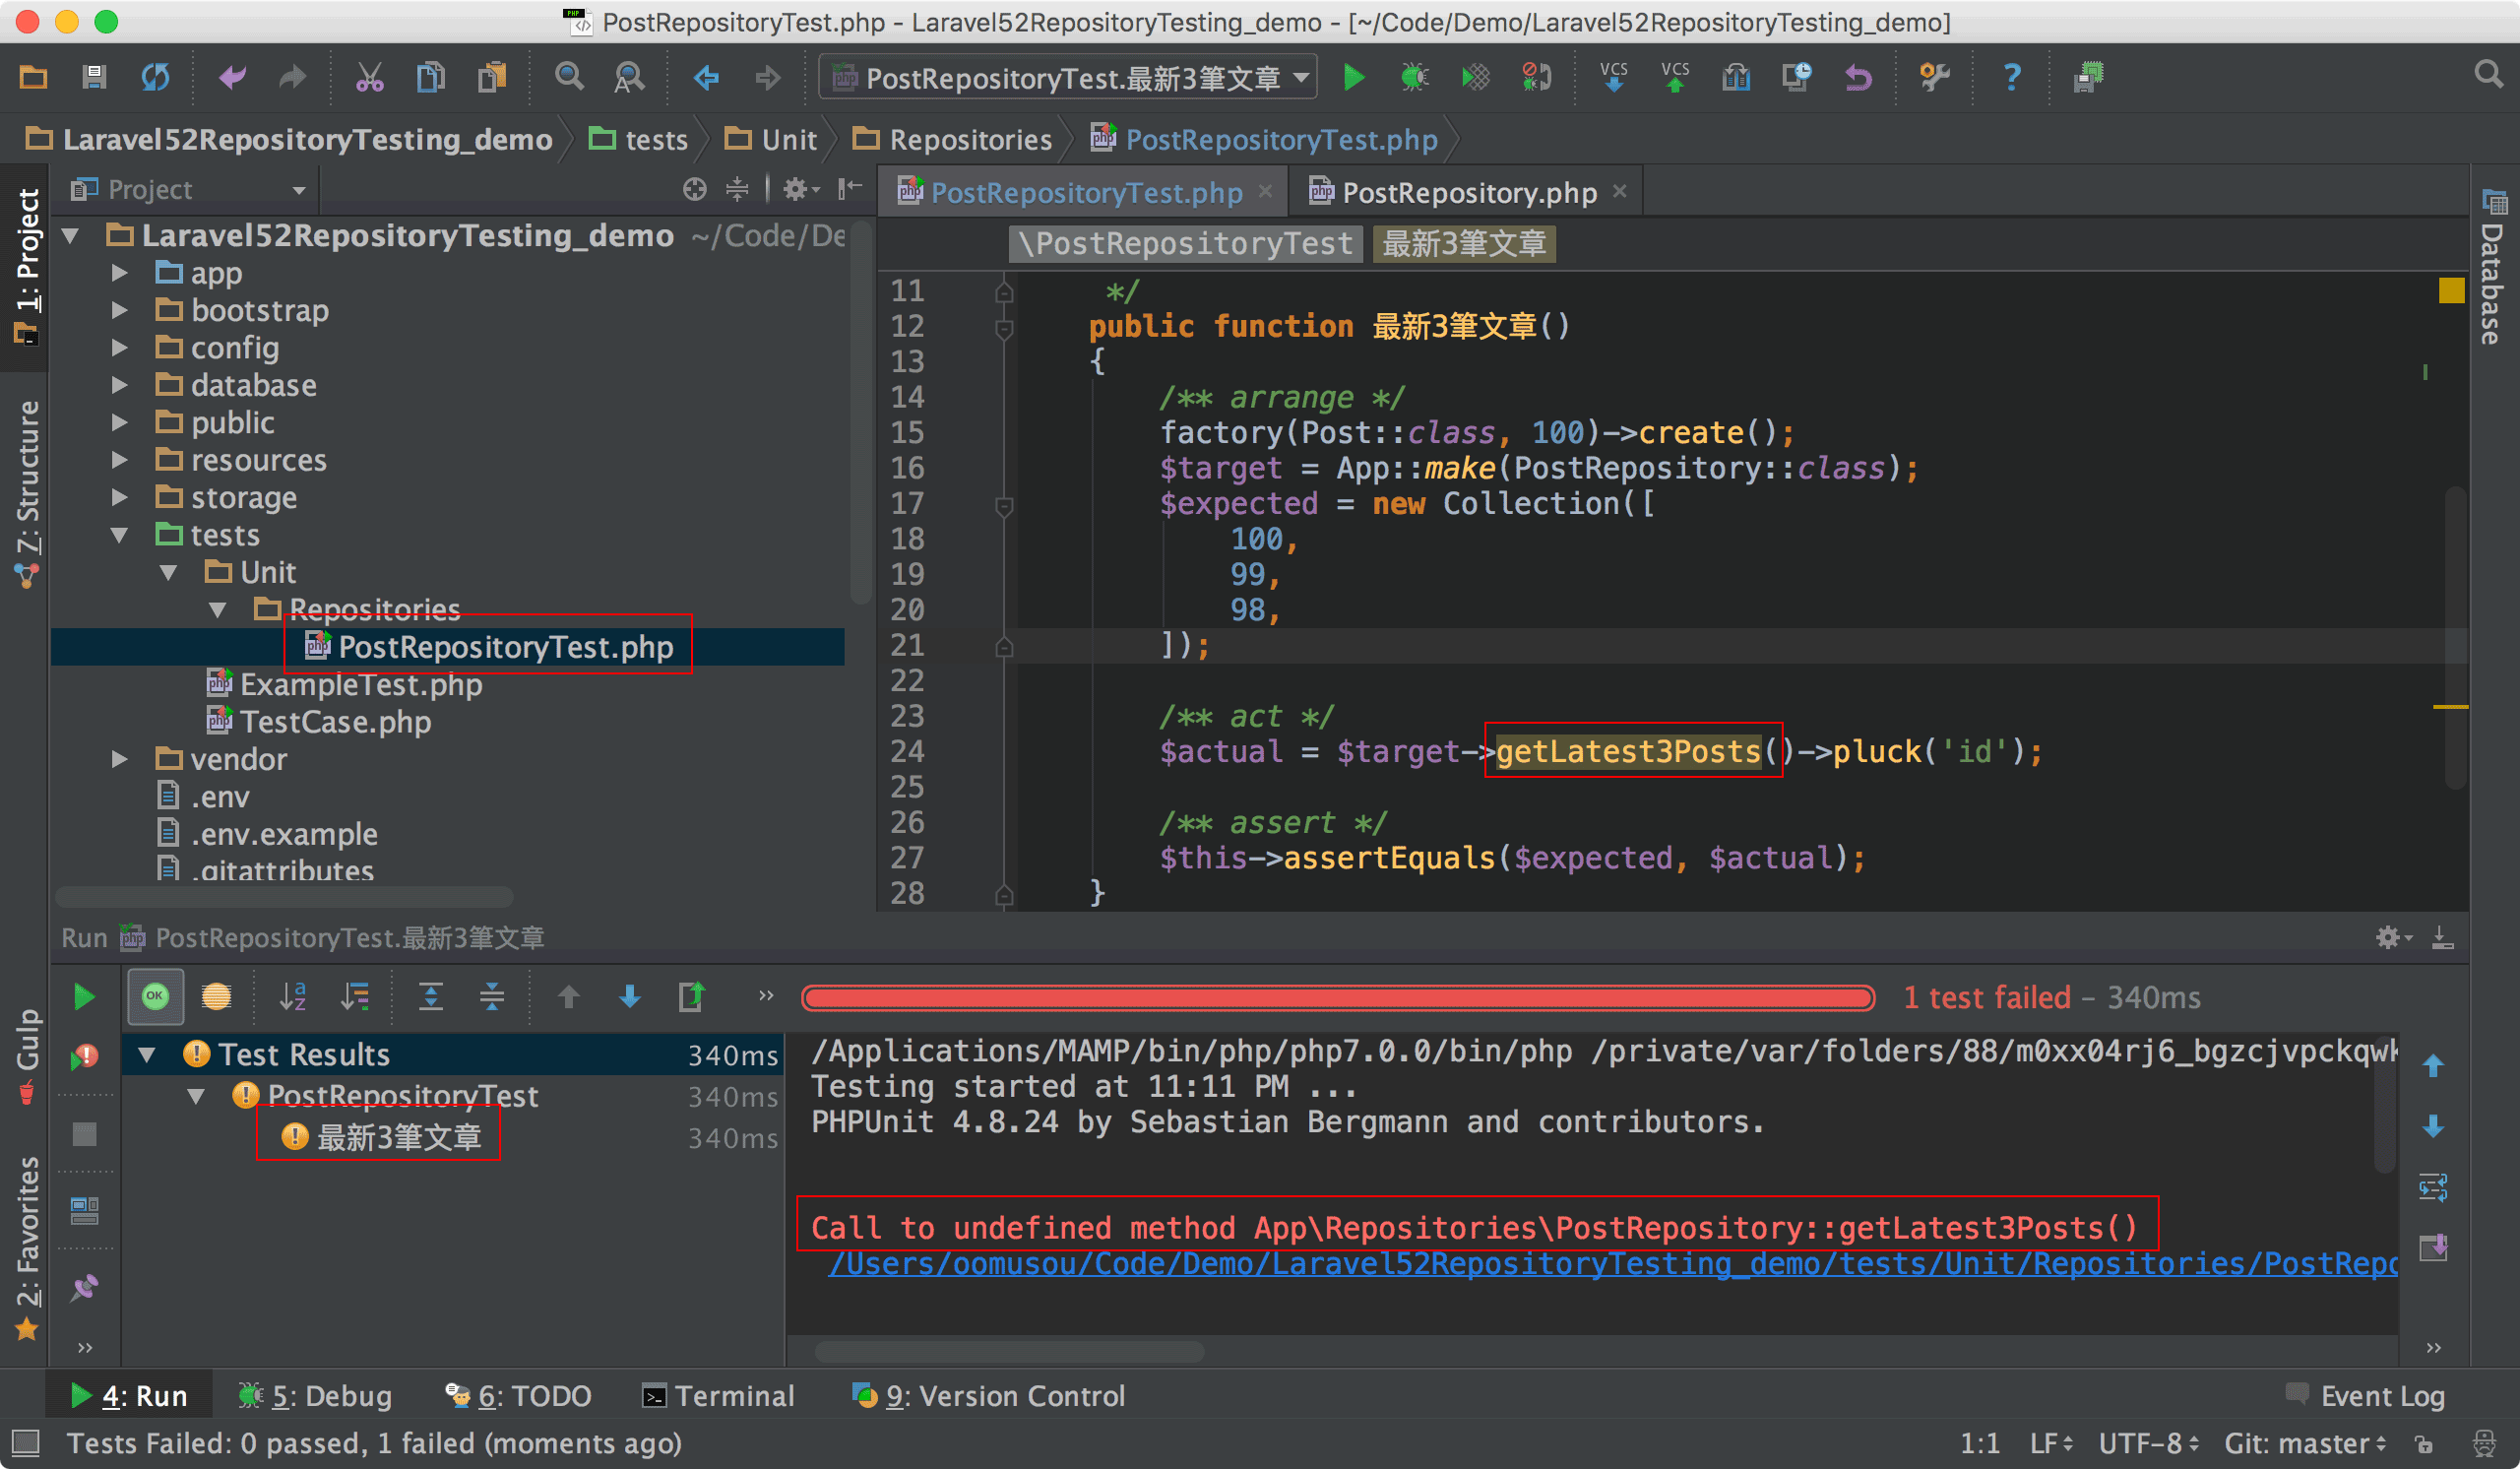
得到第 2 個 紅燈 : getLatest3Posts() 不存在,因為我們還沒有建立。
事實上 PhpStorm 也將 getLatest3Posts() 反白,警告我們 getLatest3Posts() 並不存在。
PostRepository.php17 17GitHub Commit : 建立 getLatest3Posts()1
2
3
4
5
6
7
8namespace App\Repositories;
class PostRepository
{
public function getLatest3Posts()
{
}
}
補上 getLatest3Posts() 後,繼續執行測試。
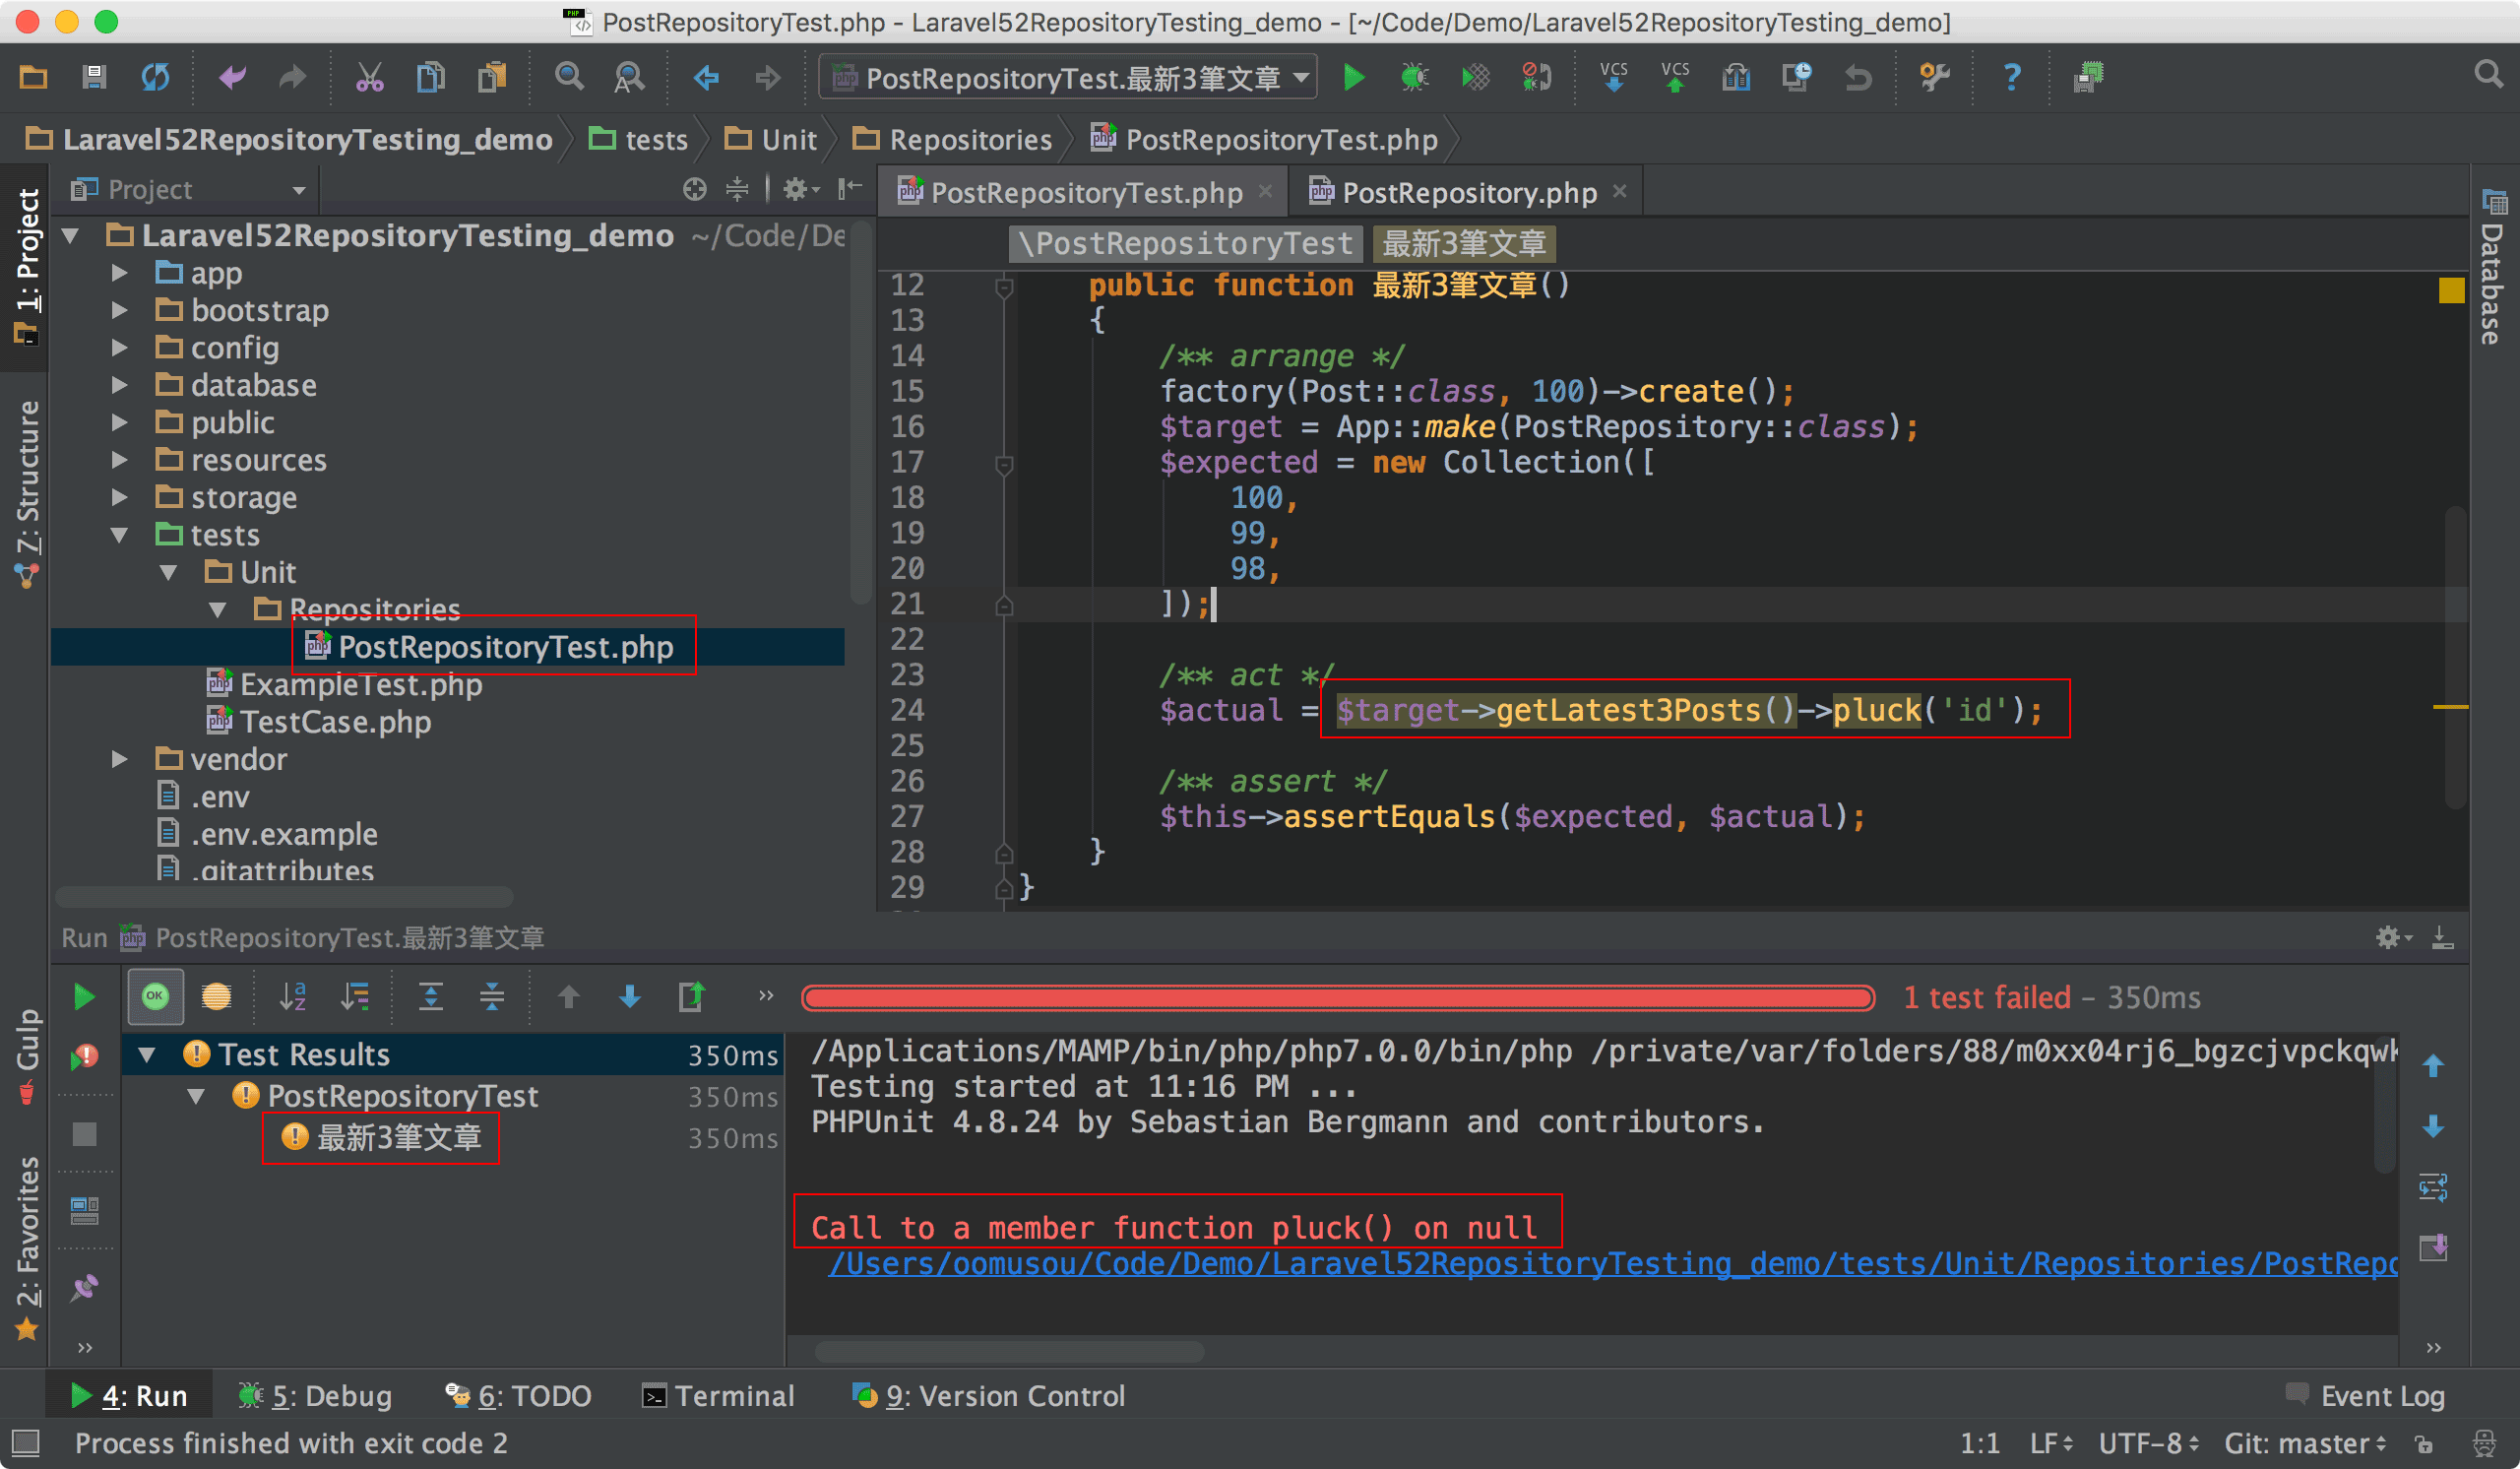
得到第 3 個 紅燈 : 對 null 物件呼叫 pluck(),因為我們還沒回傳 collection。
事實上 PhpStorm也將pluck() 反白,警告我們 getLatest3Posts() 並不是回傳 collection。
PostRepository.php18 18GitHub Commit : 回傳 collection1
2
3
4
5
6
7
8
9
10
11
12
13
14
15
16
17namespace App\Repositories;
use App\Post;
use Illuminate\Database\Eloquent\Collection;
class PostRepository
{
/**
* @return Collection
*/
public function getLatest3Posts()
{
return Post::orderBy('id', 'desc')
->take(3)
->get();
}
}
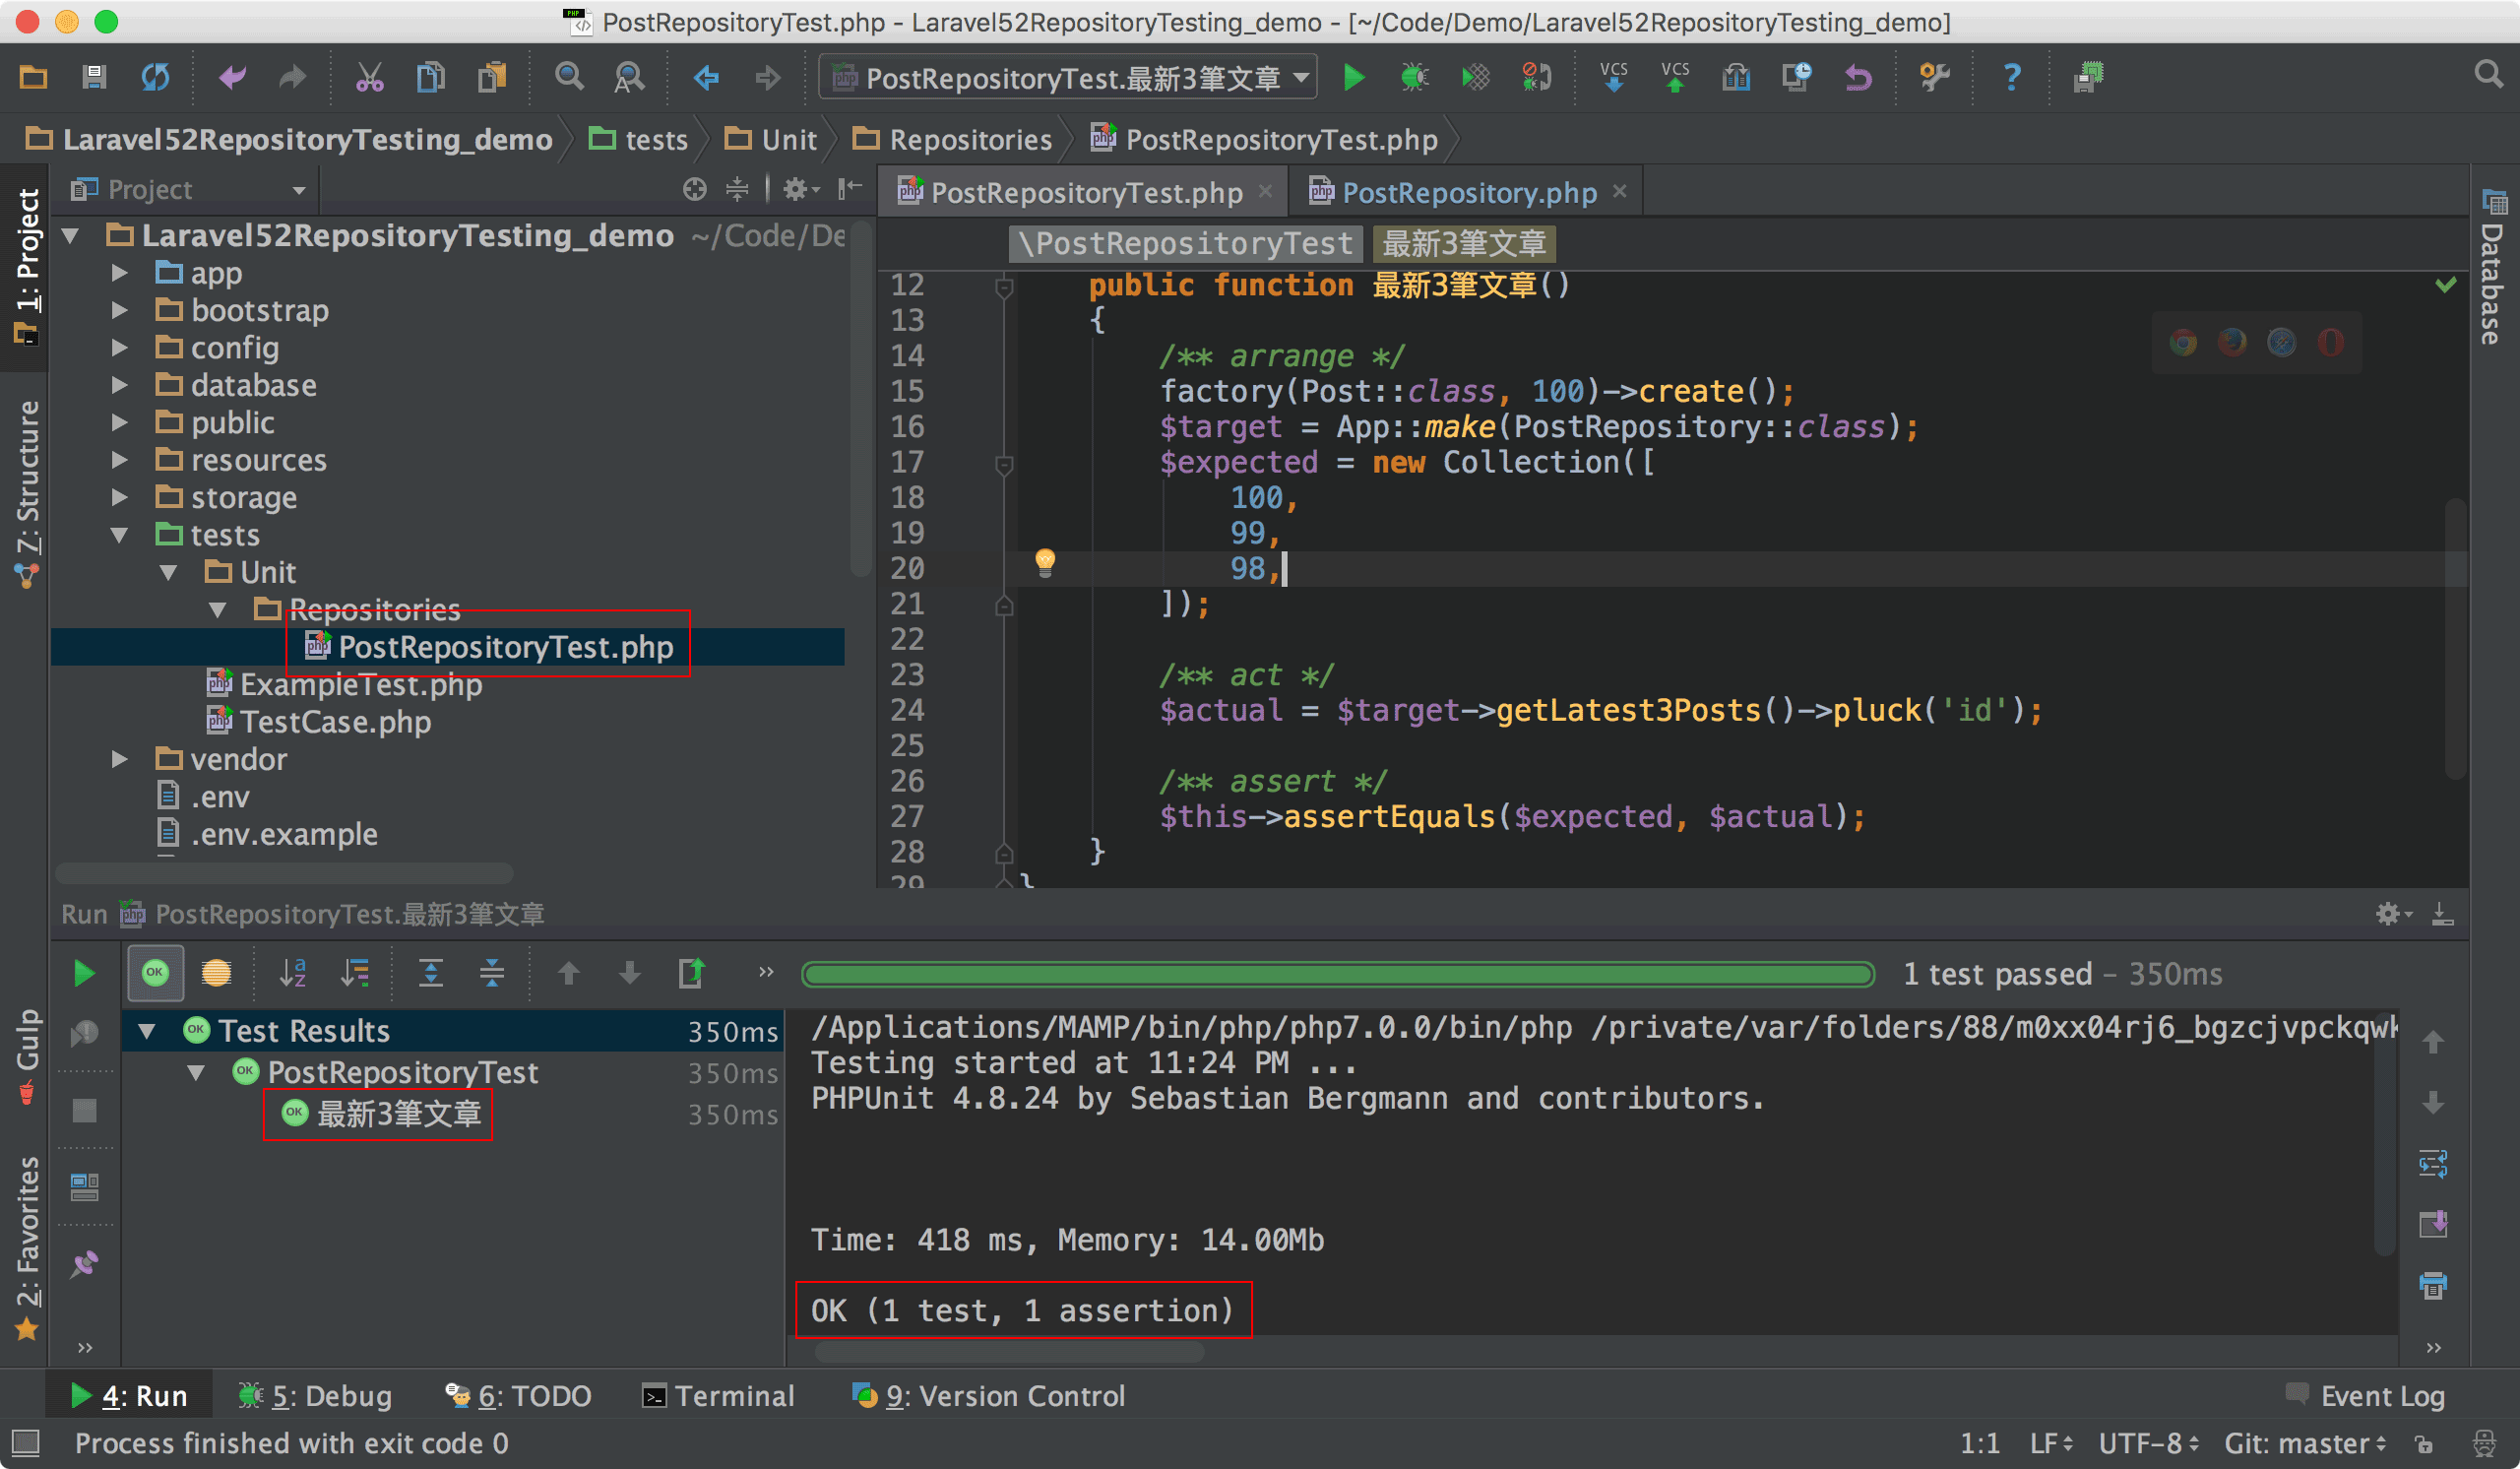
在 getLatest3Posts() 補上 query 後回傳 collection 後,繼續執行測試。
得到第 1 個 綠燈。
隨著 綠燈 的出現,我們也完成了 repository。
Conclusion
- TDD 的開發流程就是 寫測試 -> 紅燈 -> 寫程式 -> 綠燈 -> 重構 ->綠燈 -> 重構…-> 綠燈,所以測試時看到 紅燈 不要怕,只要趕快寫程式讓他 綠燈 即可。
- 本文結合 Laravel 與 PHPUnit,以 TDD 方式建立 repository,並搭配 Test Factory Generator、SQLite In-Memory 與 PhpStorm,讓 repository 測試更為簡單。
- 使用 Laravel 5 的
DatabaseMigrationstrait 之後,就不用在setUp()寫Artisan::call('migrate')了,程式更加精簡。
Sample Code
完整的範例可以在我的 GitHub 上找到。