如何在PhpStorm活用PHPDoc?
初學者使用PhpStorm開啟Laravel專案時,馬上會發現原來的程式碼出現一堆反白警告,事實上這些都是有意義的,只是初學者常常不知道怎麼處理,而忽略這些反白警告,除此之外,PhpStorm有強大的語法提示功能,讓你不用去死記物件有哪些field與method,只要用選的即可,可大幅增加開發效率,也不用擔心typo打錯。而PhpStorm威力的背後,就是基於PHPDoc。
Version
PHP 7.0.0
Laravel 5.2.22
PhpStorm 10.0.3
Laravel IDE Helper 2.1.4
使用PhpStorm開啟Laravel
第一次使用PhpStorm開啟Laravel時,原來平靜的程式碼在很多地方都出現了許多反白 :
Route
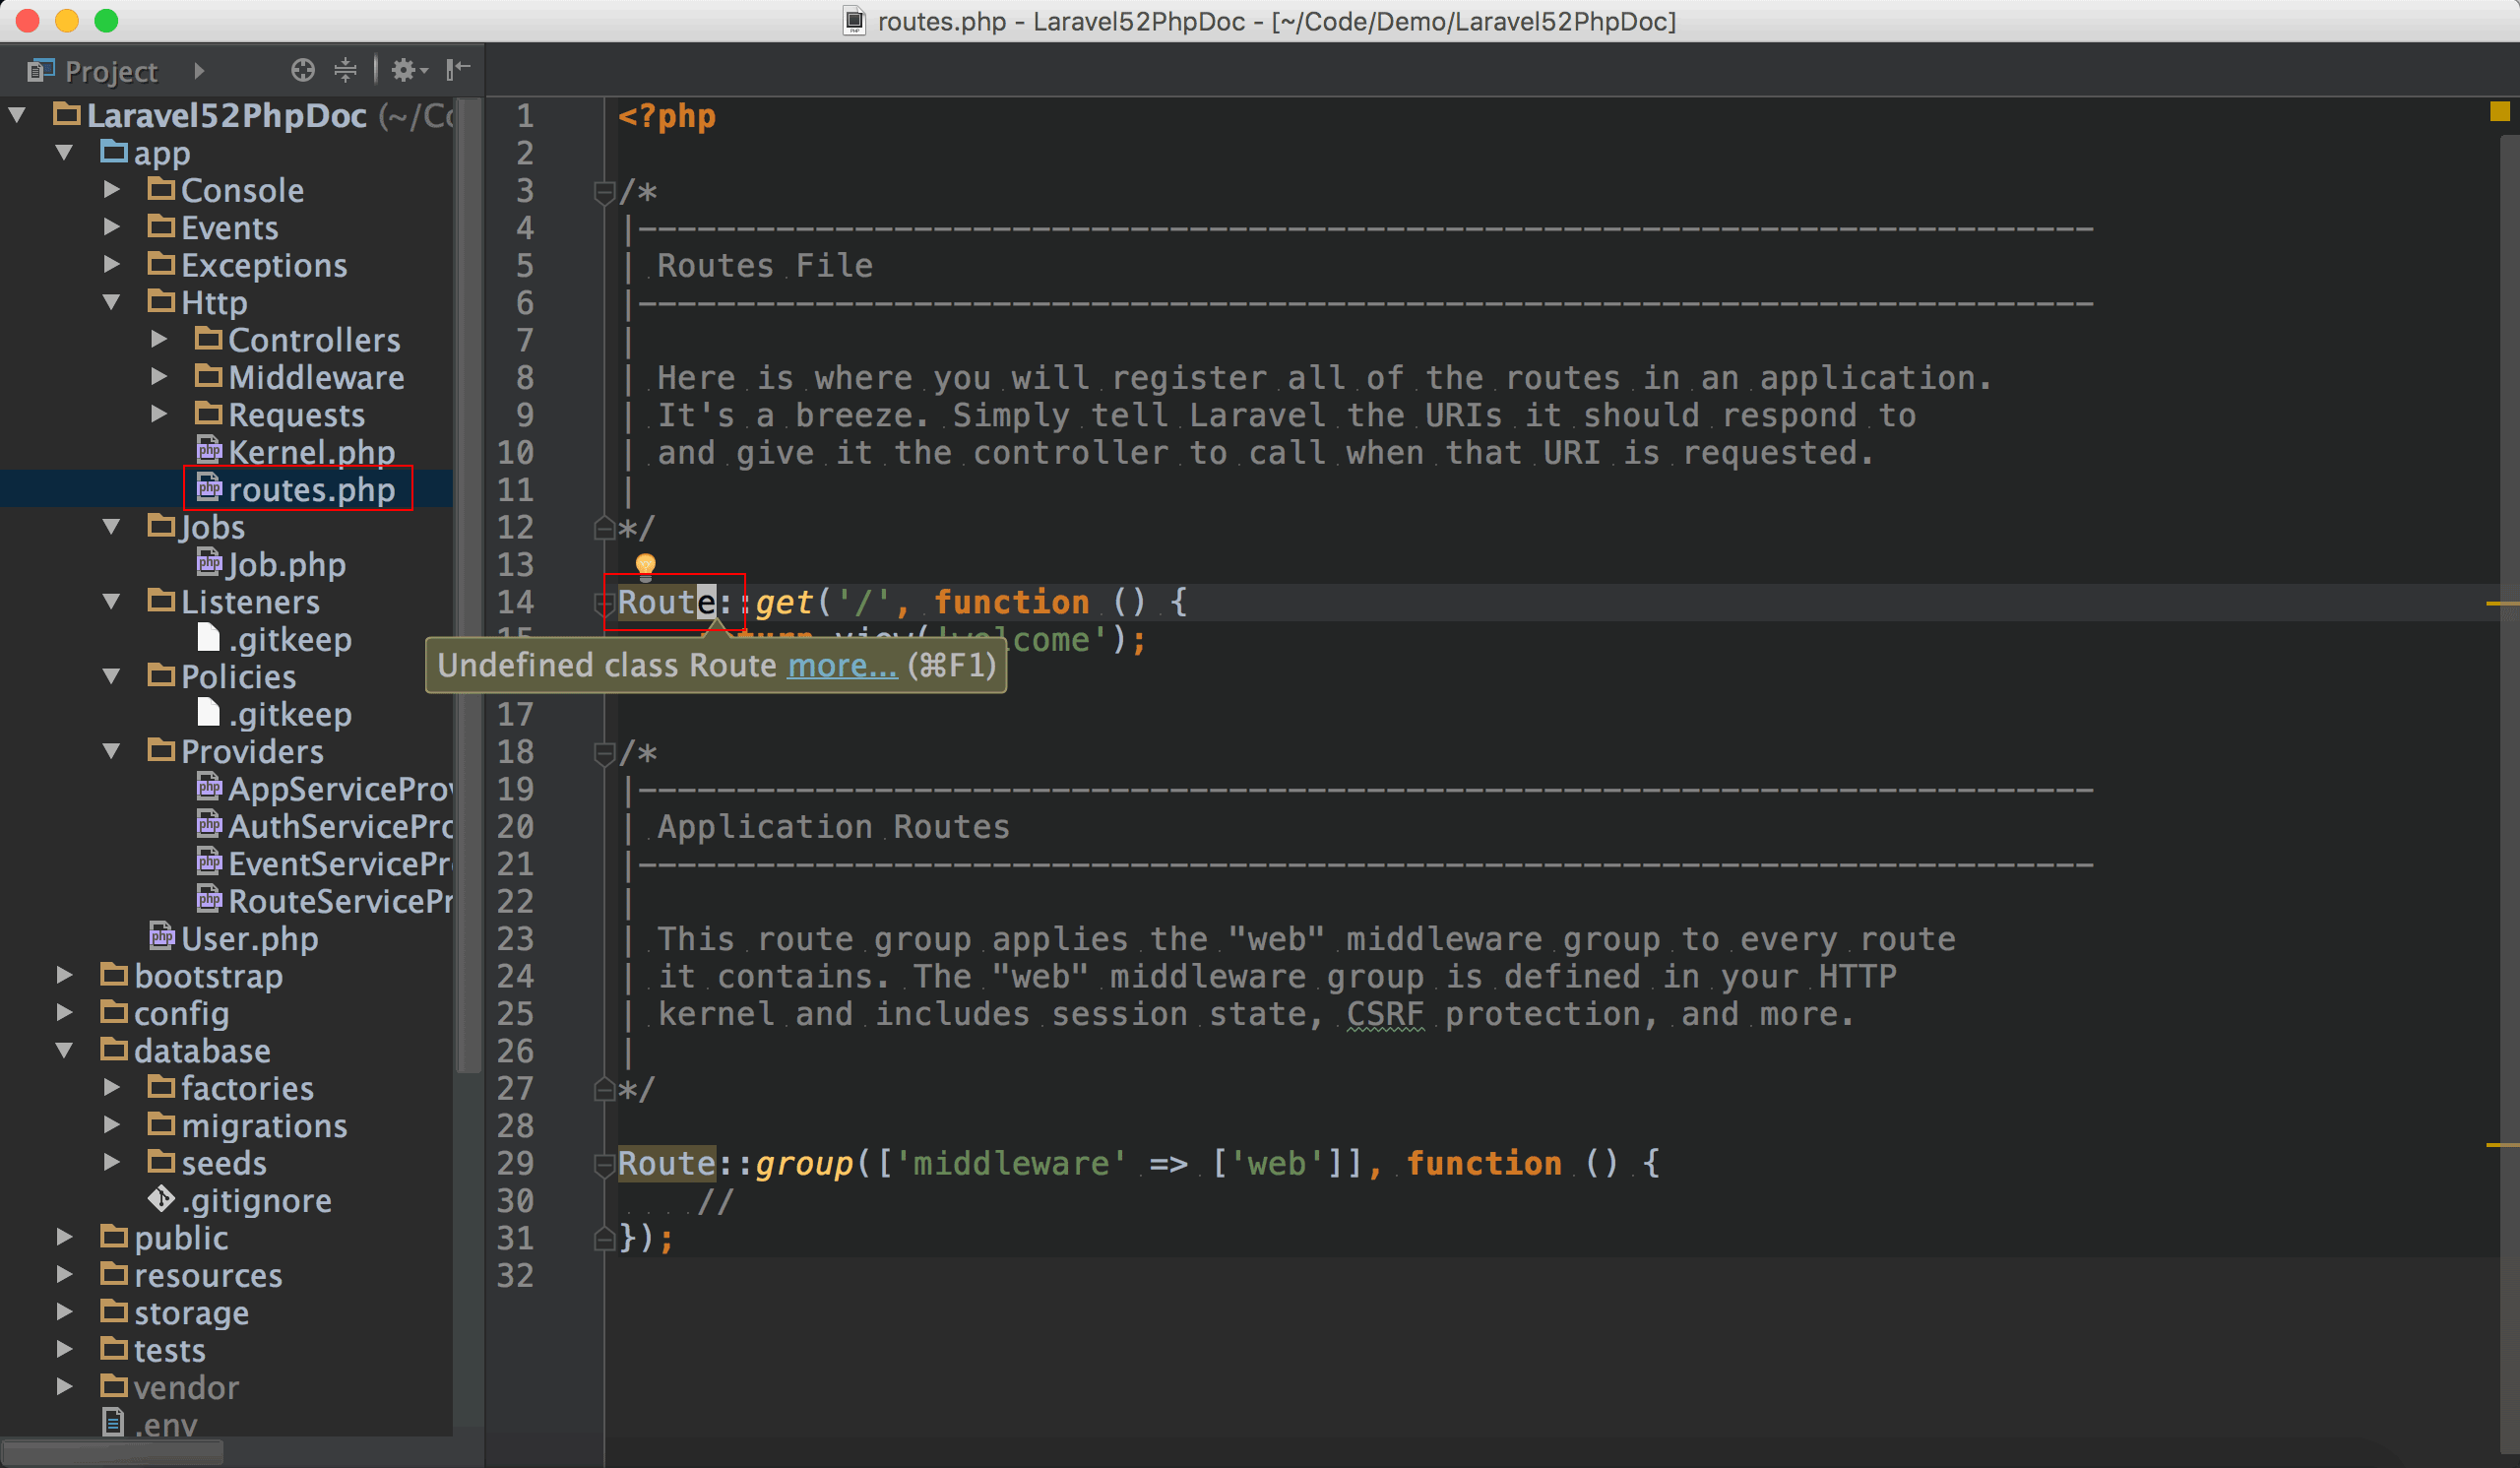
PhpStorm抱怨Route是Undefined class Route。
Validator
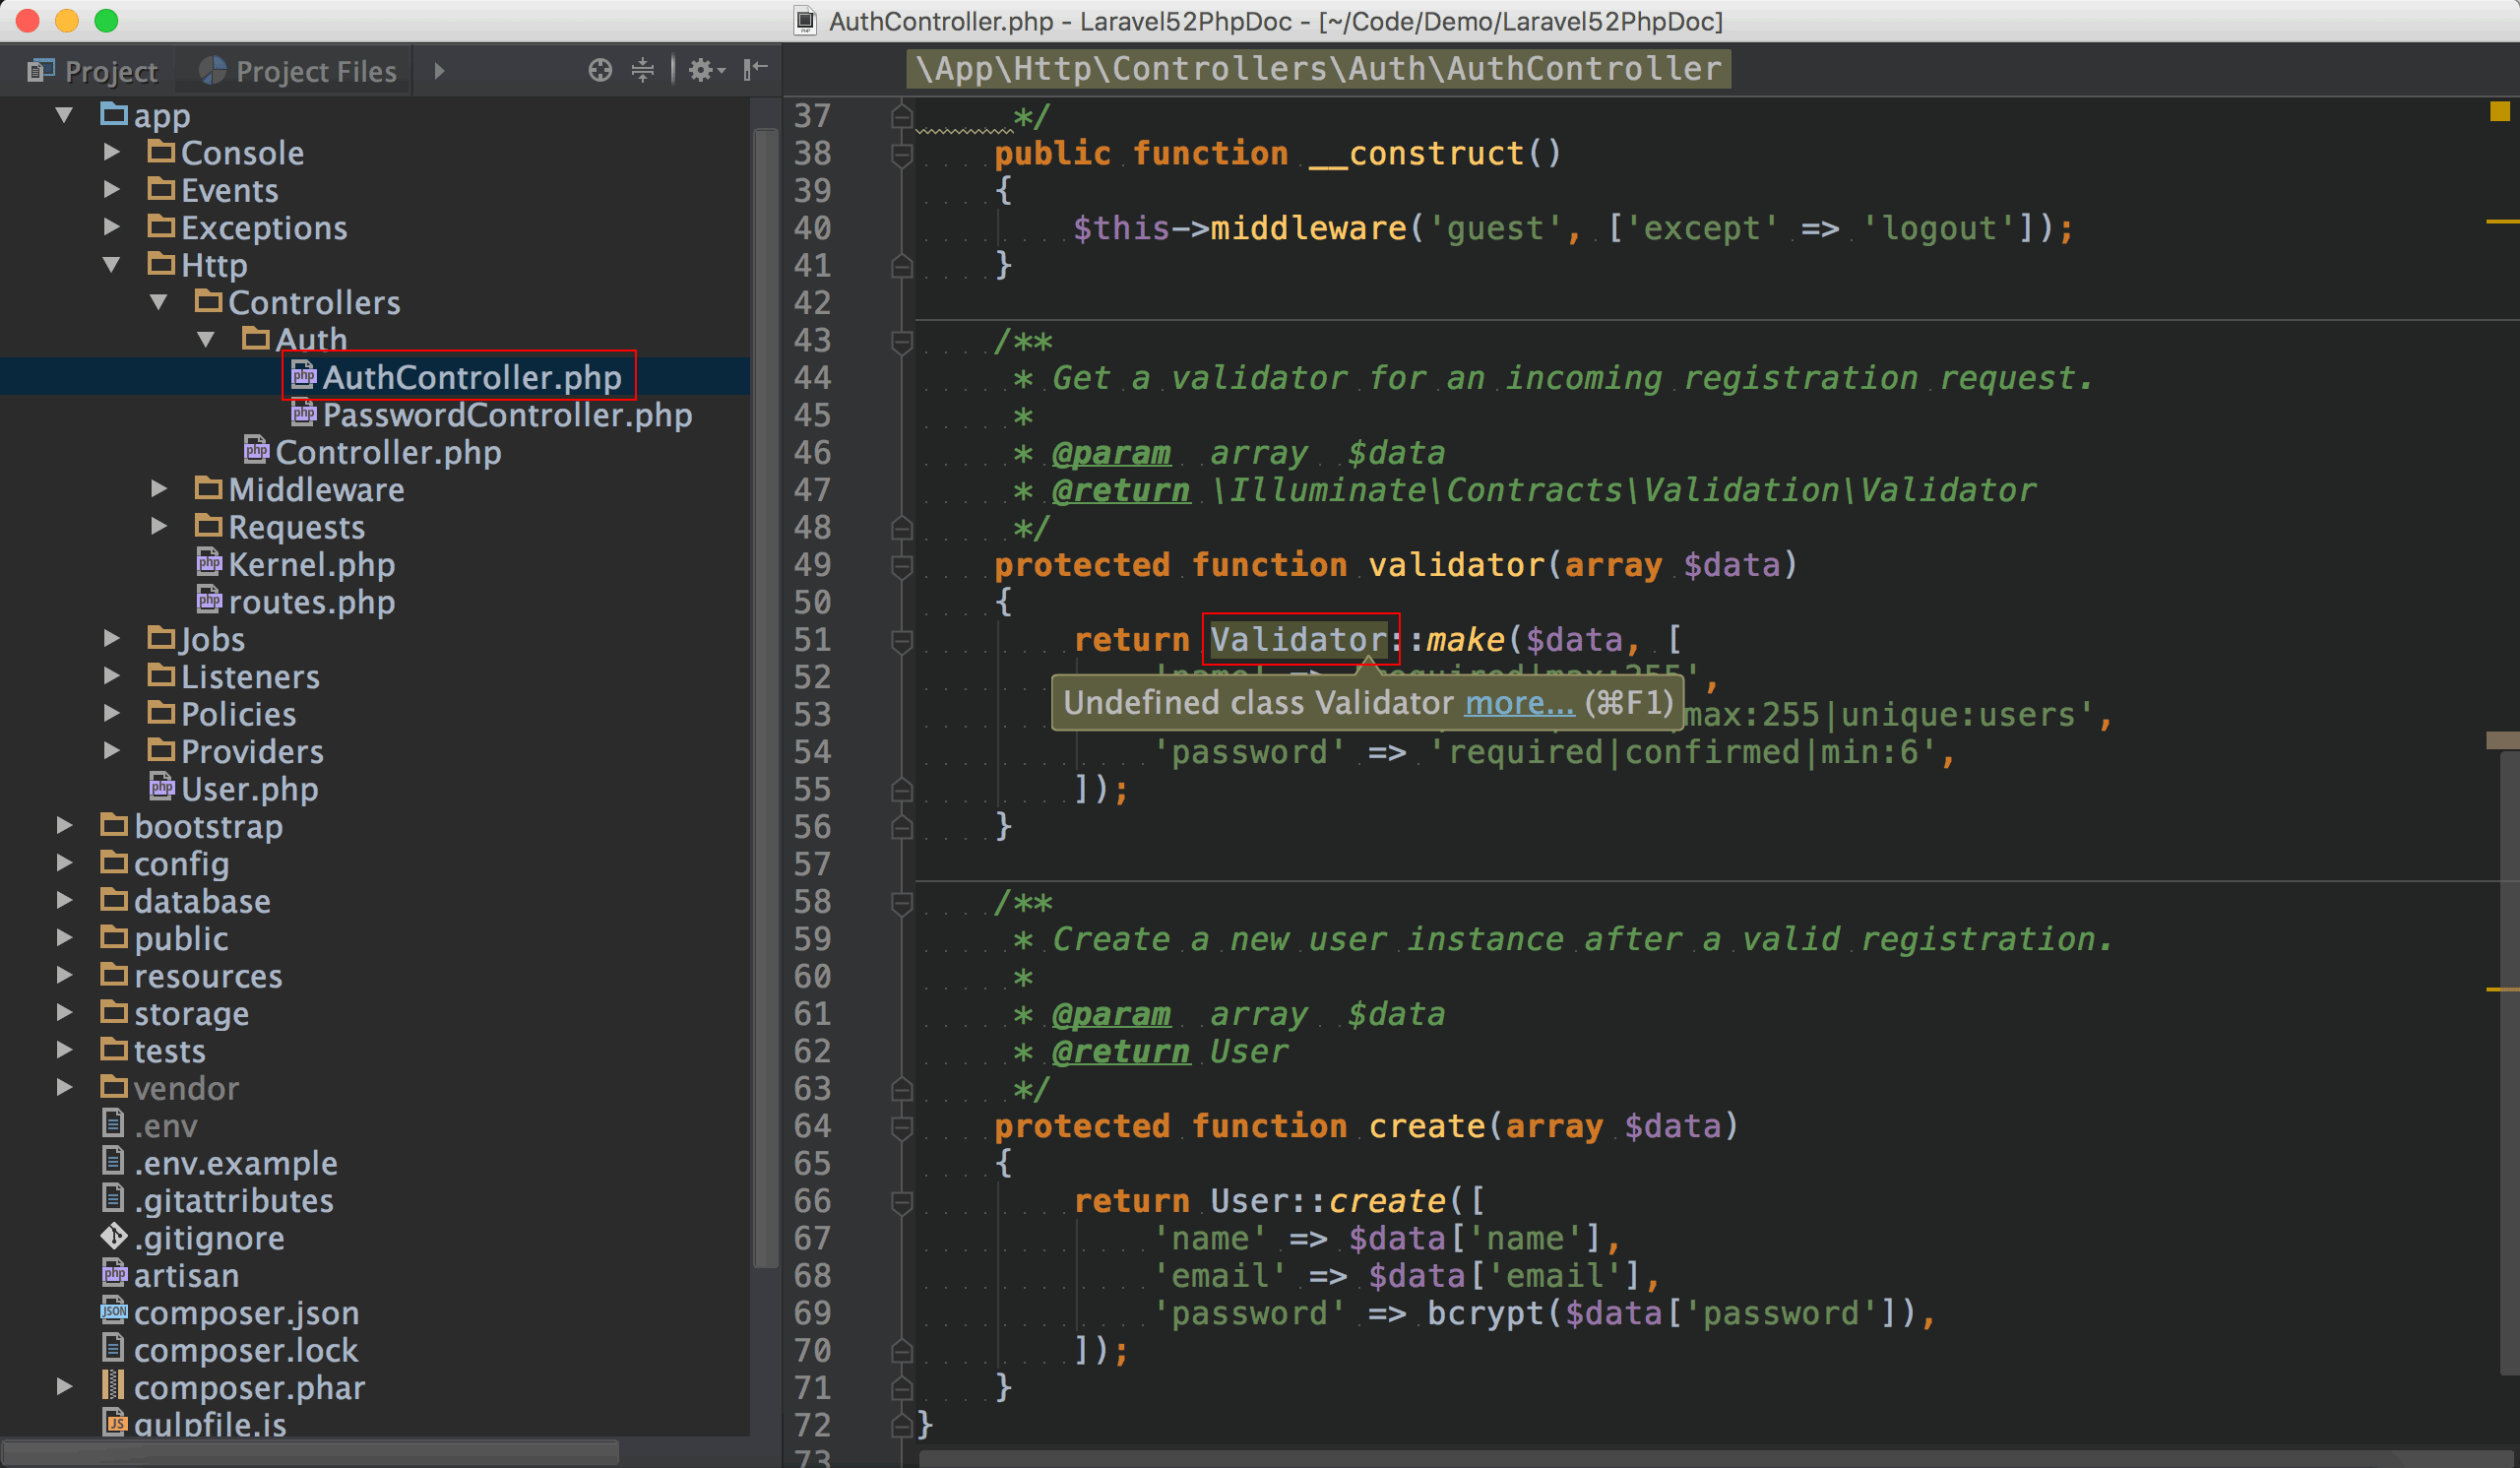
在AuthController中,PhpStorm抱怨Validator是Undefined class Validator。
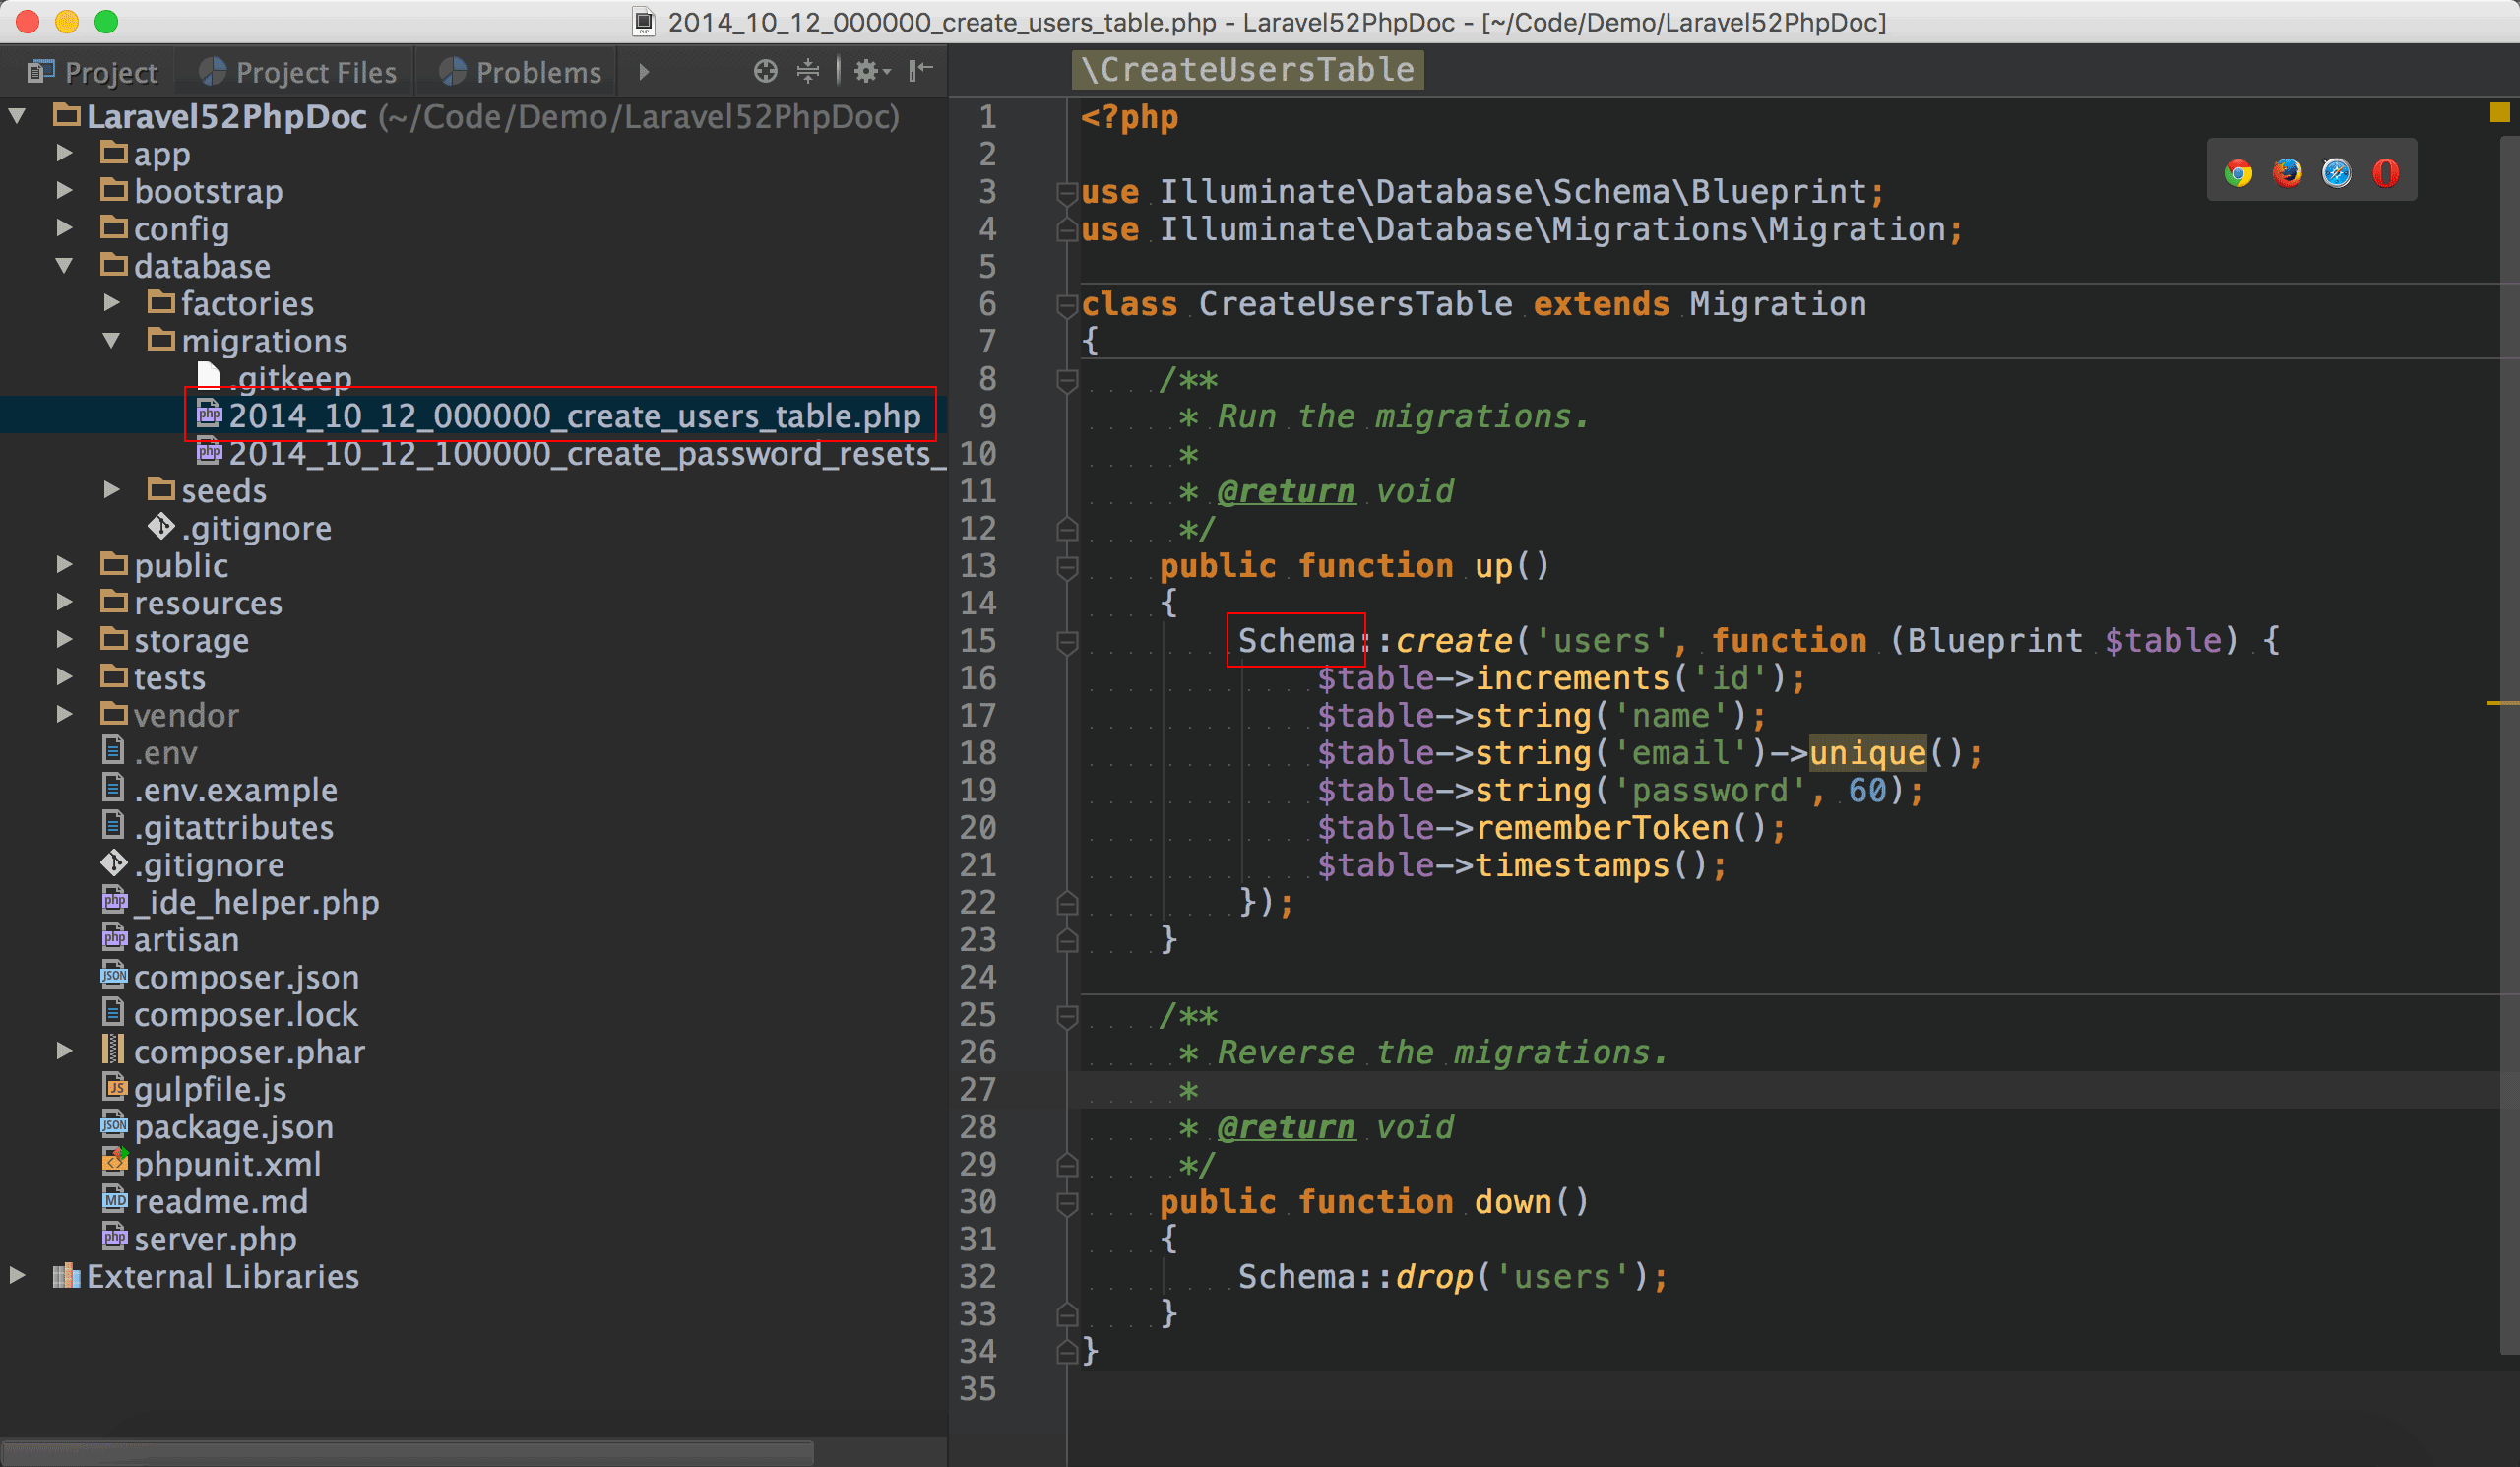
Schema Builder
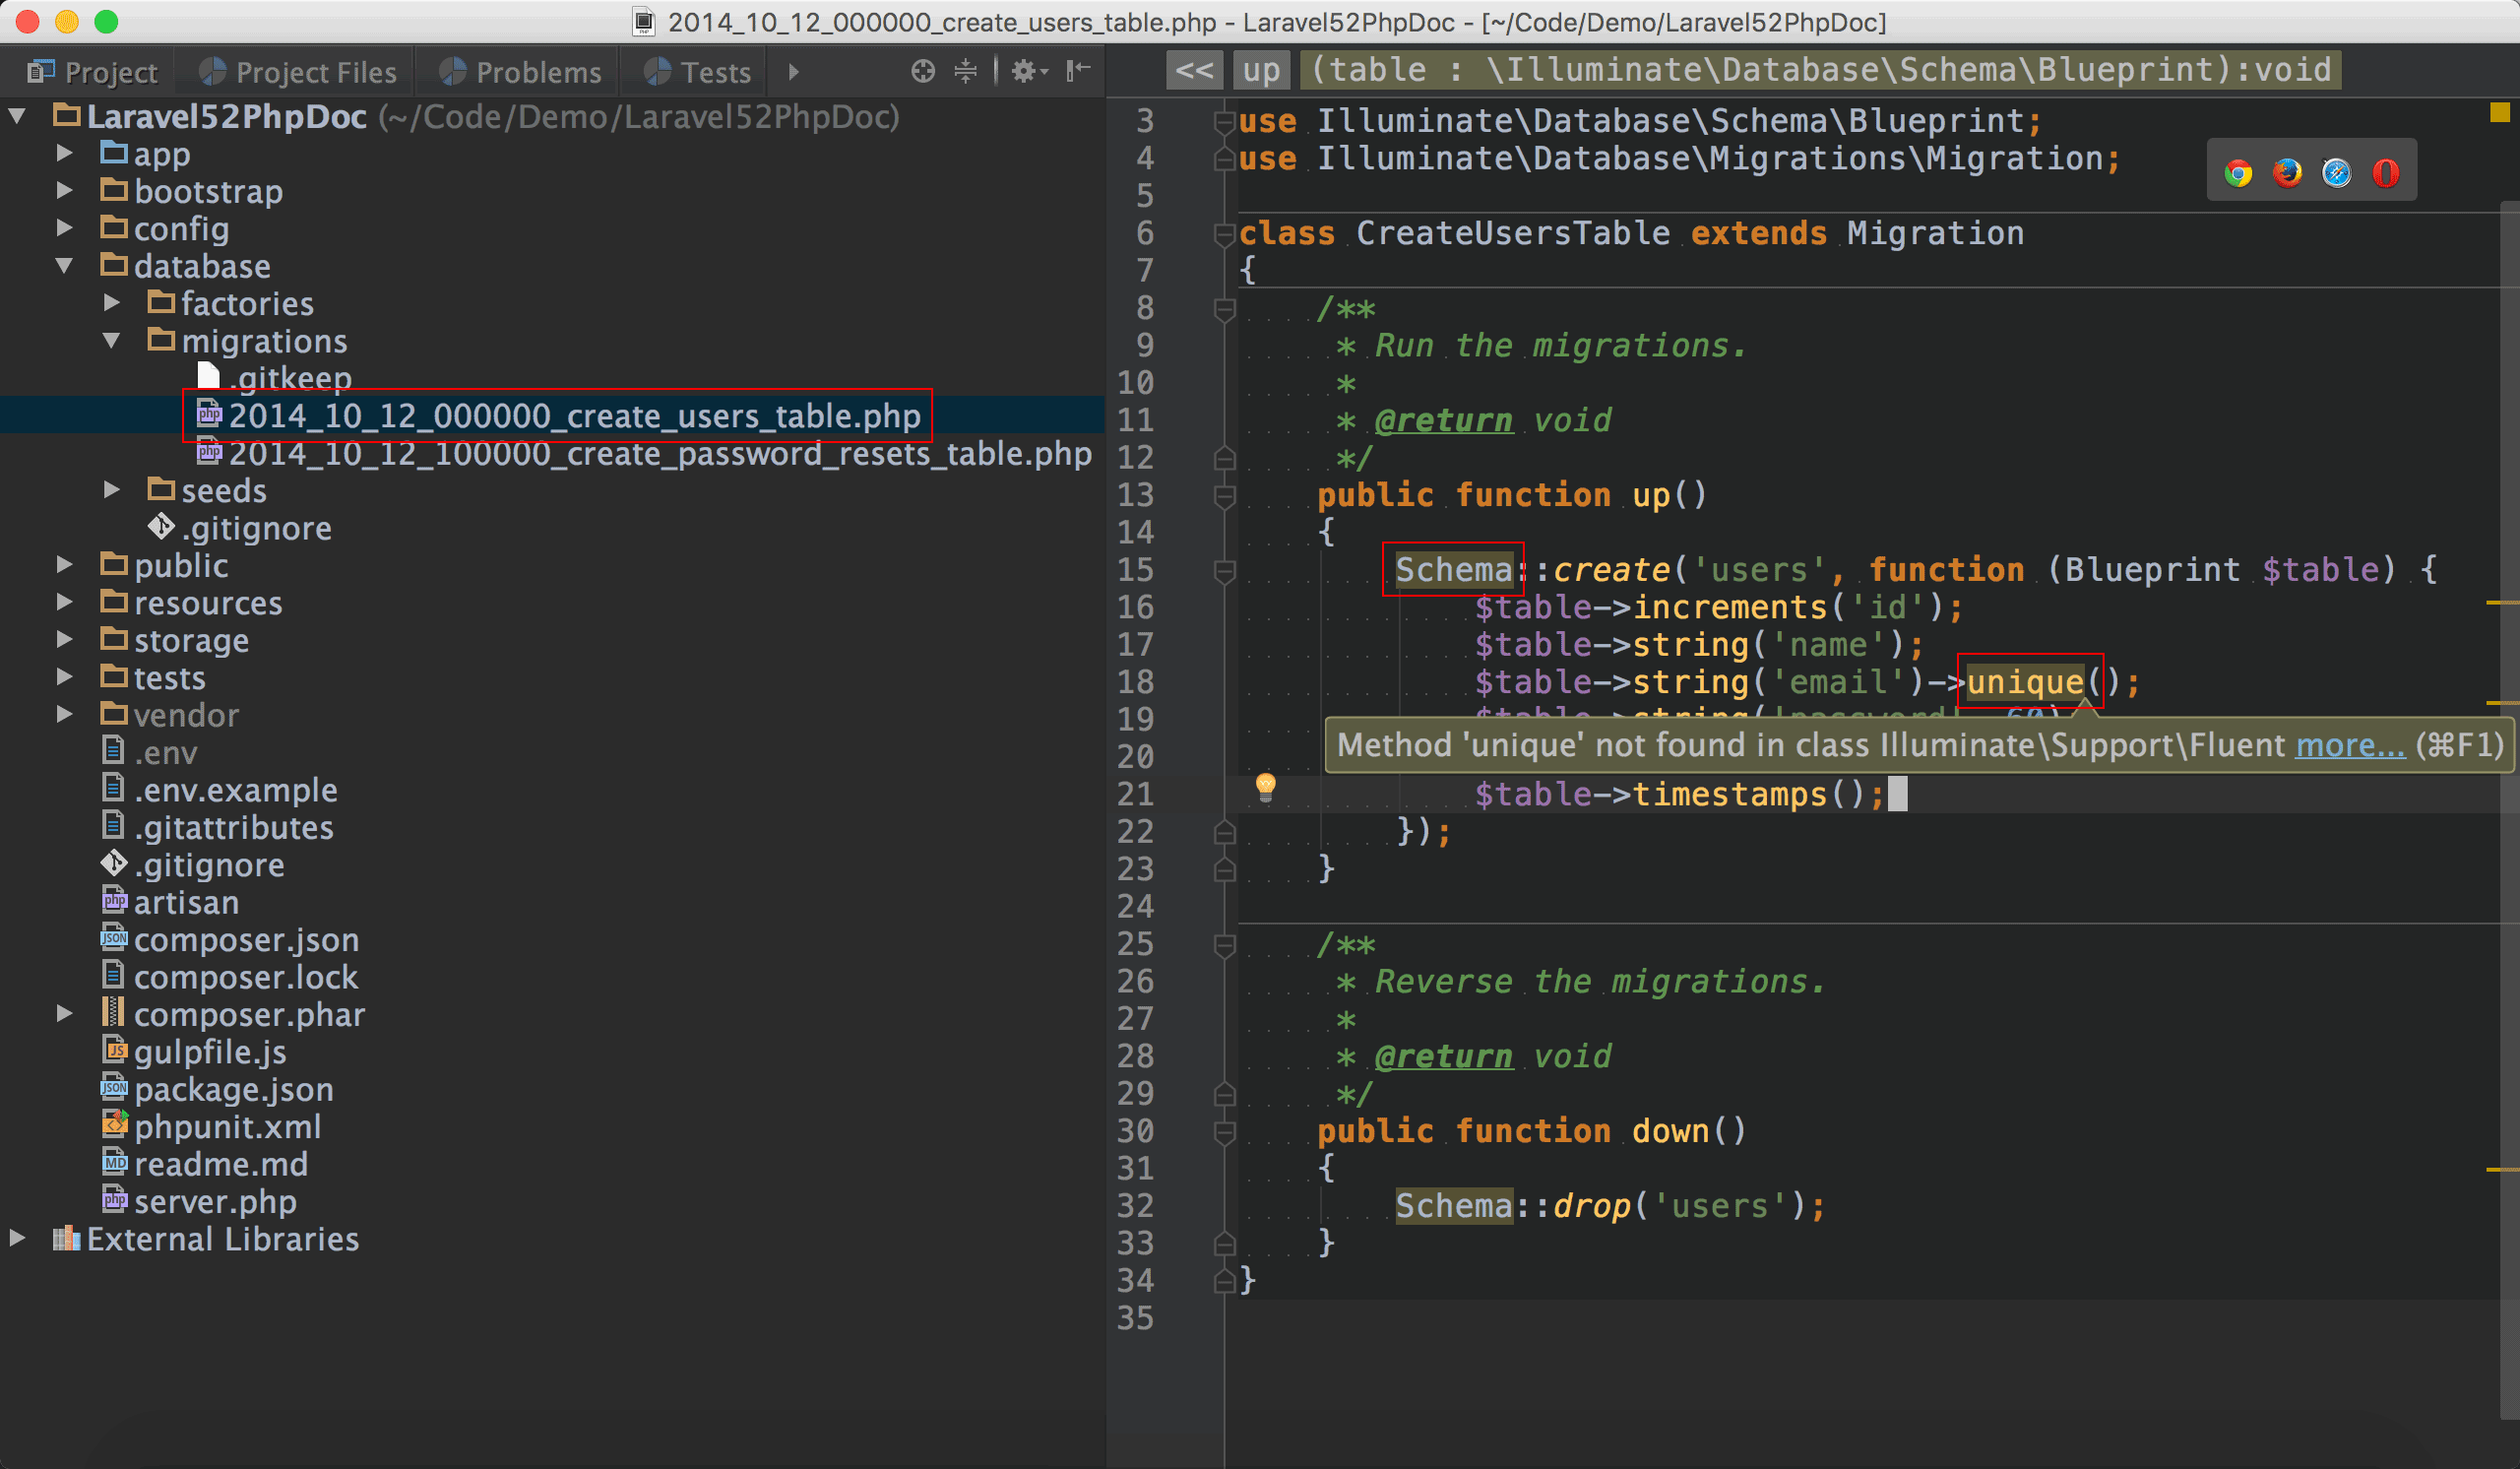
在user的migration中,PhpStorm抱怨Schema是Undefined class Schema。
還抱怨了unique()是Method not found。
之所以會如此,root cause有兩個 :
Route、Validator與Schema使用了Laravel特有的Facade機制,導致PhpStorm無法解析。unique()使用了PHP獨有的Overloading機制,可以動態產生property與method,也因為是動態產生,所以PhpStorm無法解析。1 1PHP的Overloading與一般物件導向語言所謂的Overloading不同,詳細請參考PHP與C#語法快速導覽之Overloading
Laravel IDE Helper
有了問題就要解決,我們先來解決第一個問題 : Laravel特有的Facade機制。
Laravel IDE Helper讓PhpStorm看得懂Laravel Facade,還增加了許多其他的支援。2 2Laravel IDE Helper作者Barry vd. Heuvel的另一個大作Laravel Debugbar,詳細請參考如何使用Laravel Debugbar?
安裝
1 | oomusou@mac:~/MyProject$ composer require barryvdh/laravel-ide-helper --dev |
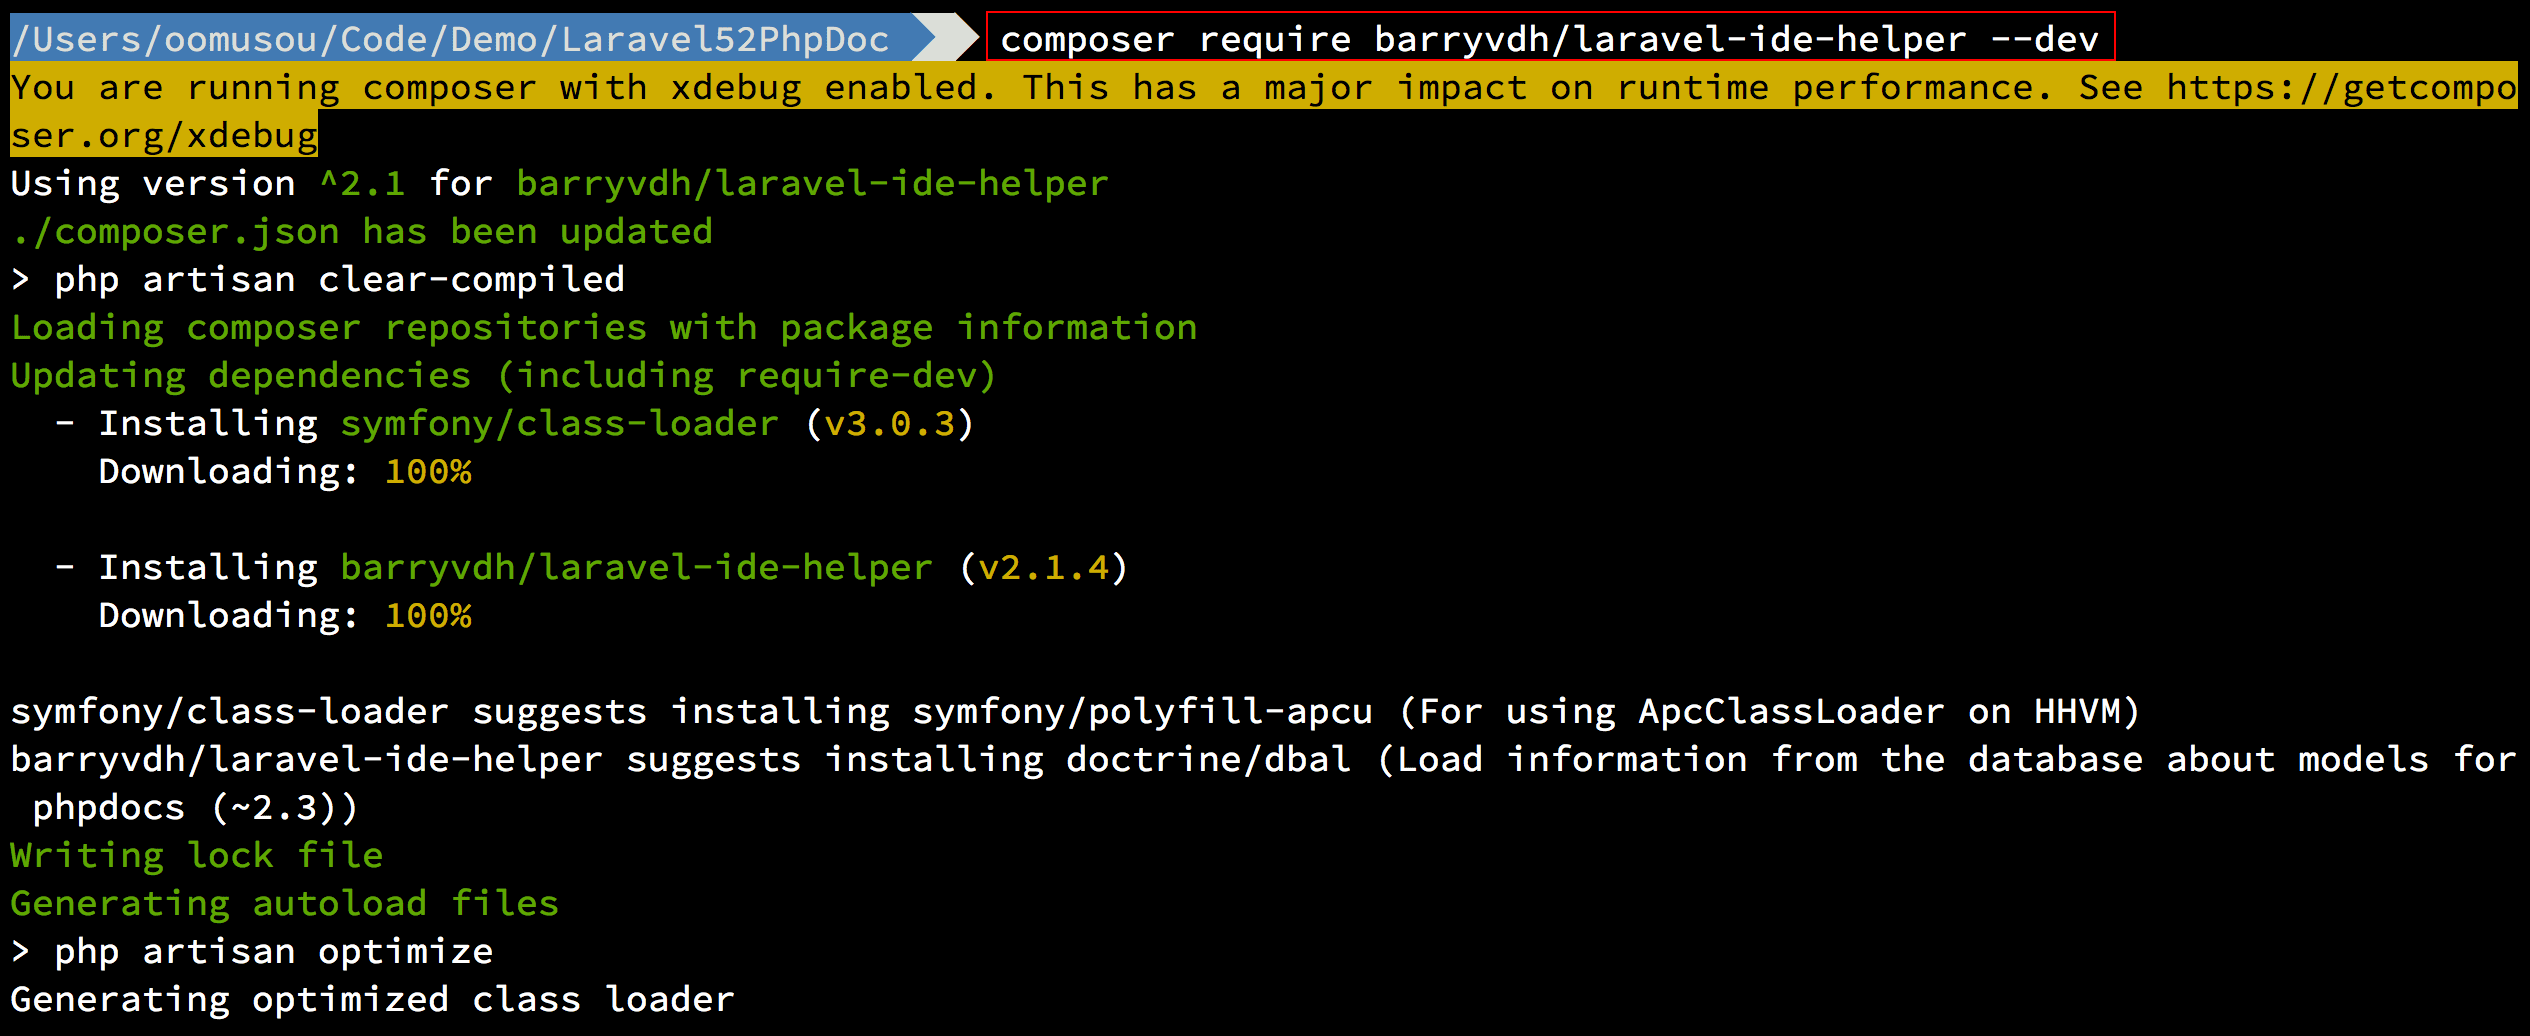
使用composer安裝Laravel IDE Helper,因為此套件只會在開發使用,可以加上--dev參數。3 3關於--dev參數,詳細請參考如何使用Laravel Debugbar#使用Composer安裝
1 | oomusou@mac:~/MyProject$ composer require doctrine/dbal --dev |
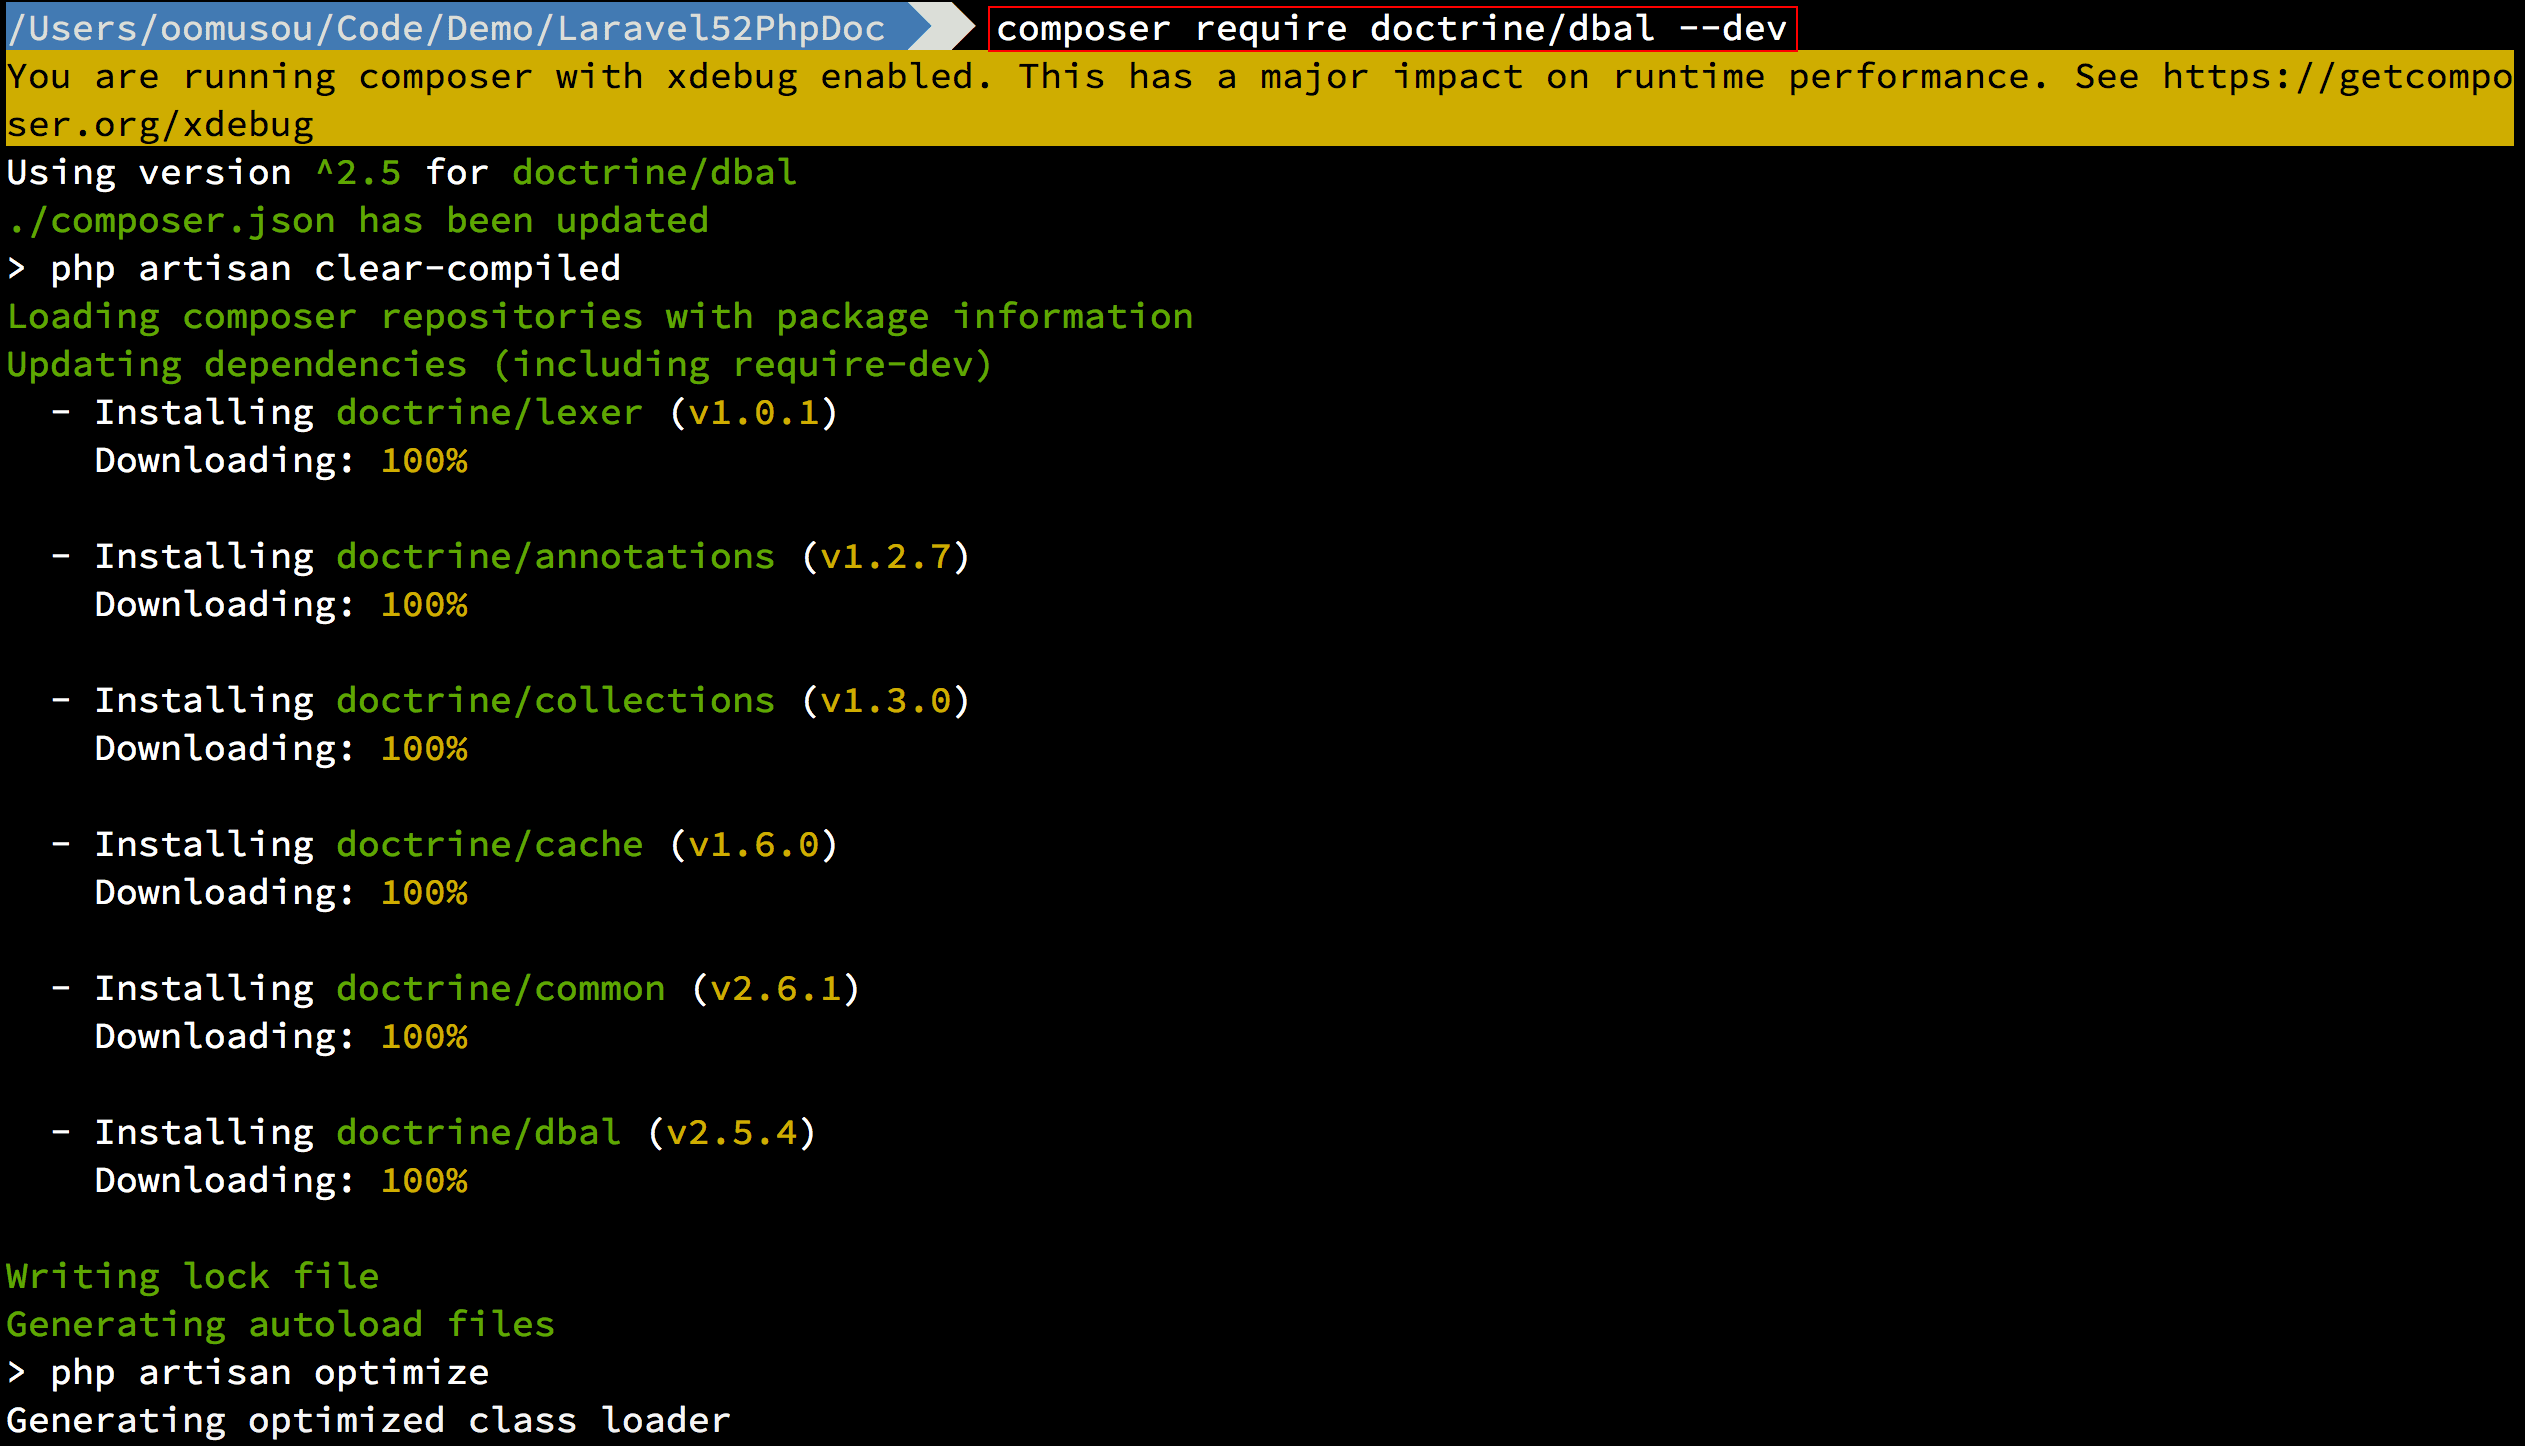
Laravel IDE Helper會透過doctrine/dbal去抓table的schema,替model加上欄位註解。
Service Provider
1 | Barryvdh\LaravelIdeHelper\IdeHelperServiceProvider::class, |
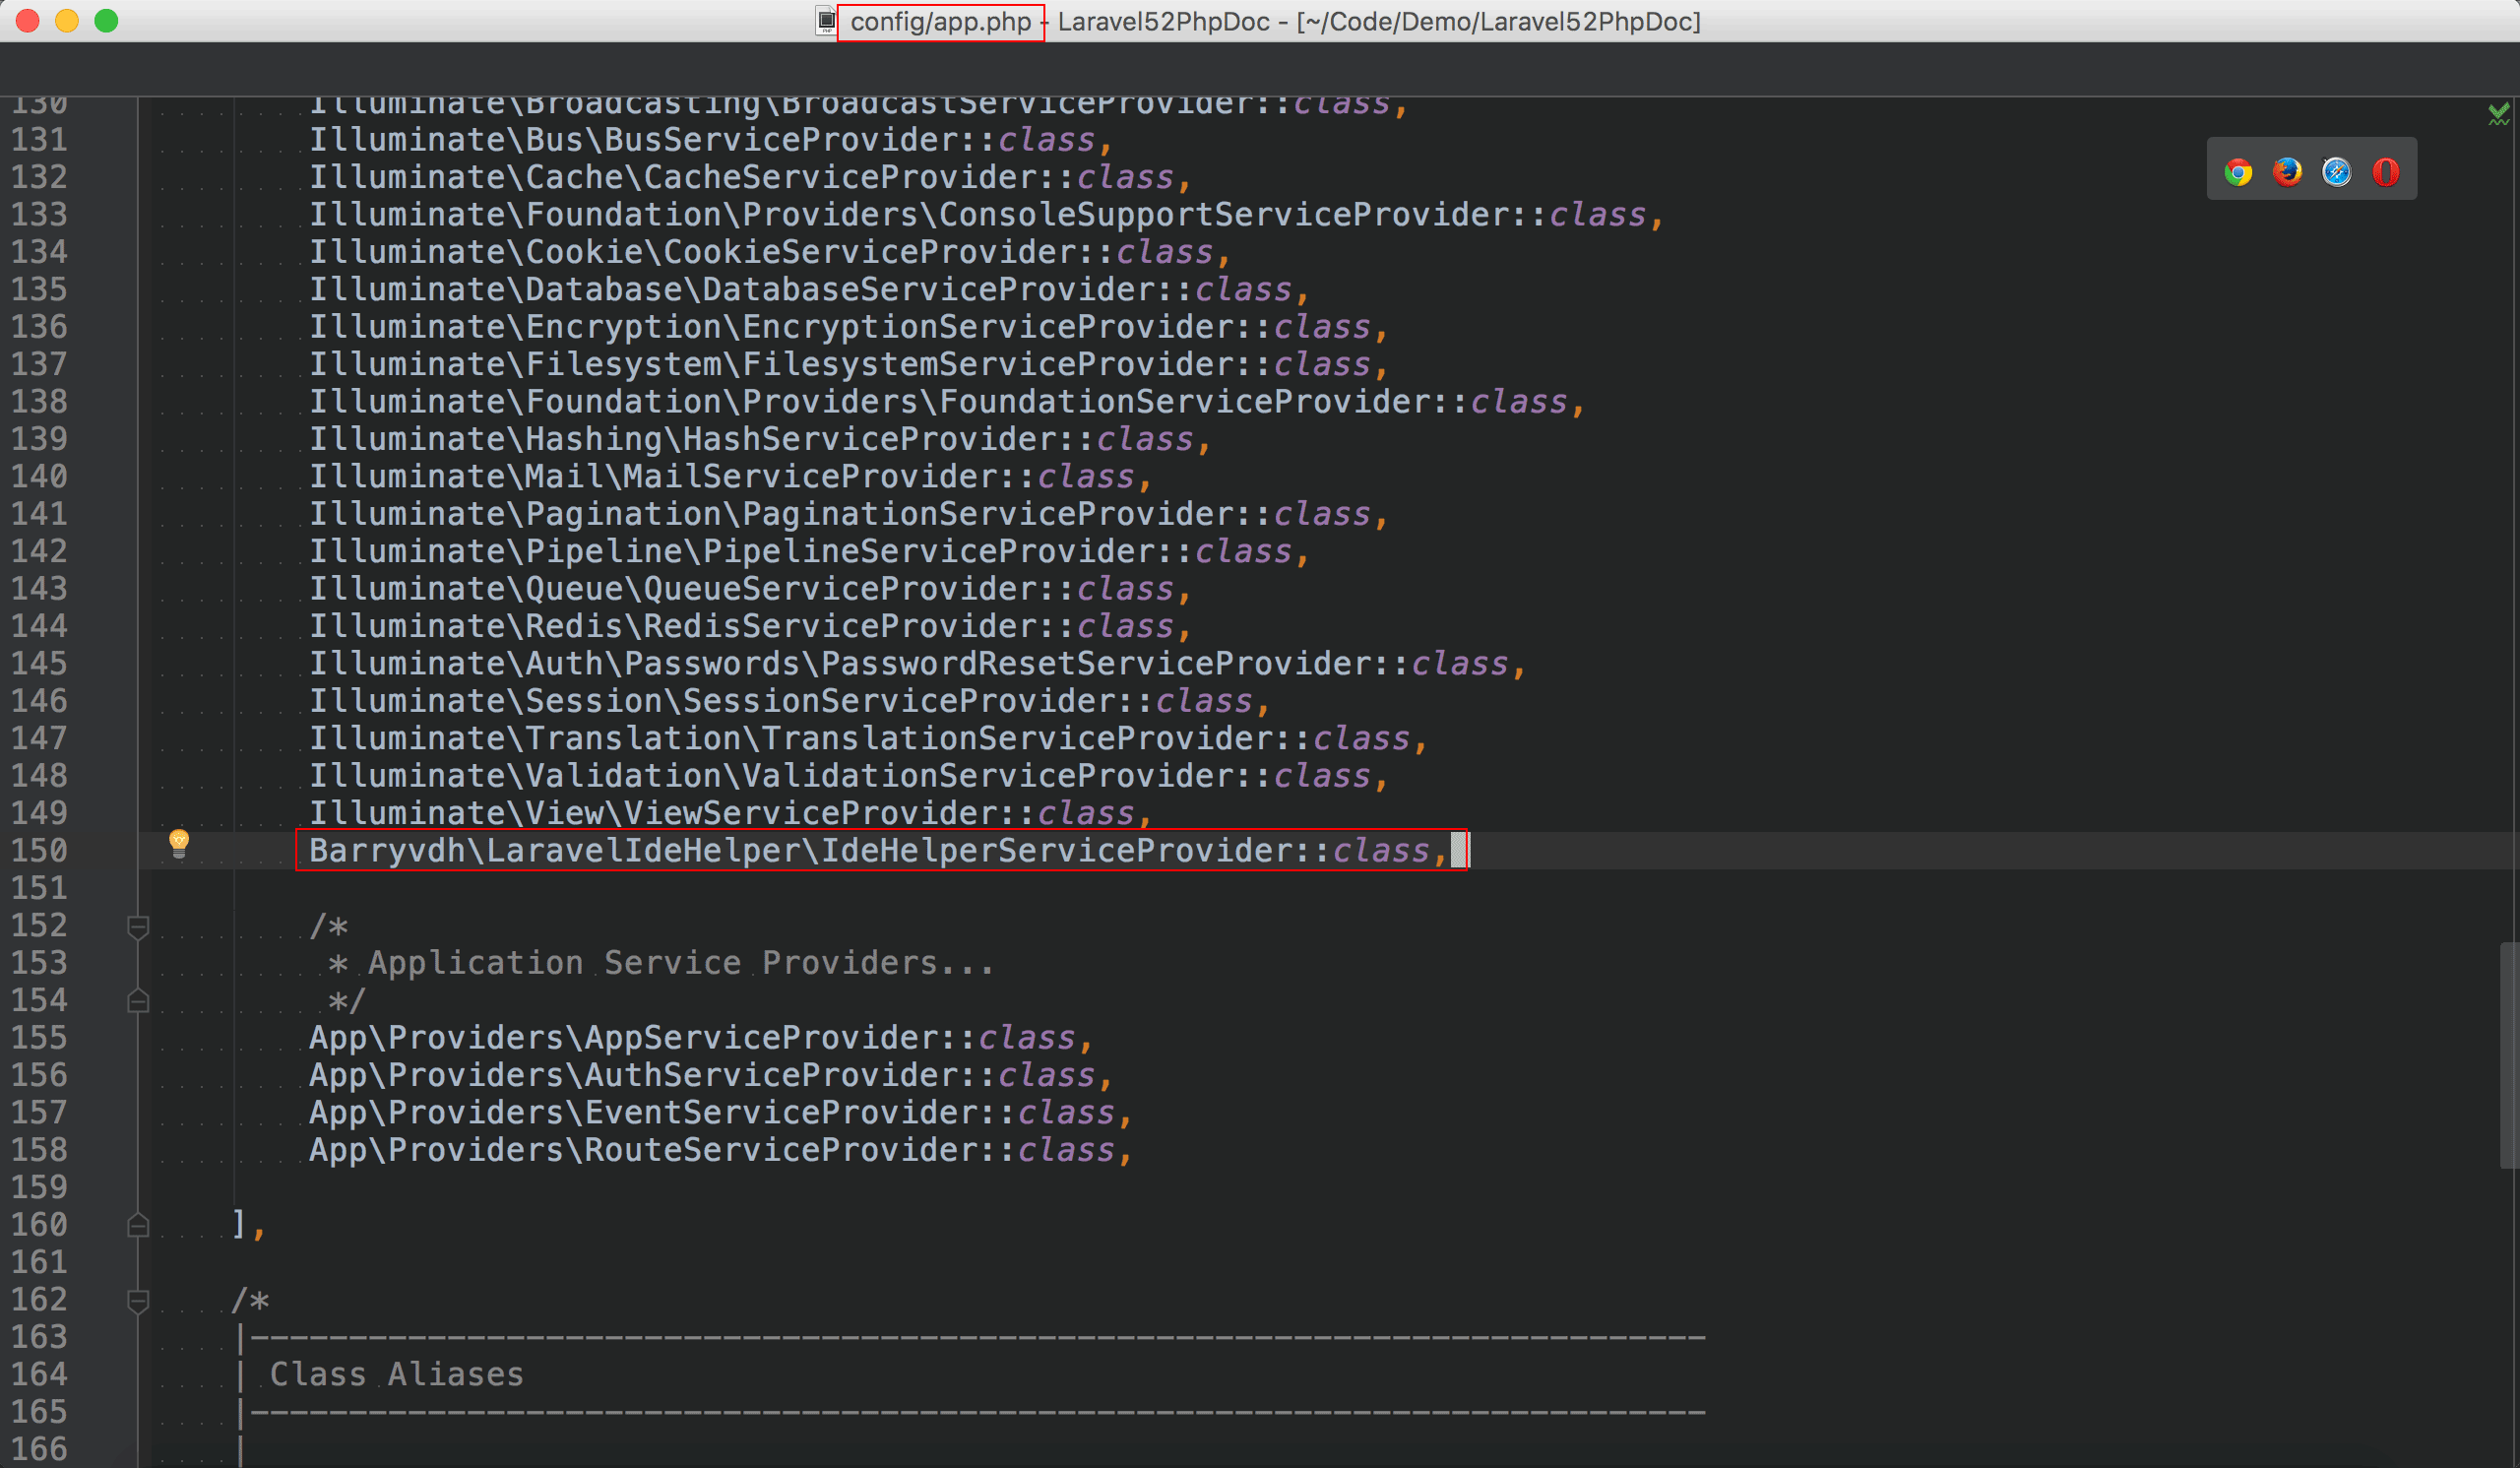
在config/app.php中加入IdeHelperServiceProvider。
設定檔
1 | oomusou@mac:~/MyProject$ php artisan vendor:publish --provider="Barryvdh\LaravelIdeHelper\IdeHelperServiceProvider" --tag=config |

產生Laravel IDE Helper自己的設定檔,位在config/ide-helper.php。
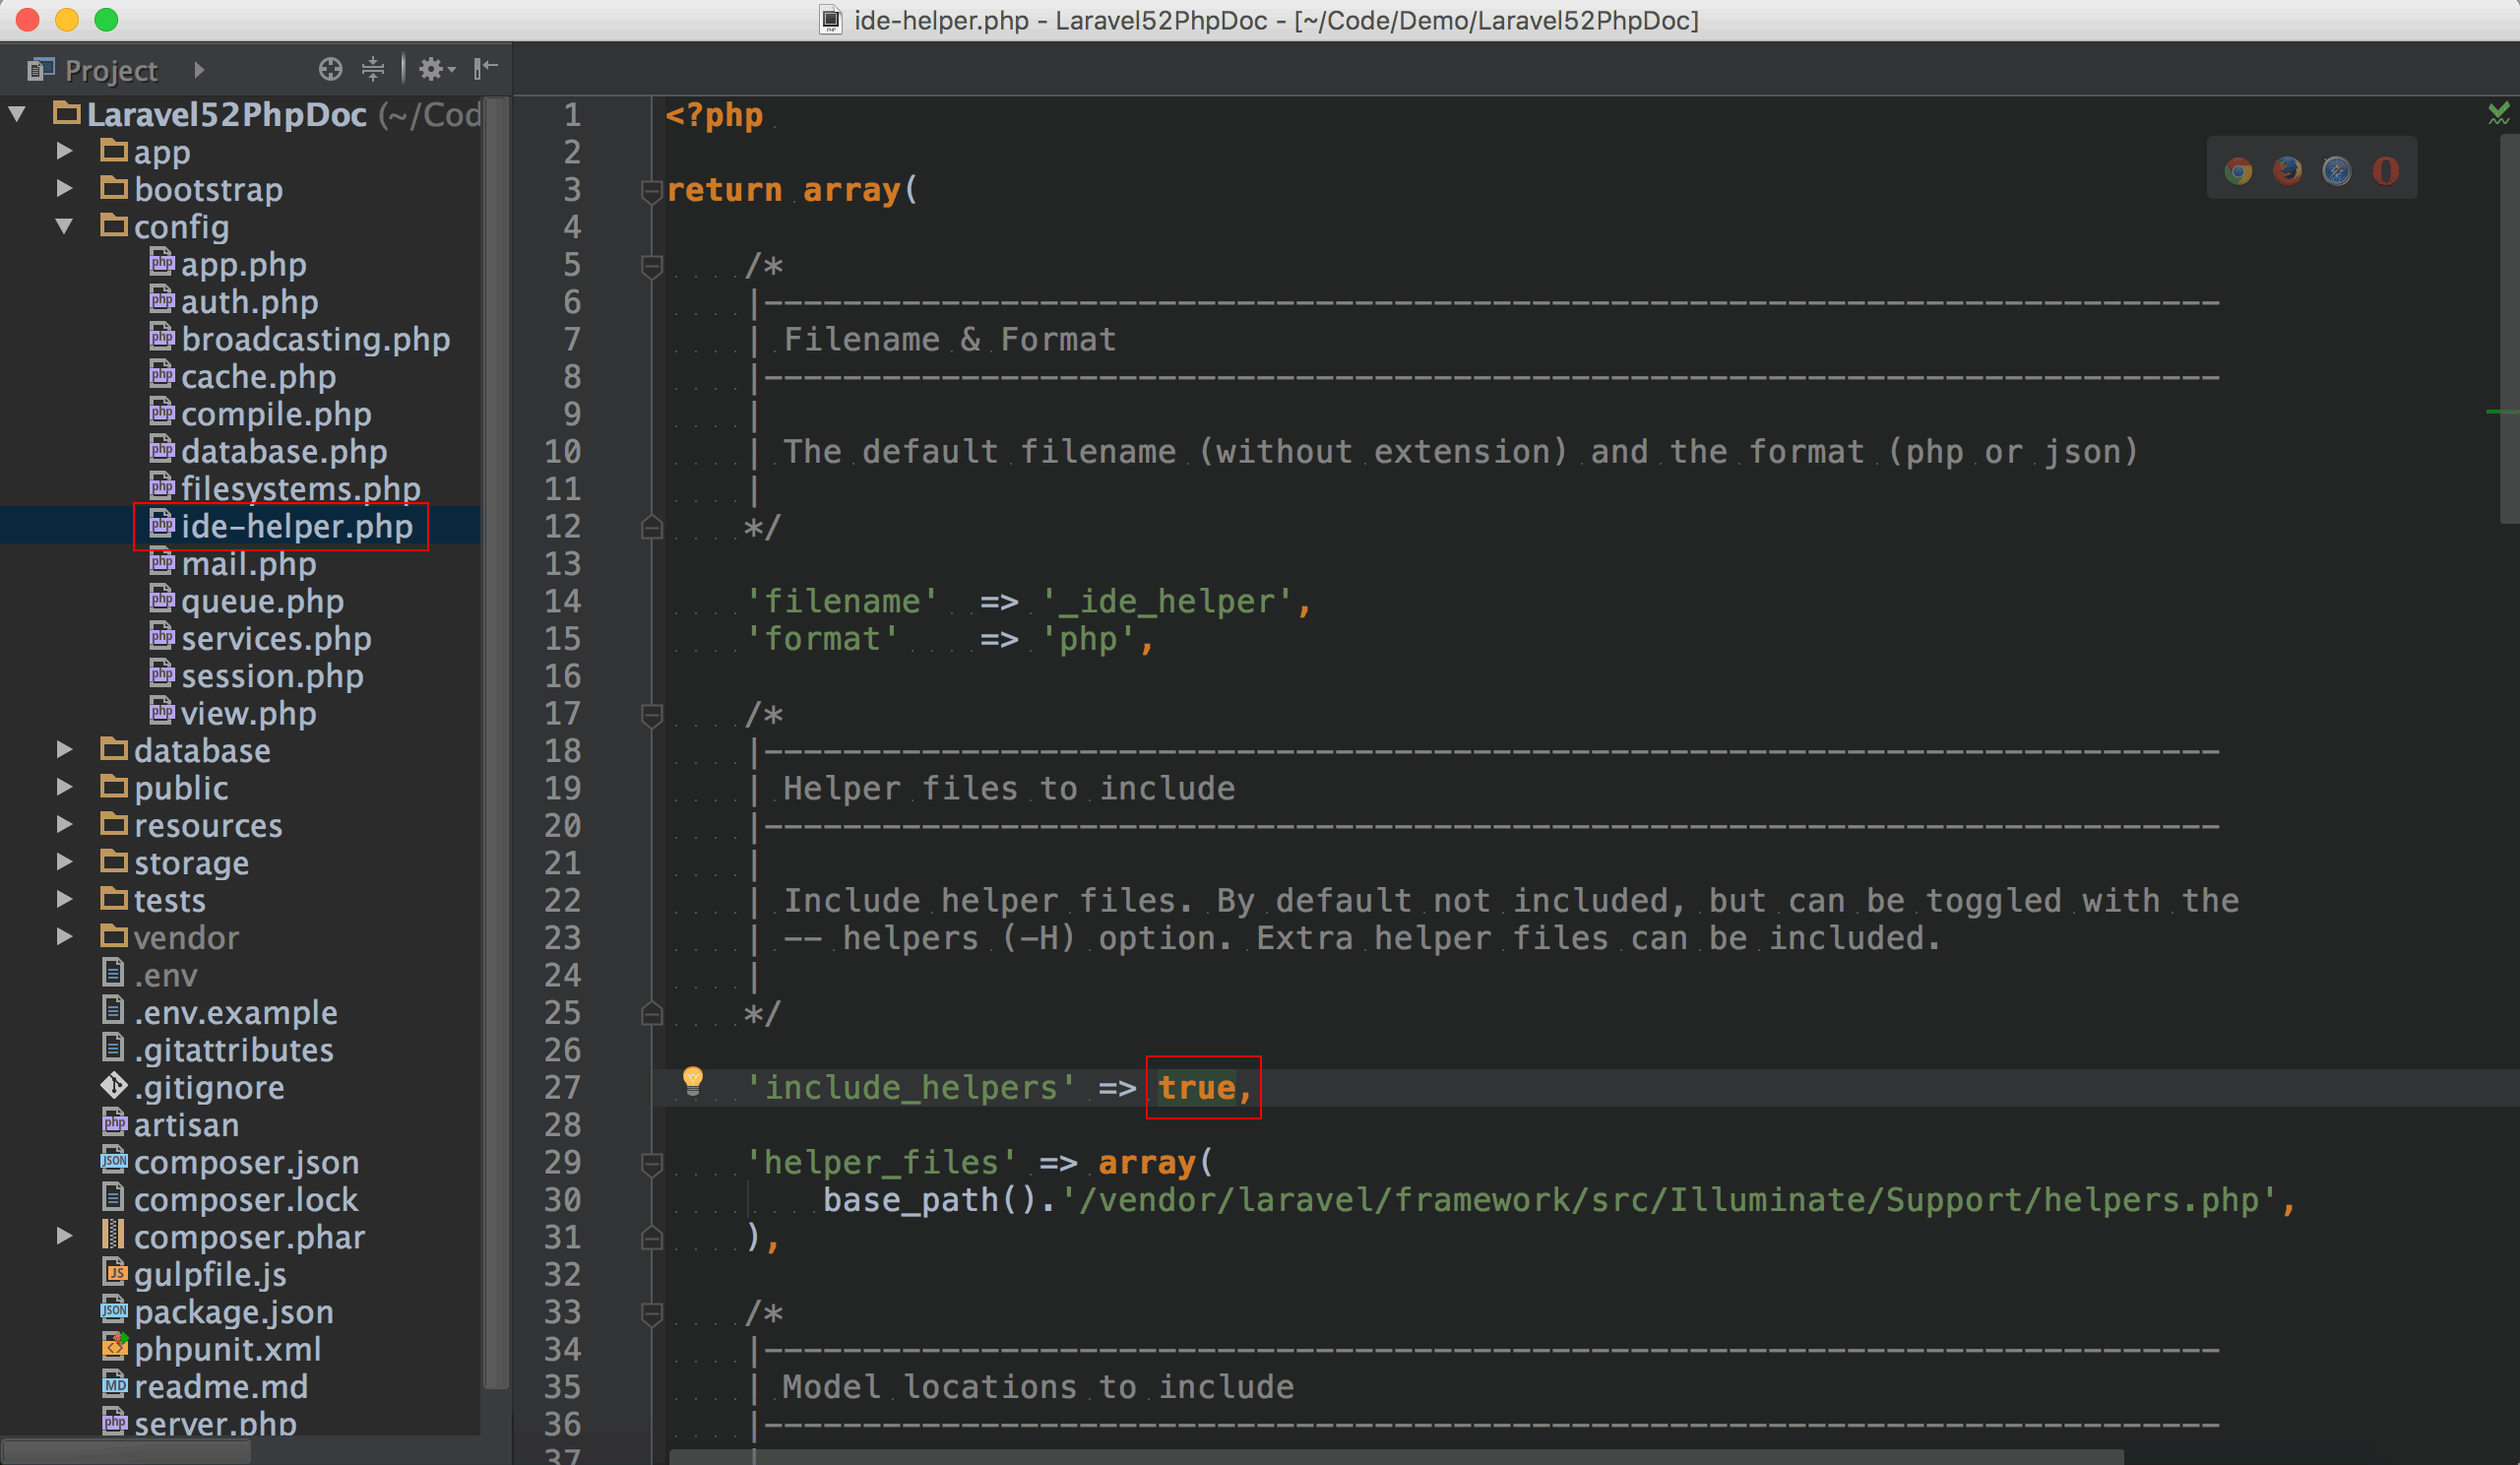
建議將include_helpers設定為true,讓Laravel IDE Helper幫我們建立helper function的註解。
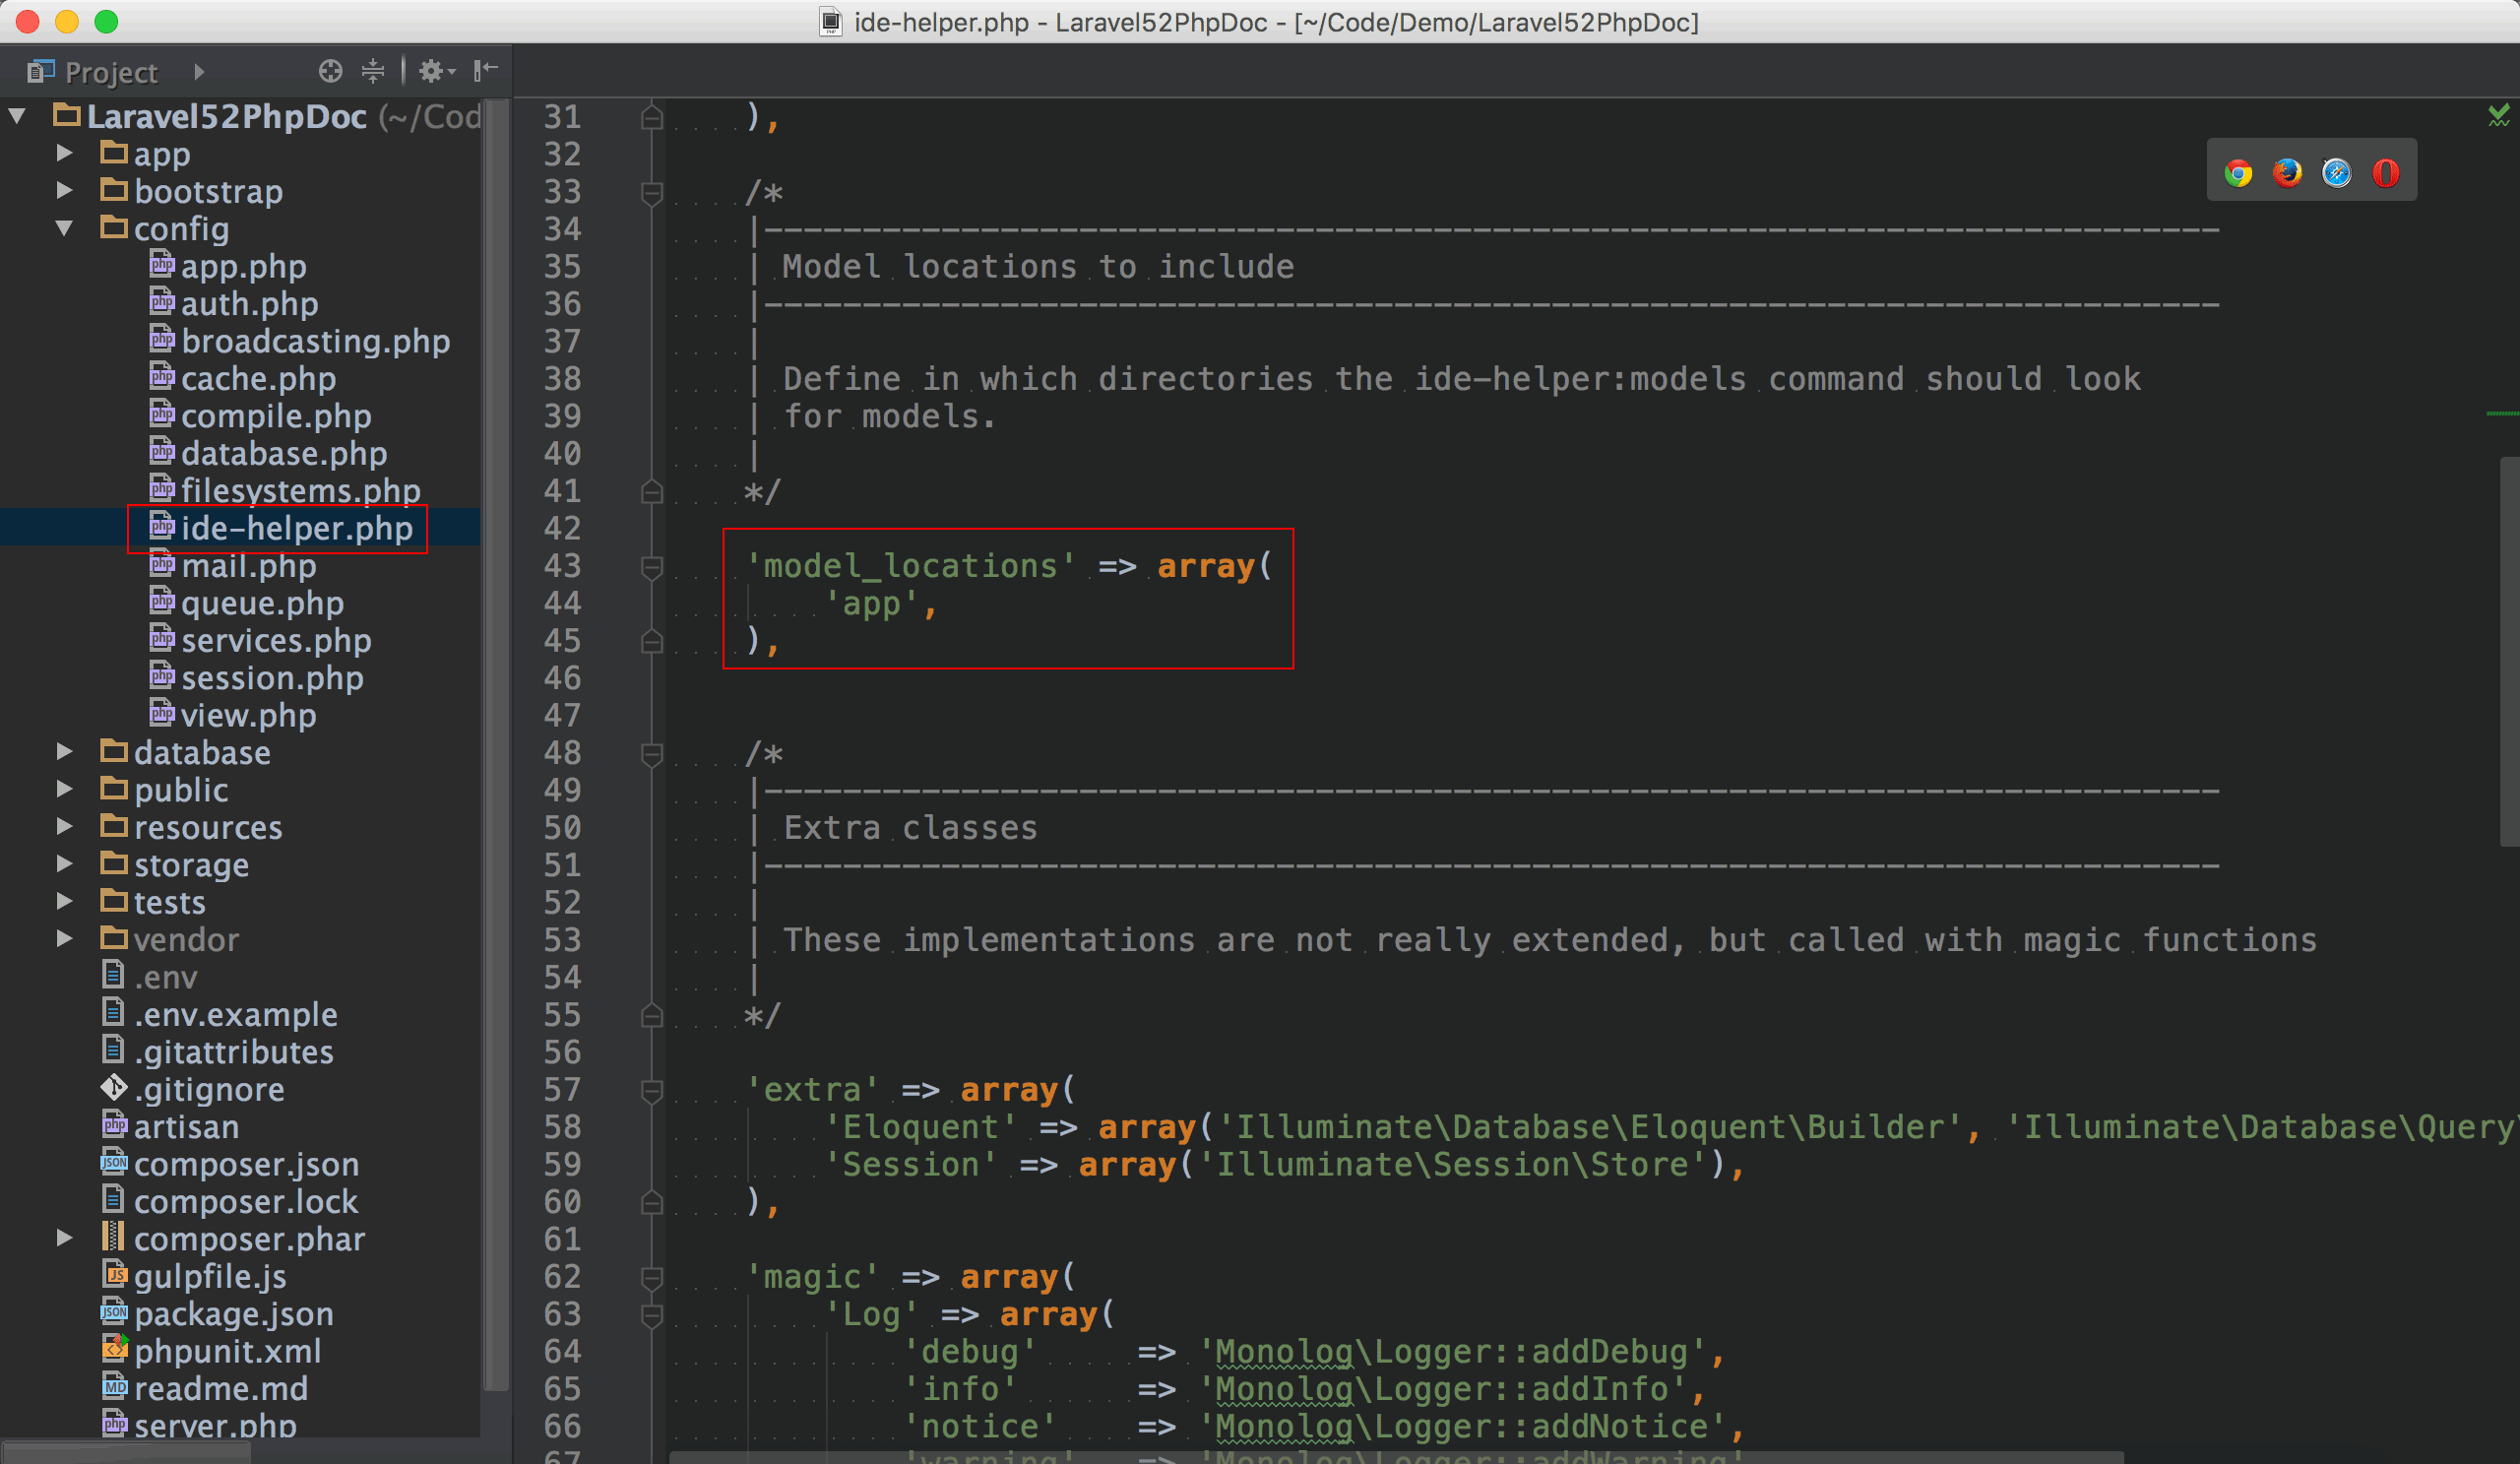
Laravel 5預設將model放在app目錄下,若你有自己的model目錄,請修改此設定。
資料庫連線
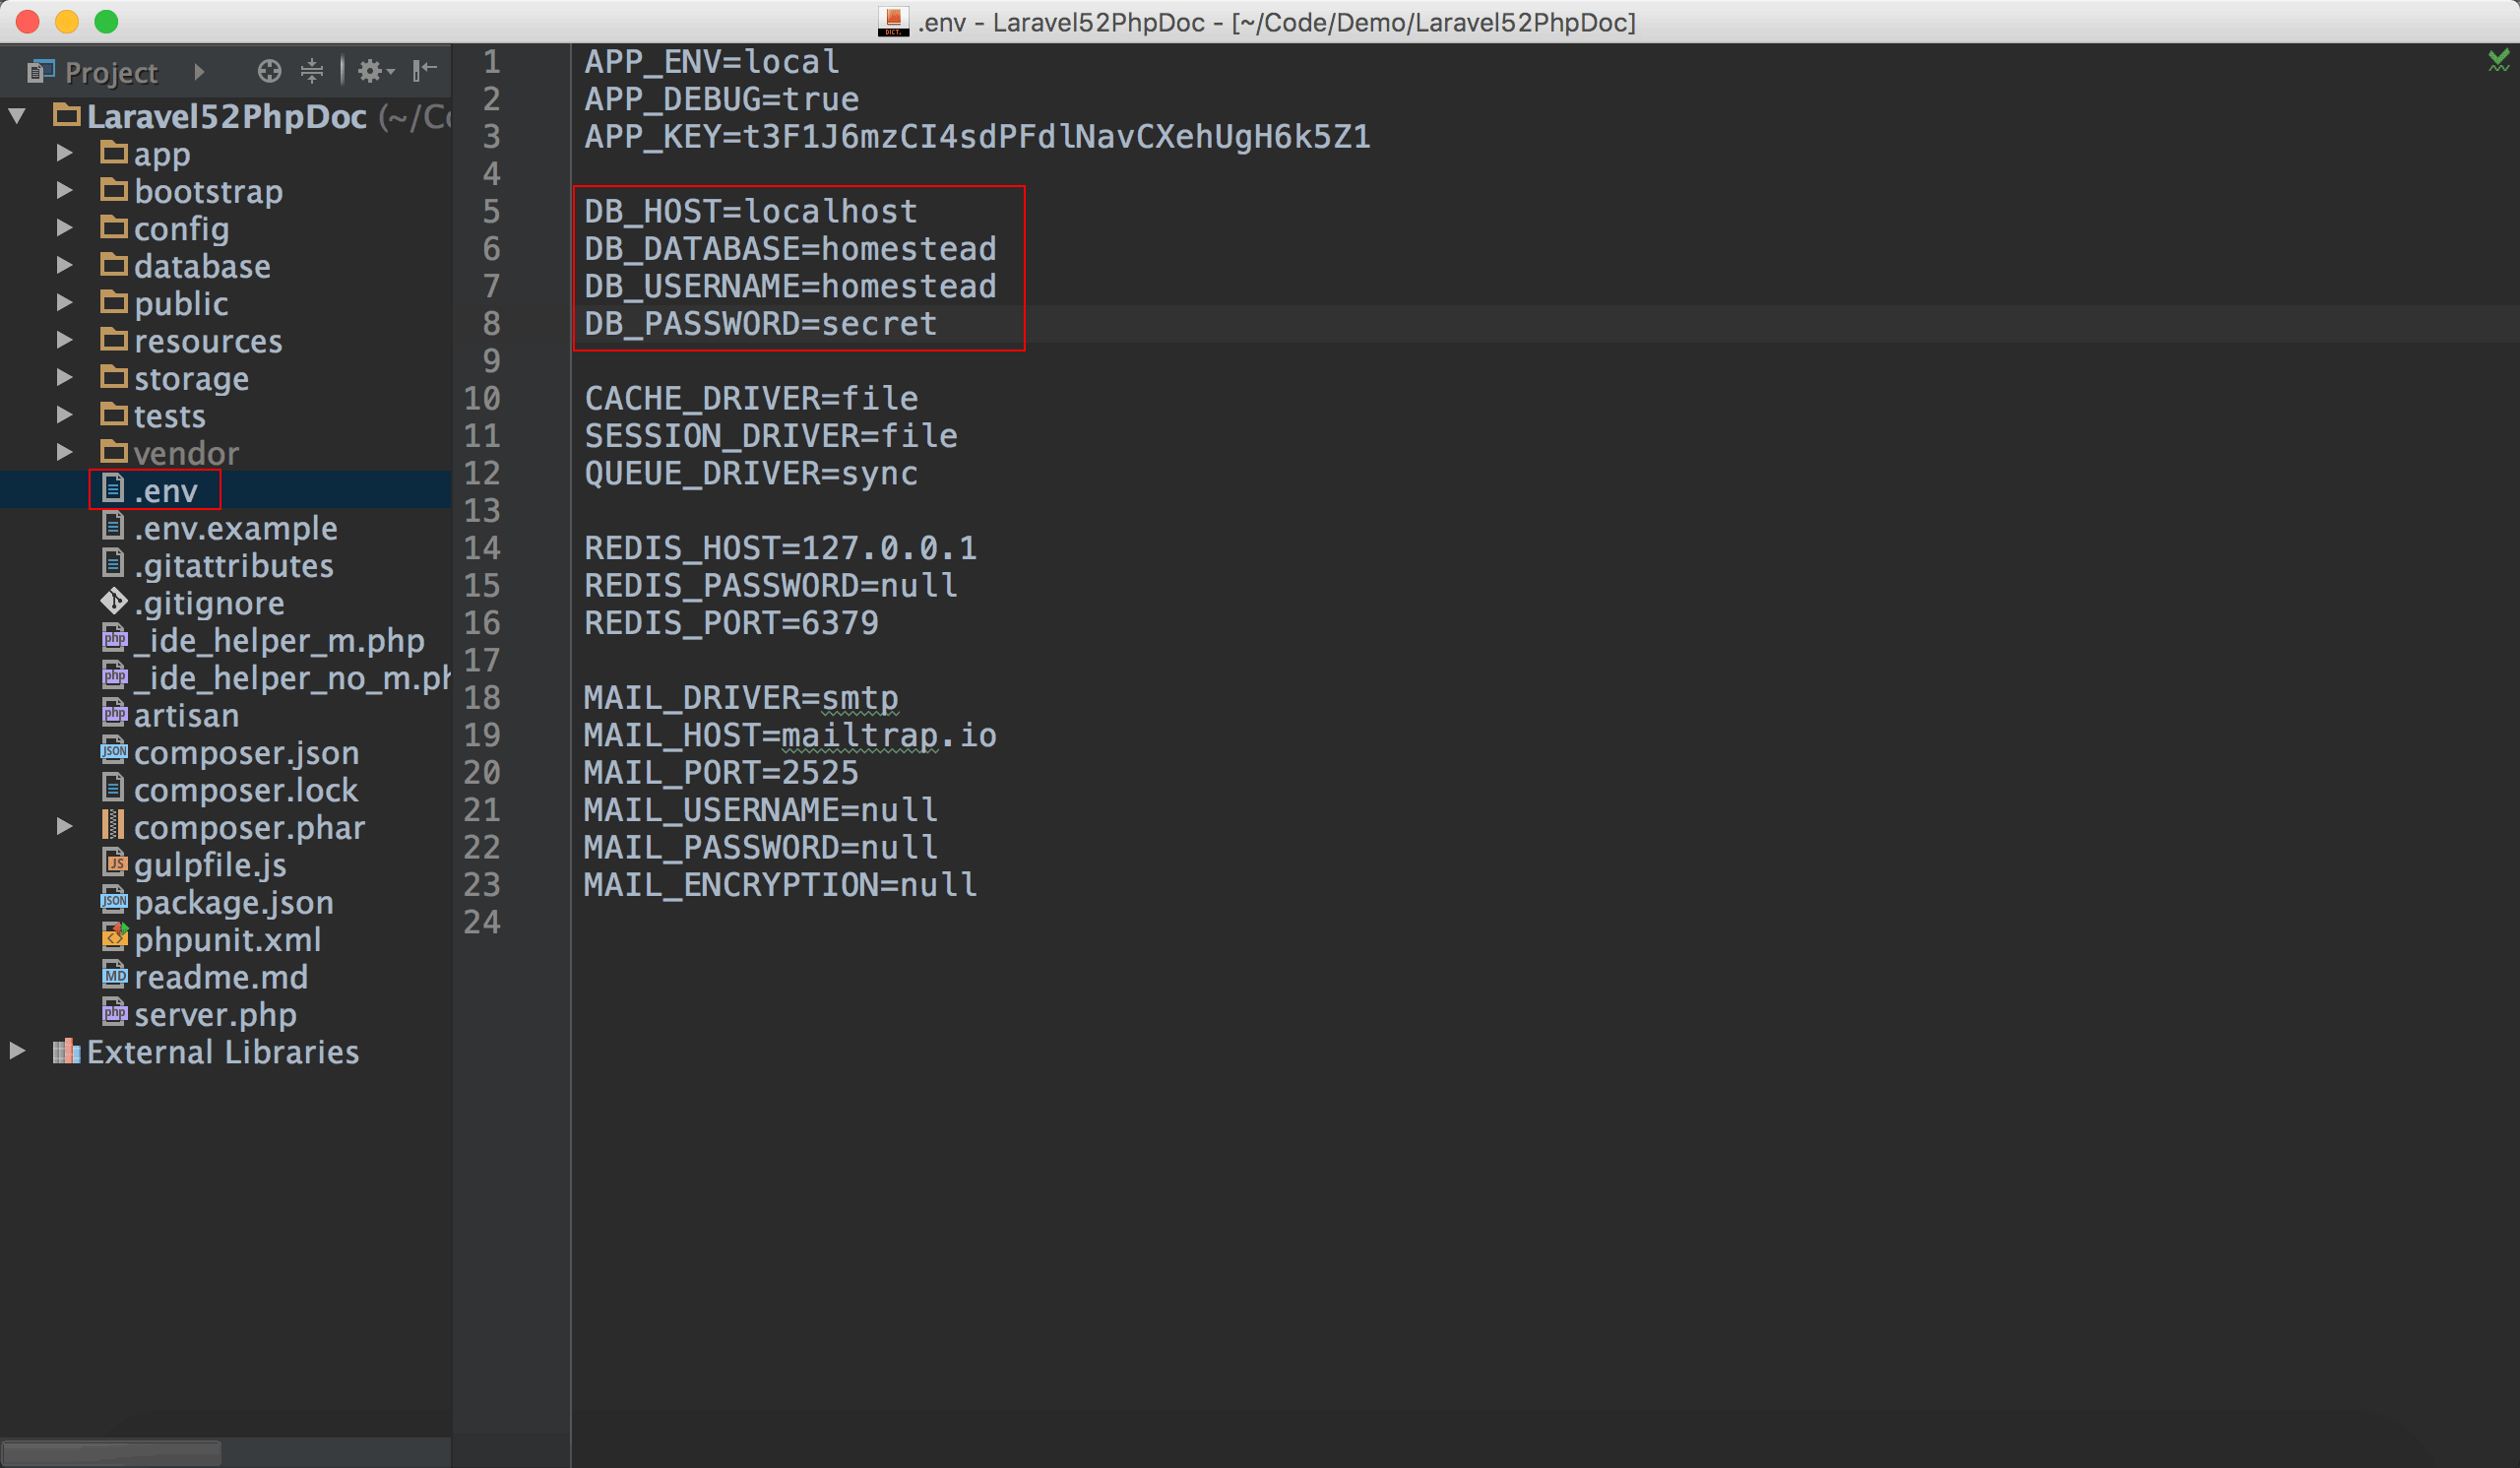
有些Facade與資料庫有關,先確定專案已經與資料庫順利連線。
Facade
1 | oomusou@mac:~/MyProject$ php artisan ide-helper:generate |

建立Laravel Facade的PHPDoc,產生了_ide_helper.php。
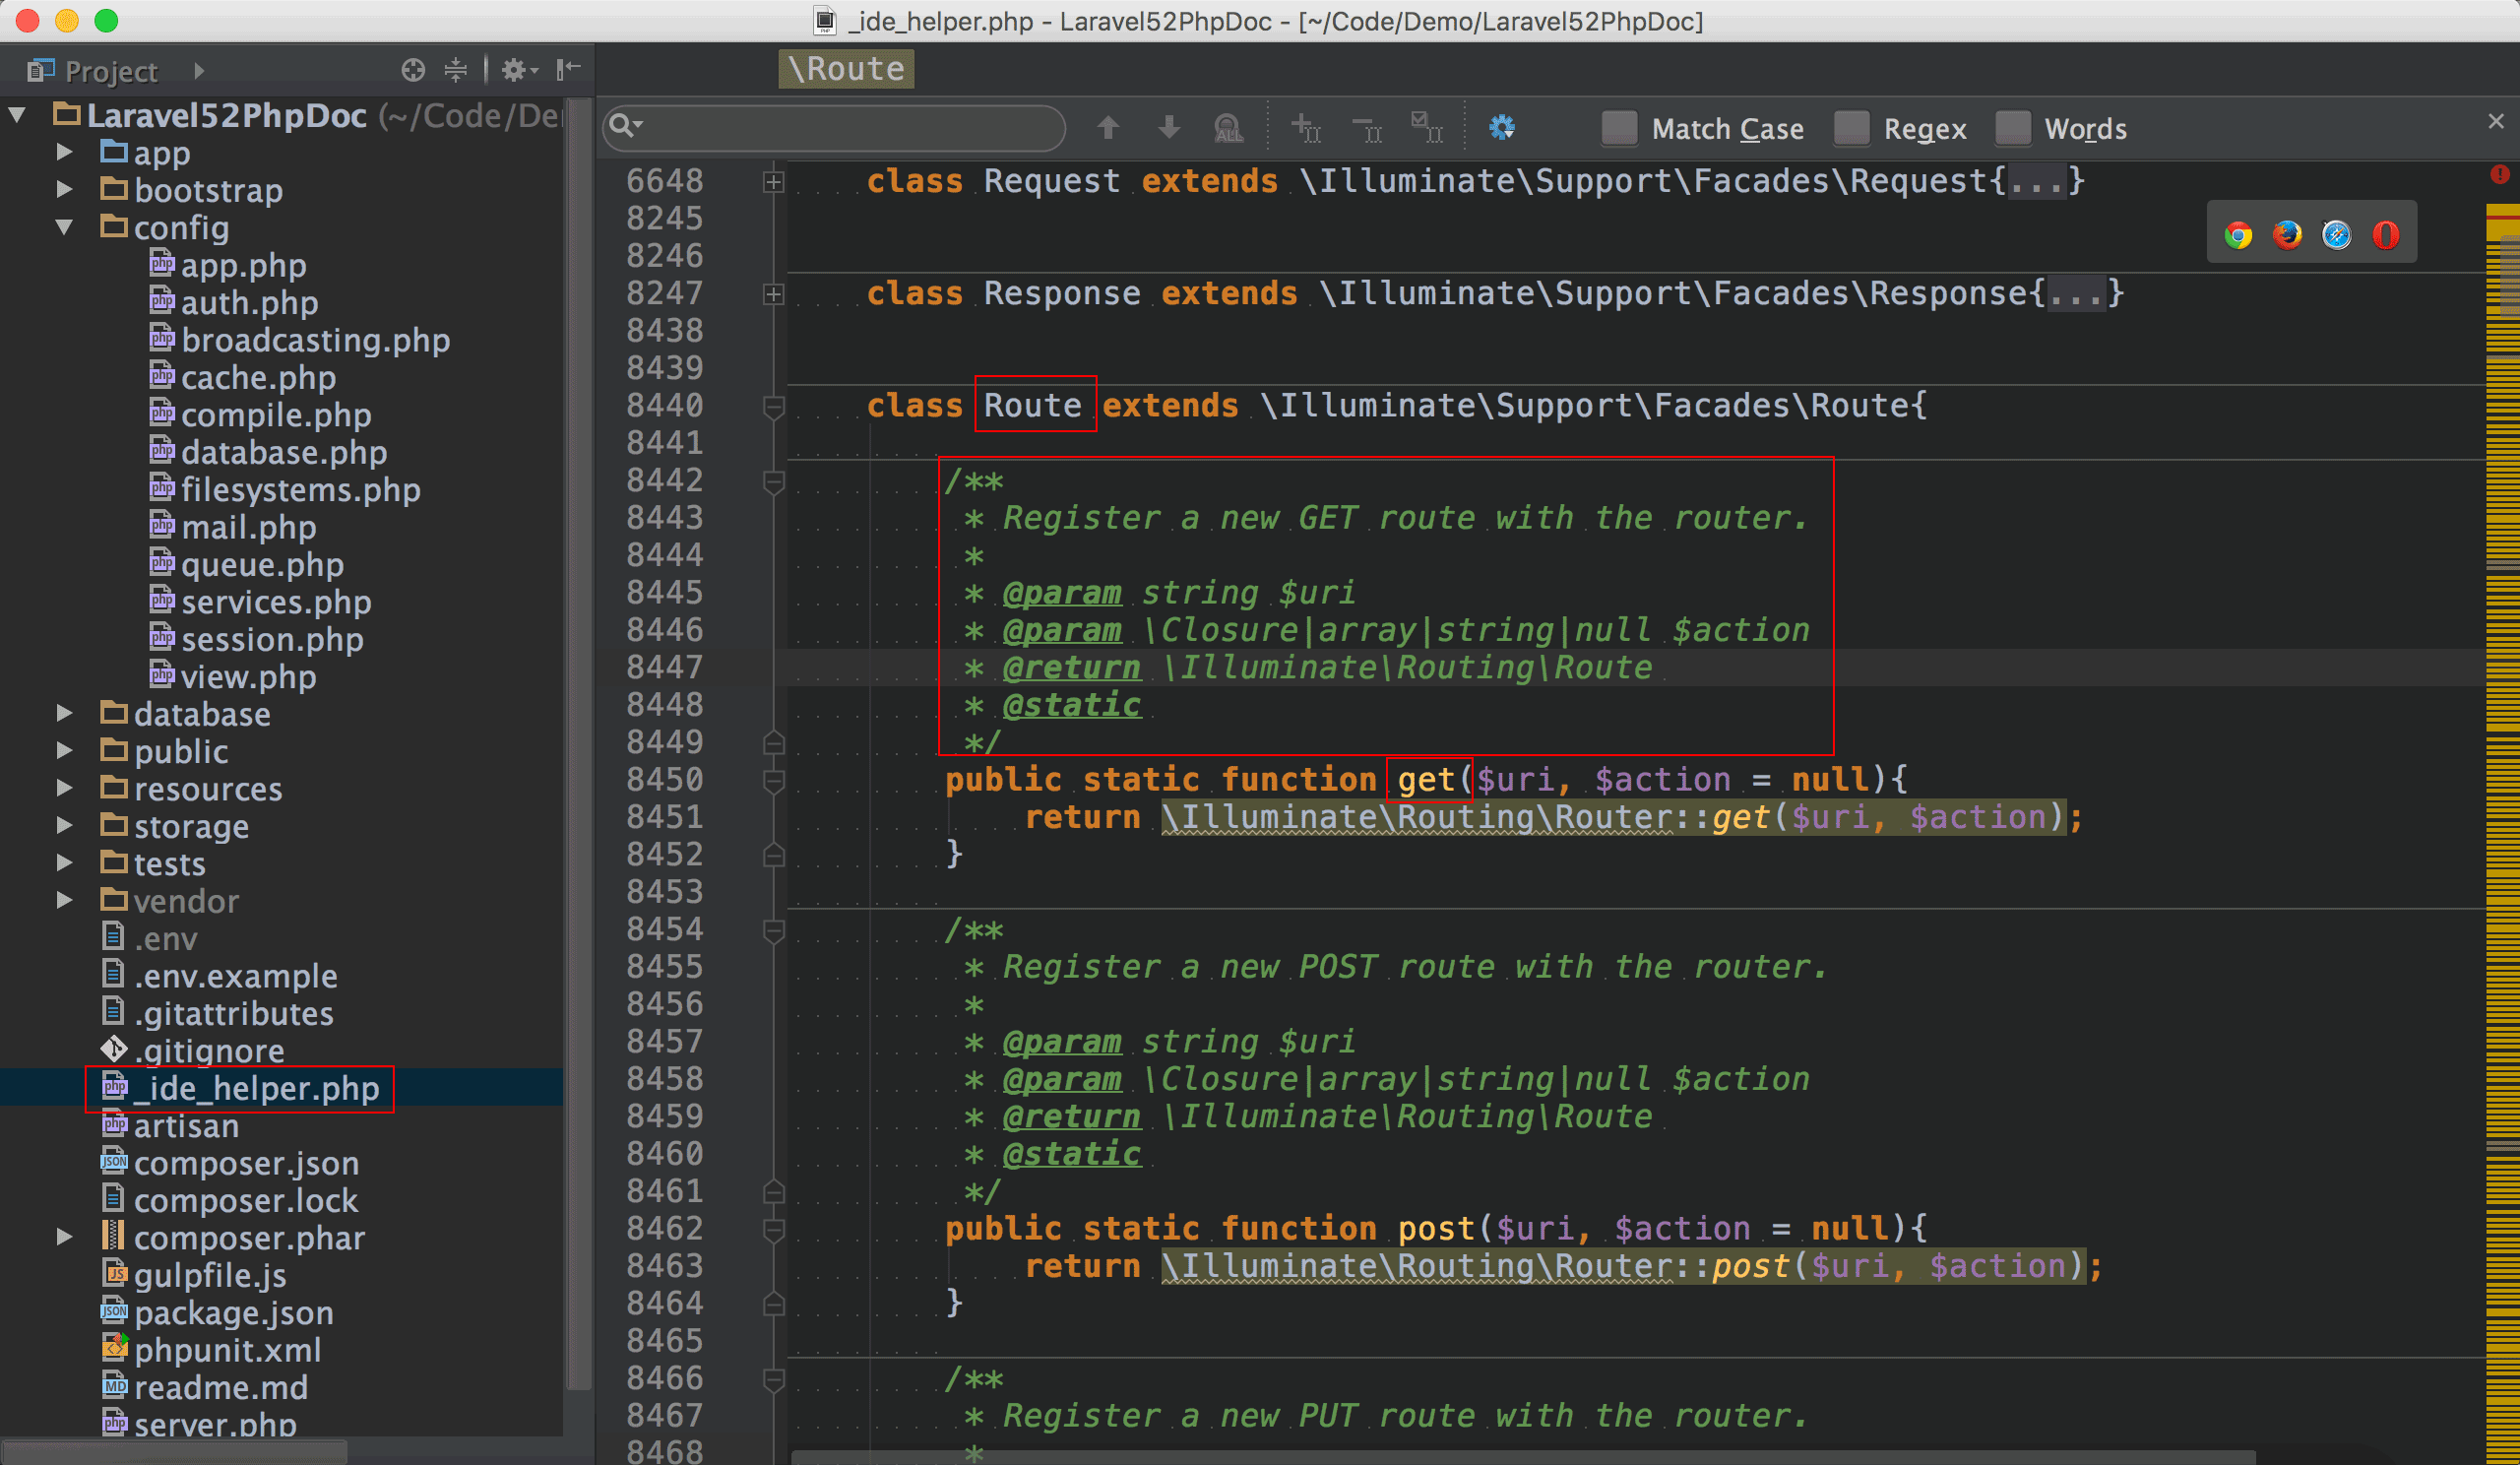
可以發現在專案根目錄多了_ide_helper.php,我們找到了Route class與get(),發現多加了PHPDoc註解,讓PhpStorm知道get()的參數資訊與回傳型別,這提供了PhpStorm幫我們做語法檢查的根據。
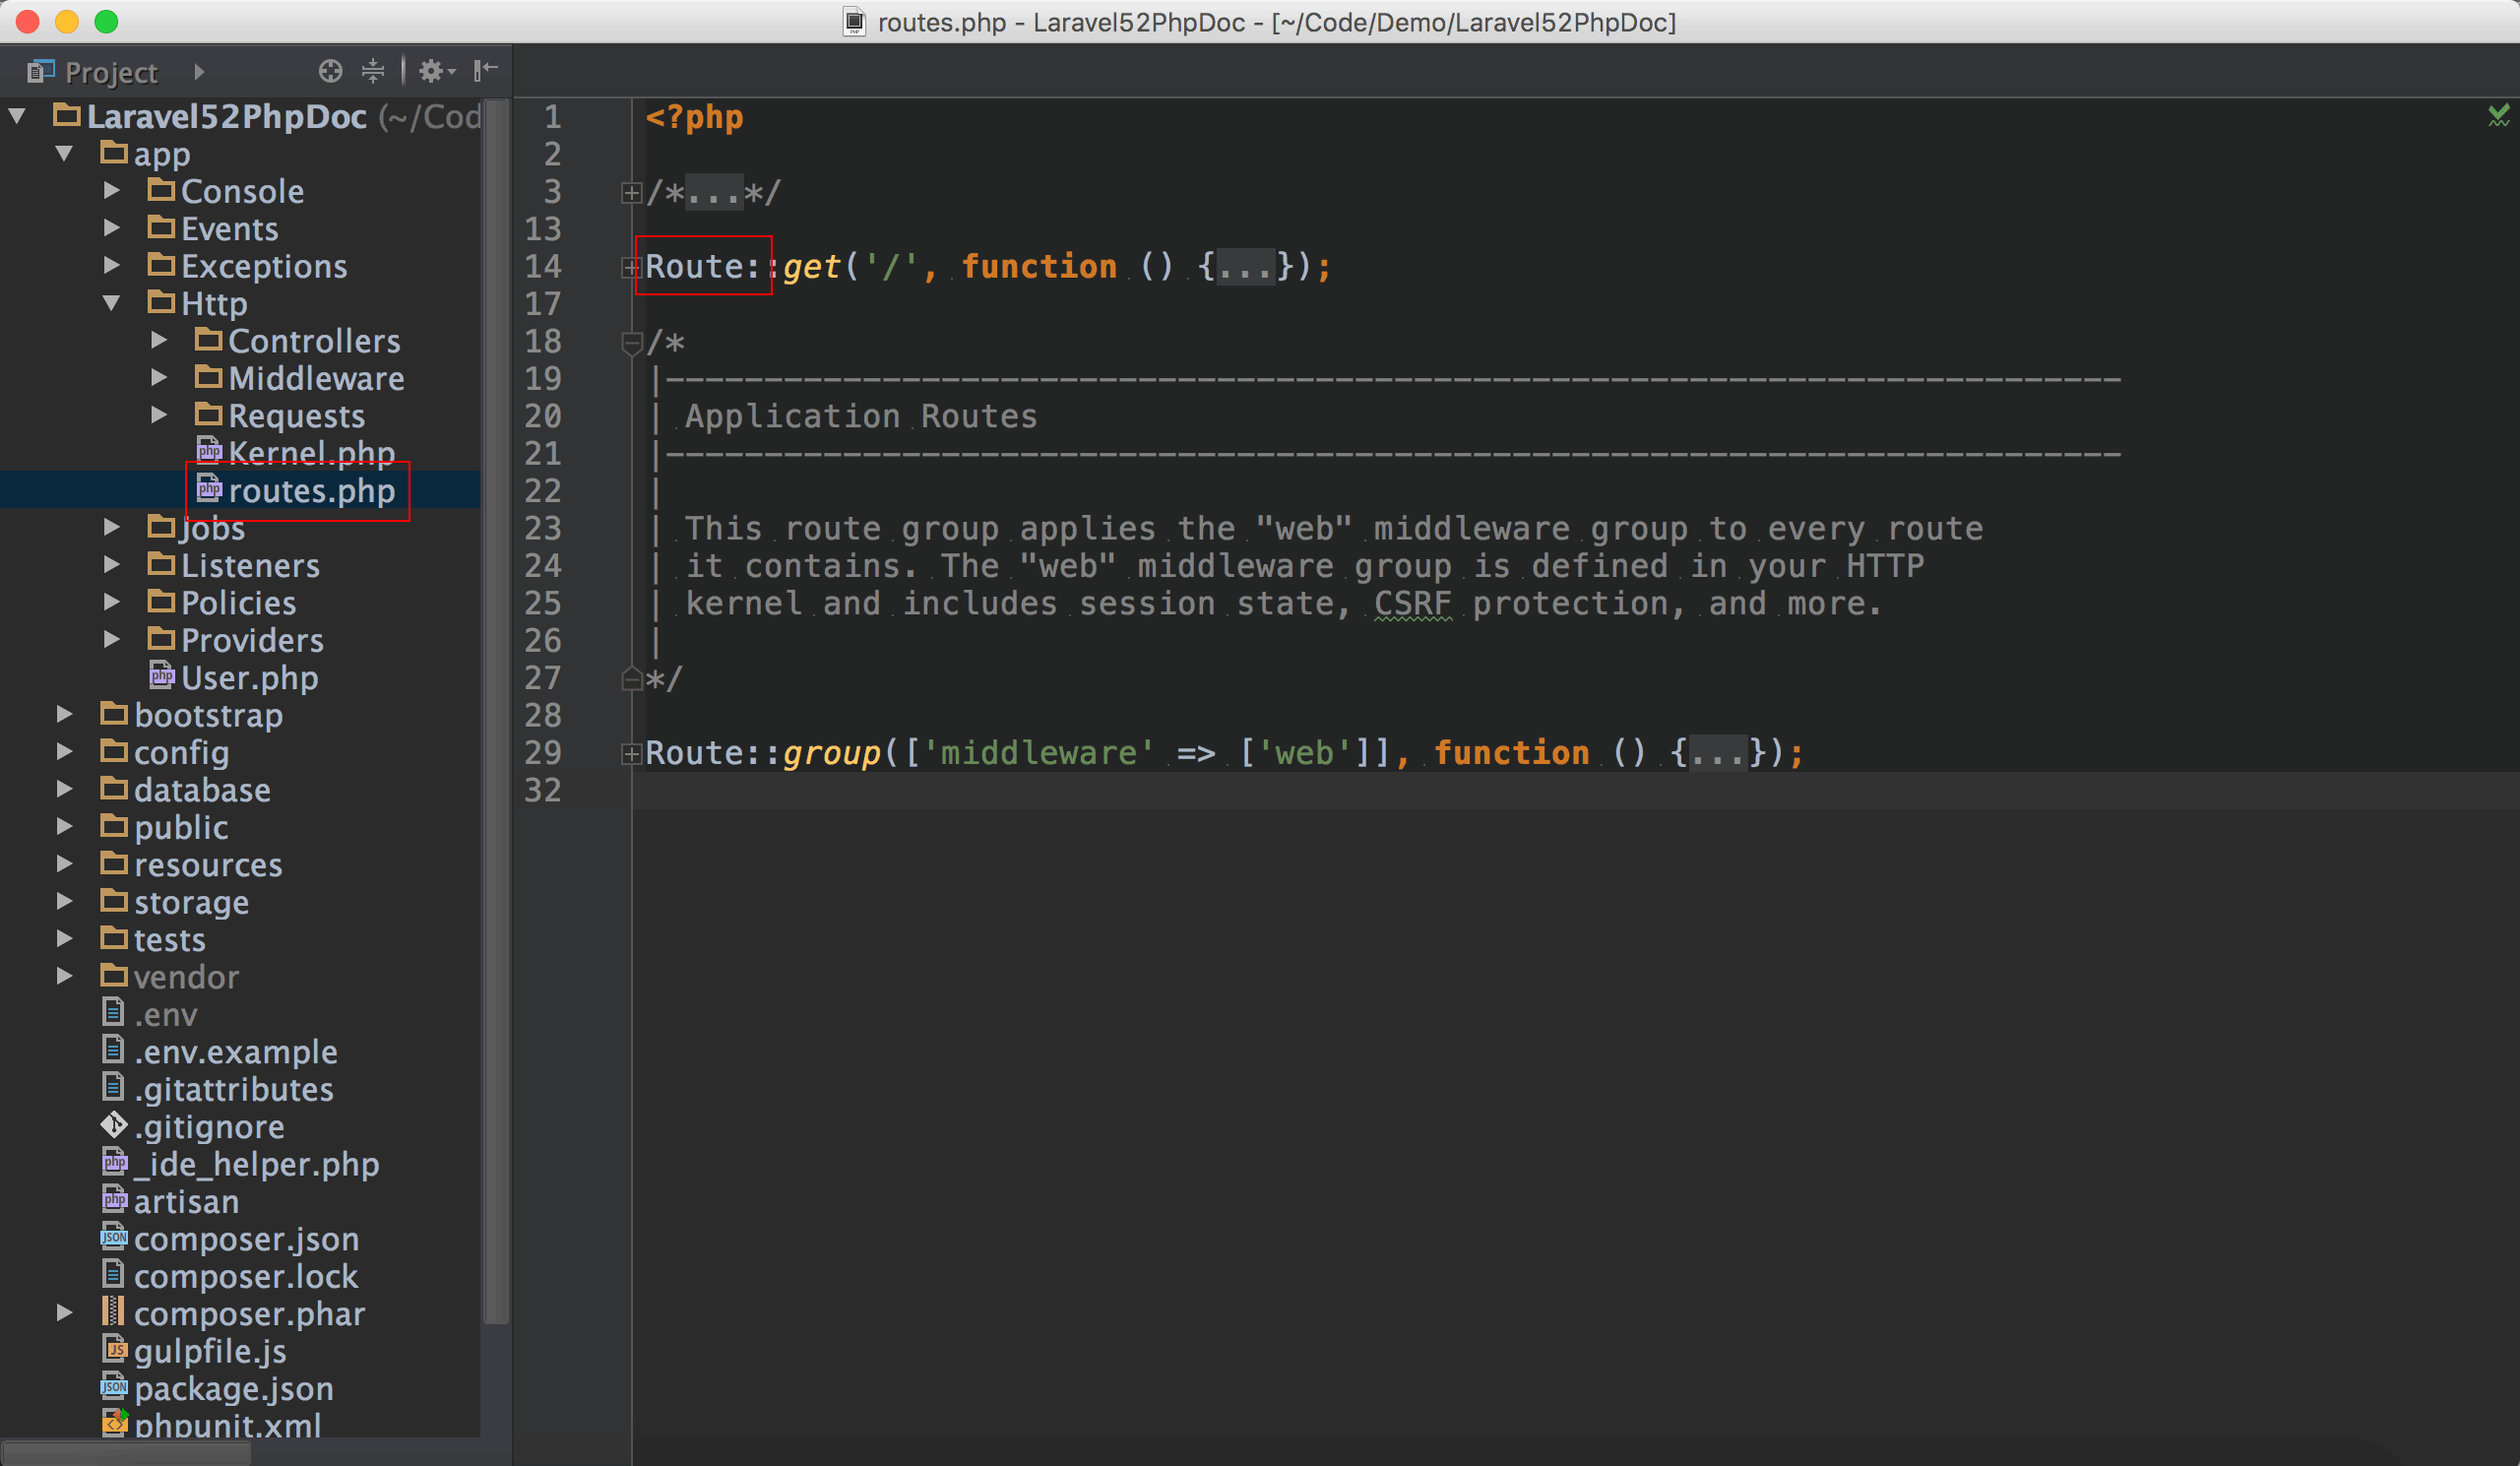
Route不再反白。
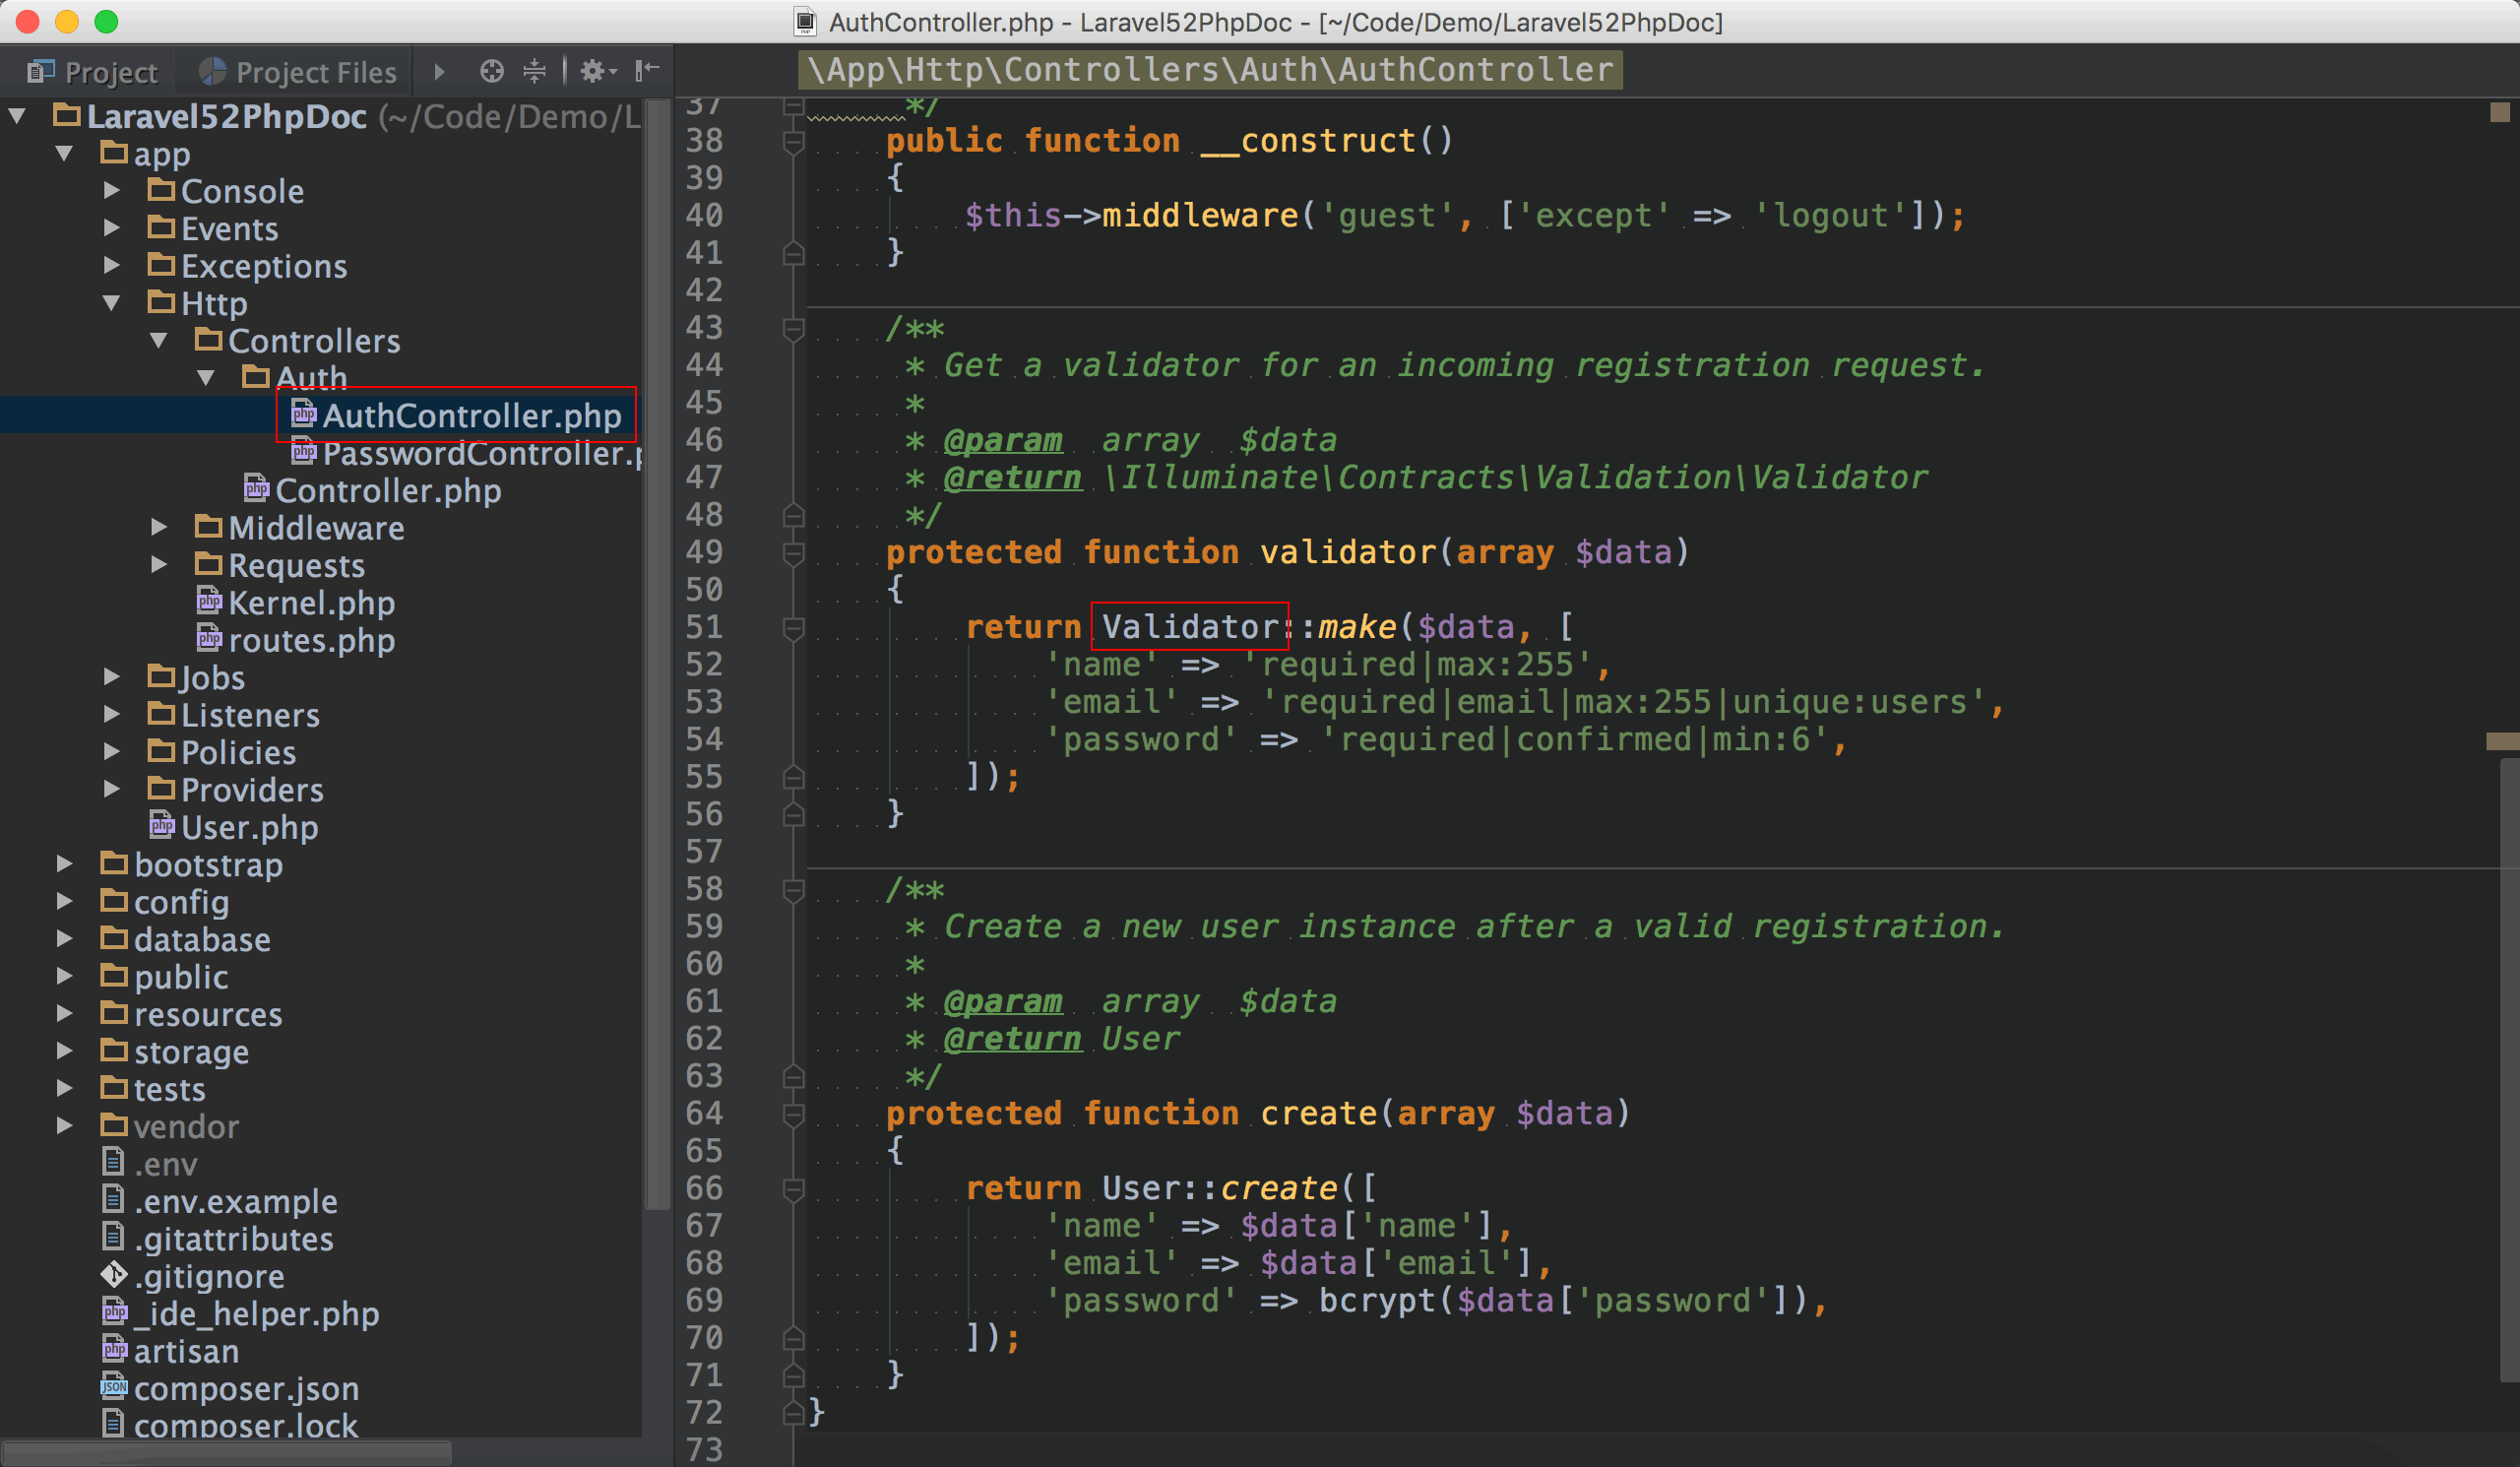
Validator也不再反白。
Schema也不再反白,不過unique()還是反白,稍後會解決。
composer.json
1 | "scripts":{ |
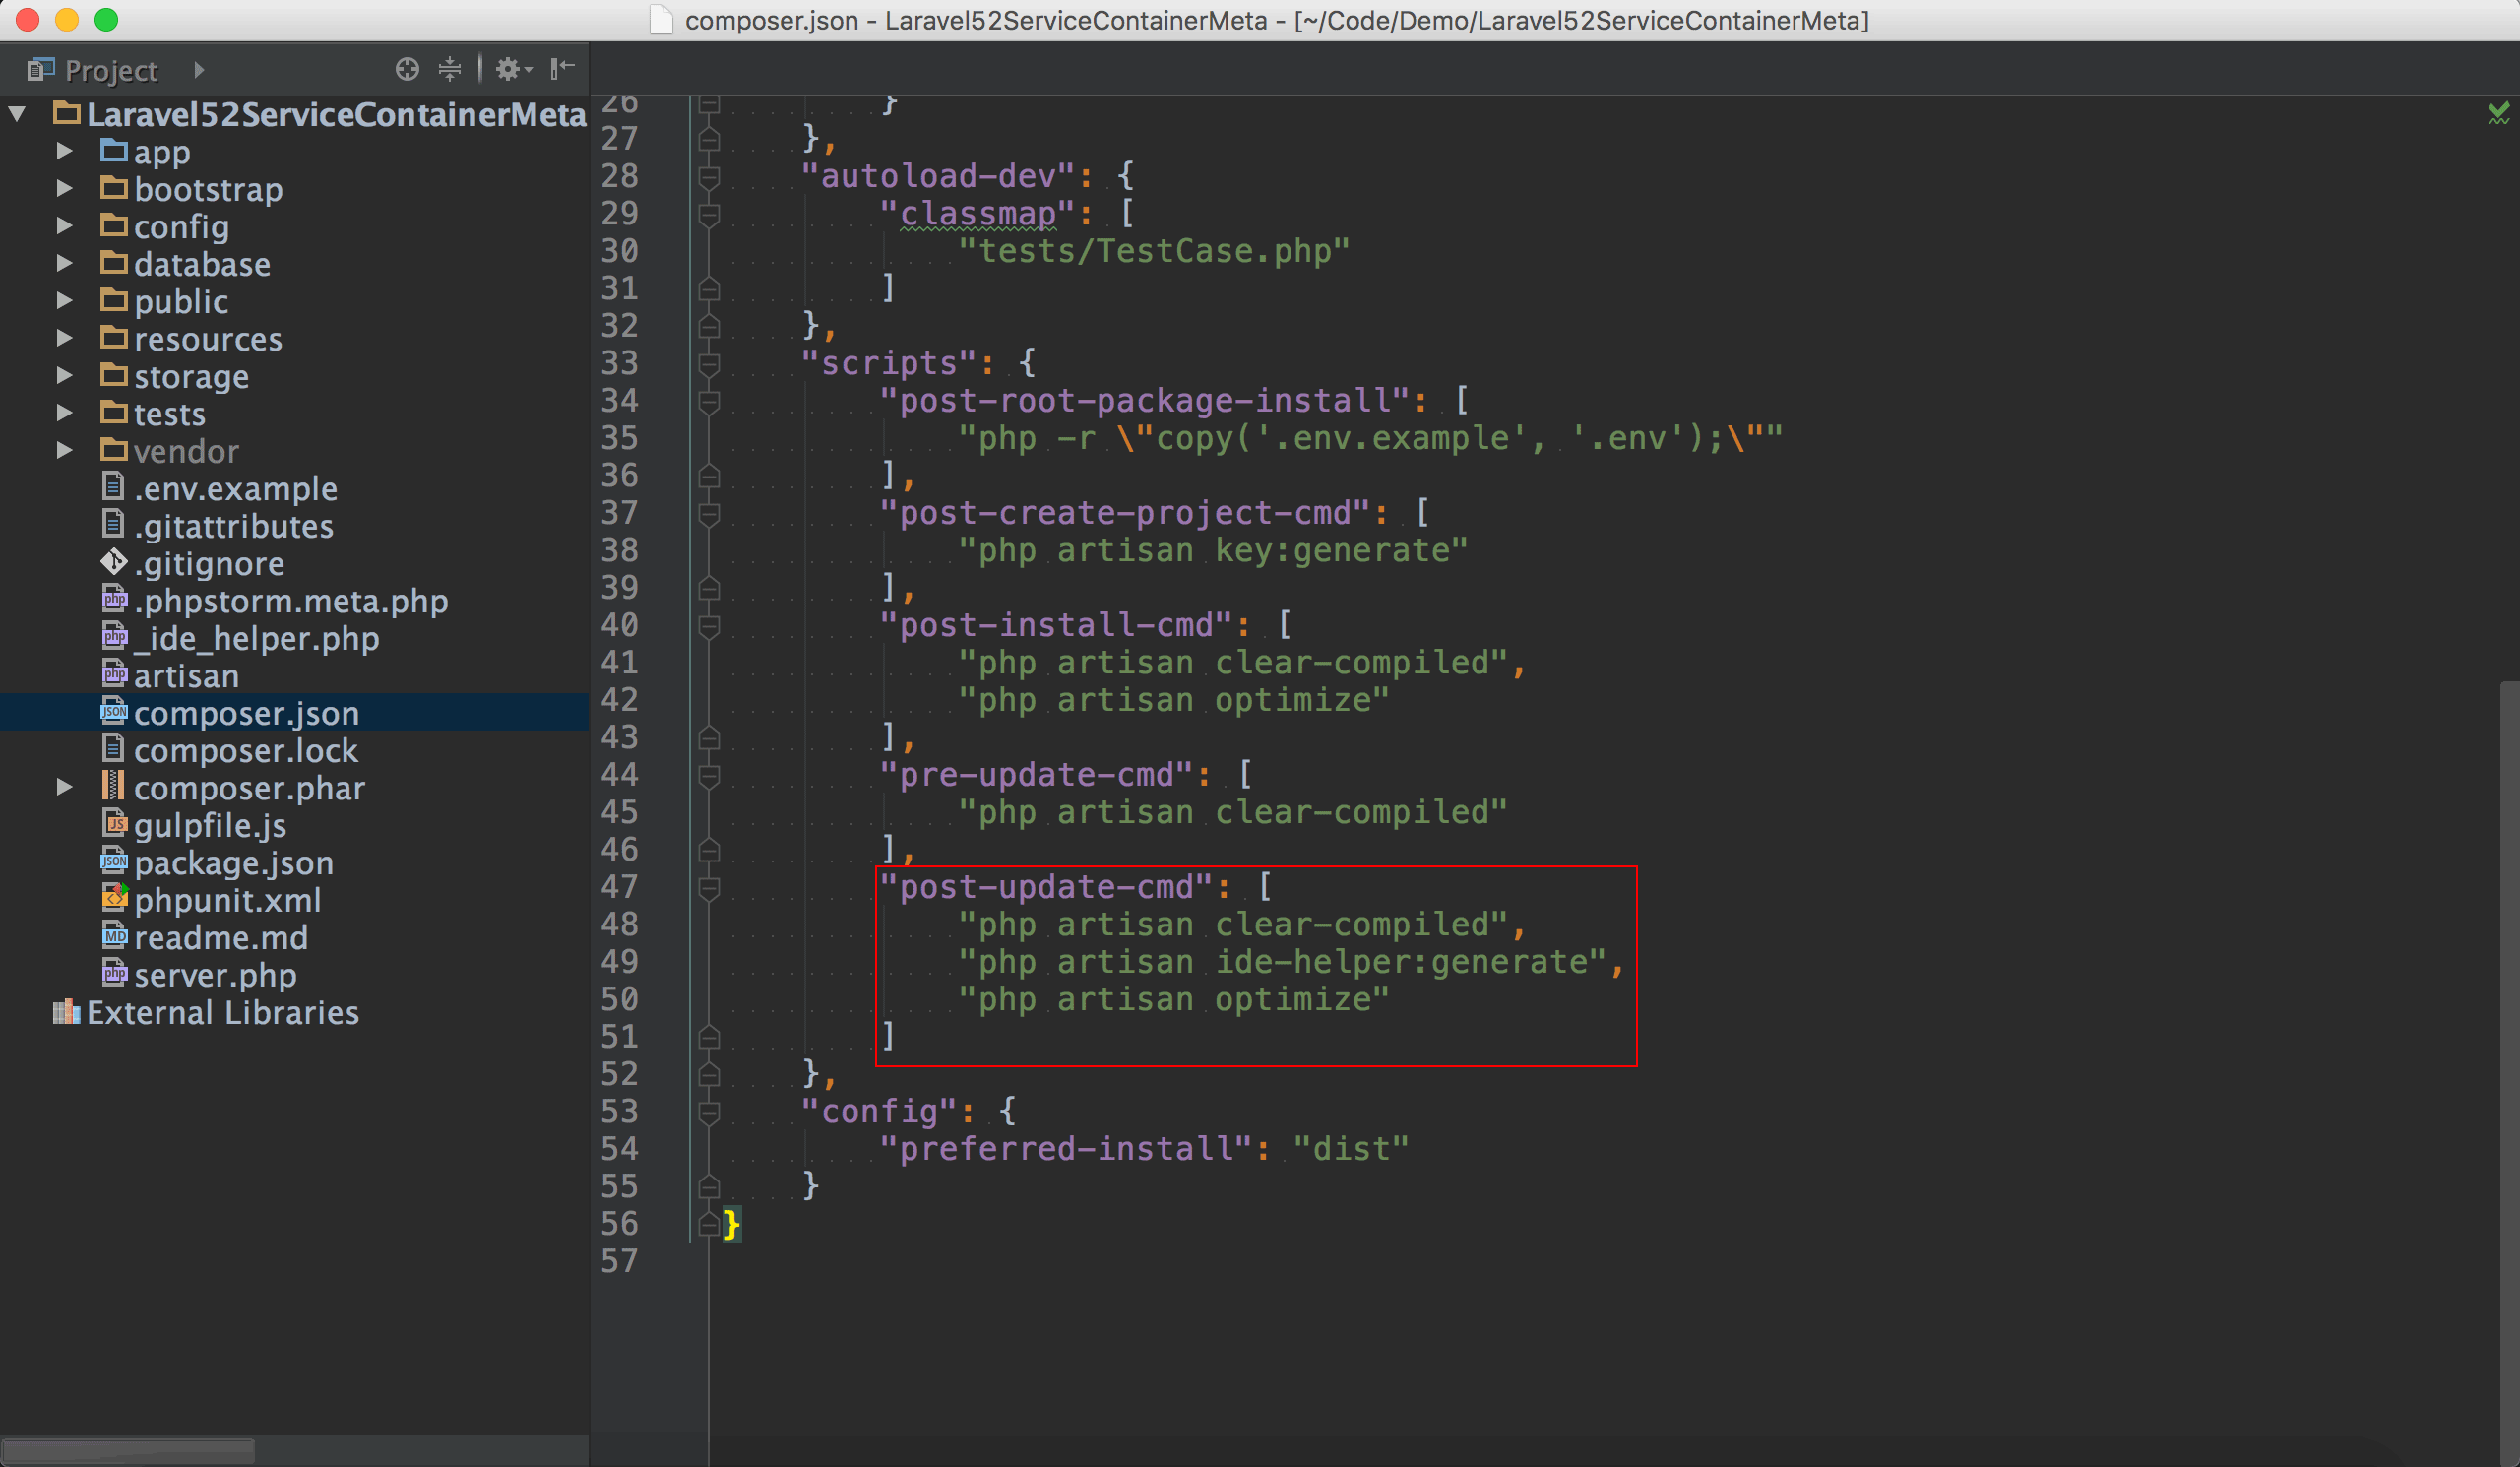
只要在composer.json的post-update-cmd改成如上圖所示,以後只要composer update更新Laravel,就會自動重新建立_ide_helper.php。
Model
資料庫欄位名稱是開發過程的另外一個痛,傳統都要另外一個視窗開著phpMyAdmin或Sequel Pro,一邊查詢資料庫欄位一邊寫程式,若PhpStorm能替我們對model的欄位名稱做語法提示,讓我們用選的,那就太好了。1
oomusou@mac:~/MyProject$ php artisan ide-helper:models

Laravel IDE Helper提供兩種方式幫你建立model的PHPDoc,預設是產生一個_ide_helper_models.php,也可以直接將PHPDoc寫在原本的model檔內,我們打yes,選擇直接在model內建立PHPDoc。4 4理論上選擇預設的_ide_helper_models.php也不是問題,不過因為在_ide_helper_models.php也定義了User class,所以在repository內use User時,會出現Multiple definitions for class User的警告,所以才選擇將PHPDoc直接建立在model內。
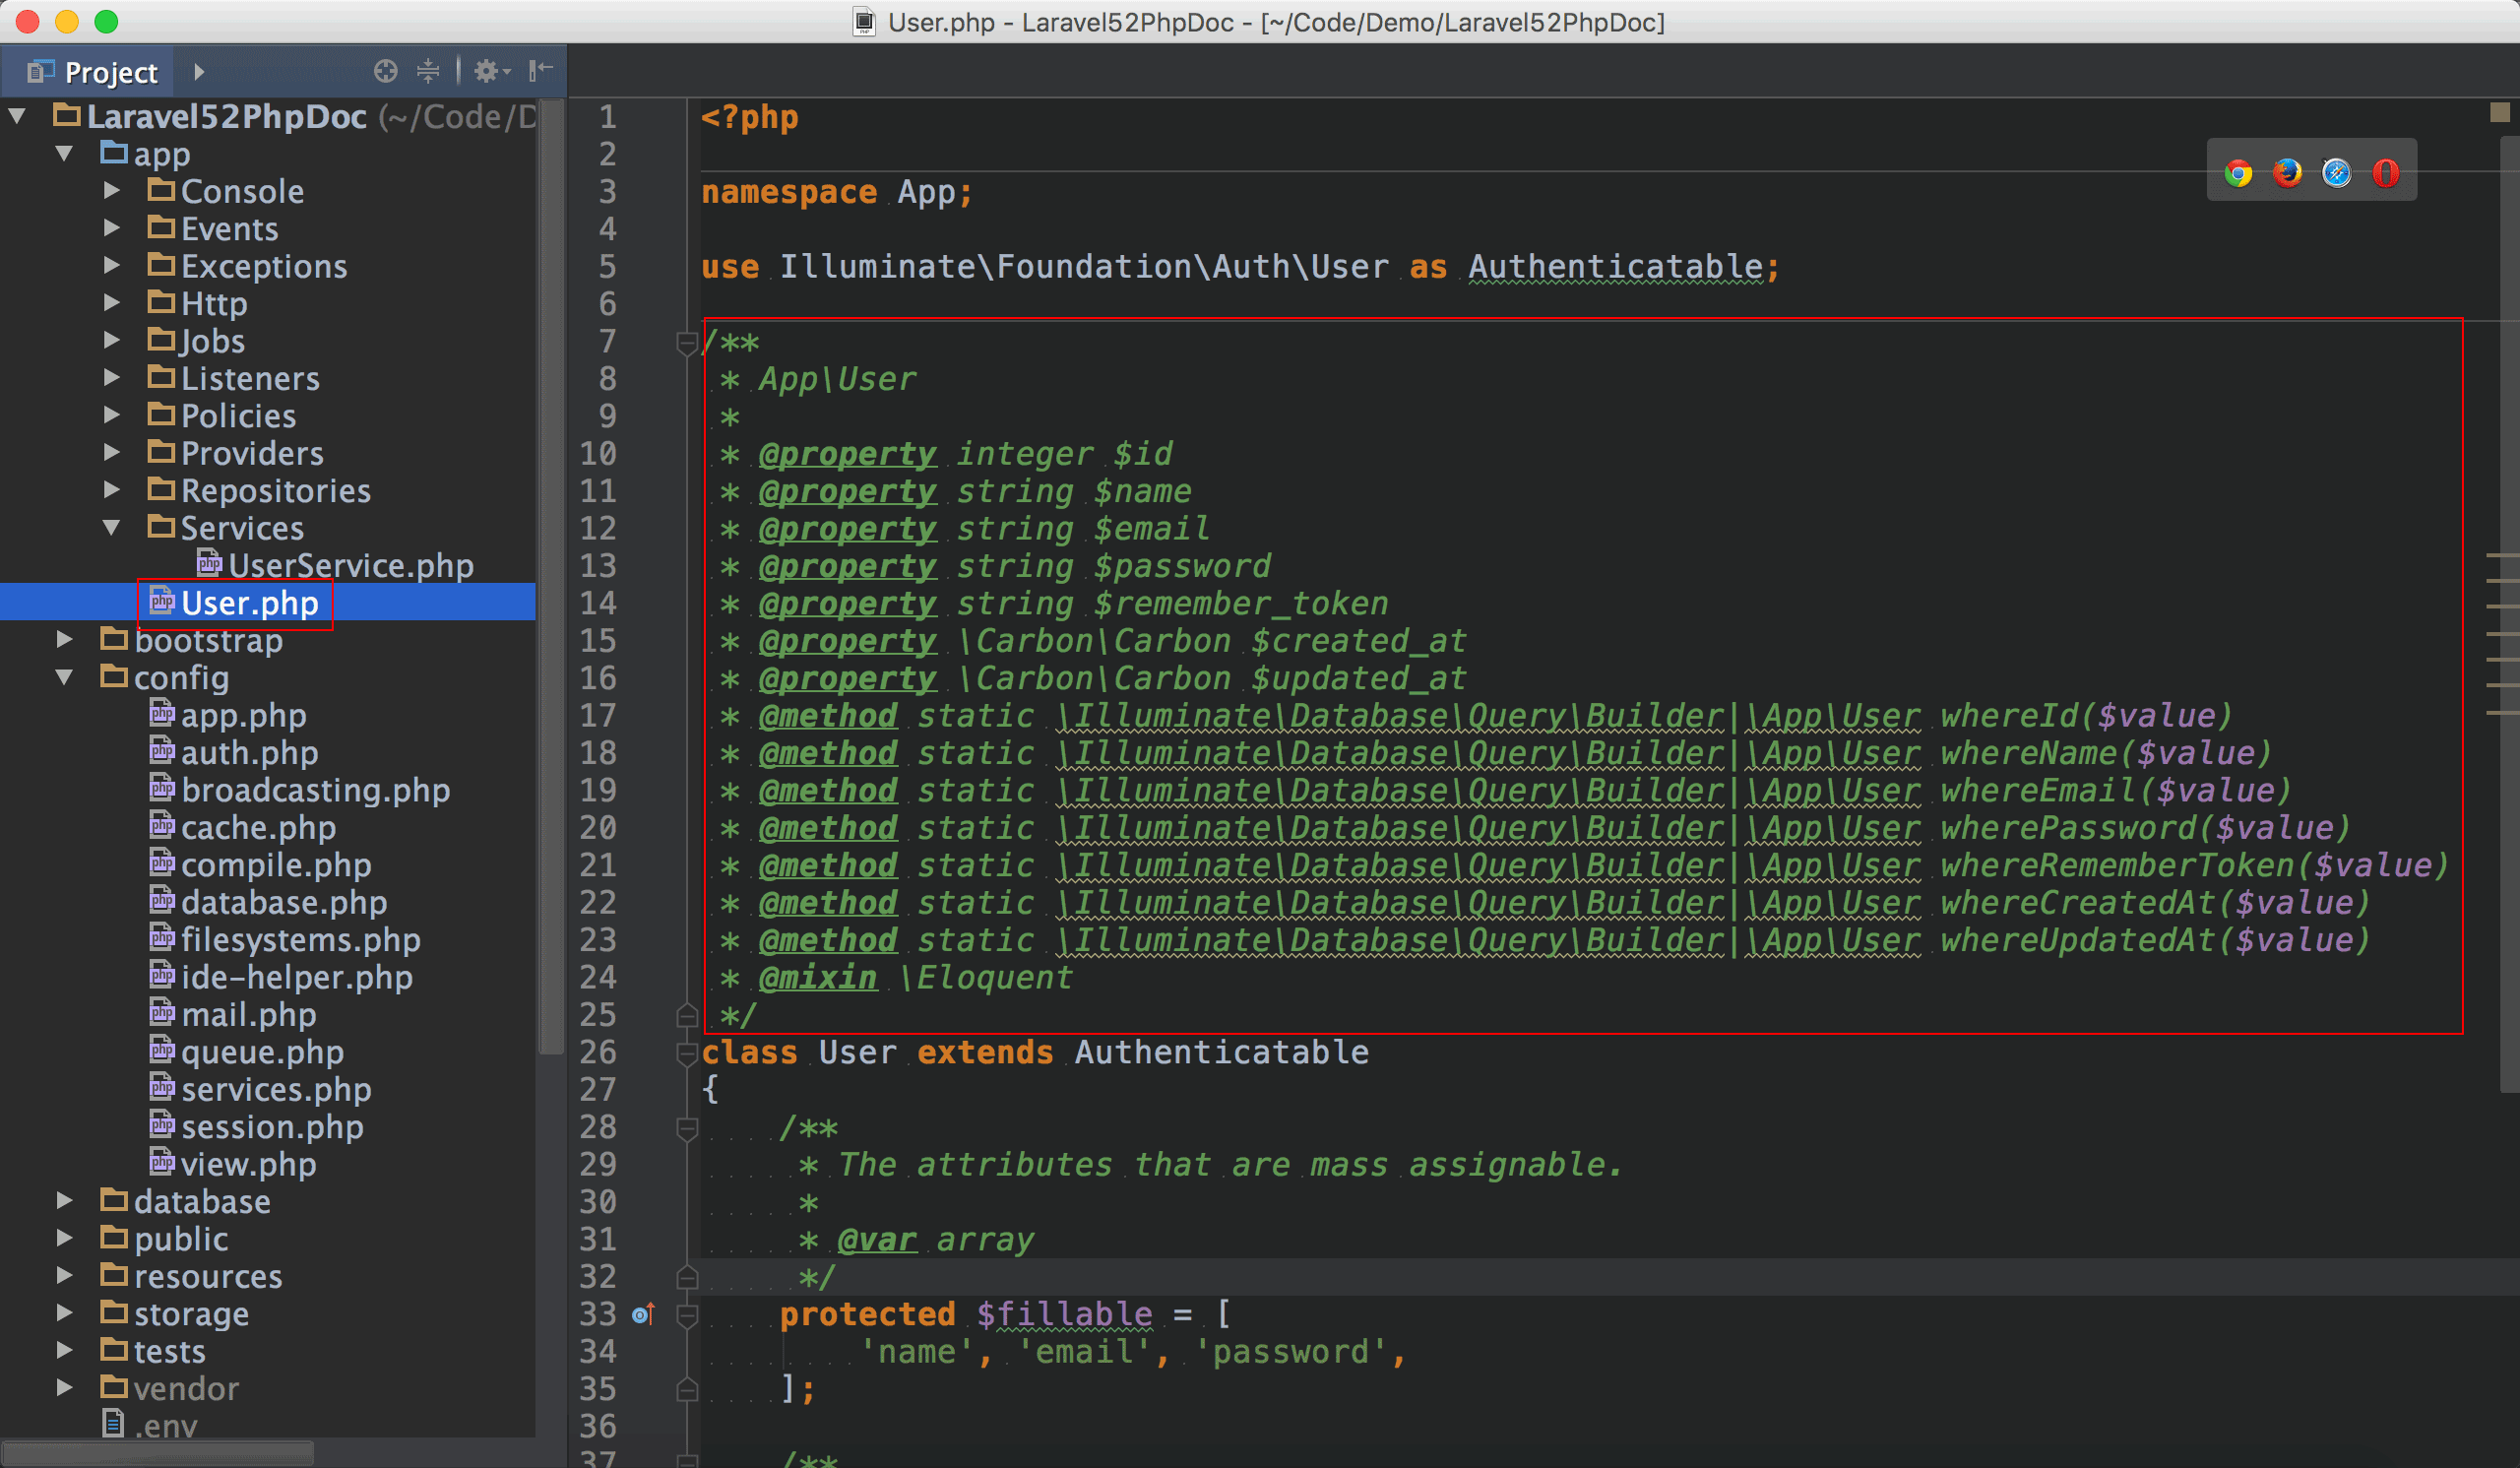
Laravel IDE Helper幫我們替User model建立了PHPDoc :
- 所有的資料庫欄位名稱都加上了
@property註解。 - 所有的資料庫欄位名稱的
where都加上了@method註解。5 5這些method都是Eloquent根據資料庫欄位,使用Overloading機制動態產生的method,因此PhpStorm無法自動抓到,必須手動寫PHPDoc的@method
1 | namespace App\Repositories; |
19行1
2
3
4
5
6
7
8
9/**
* 回傳第一位User
*
* @return User
*/
public function getFirstUser() : User
{
return $this->user->all()->first();
}
我們傳回第一筆User model。
1 | namespace App\Services; |
19行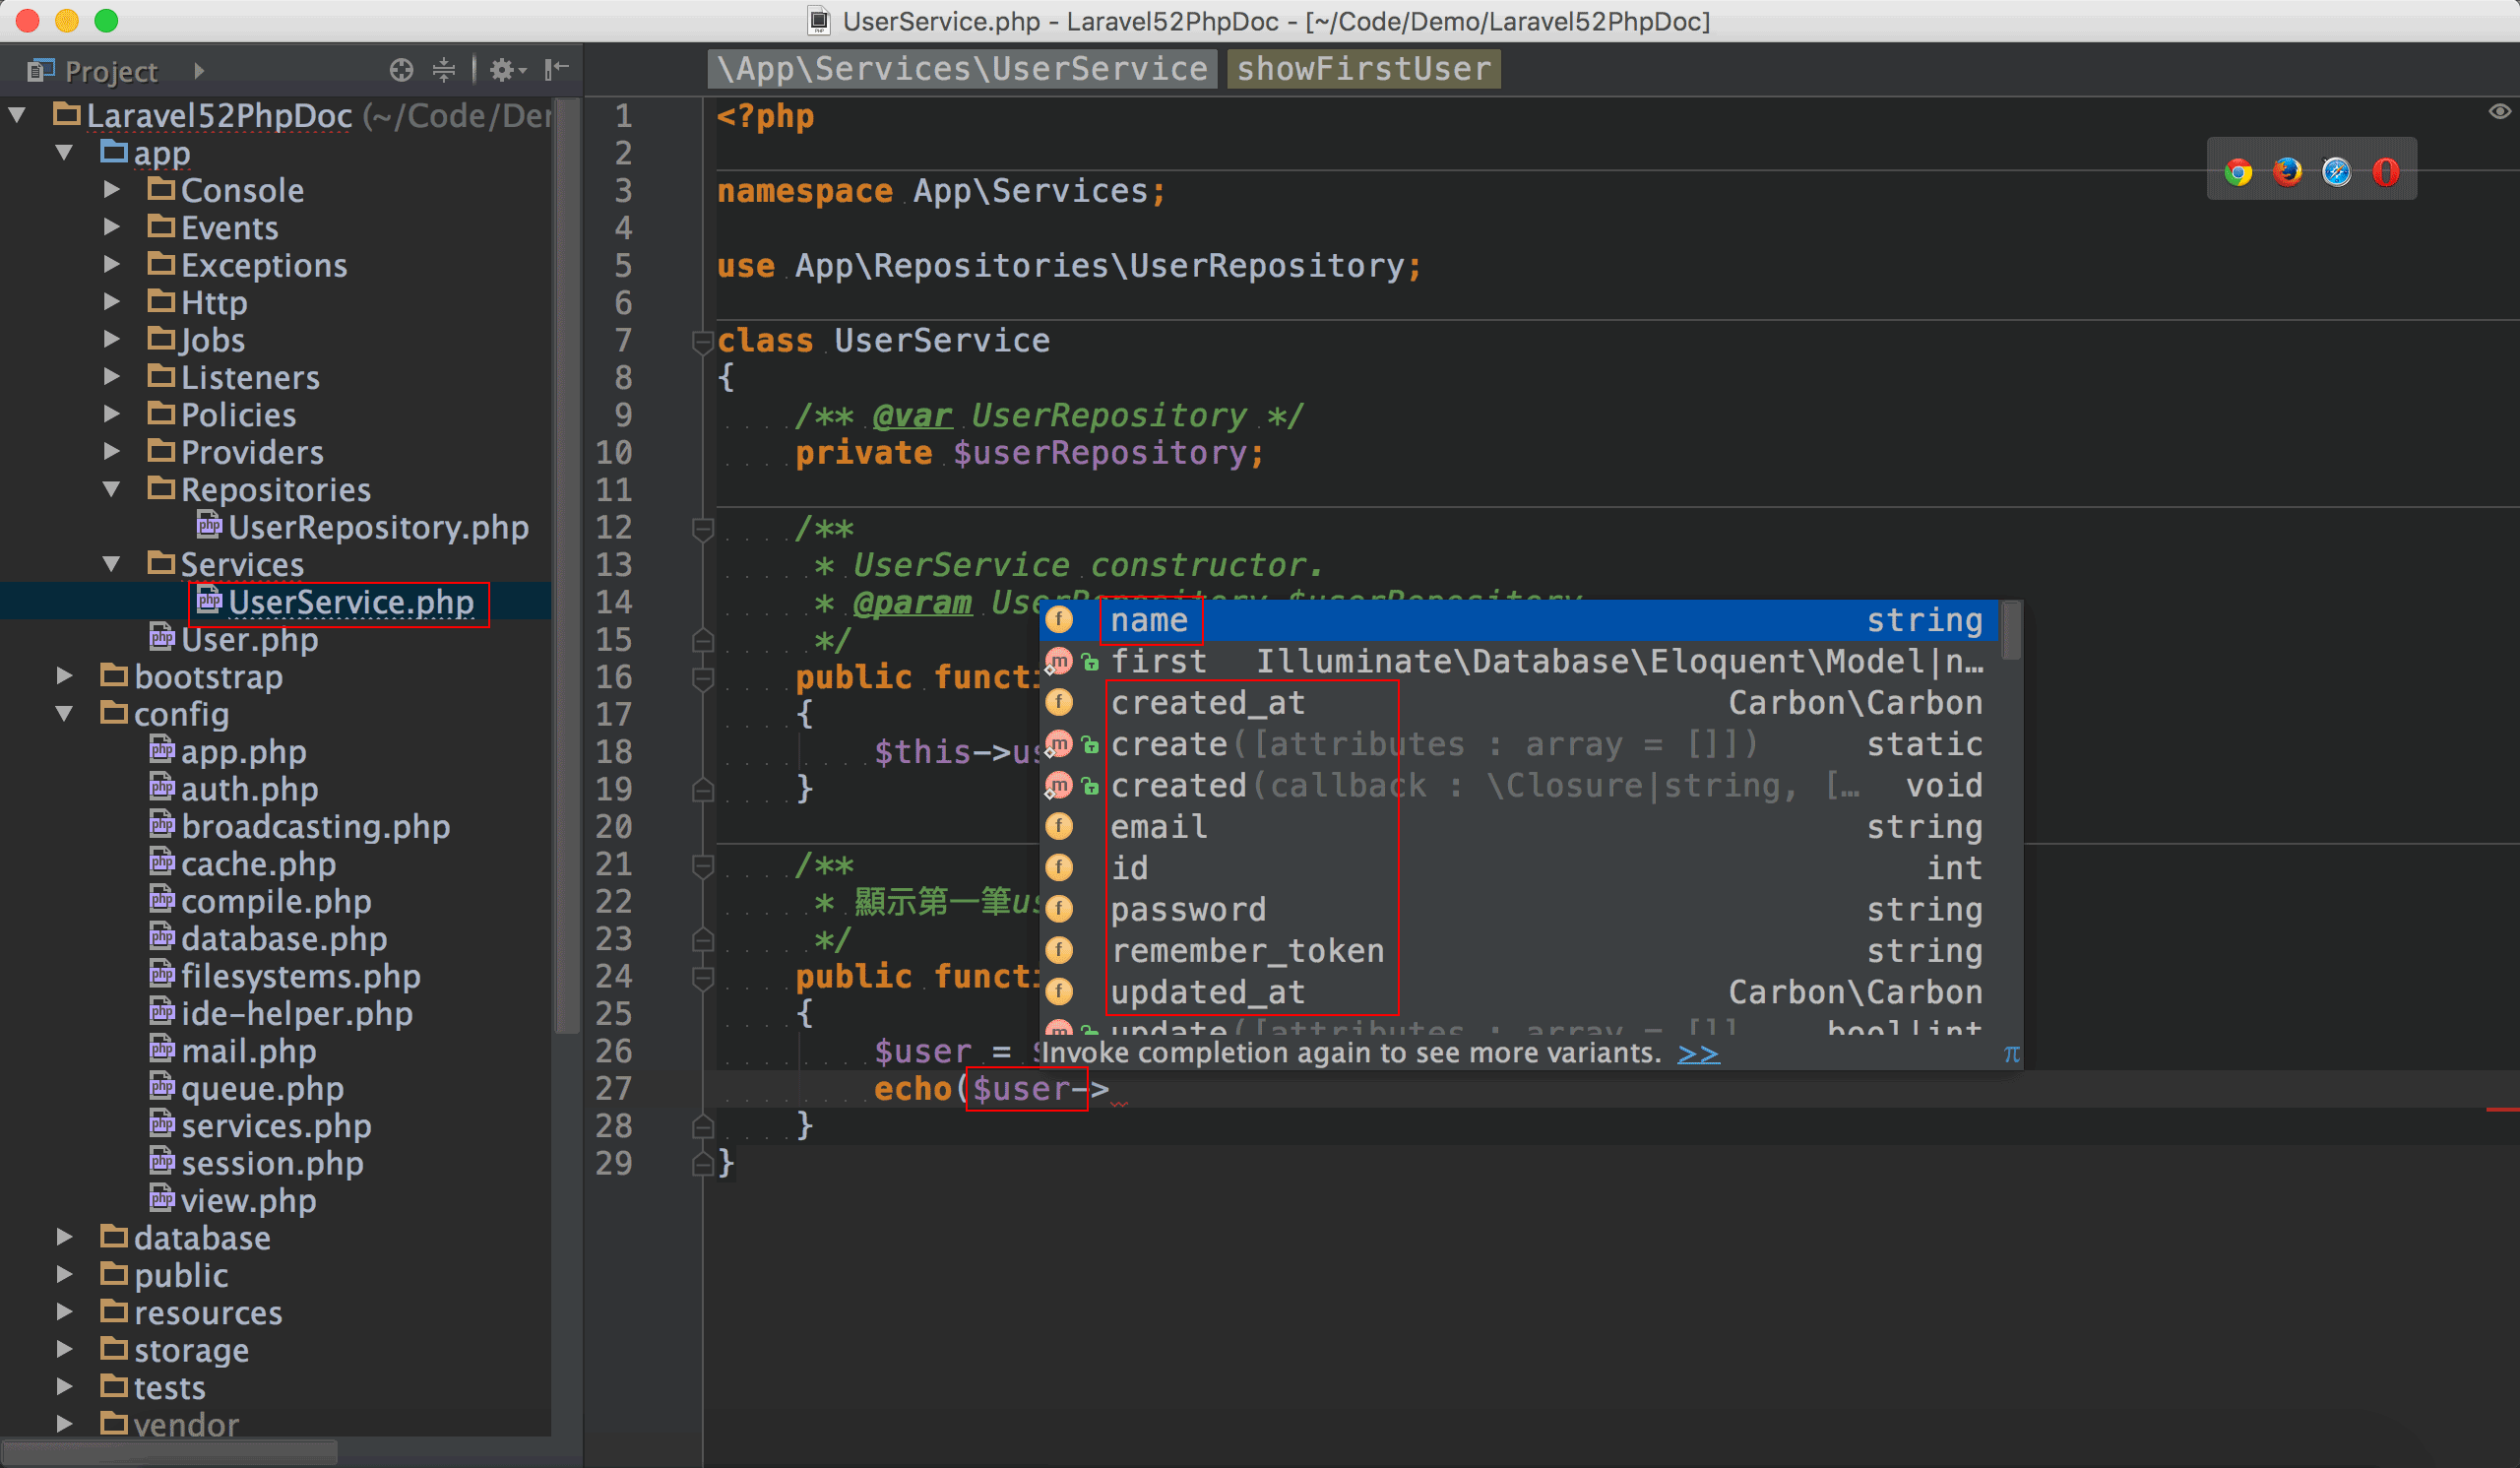
輸入$user後,只要輸入->,就會出現資料庫欄位名稱讓你挑選,再也不用死記或靠其他工具查詢資料庫欄位名稱了。
Service Container
當我們使用service container,利用App::make()建立物件時,由於傳進去的是字串,因此PhpStorm根本不知道我們建立了什麼物件,但透過PhpStorm另外擴充的PhpStorm Advanced Metadata機制,讓我們在使用service container時,也能享受語法提示功能。6 6關於PhpStorm Advanced Meta,請參考PhpStorm官網的PhpStorm Advanced Metadata
不過這裡不用擔心,不需要會寫PhpStorm Advanced Metadata,因為Laravel IDE Helper幫大家寫好了。
Strategy Pattern
routes.php7 7GitHub Commit : 修改routes.php1
Route::get('/show', 'UserController@show');
在routes.php加上URI與其對應的controller action。
UserController.php8 8GitHub Commit : 建立UserController.php1
2
3
4
5
6
7
8
9
10
11
12
13
14
15
16
17
18
19
20
21
22
23
24namespace App\Http\Controllers;
use App\Http\Requests;
use App\Services\UserService;
class UserController extends Controller
{
/** @var UserService */
private $userService;

/**
 * UserController constructor.
 * @param UserService $userService
 */
public function __construct(UserService $userService)
{
    $this->userService = $userService;
}
public function show()
{
    $this->userService->show('admin');
}
}
第8行1
2
3
4
5
6
7
8
9
10
11/** @var UserService */
private $userService;
/**
* UserController constructor.
* @param UserService $userService
*/
public function __construct(UserService $userService)
{
$this->userService = $userService;
}
注入UserService。
20行1
2
3
4public function show()
{
$this->userService->show('admin');
}
在show()呼叫$this->userService的show(),並將admin變數傳入。
AbstractUser.php9 9GitHub Commit : 建立AbstractUser.php
1 | namespace App\Services\User; |
由abstract class定義show(),如此PhpStorm就能幫我們做語法提示與語法檢查了。
Admin.php10 10GitHub Commit : 建立Admin.php
1 | namespace App\Services\User; |
Admin繼承AbstractUser,因為之前定義了show() abstract method,所以必須在此實作show()。
Customer.php11 11GitHub Commit : 建立Customer.php
1 | namespace App\Services\User; |
Customer繼承AbstractUser,因為之前定義了show() abstract method,所以必須在此實作show()。
UserService.php12 12GitHub Commit : 建立UserService.php1
2
3
4
5
6
7
8
9
10
11
12
13namespace App\Services;
use App;
use App\Services\User\AbstractUser;
class UserService
{
public function show(string $type)
{
App::bind(AbstractUser::class, 'App\Services\User\\' . ucfirst($type));
App::make(AbstractUser::class)->show();
}
}
第10行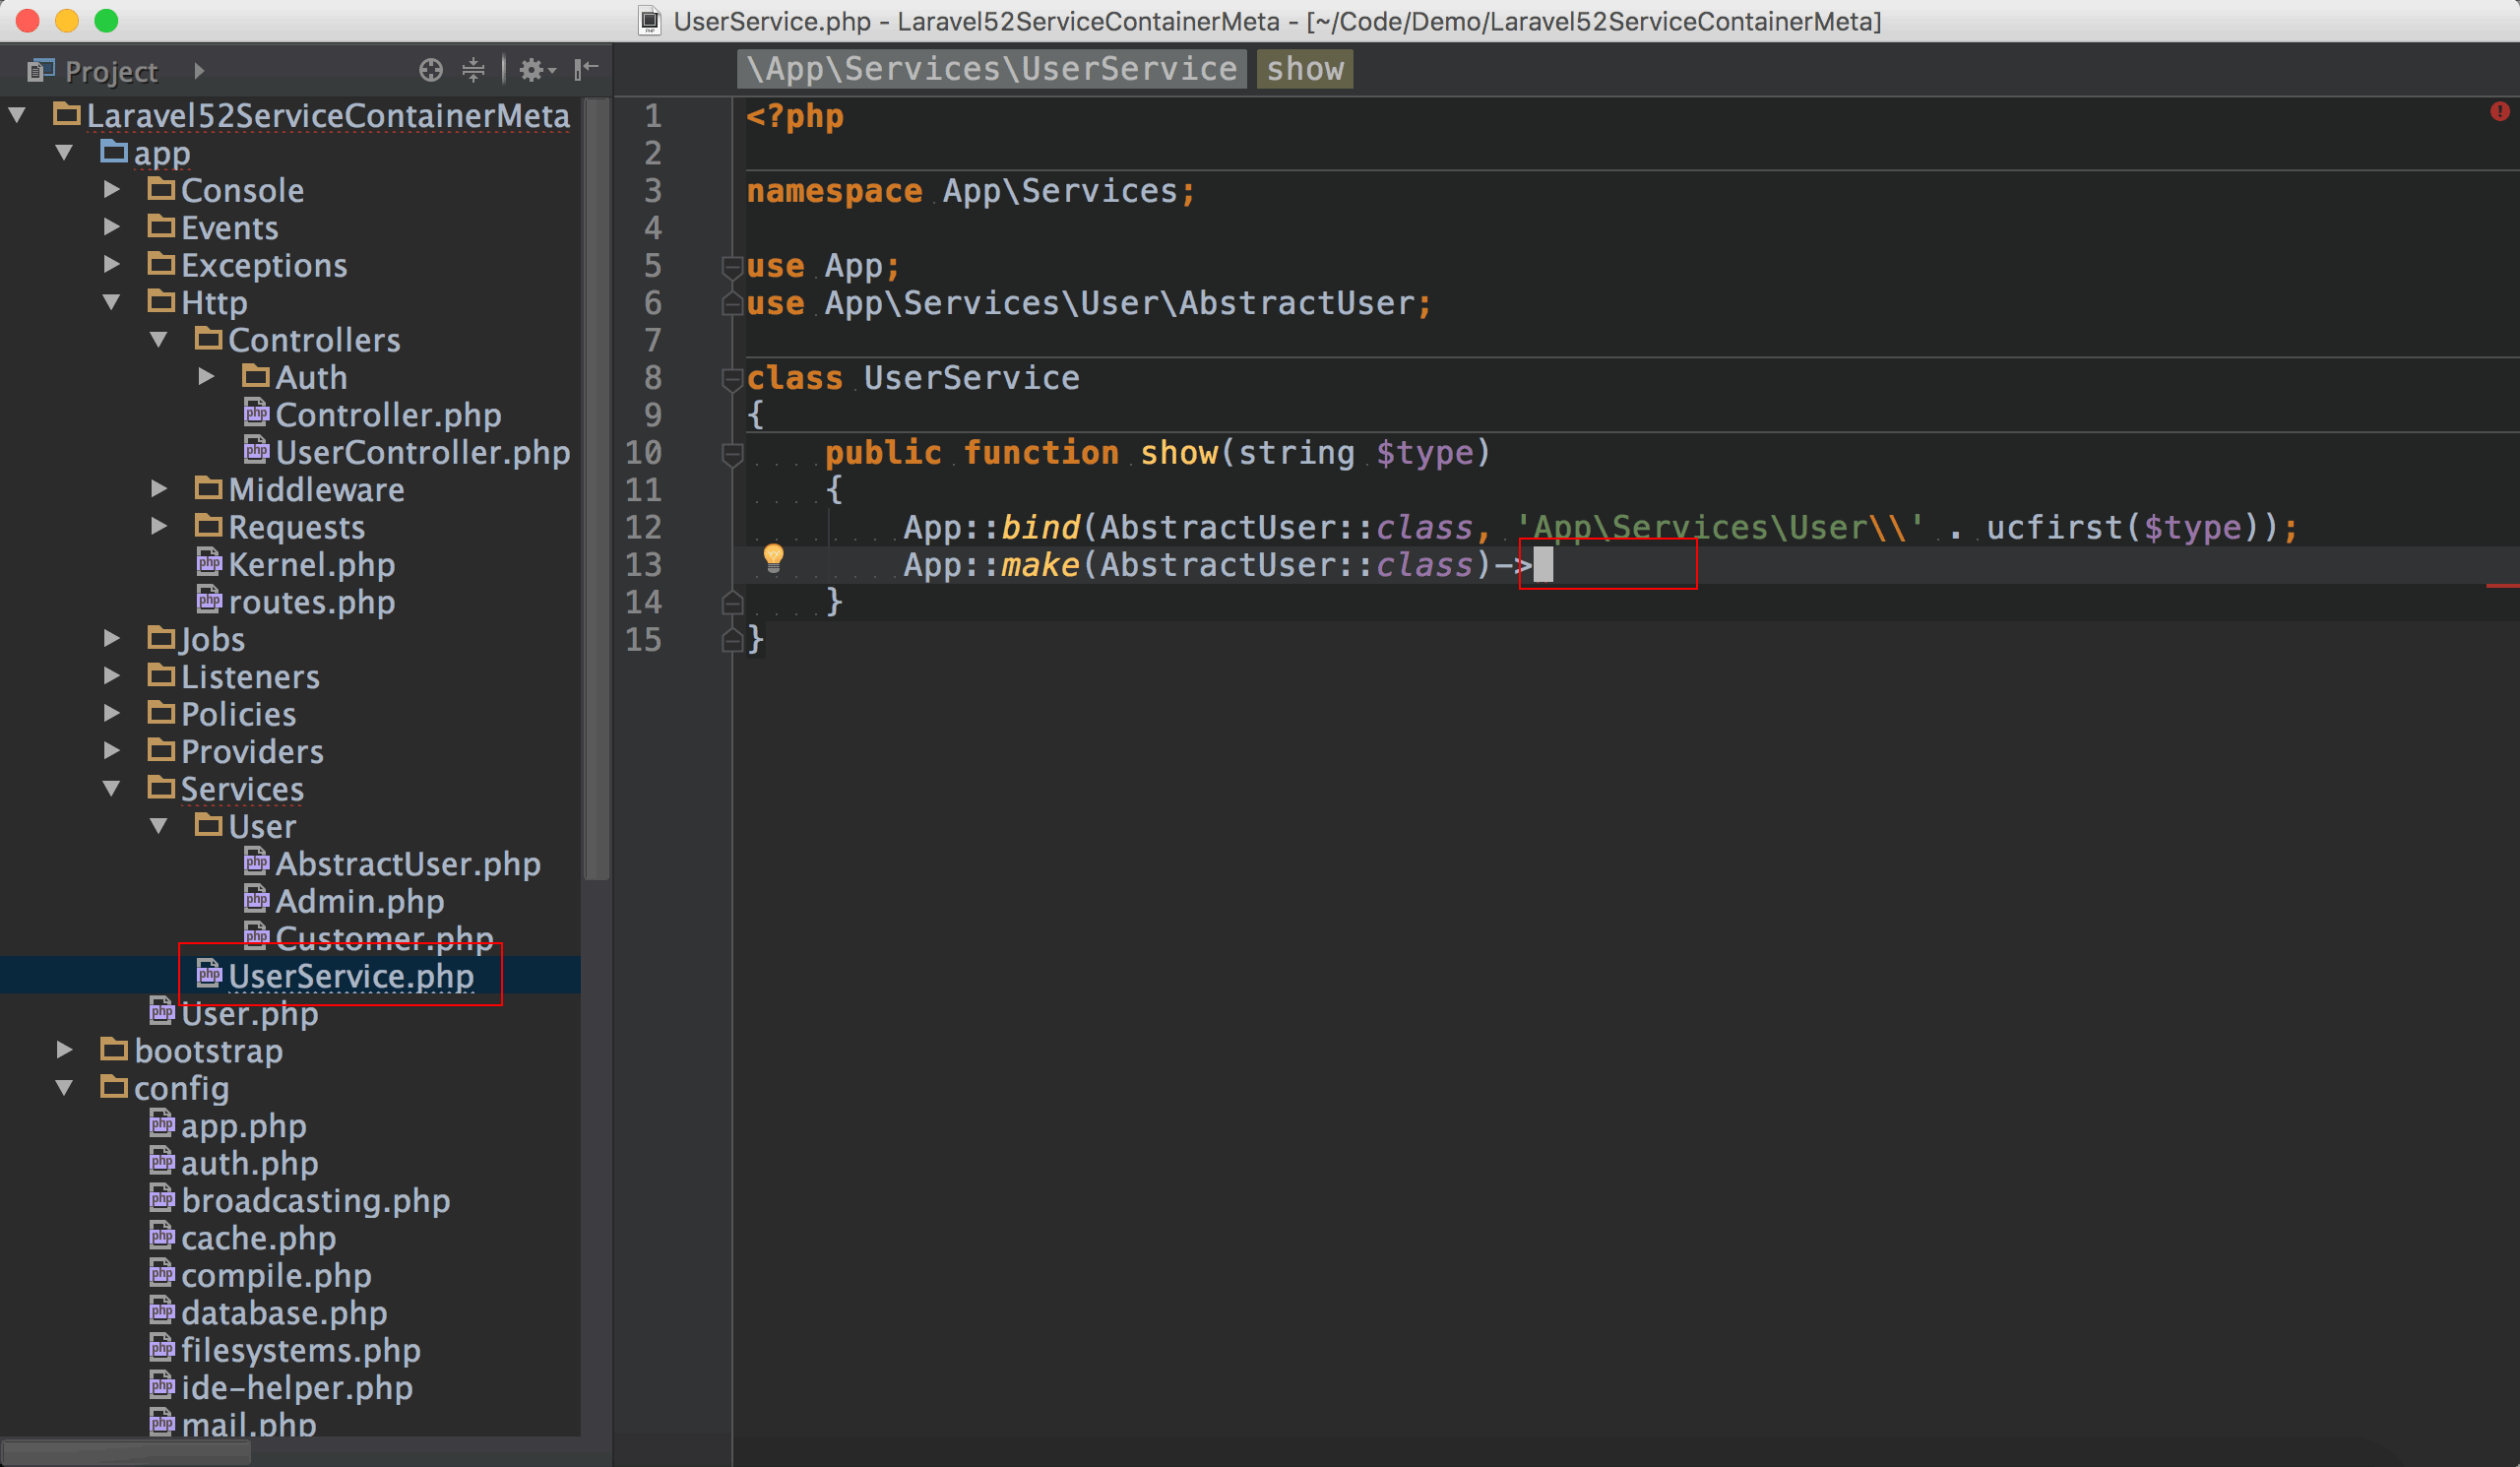
透過App::make()產生的物件,PhpStorm並無法提供語法提示。
產生PhpStorm Advanced Metadata13 13GitHub Commit : 建立.phpstorm.meta.php
1 | oomusou@mac:~/MyProject$ php artisan ide-helper:meta |

Laravel IDE Helper幫我們建立了PhpStorm Advanced Metadata,檔名為.phpstorm.meta.php。
重新啟動PhpStorm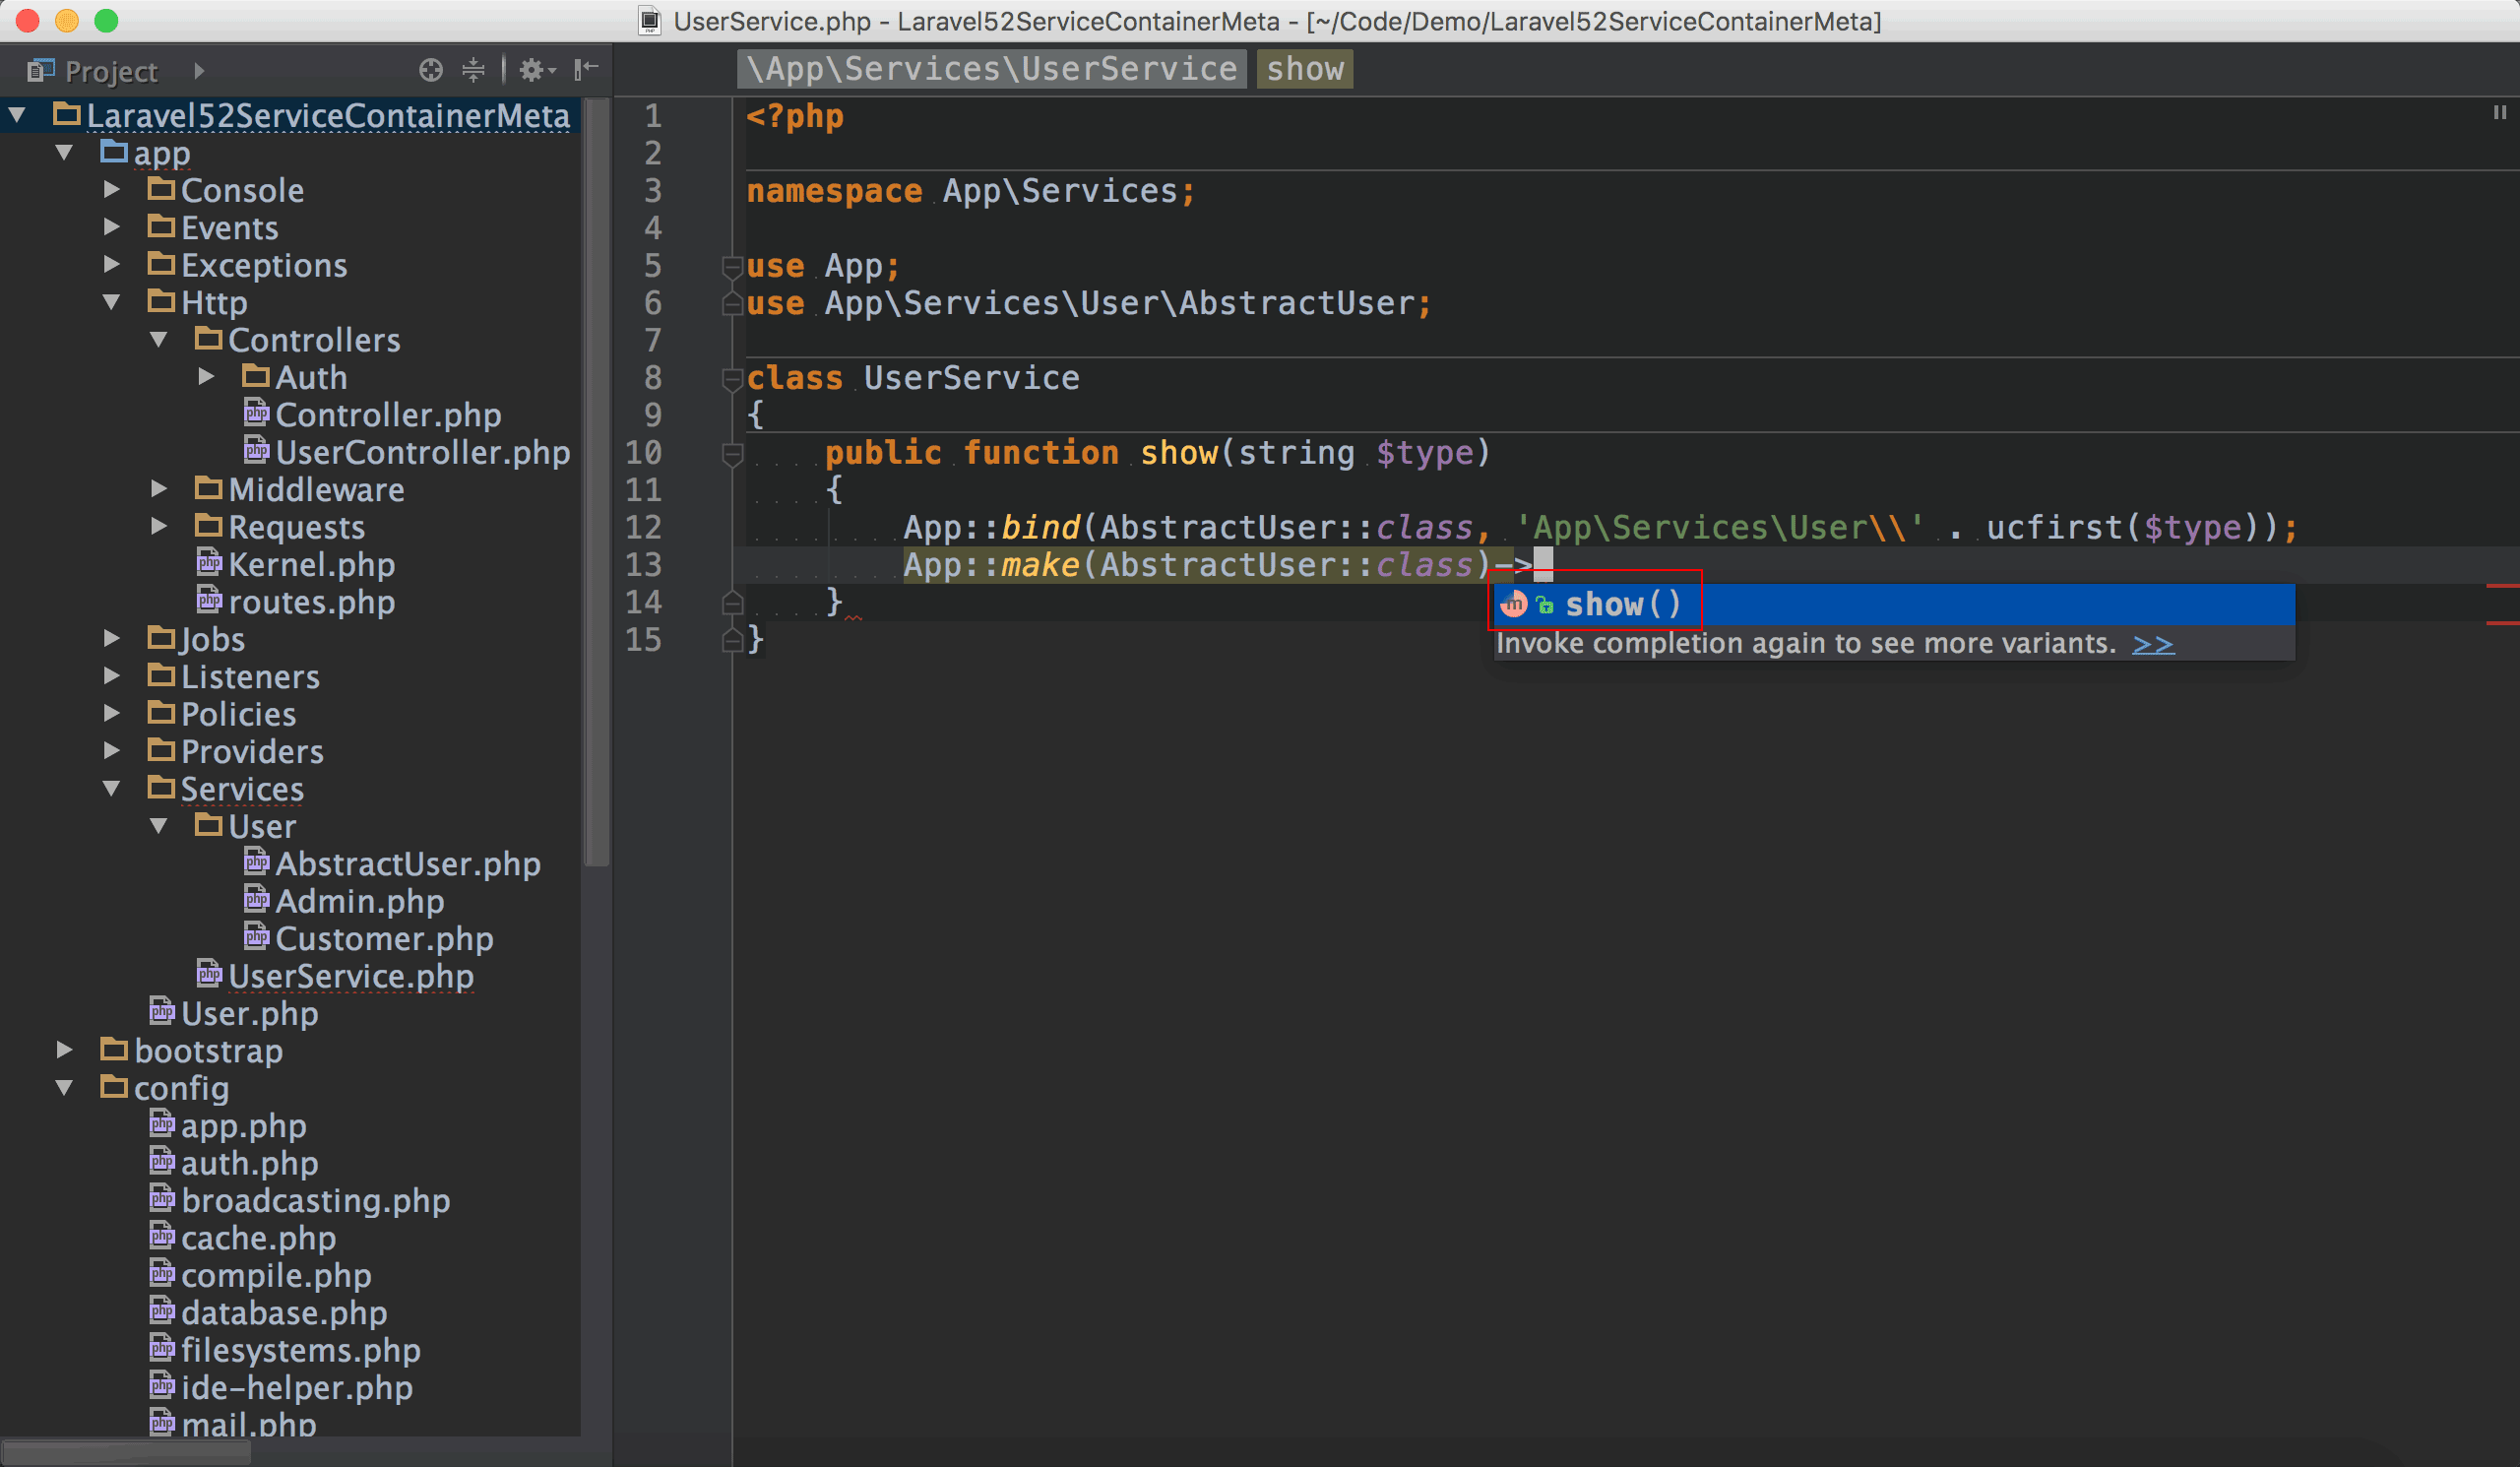
有了.phpstorm.meta.php,App::make()就會參考此檔,自動顯示語法提示。14 14在.phpstorm.meta.php中定義了3種方式會啟動語法提示 : ArrayAccess style, App::make()與app(),其中Laravel IDE Helper在該檔中幫我們建立了很多class與interaface的別名,讓我們可以用更簡短的名稱使用service container。
Laravel Plugin
我們還需要安裝Laravel Plugin,它包含了一些Laravel IDE Helper所沒有提供的語法提示功能。
安裝
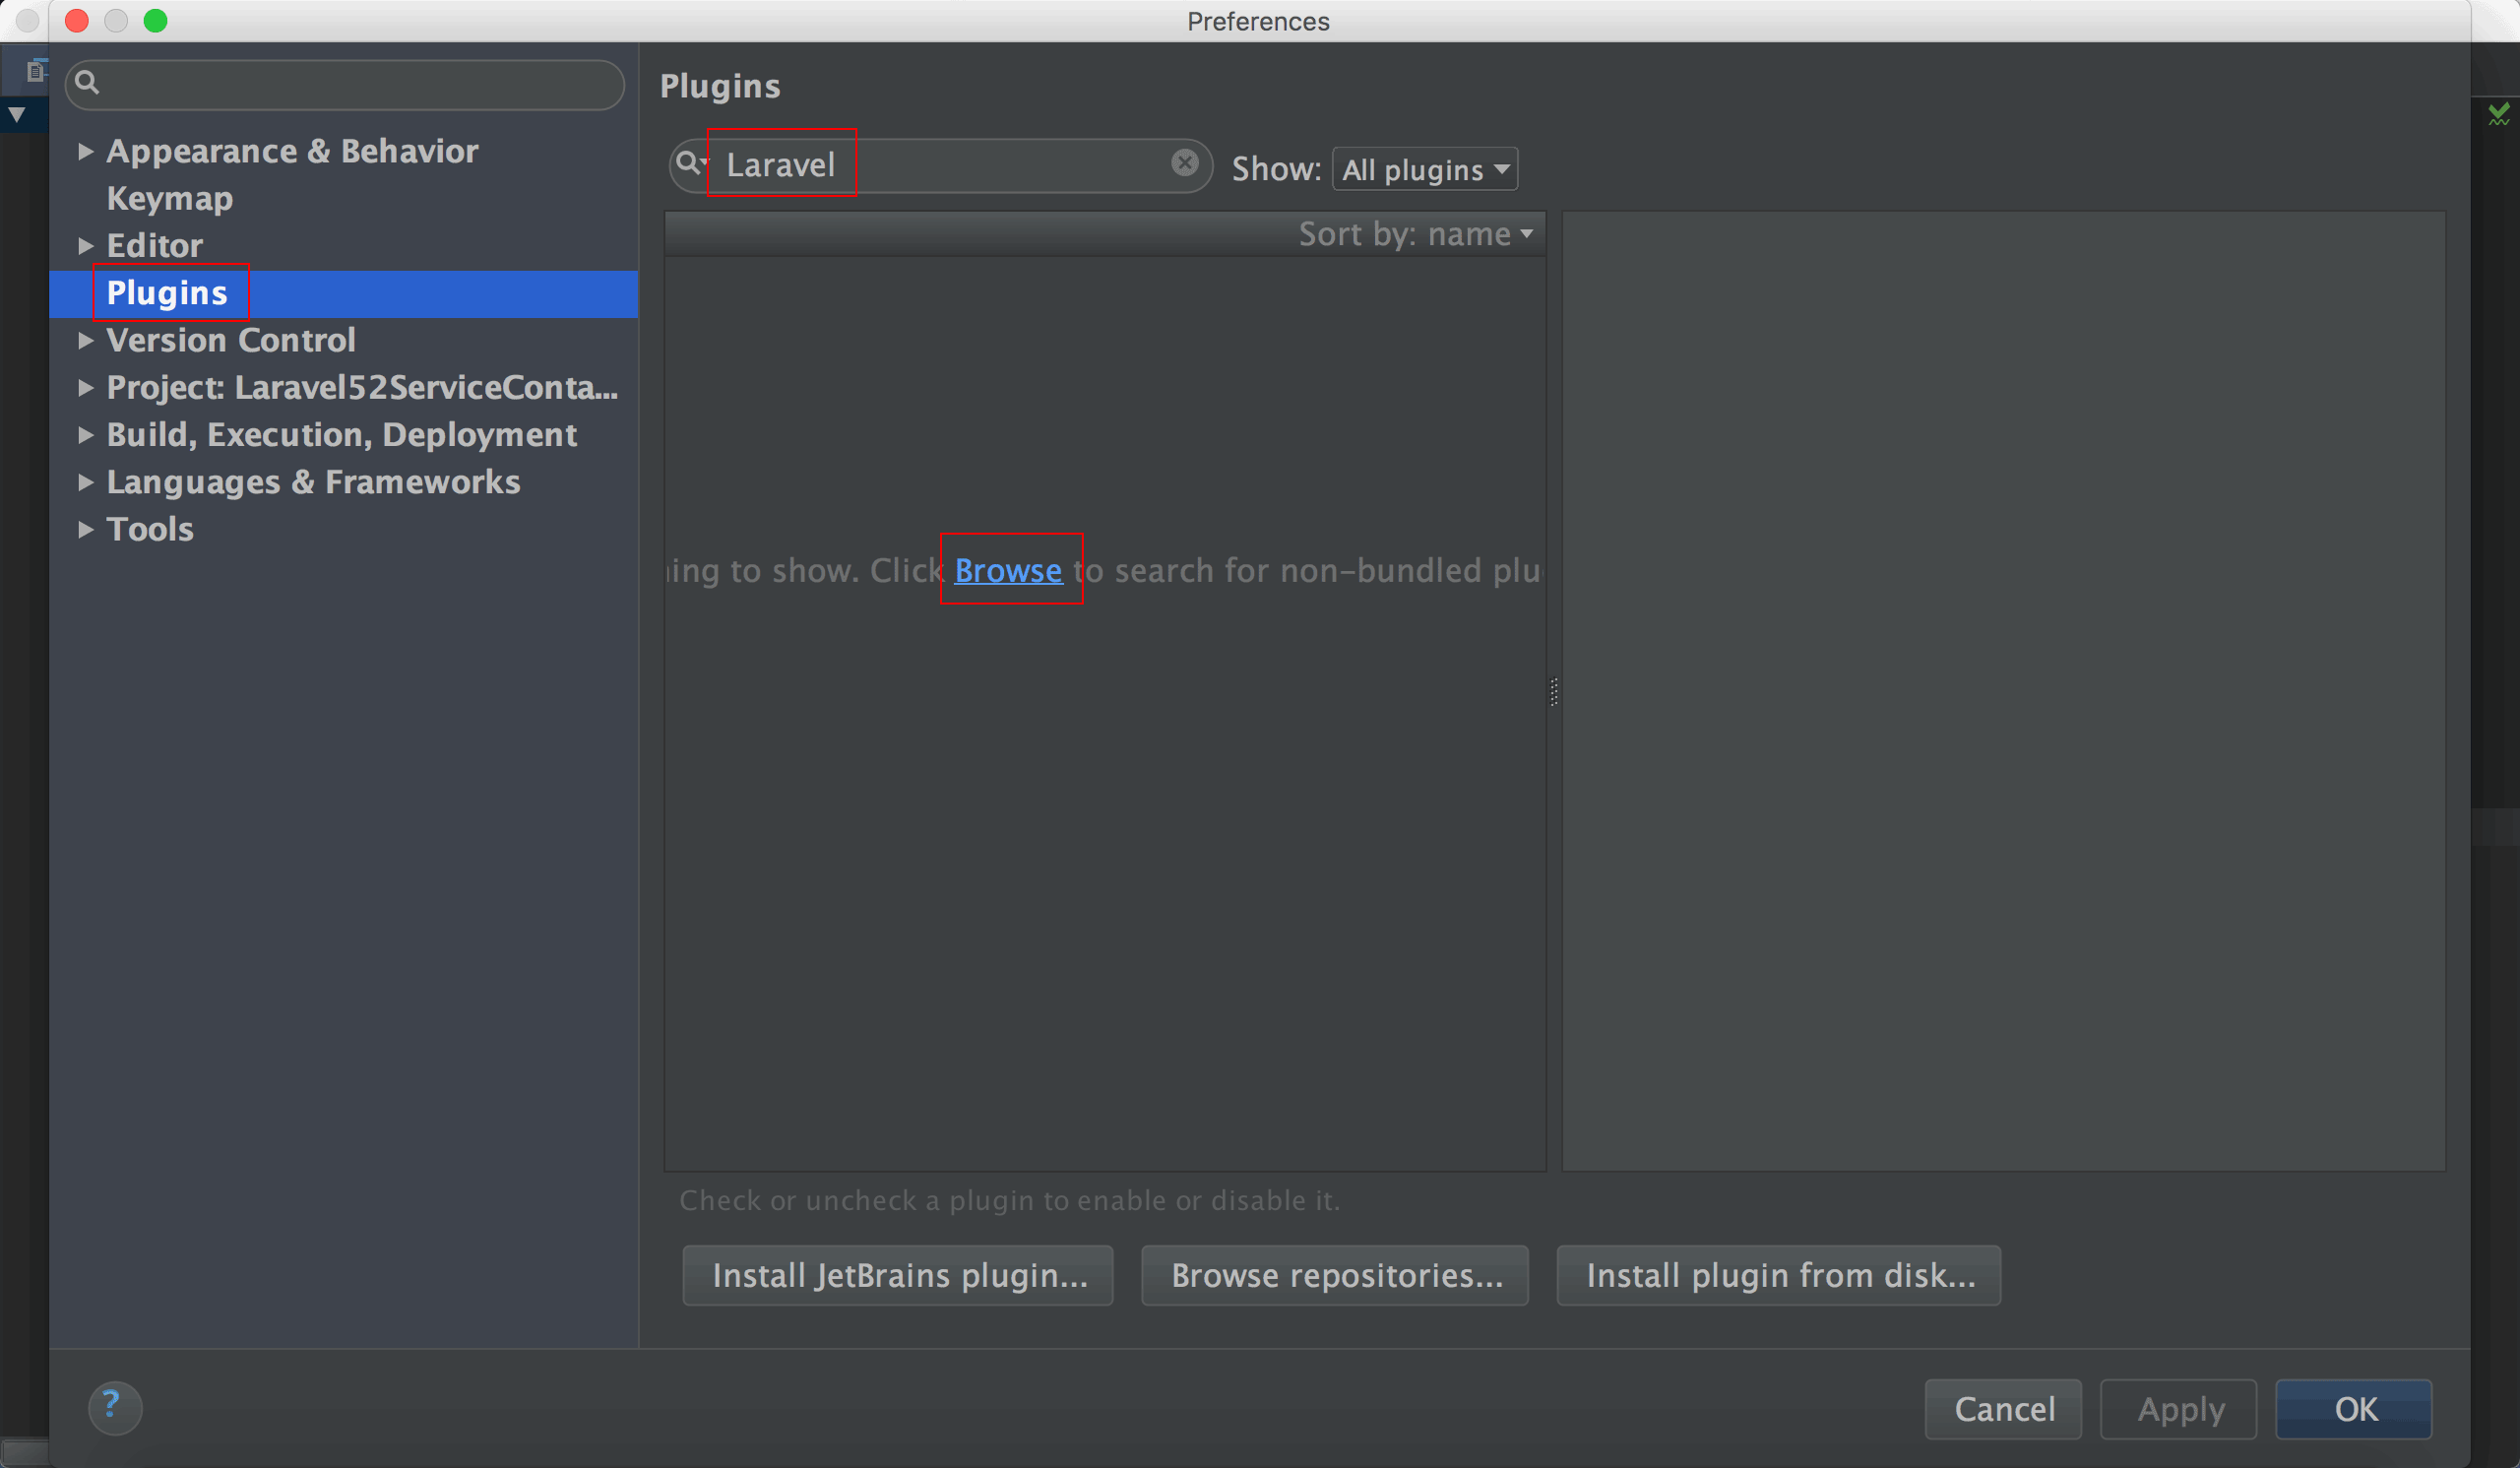
PhpStorm -> Preferences -> Plugins
輸入Laravel,按Browse。
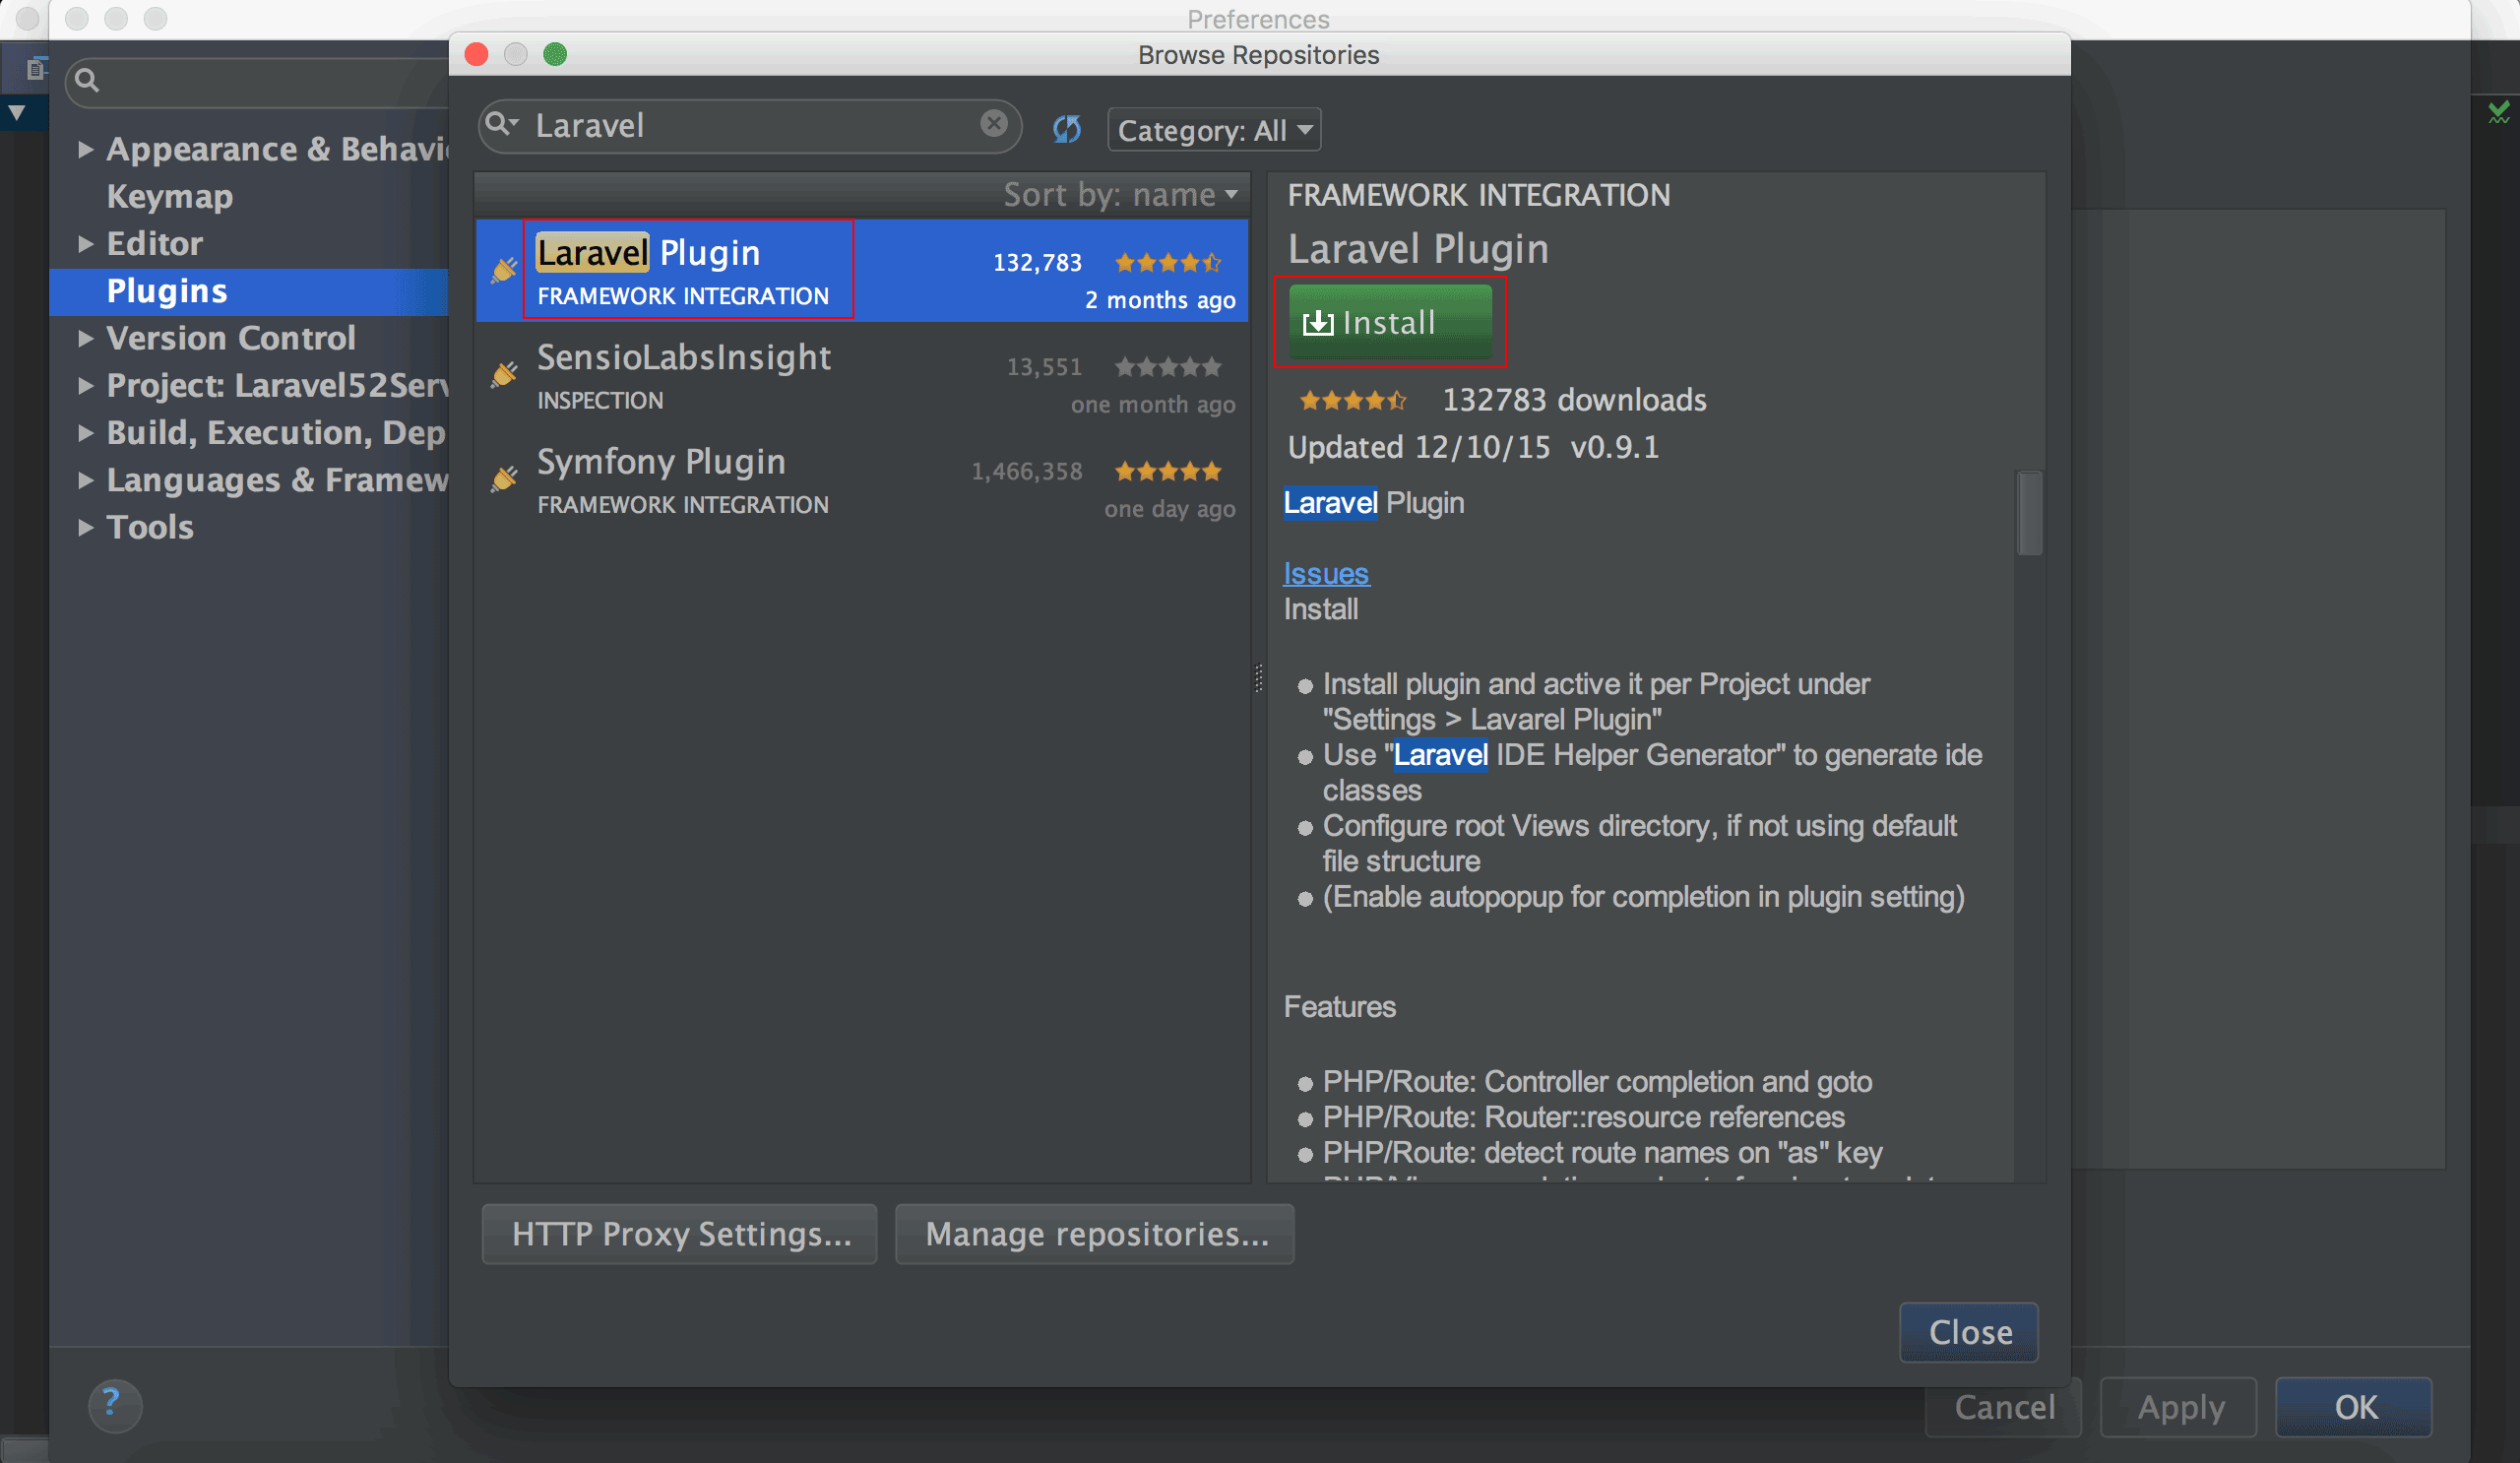
選擇Laravel Plugin,按Install安裝。
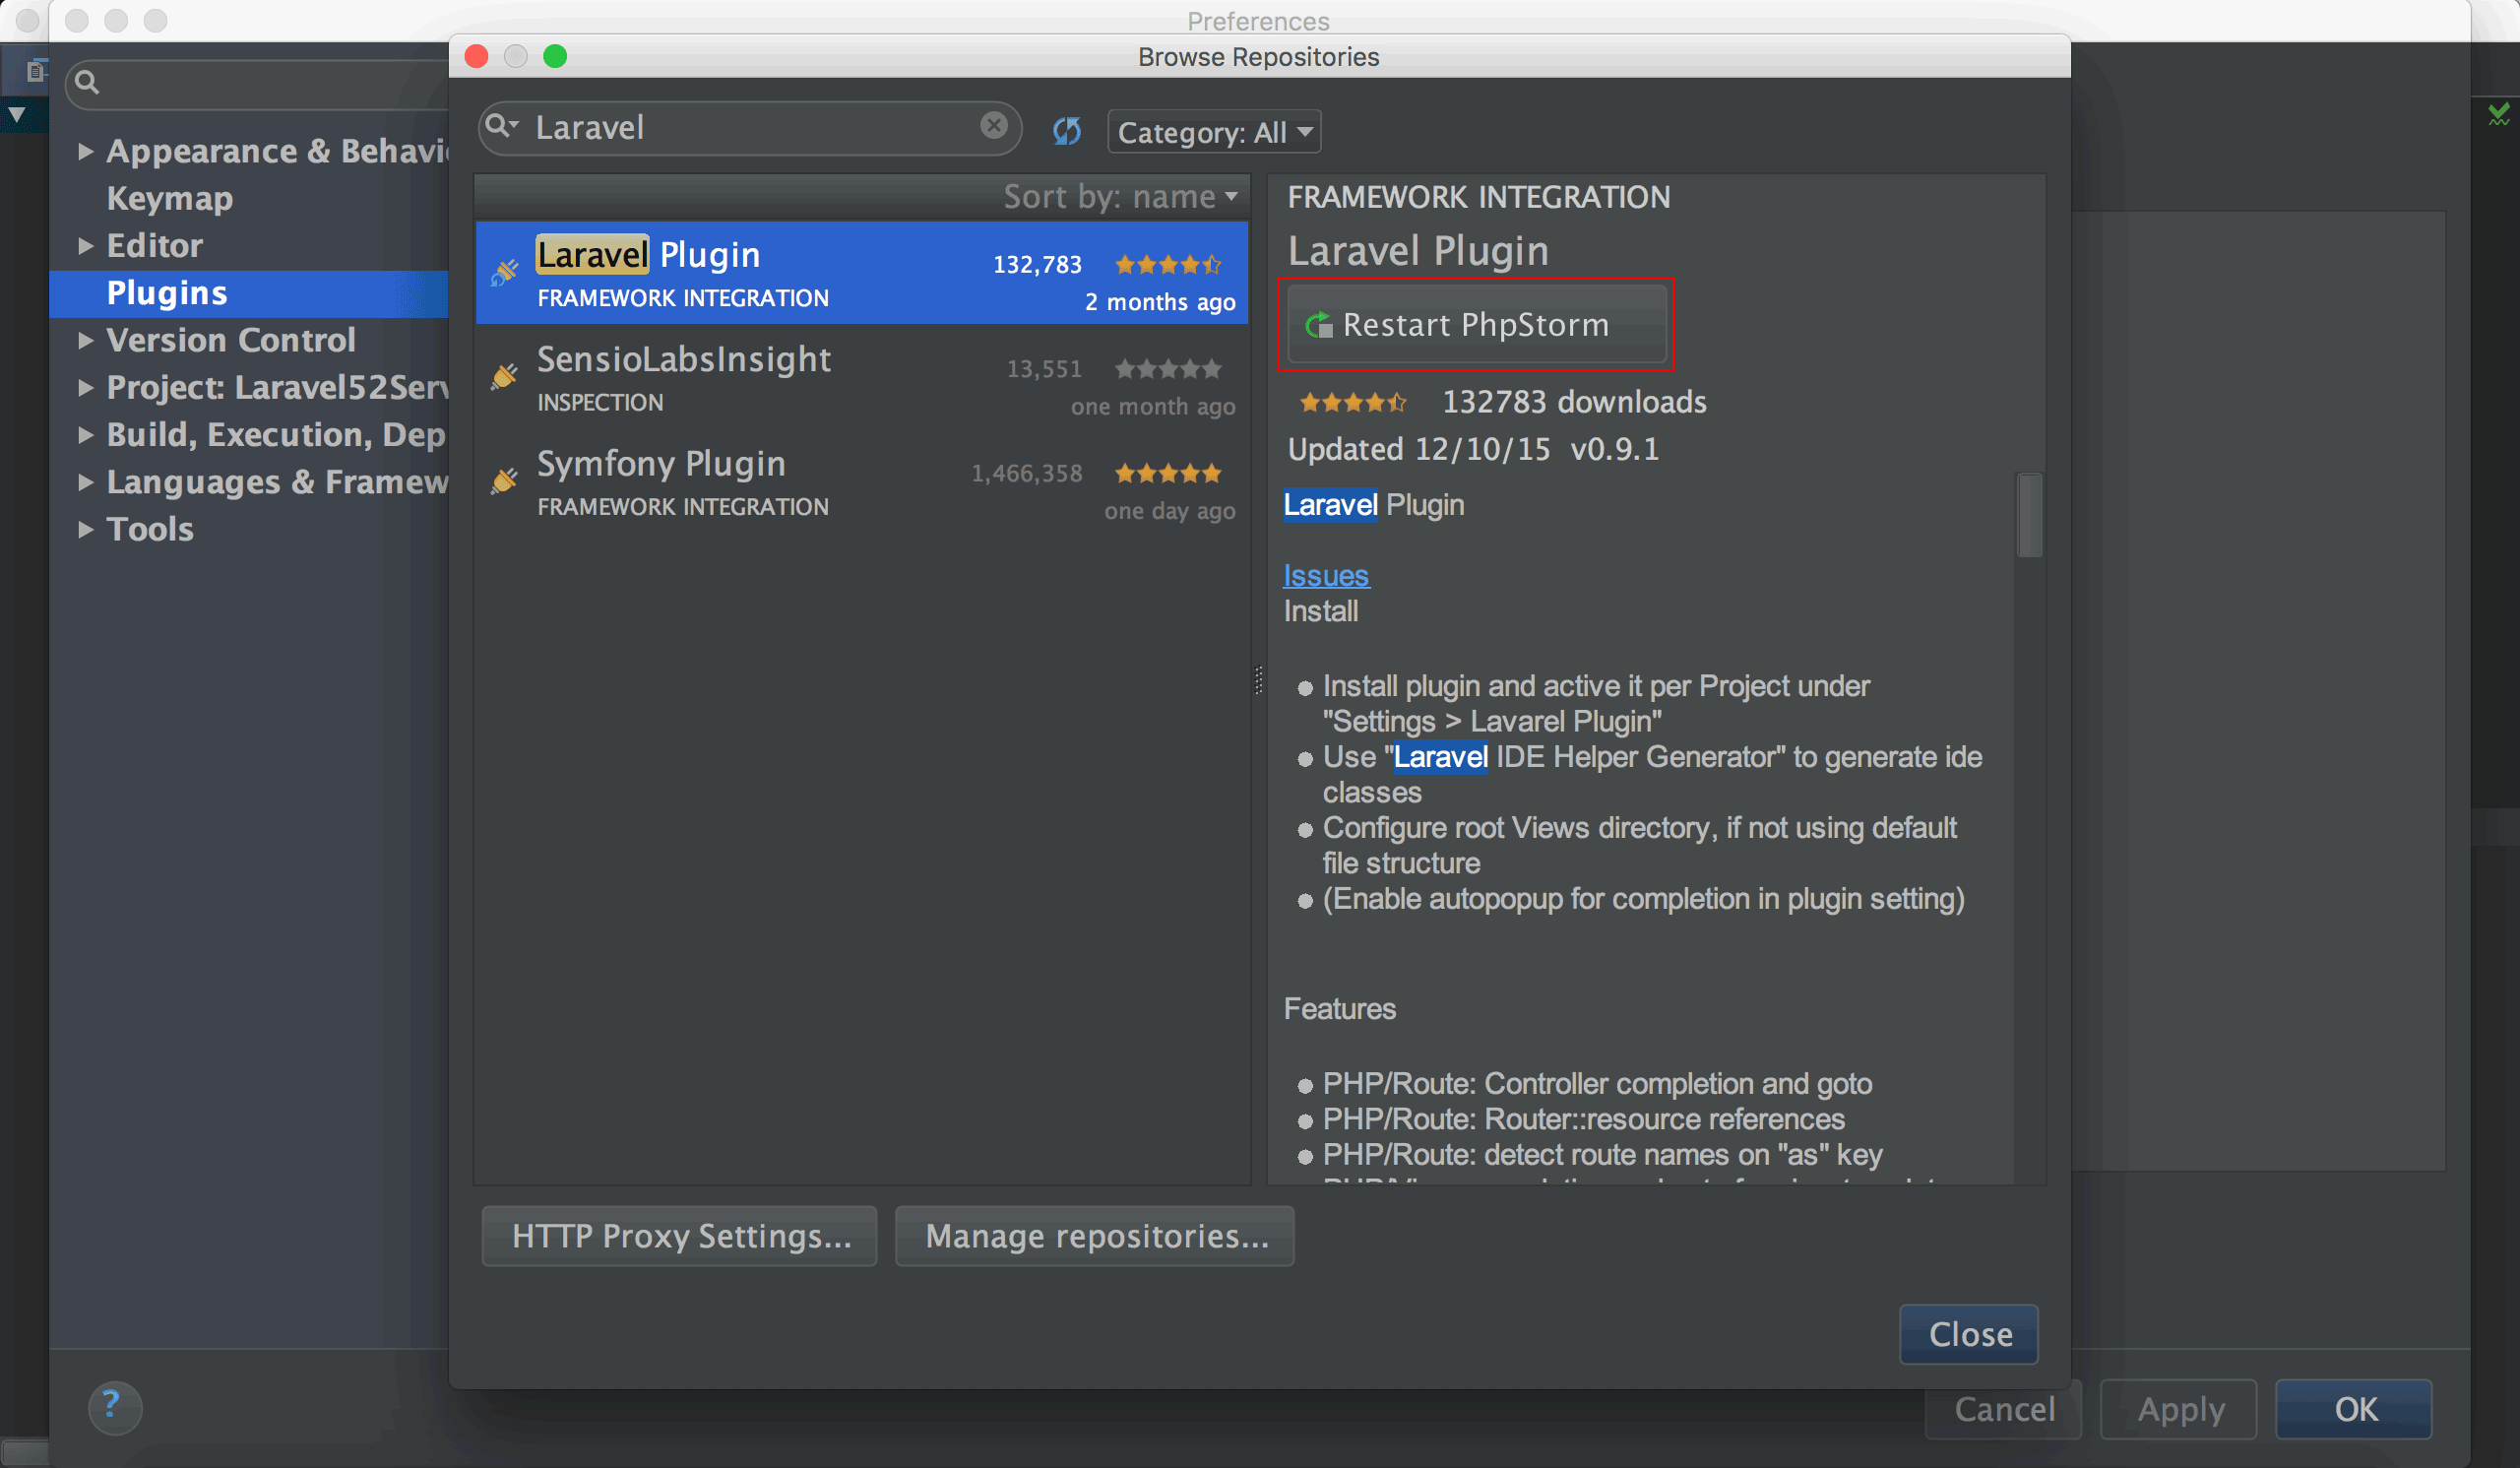
安裝完,按Restart PhpStorm重新啟動。
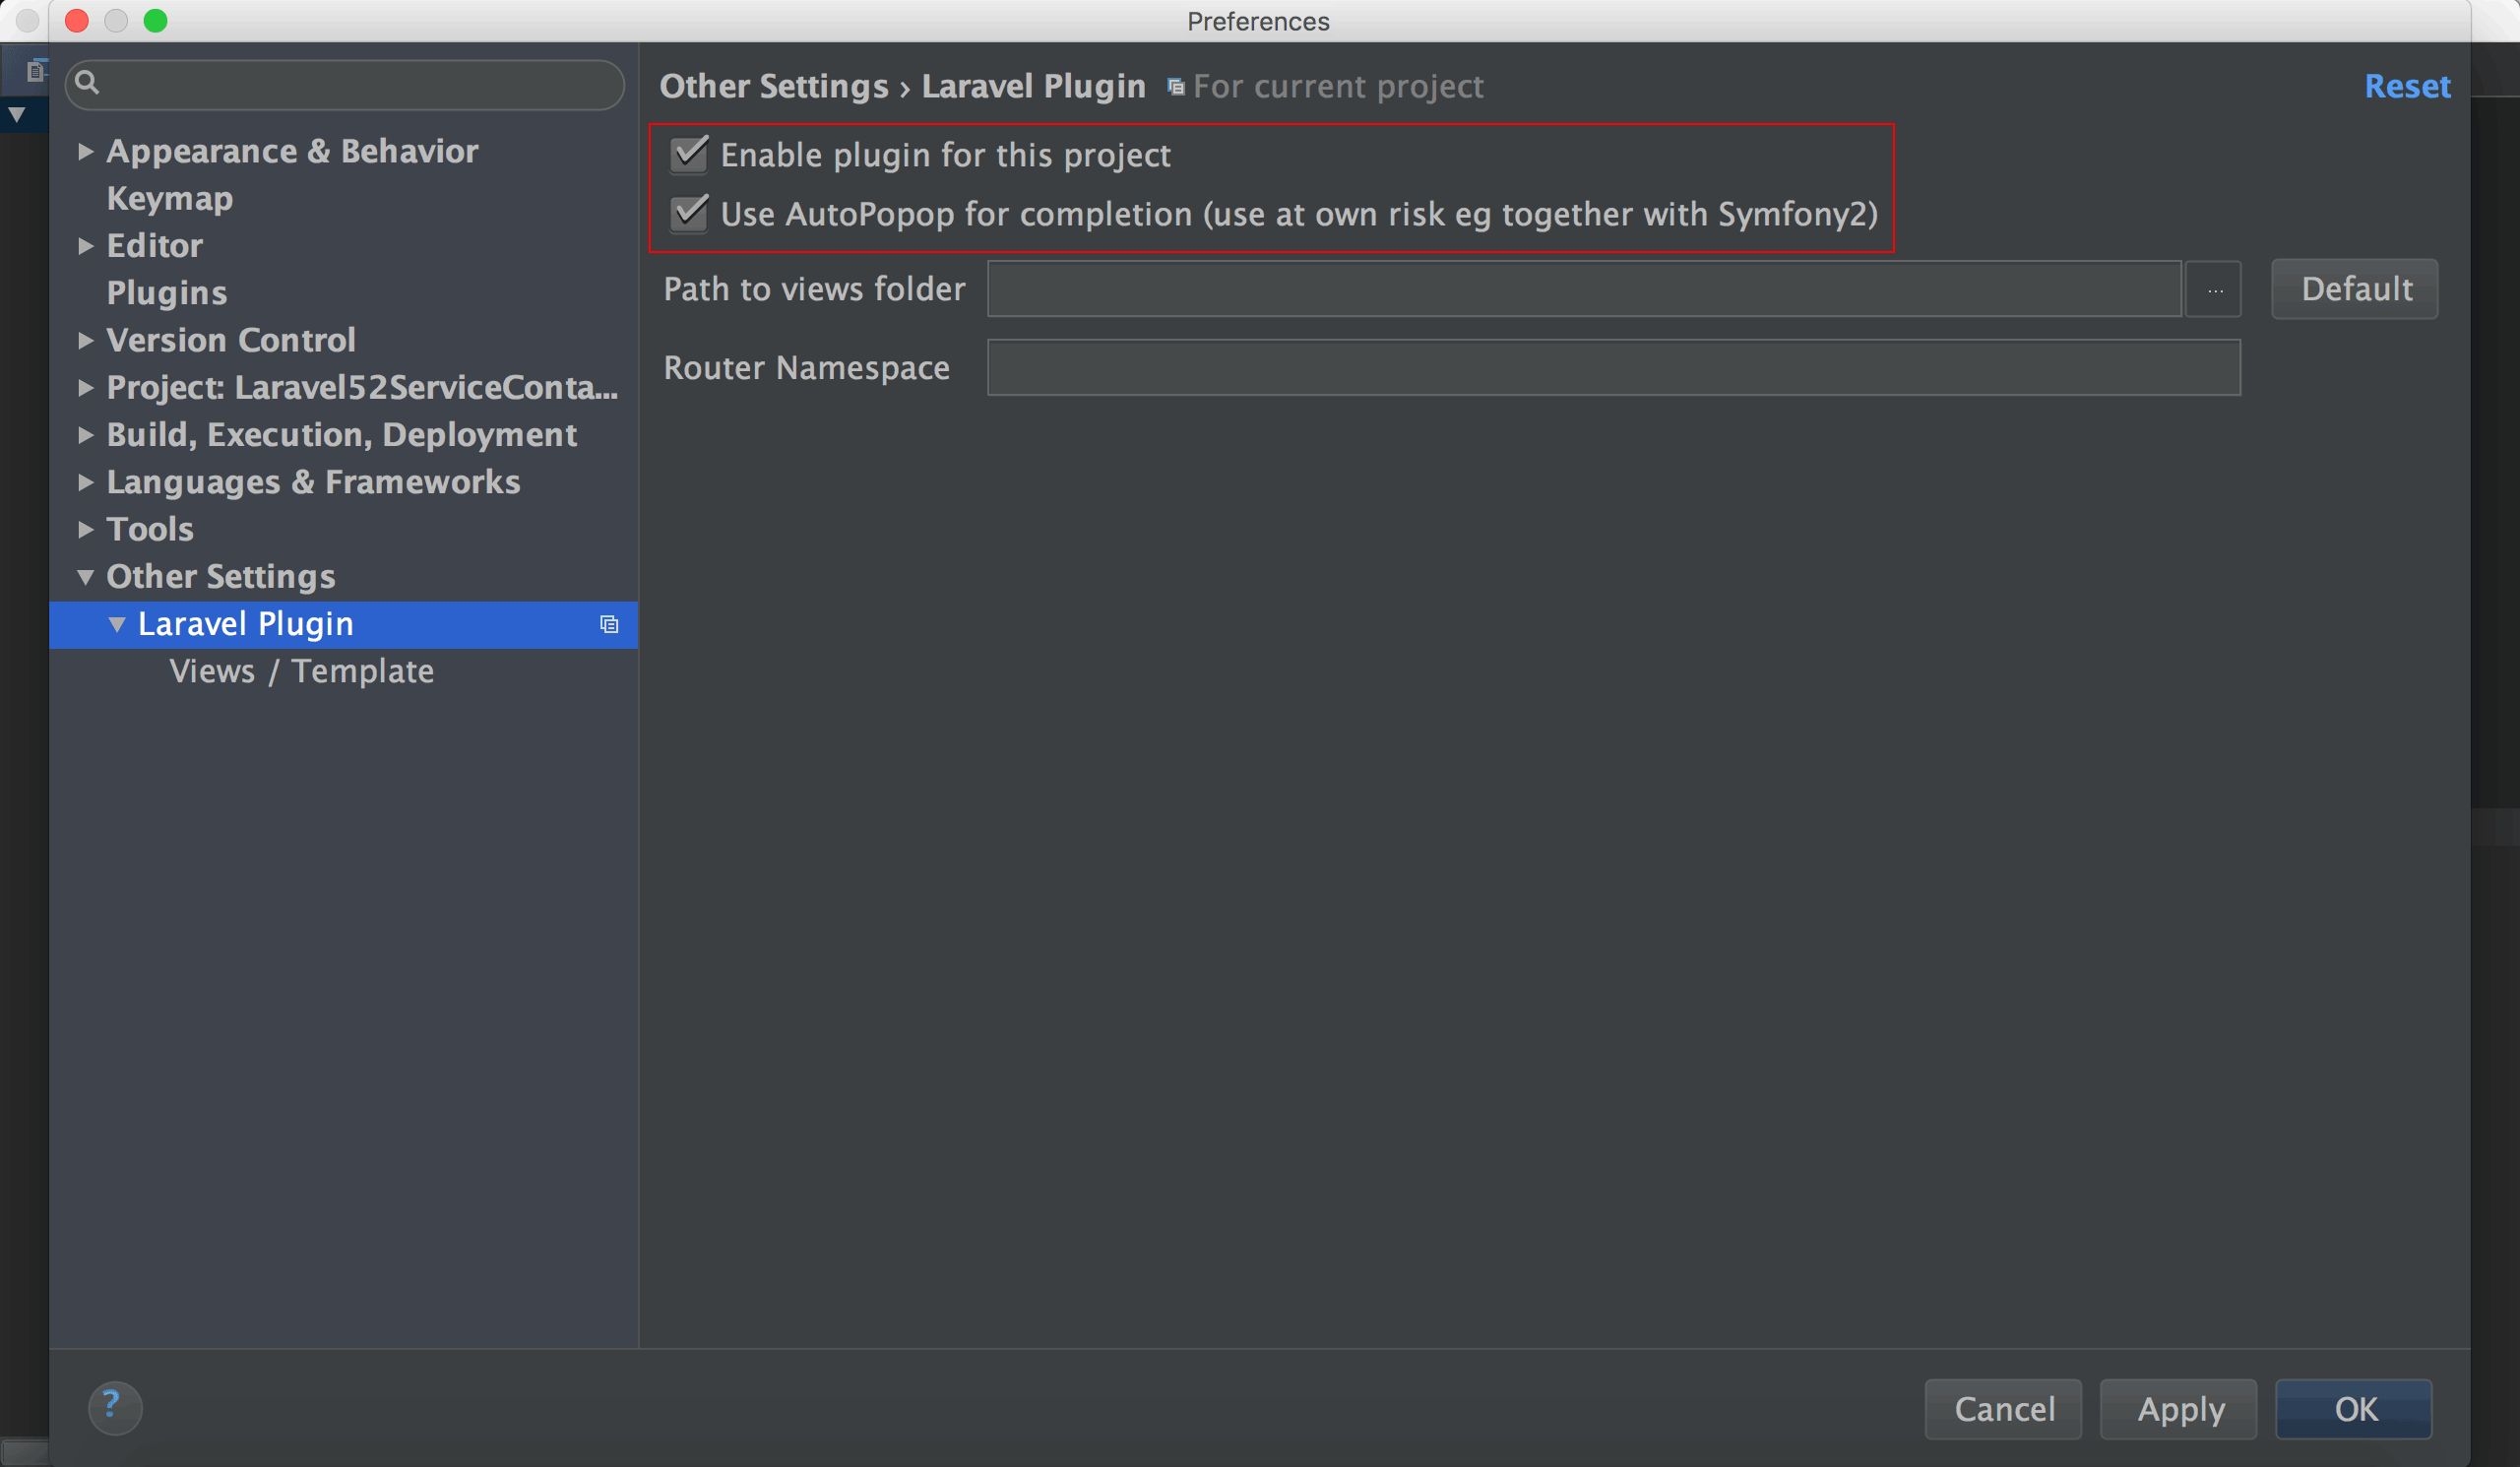
PhpStorm -> Preferences -> Other Settings -> Laravel Plugin
將Enable plugin for this project與Use AutoPopop for completion打勾。
再次重新啟動PhpStorm。
Controller
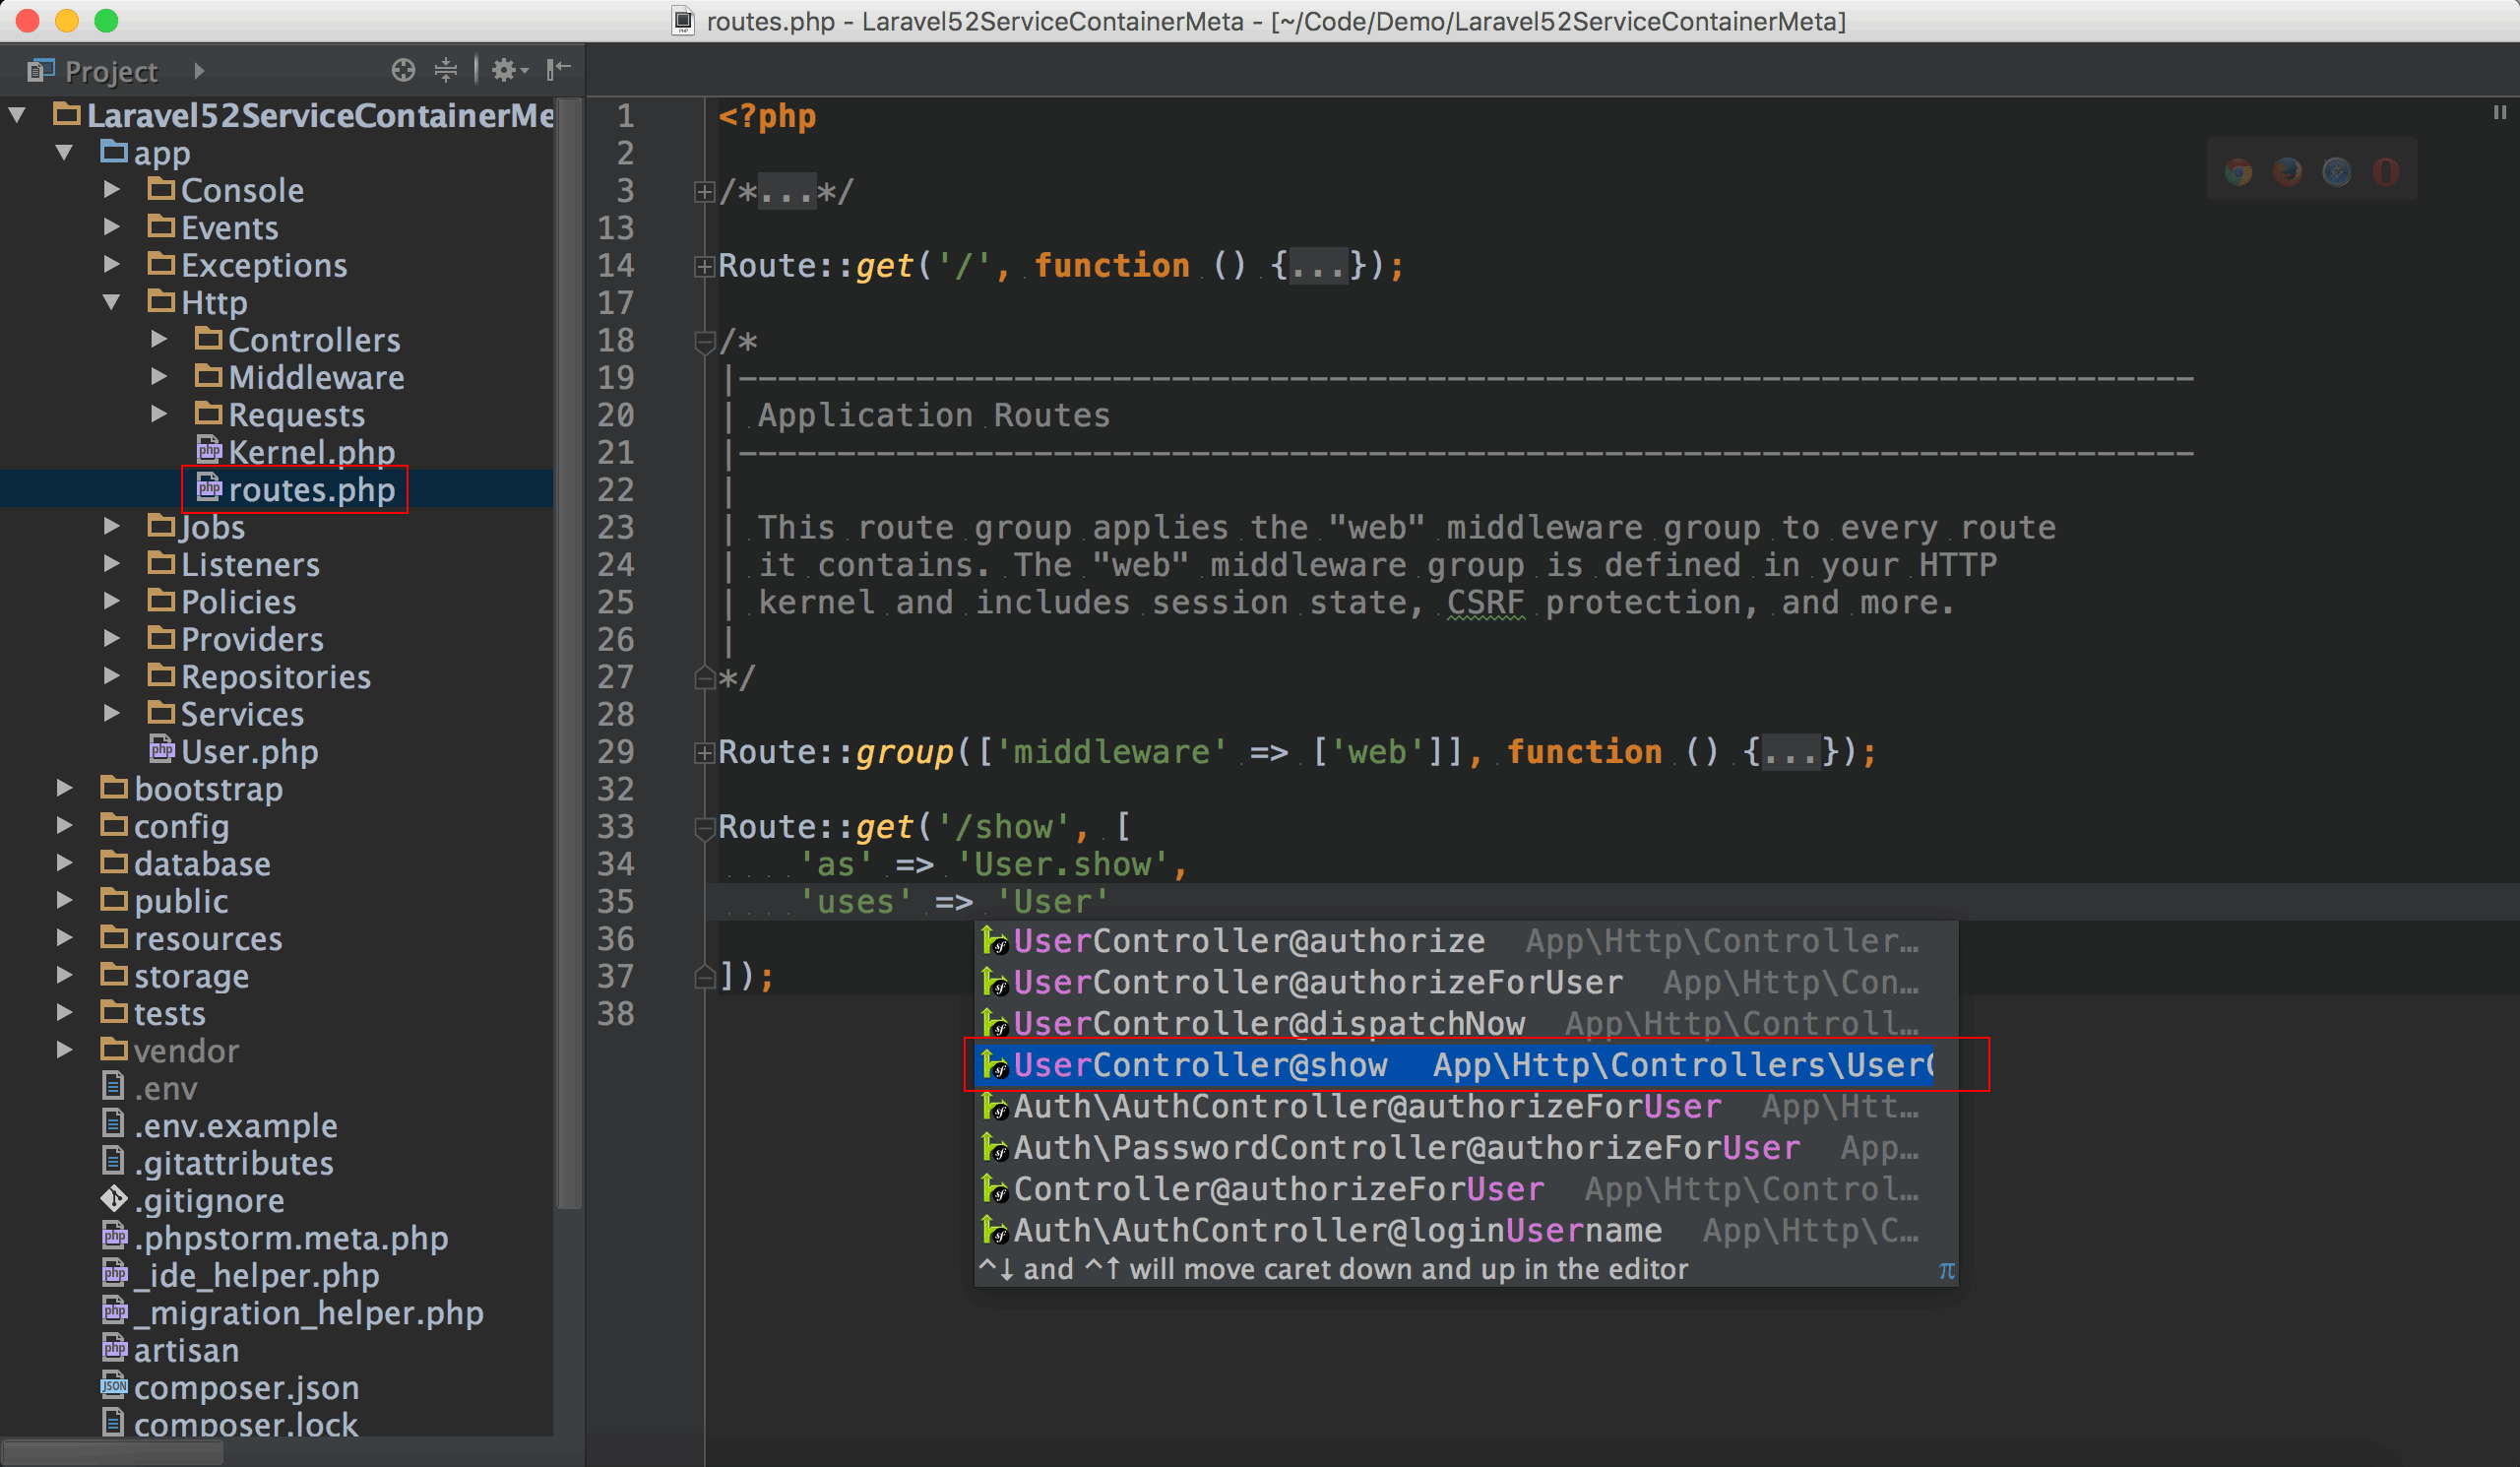
在routes.php中,已經可以選擇controller與action。
Route
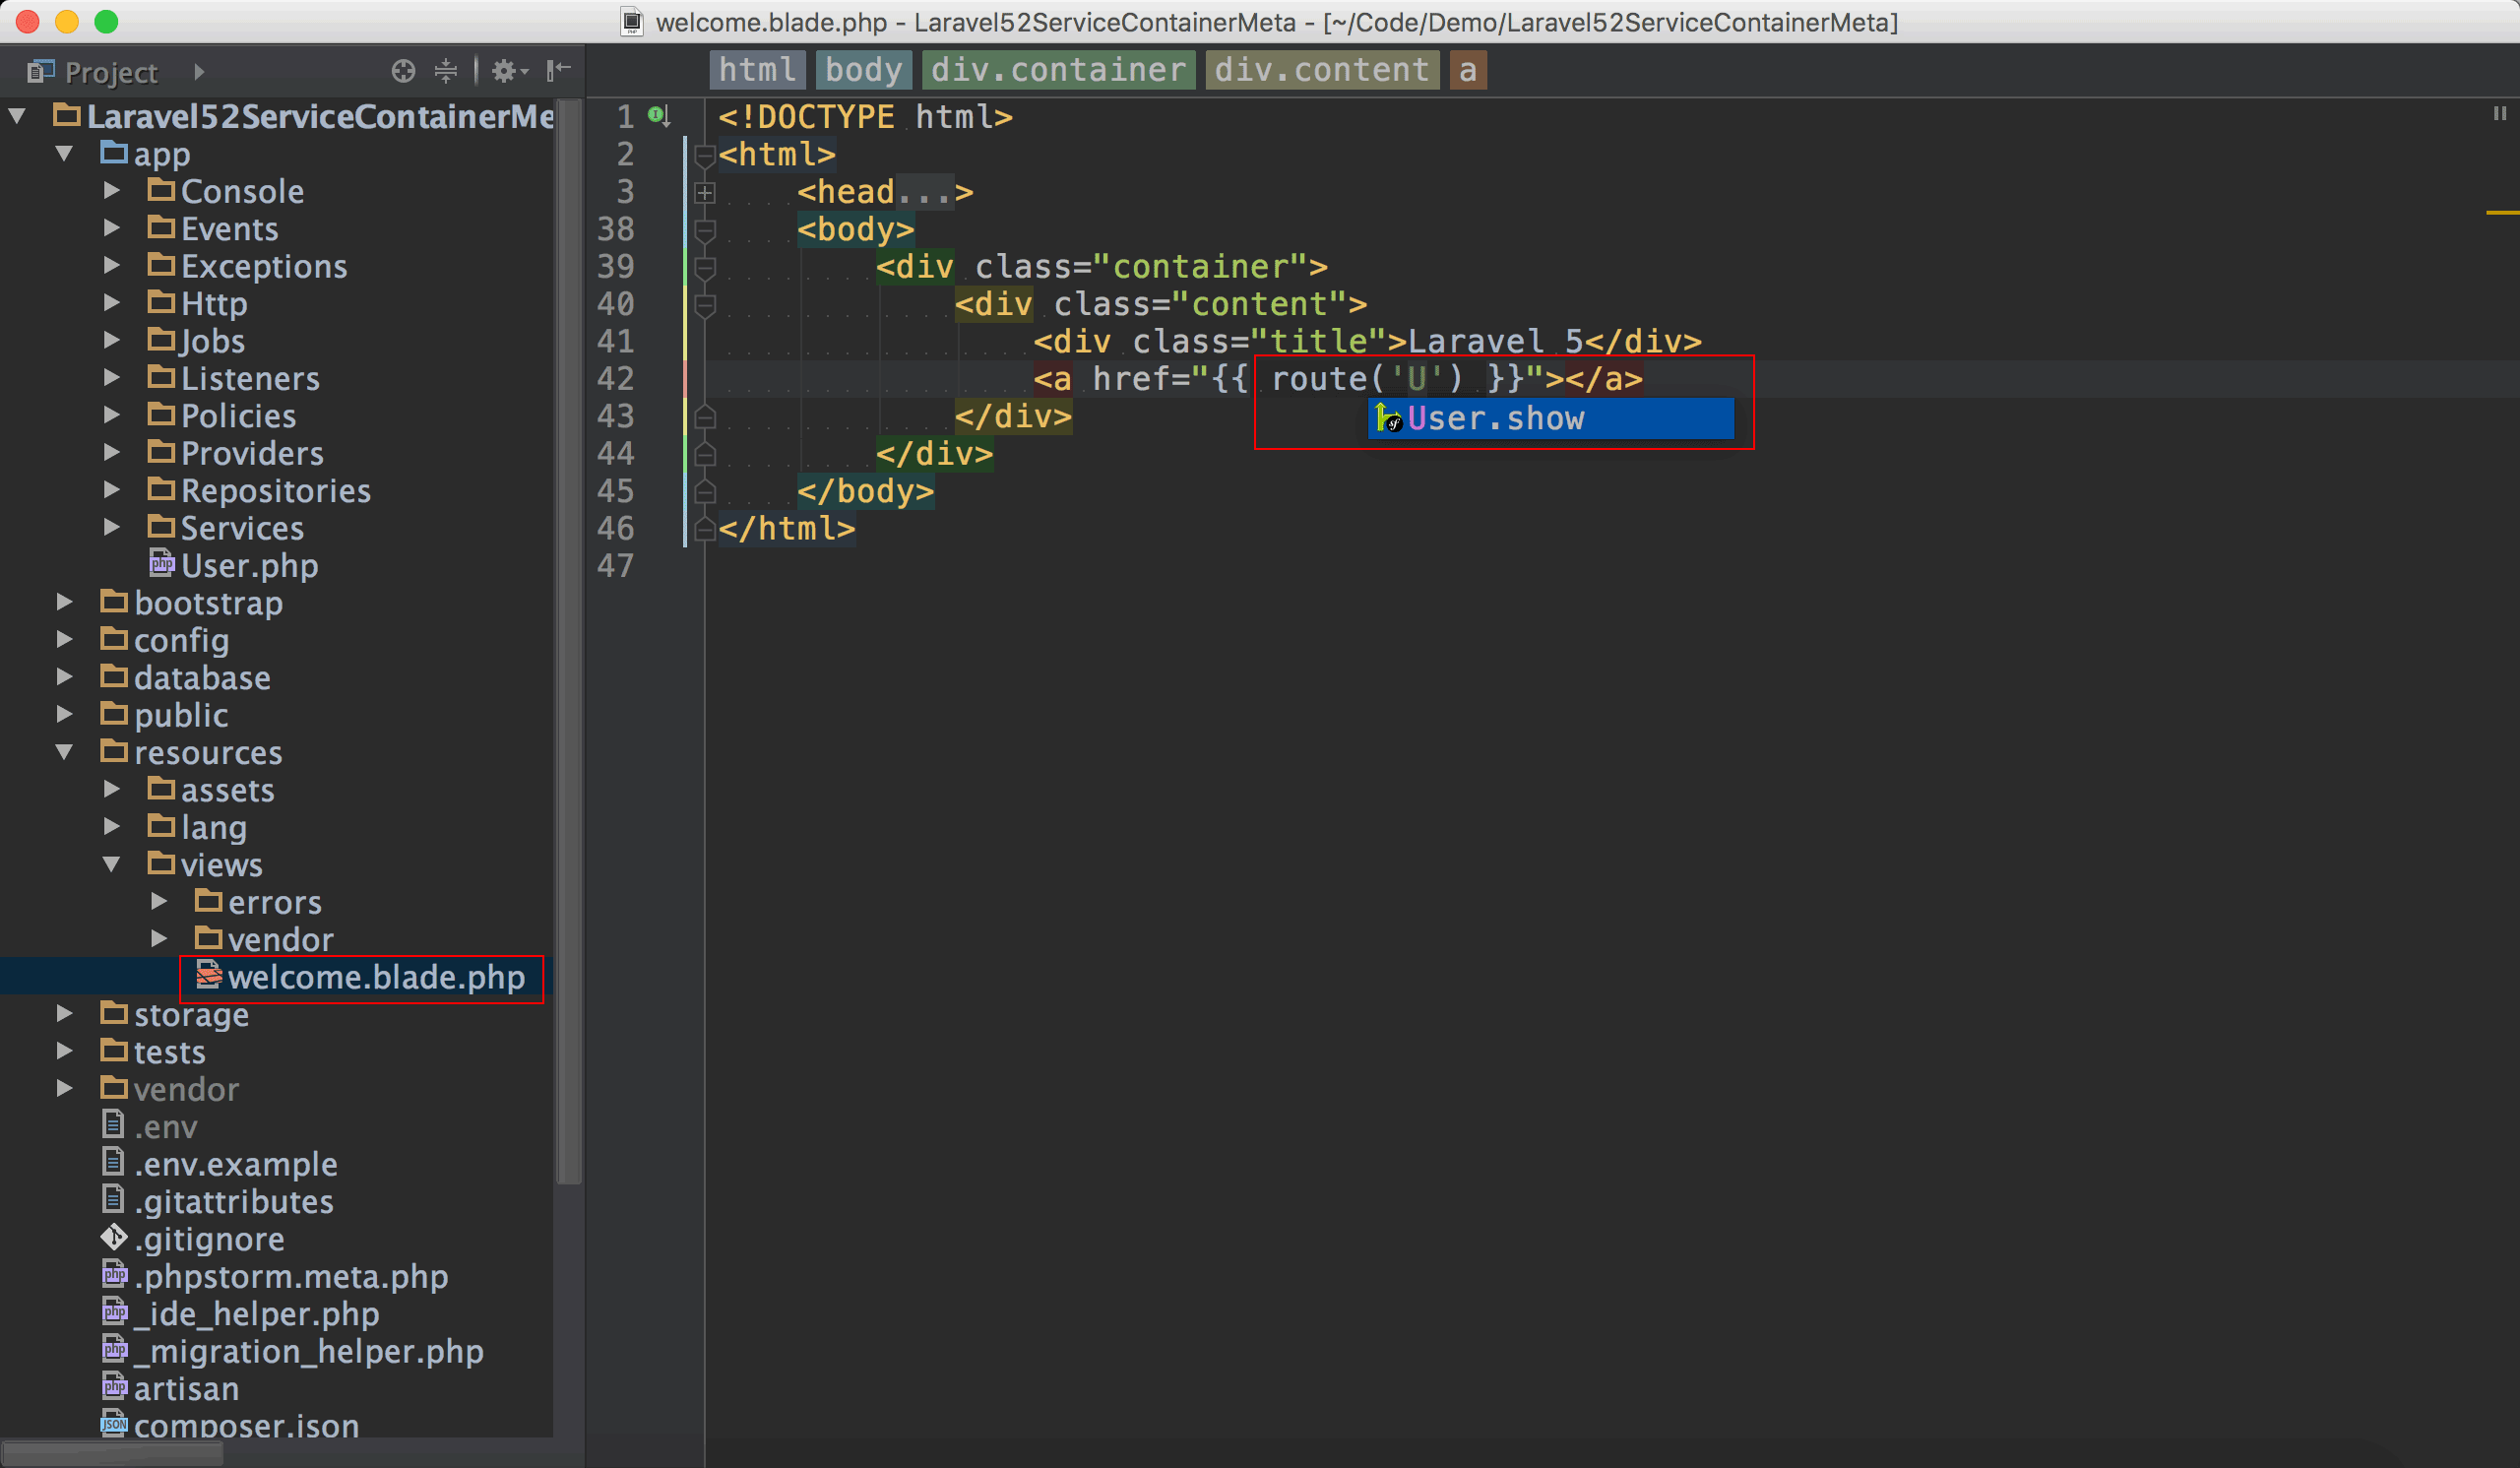
在blade使用route()時,已經可以抓到在routes.php所定義的route別名。
View
在controller回傳view時,已經可以抓到在resources/views目錄下所定義的view。
除此之外,在blade中如@include也可以抓到其他blade。
config::get()
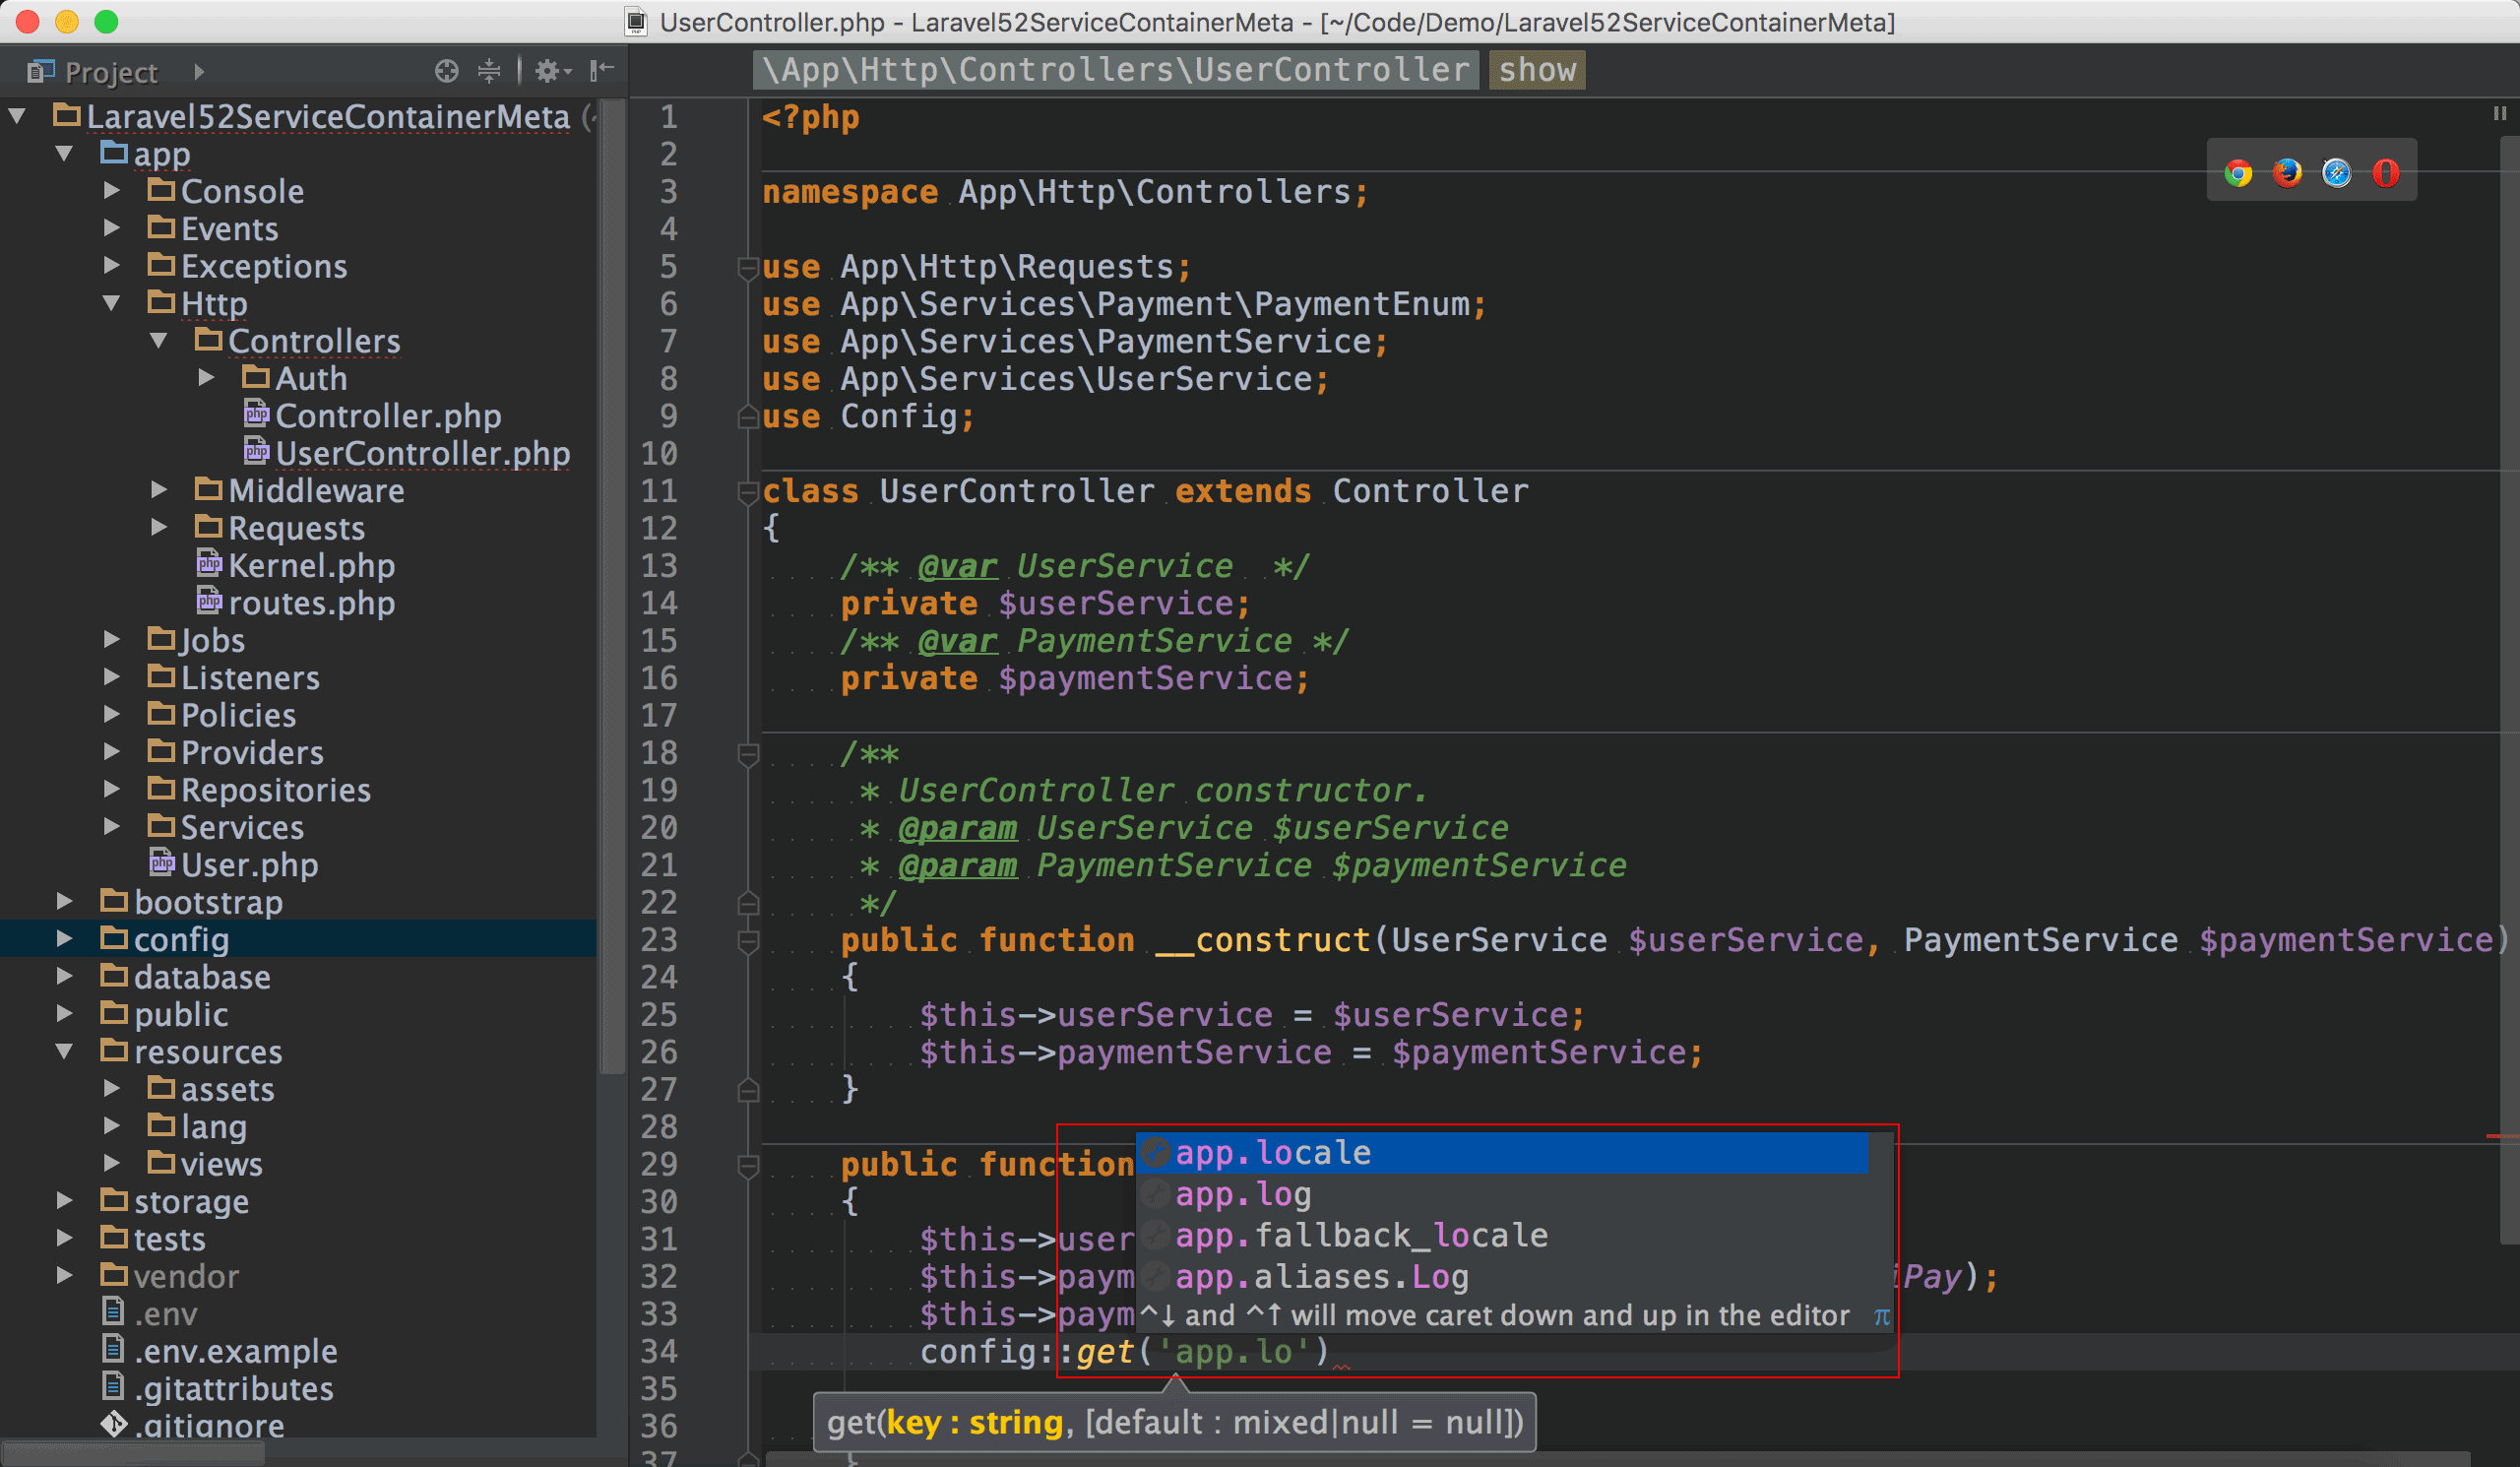
config::get()已經可以抓到array的key值了。
Why PHPDoc?
Laravel IDE Helper幫我們做了很多事情,讓PHP在PhpStorm可以如強型別語言一樣使用語法提示與語法檢查,但其黑魔法在哪裡呢?
如C#這種強型別語言,Visual Studio之所以能即時提供語法提示與語法檢查,因為當你在Visual Studio寫程式時,C# compiler就在背景默默地編譯,因此可以及時提供語法提示,且及時顯示語法檢查的警告,也因此Visual Studio需要更高檔的硬體支援。
但PHP沒有compiler,必須執行了才知道結果,所以PhpStorm所有的語法檢查與語法提示資訊都來自於PHPDoc,甚至可以說,PhpStorm是在檢查你的PHPDoc,而不是在檢查PHP。
Laravel IDE Helper幫我們做的,就是將Laravel部分的PHPDoc補齊。
接下來要談的,是你自己寫程式的部分,也就是Laravel IDE Helper沒有辦法幫你的部分,必須自己寫PHPDoc。15 15若你對更多的PHPDoc指令有興趣,詳細請參考如何使用PHPDoc寫註解?
自己寫的class
手動建立PHPDoc
在PhpStorm輸入
/**,然後按下↩,PhpStorm會自動依據當時的游標的位置產生適當的PHPDoc blocks。按熱鍵⌘ + N,會產生
Generate選單,選擇PHPDoc Blocks。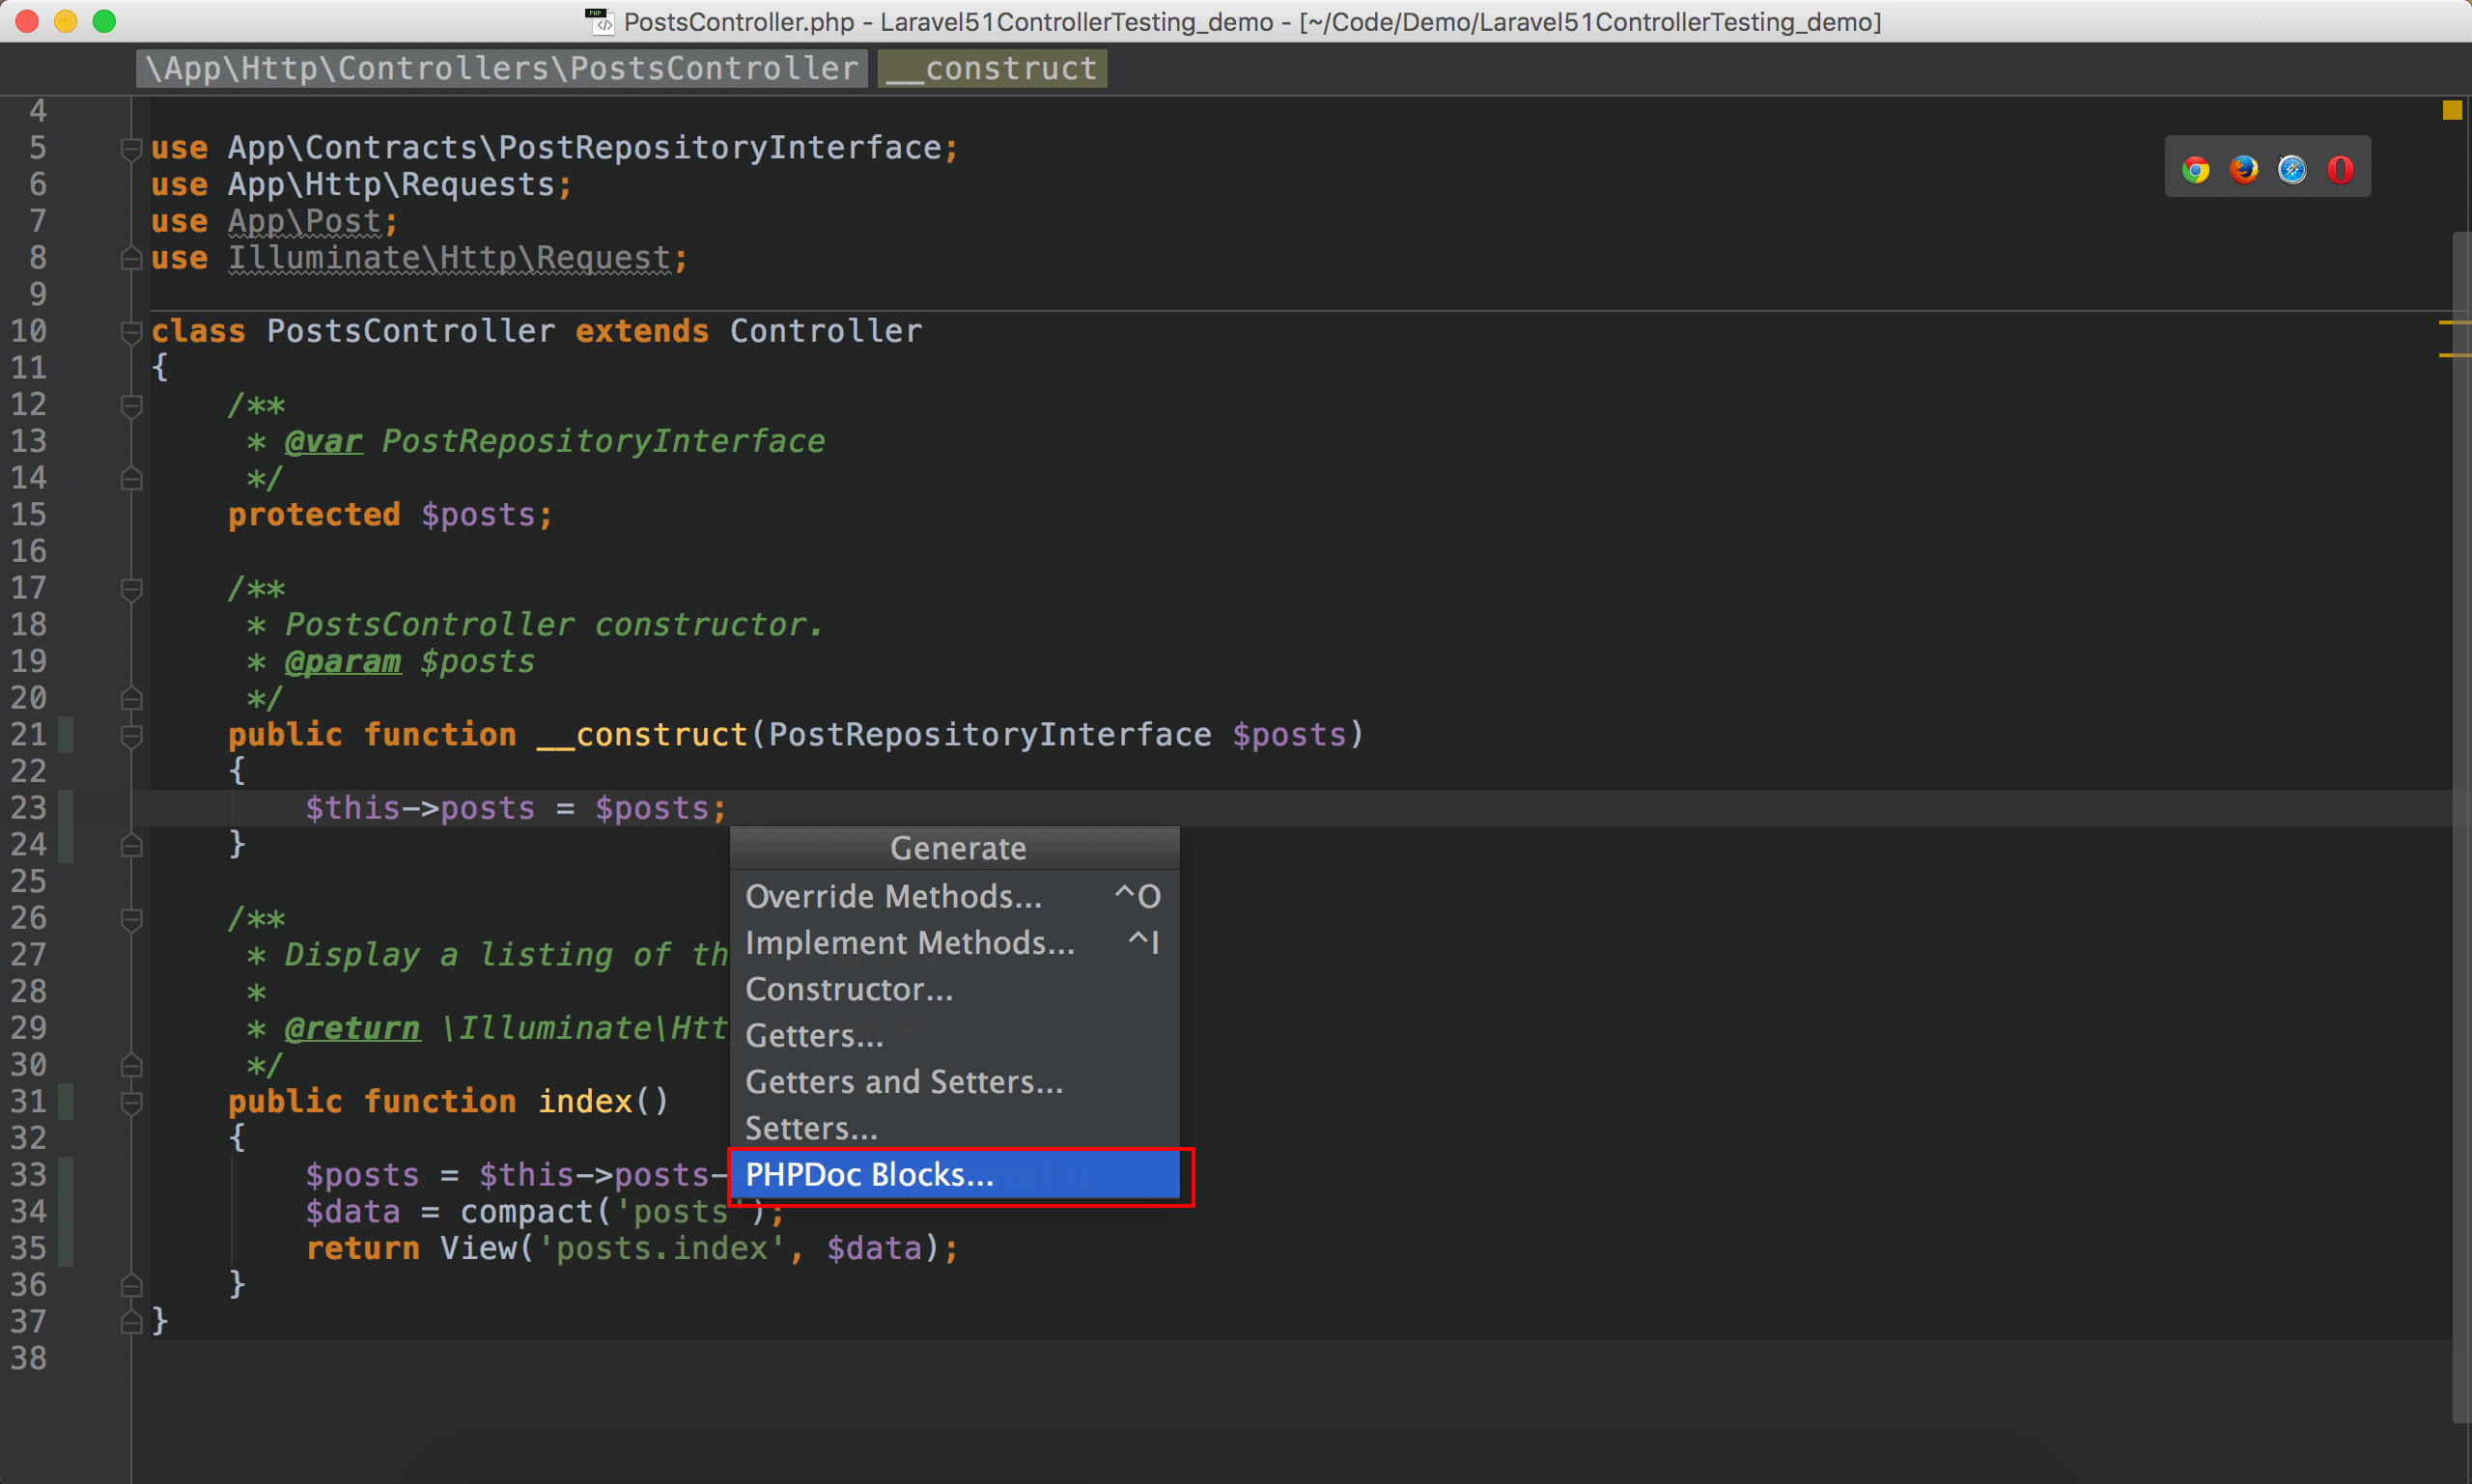
在
適當時機按熱鍵⌥ + ↩,會出現Generate PHPDoc for ...。如剛建立完class, property或method時。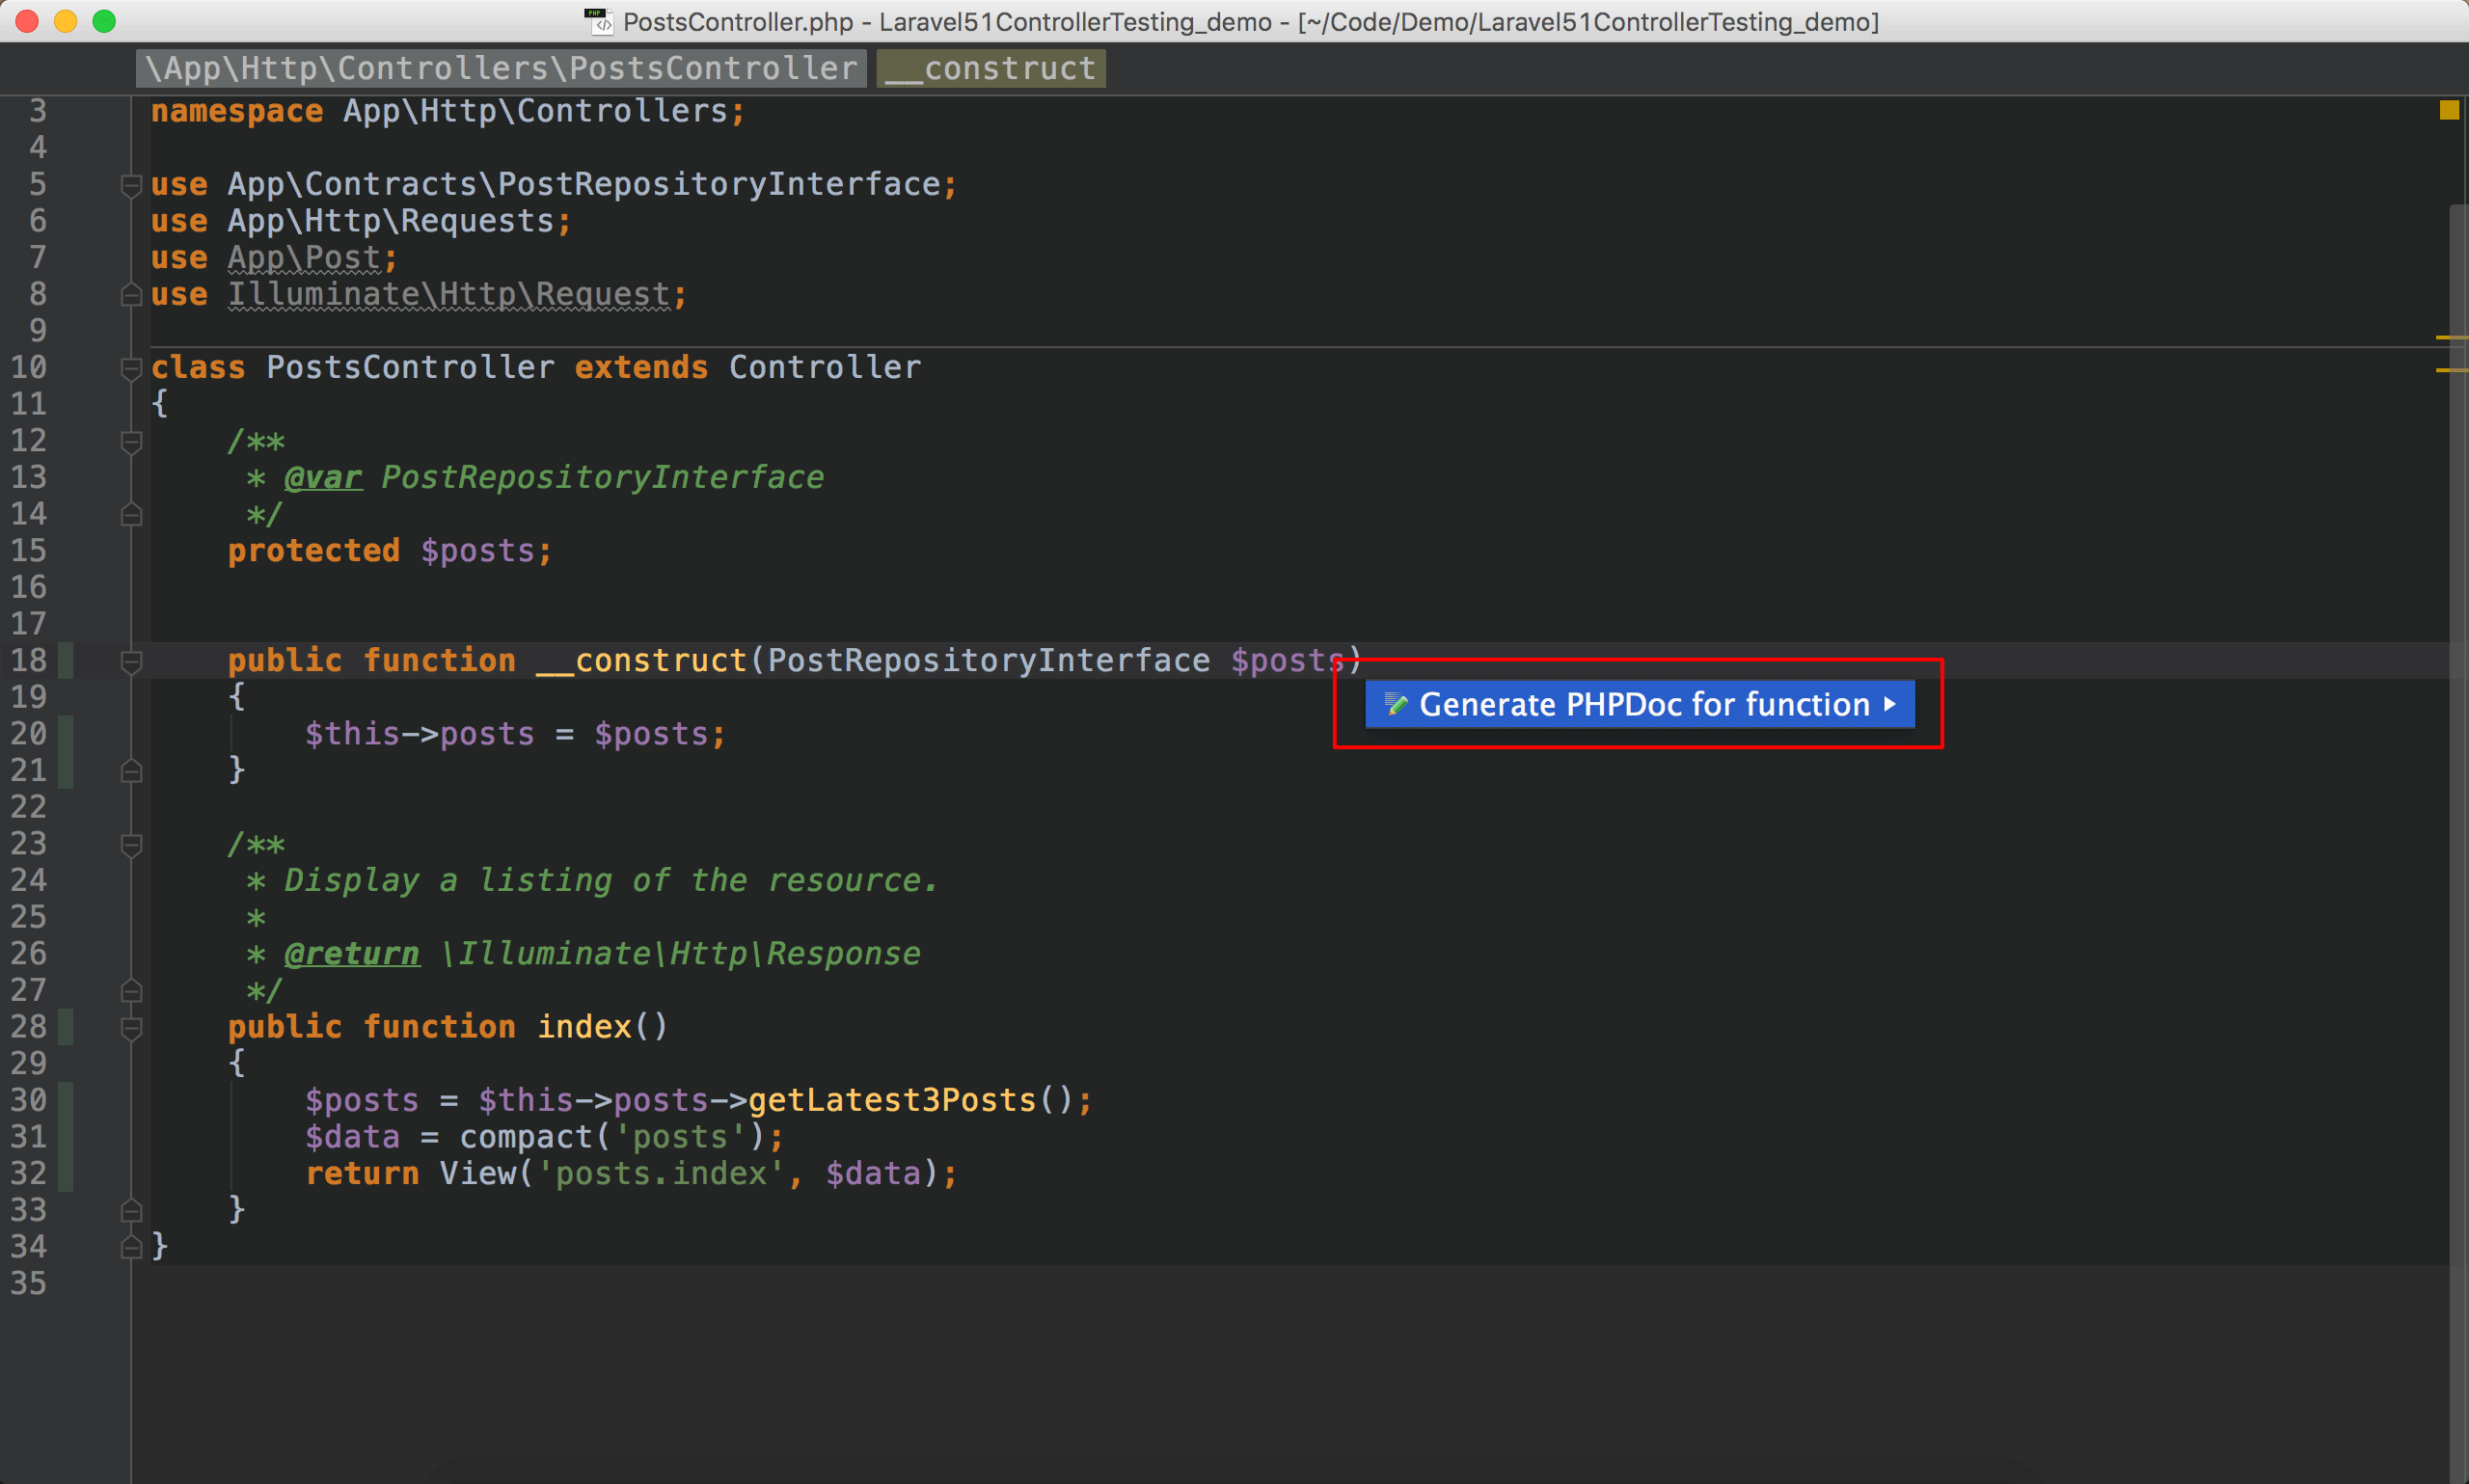
Fields
語法1
/** @var 型別 [變數名稱] [註解] */
- 型別可以是PHP原生型別,class,interface或trait。
- 假如下一行就是該變數,可以省略變數名稱。
- 可選擇性對該變數加上註解。
自動建立PHPDoc
實務上建立field會有2種方式 :
- 由constructor injection建立field。(如注入service, repository)
- 由setter與getter建立field。(如strategy, state, adpater,decorator pattern..設定物件)
PhpStorm都提供了快速的方式自動建立PHPDoc。
由Constructor Injection建立Field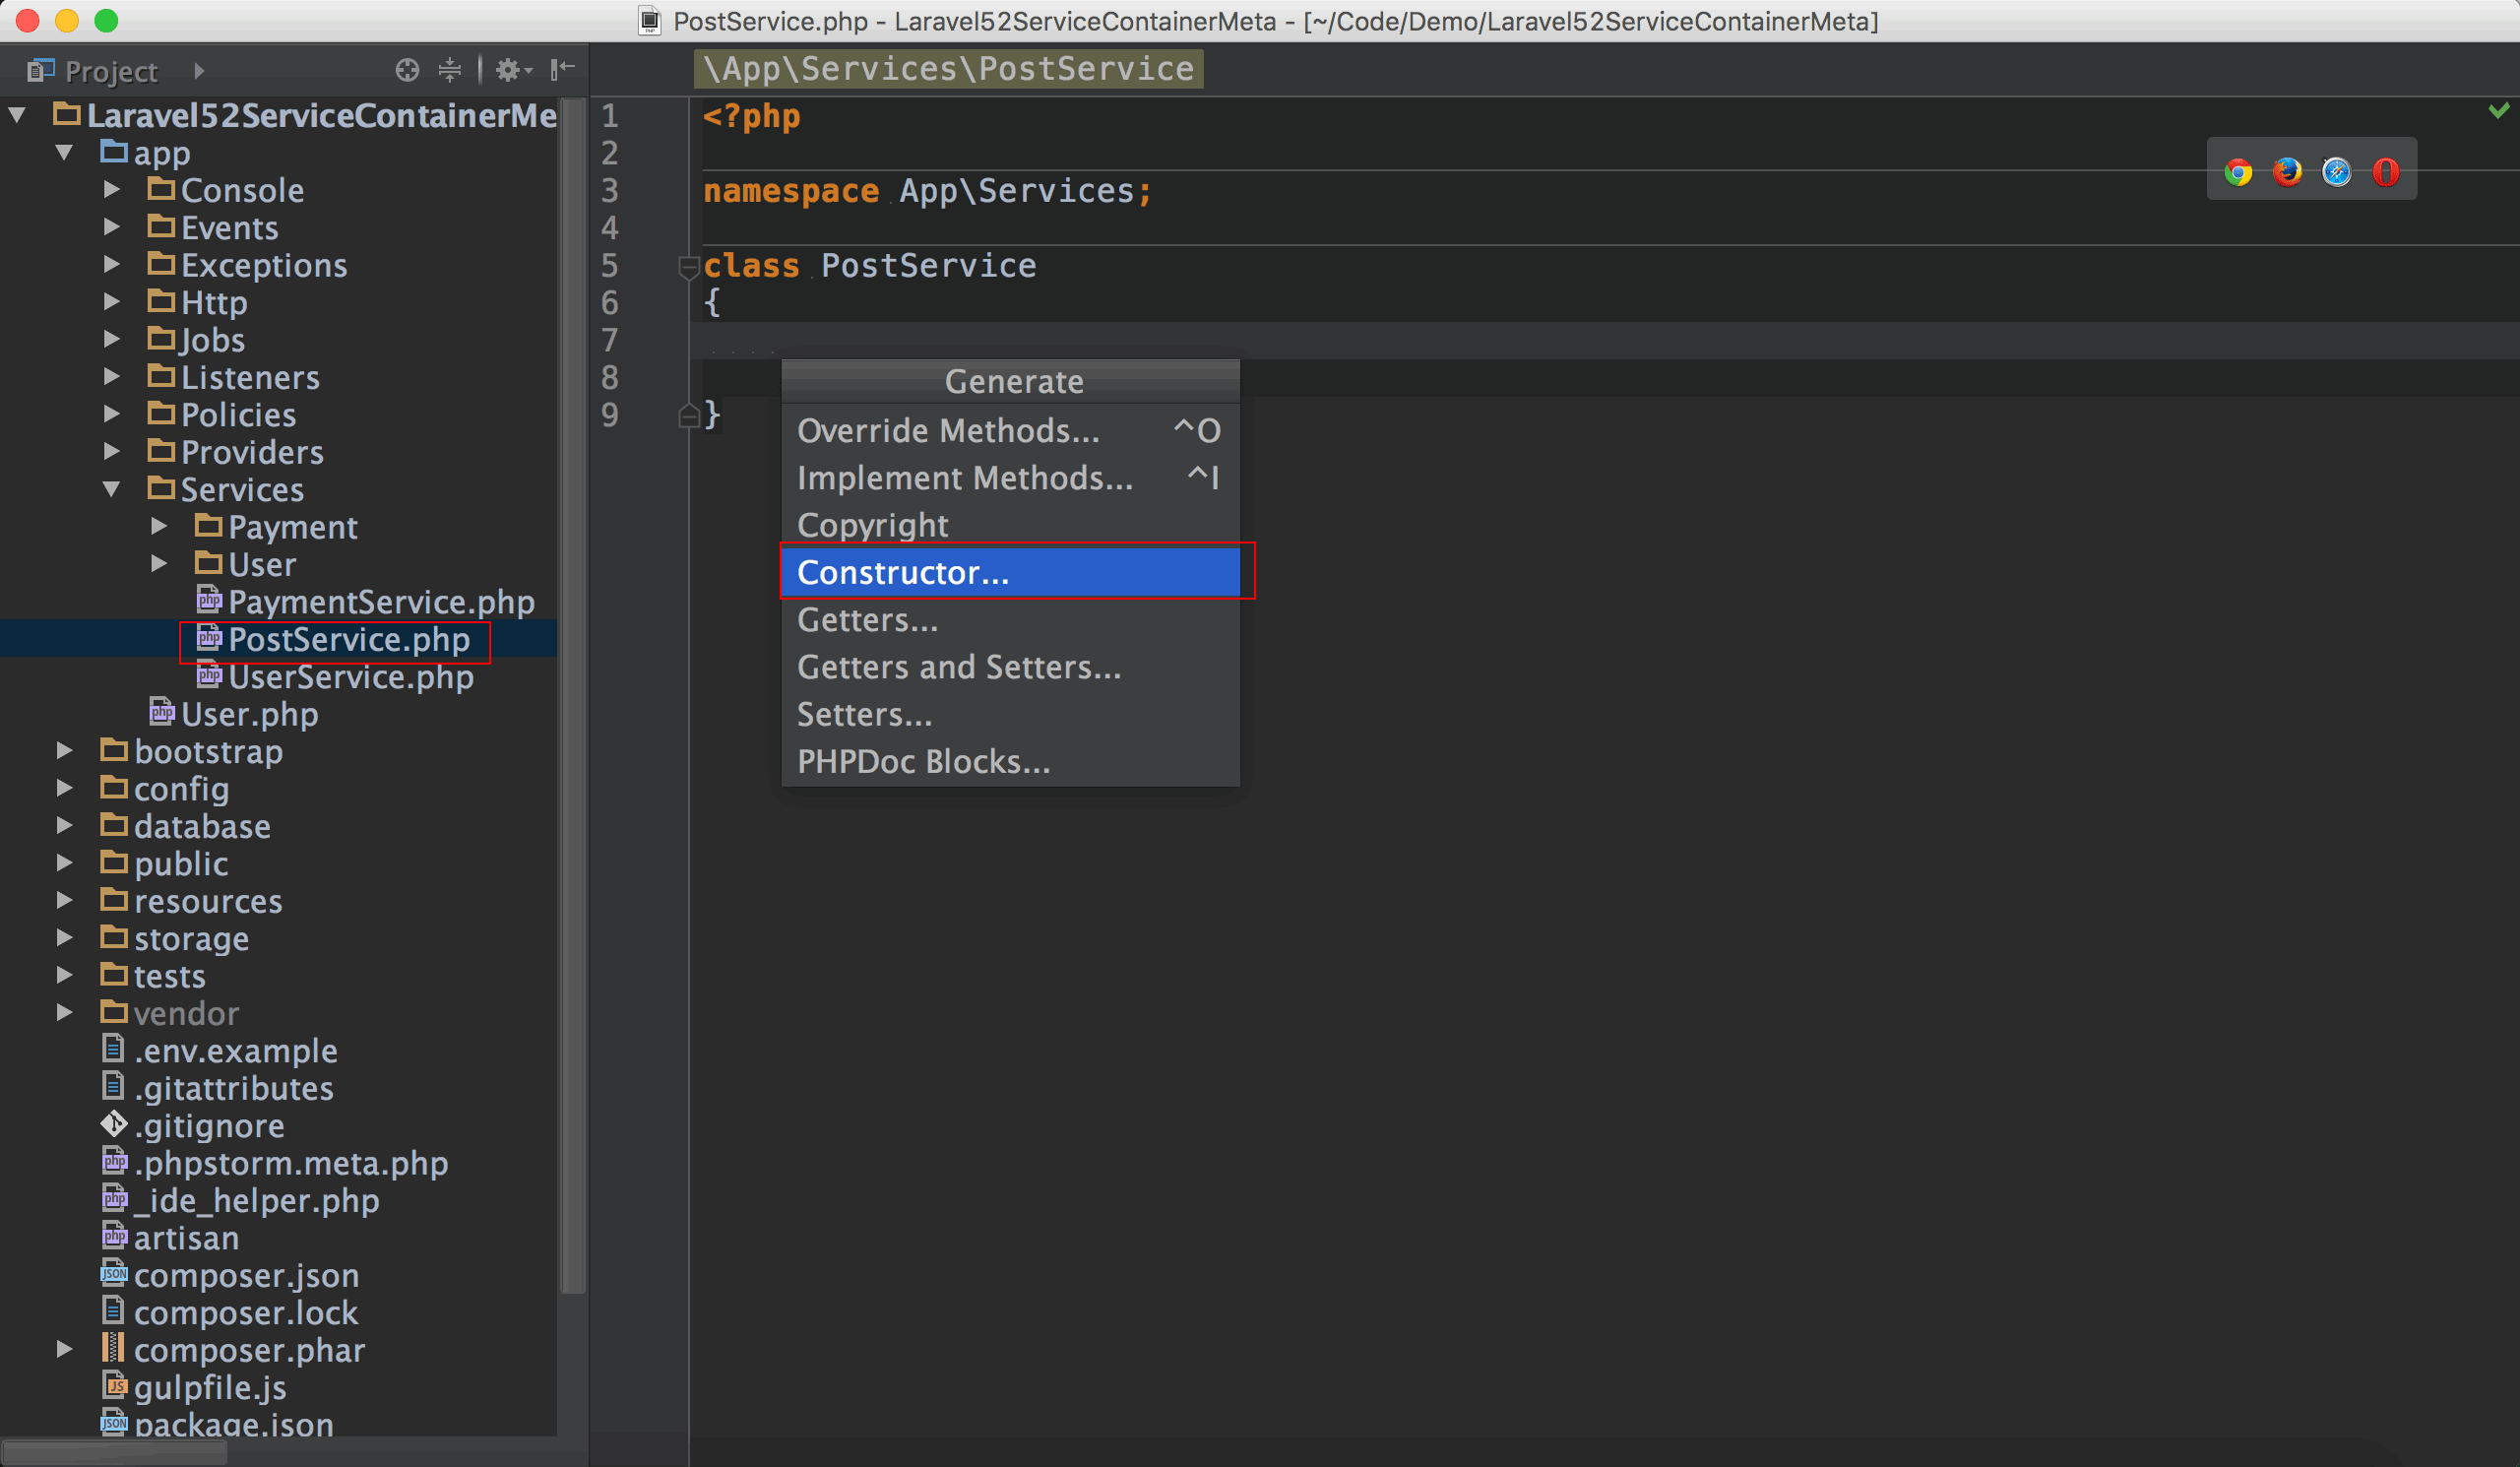
新建立了PostService,按熱鍵⌃ + N,顯示Generate視窗,選擇Constructor...。
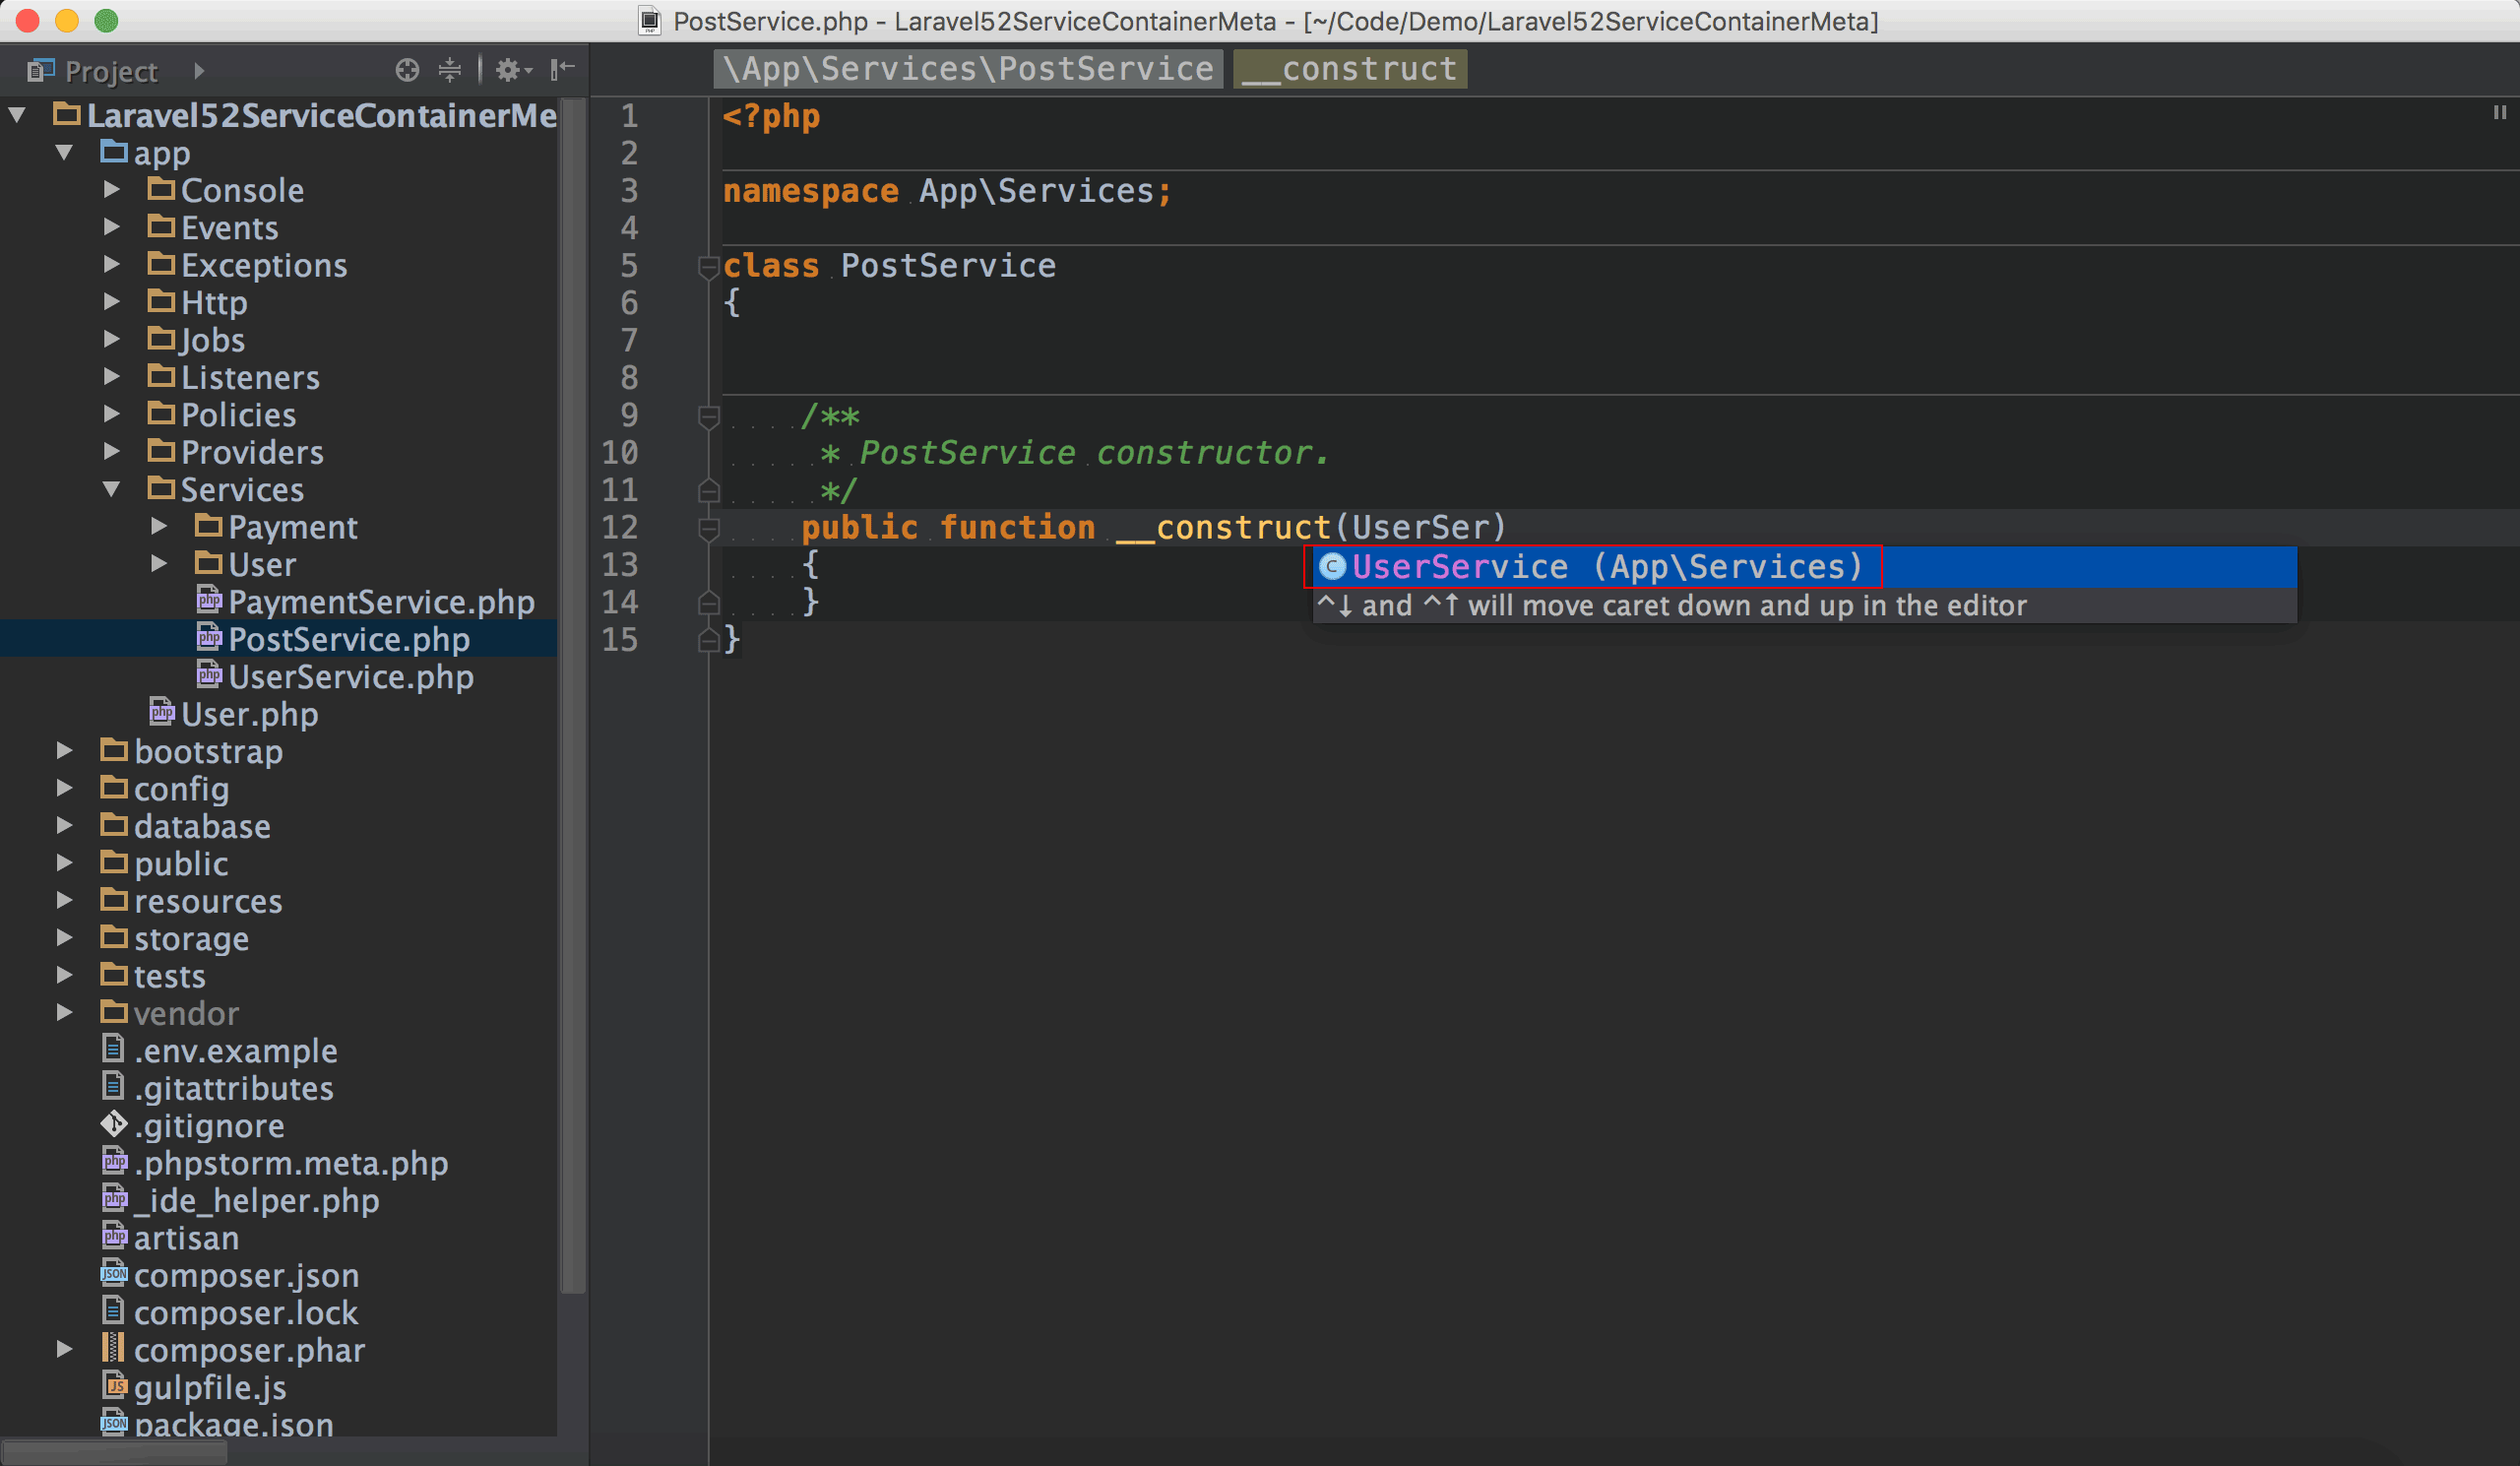
PhpStorm替我們自動產生了constructor框架,我們想藉由constructor注入UserService,輸入UserSer就可以發現PhpStorm的語法提示已經出現了UserService,按↩選擇之。
在constructor注入了$userService。
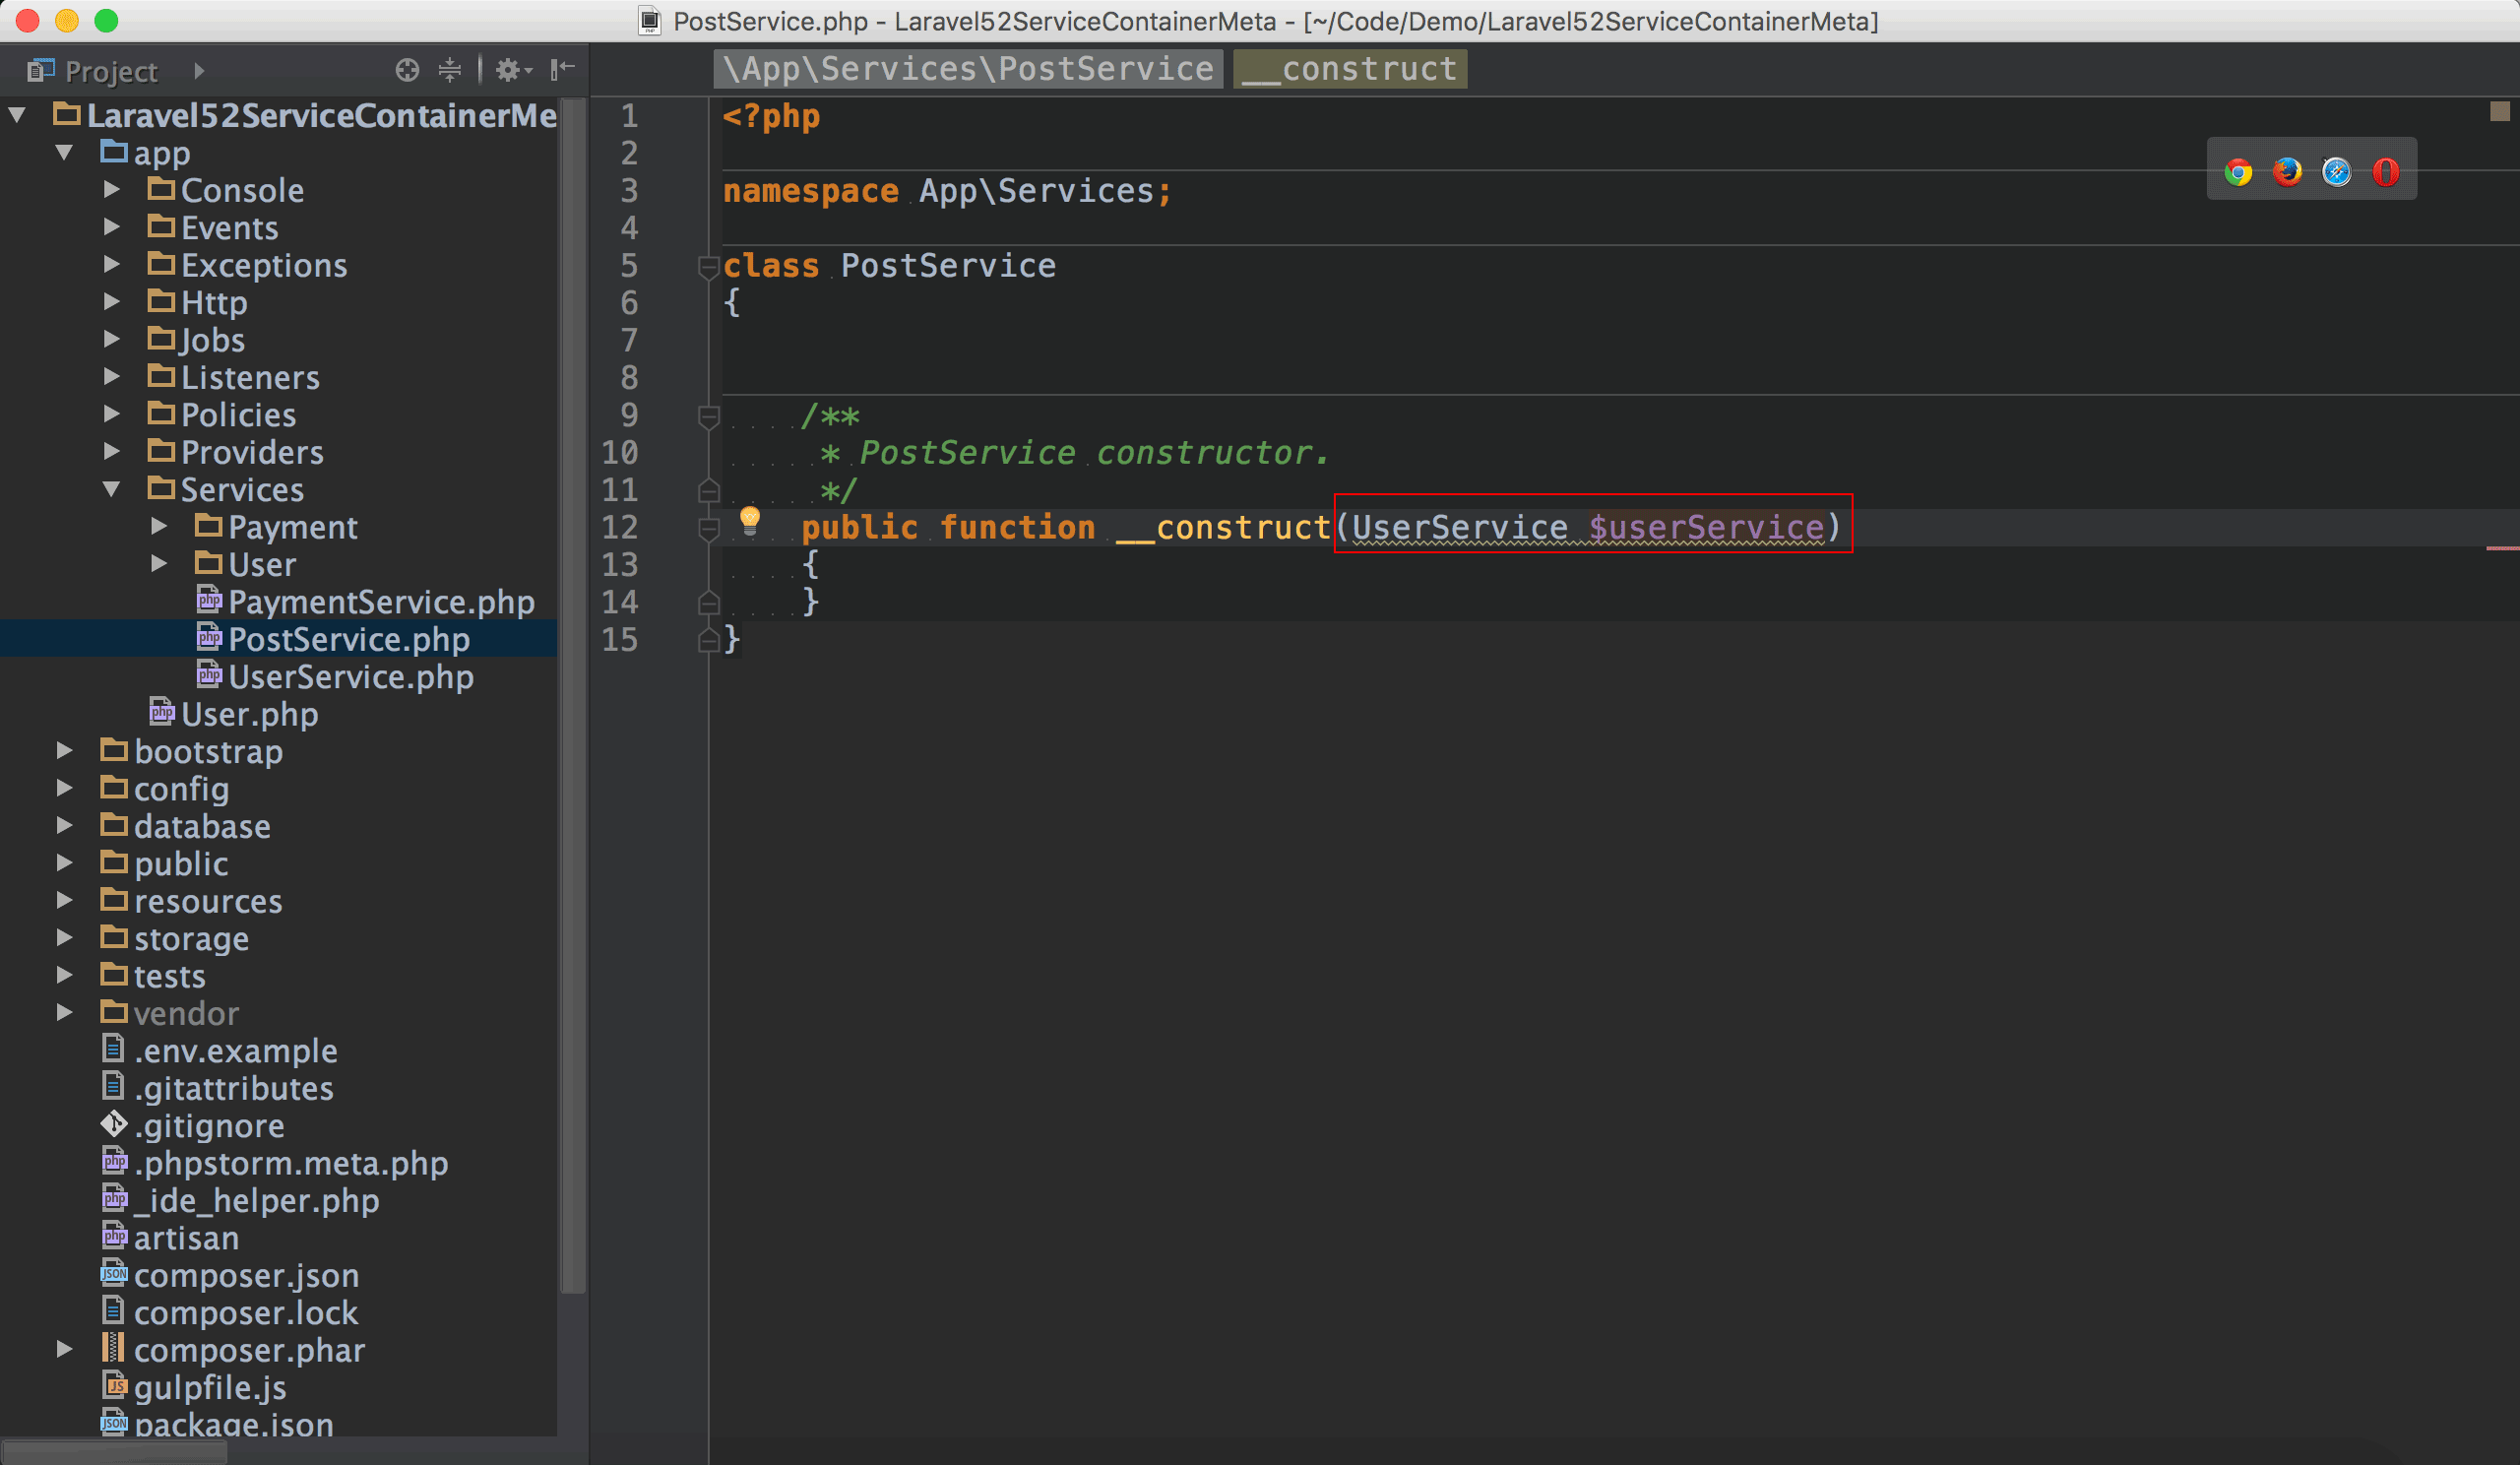
在$userService之後按熱鍵⌥ + ↩,顯示Show Intention Actions視窗,選擇Update PHPDoc Comment。
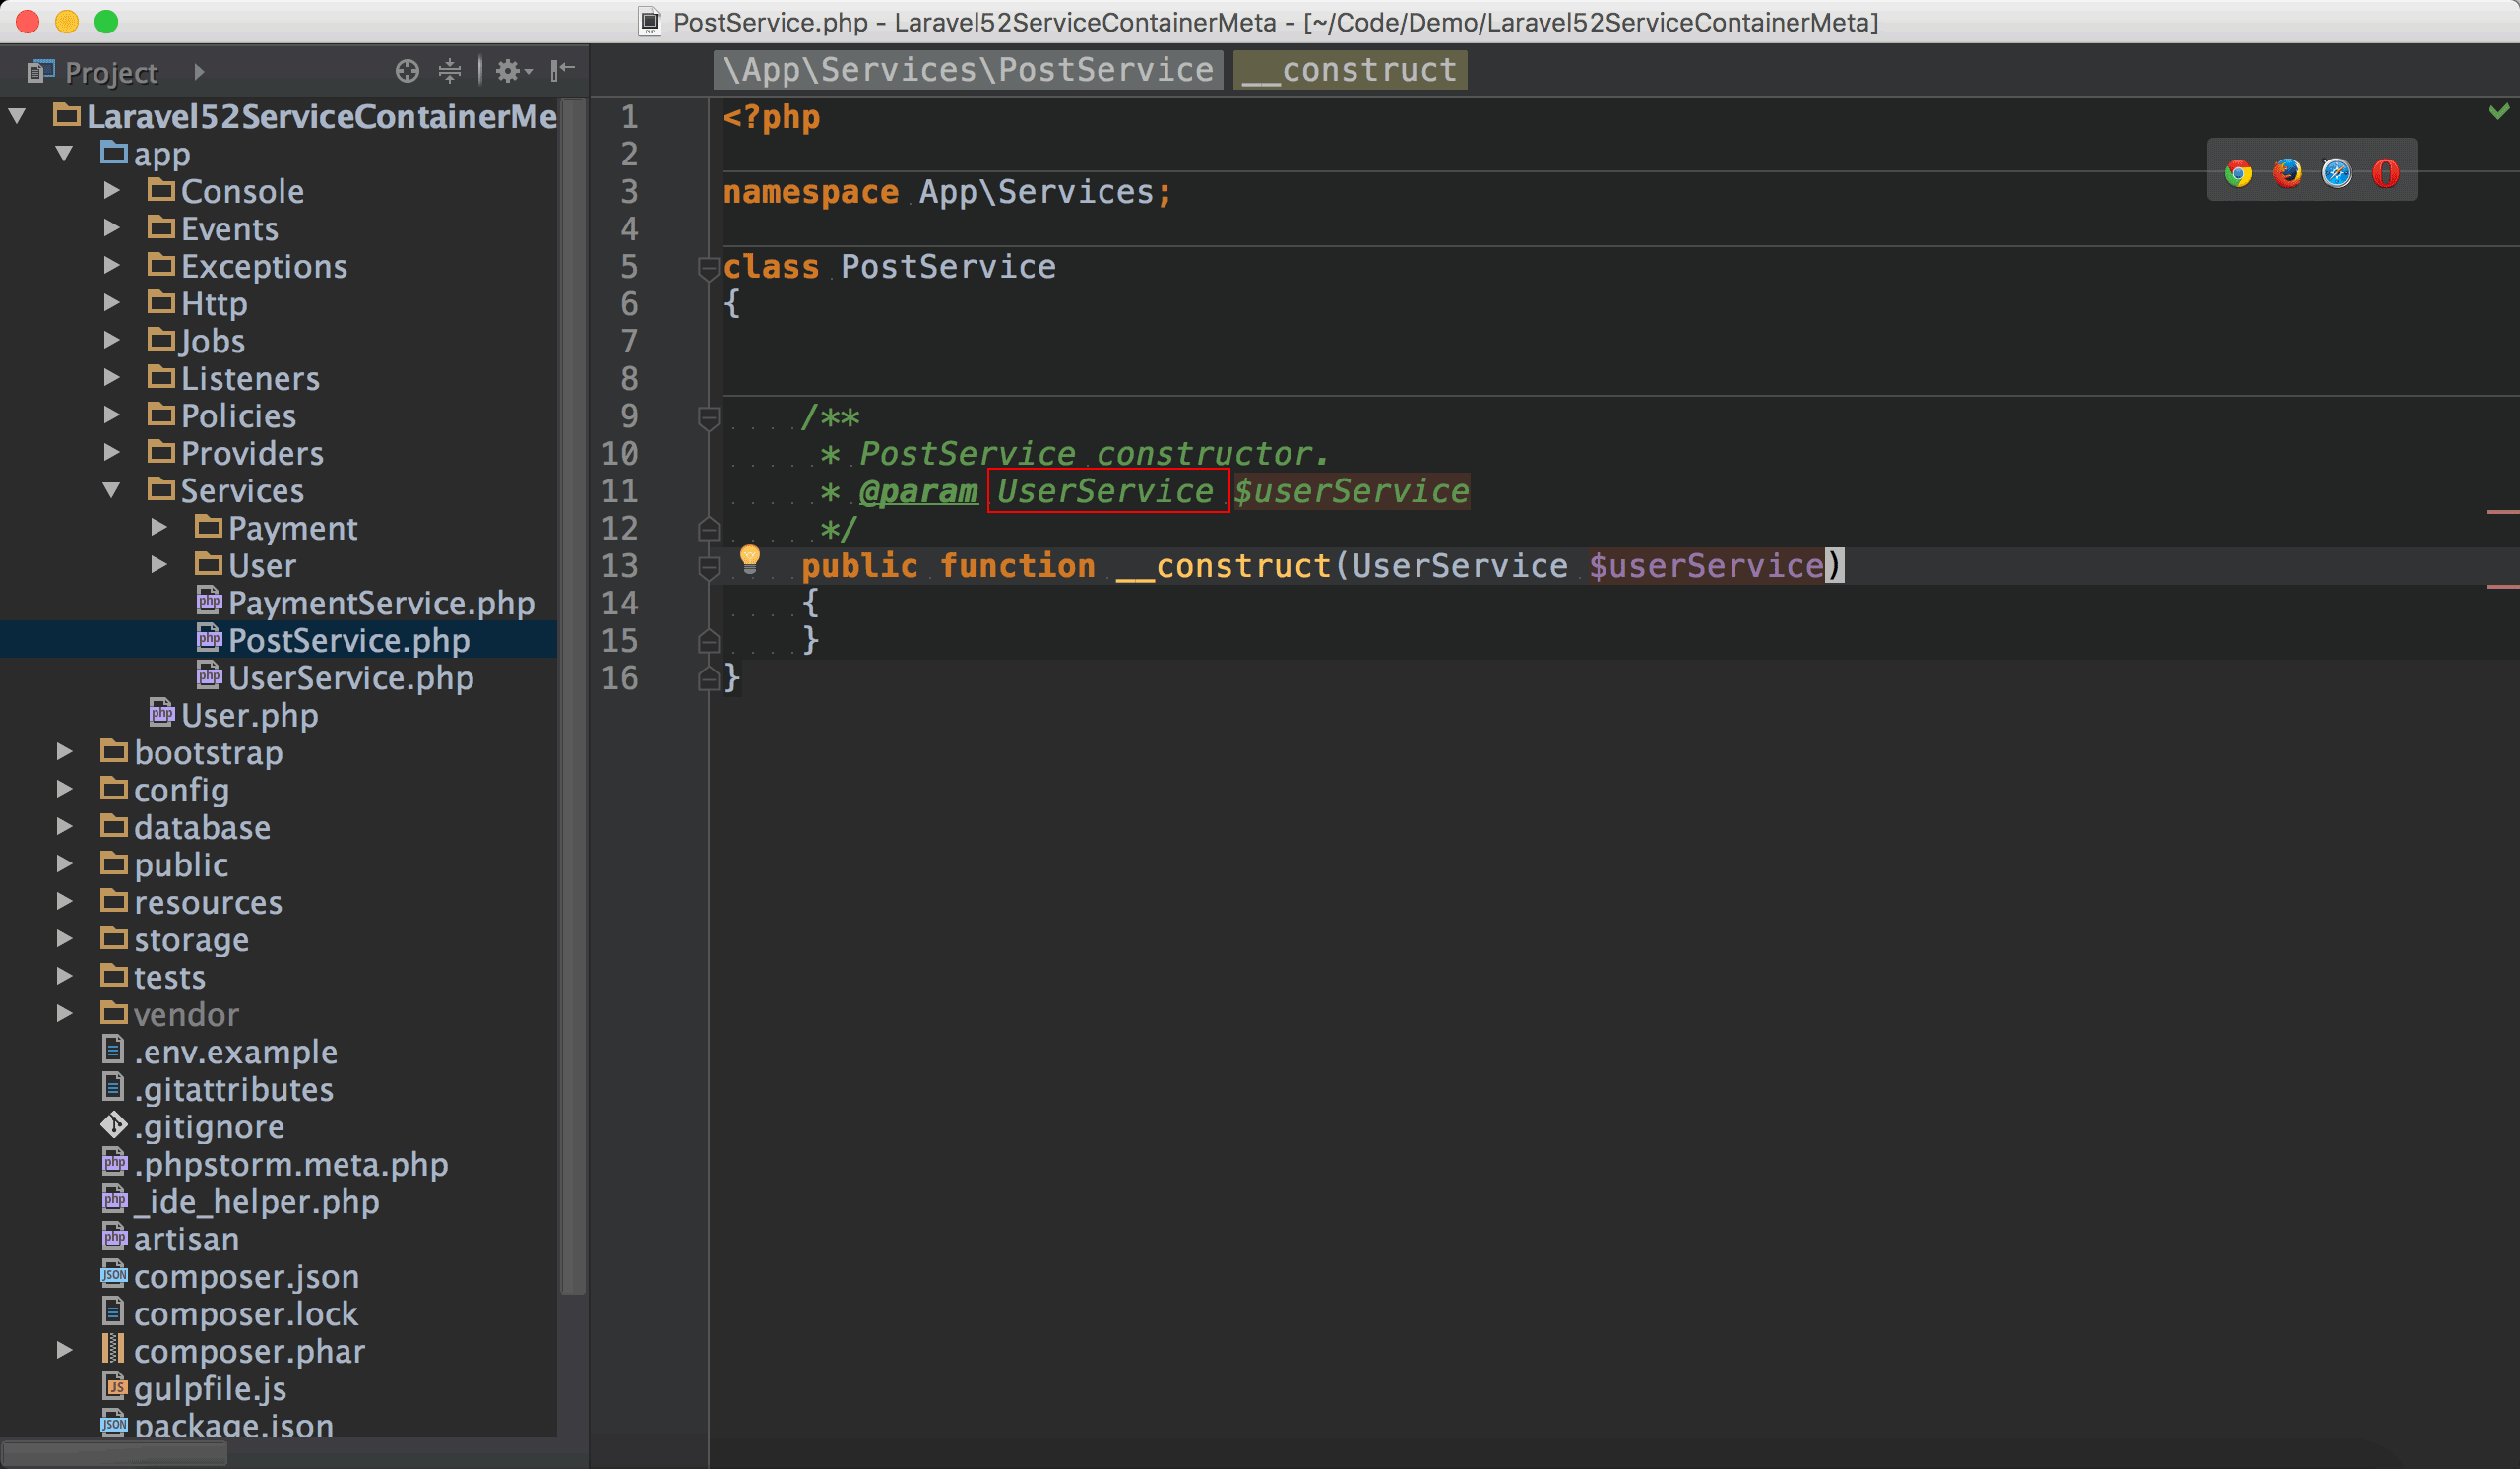
由於在constructor的parameter已經有了type hint,因此產生的PHPDoc也自動加上了UserService型別。
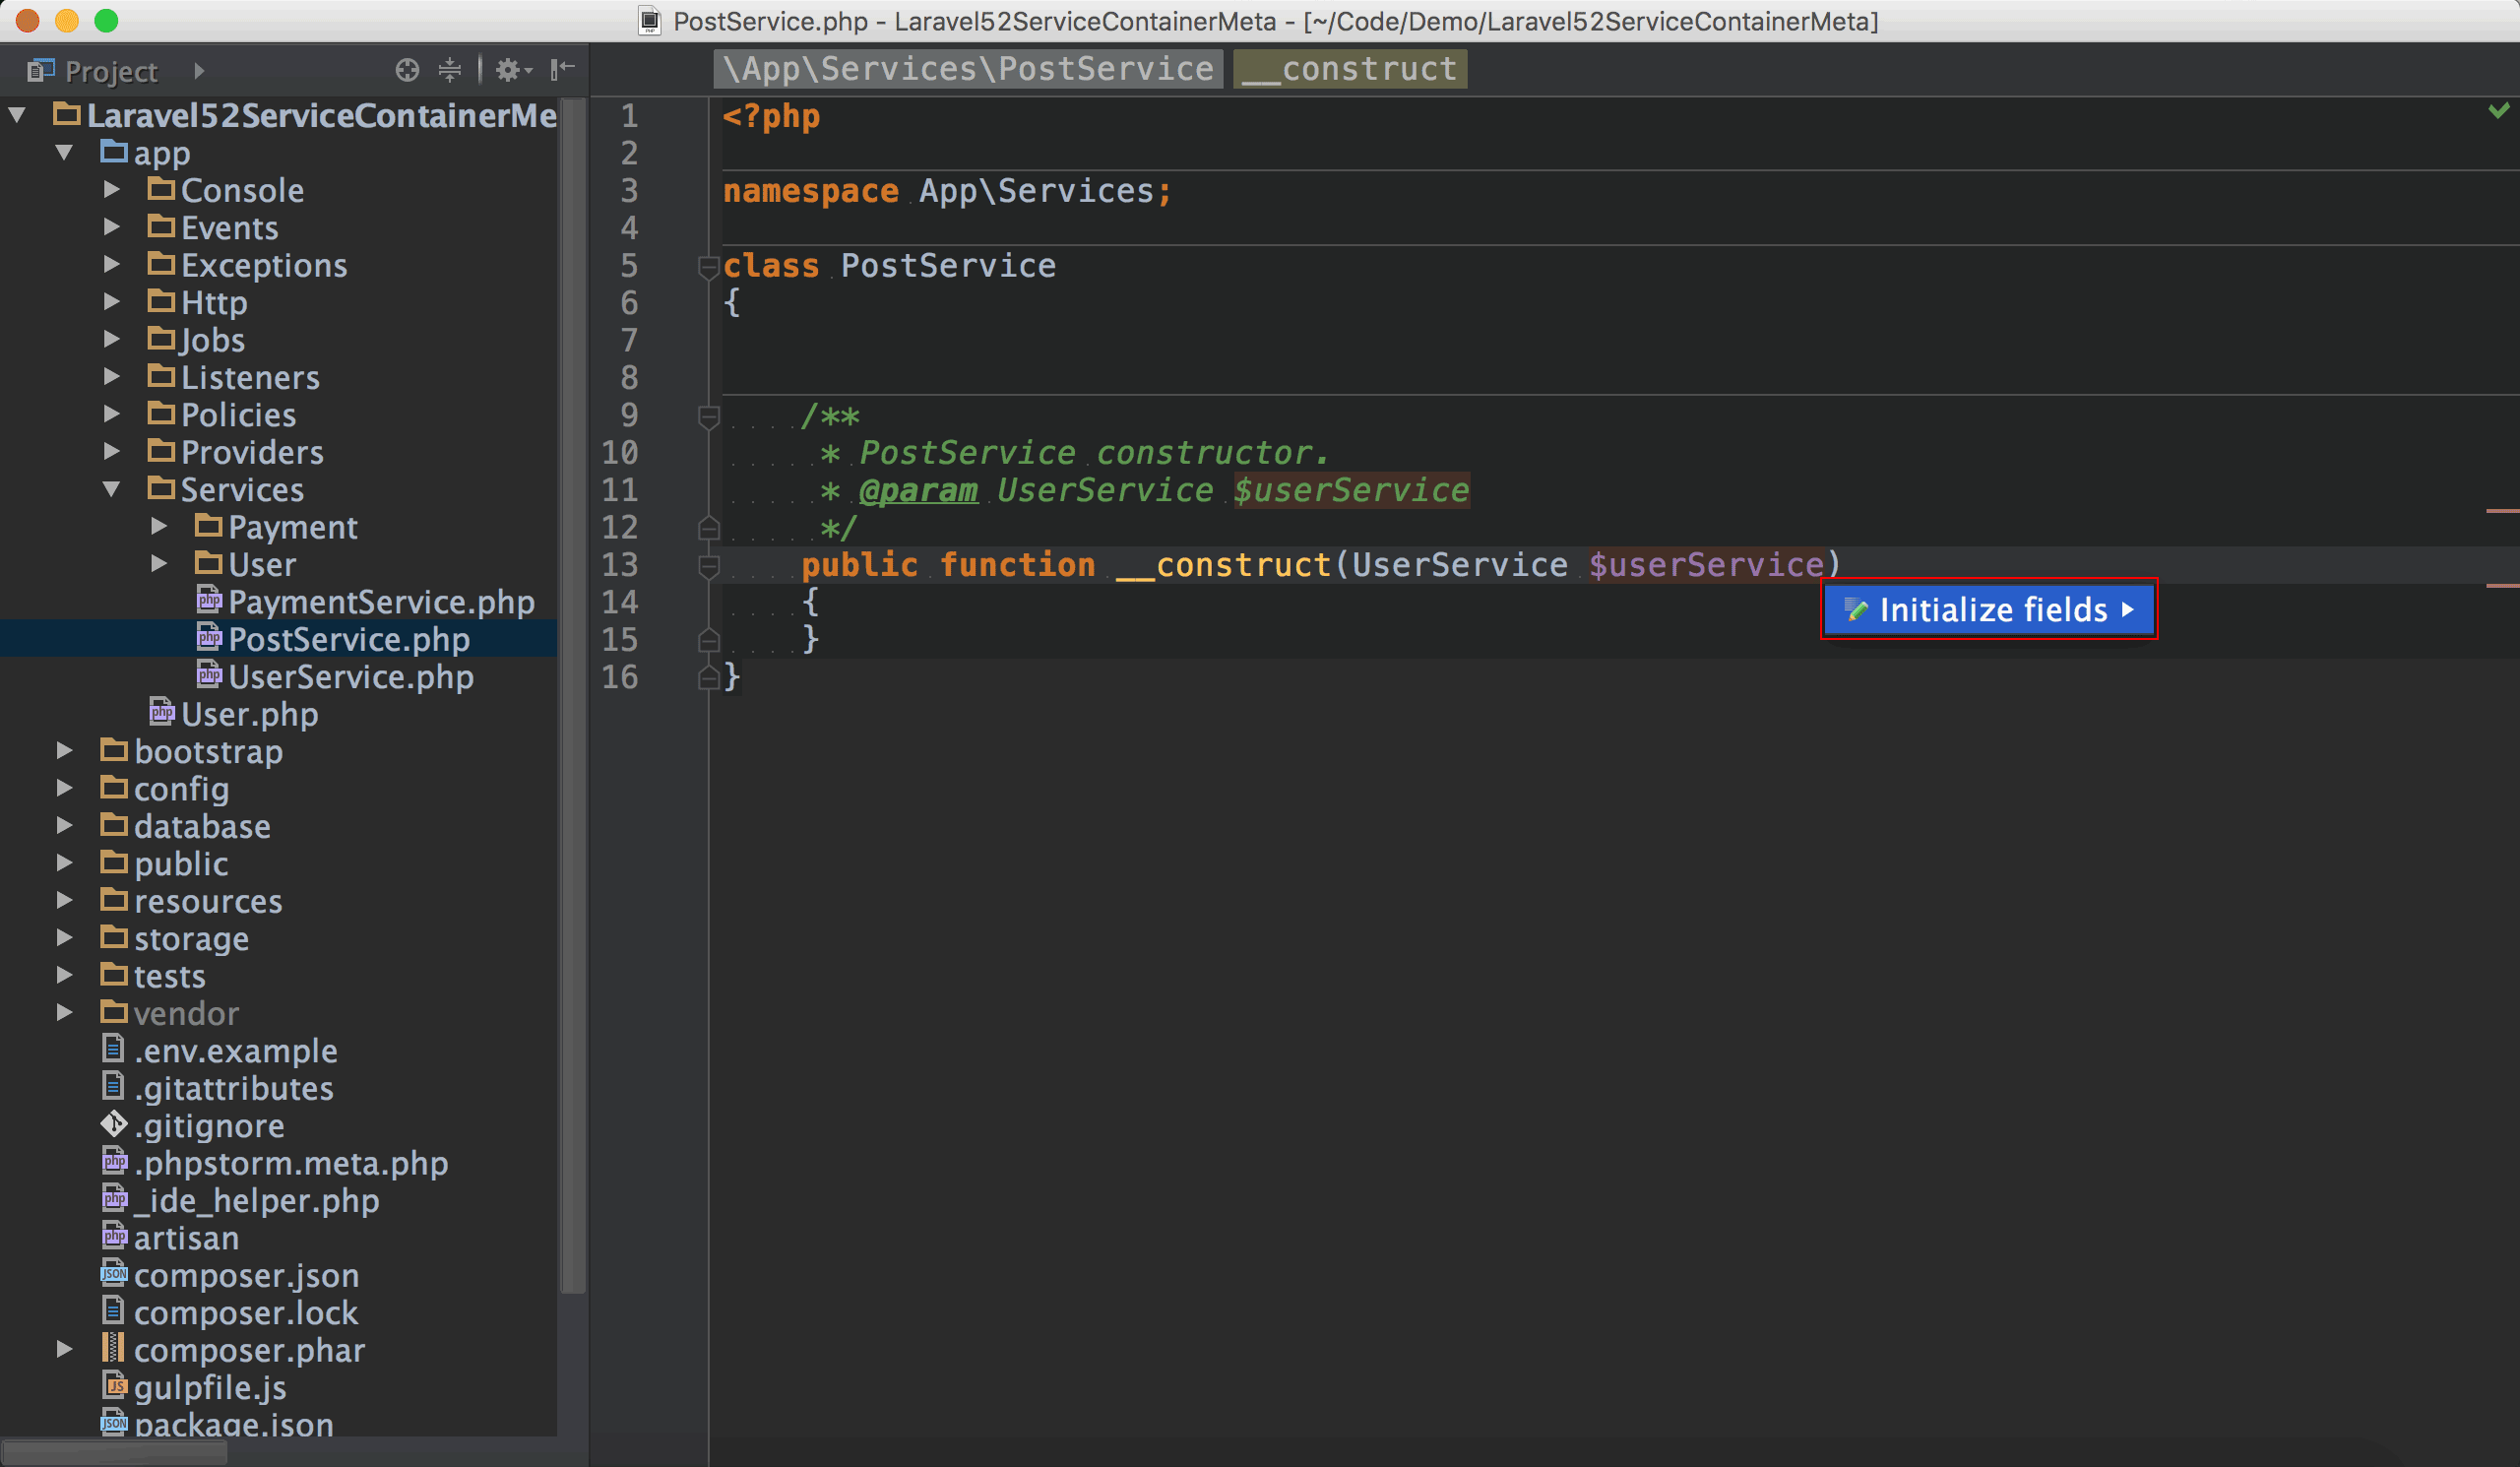
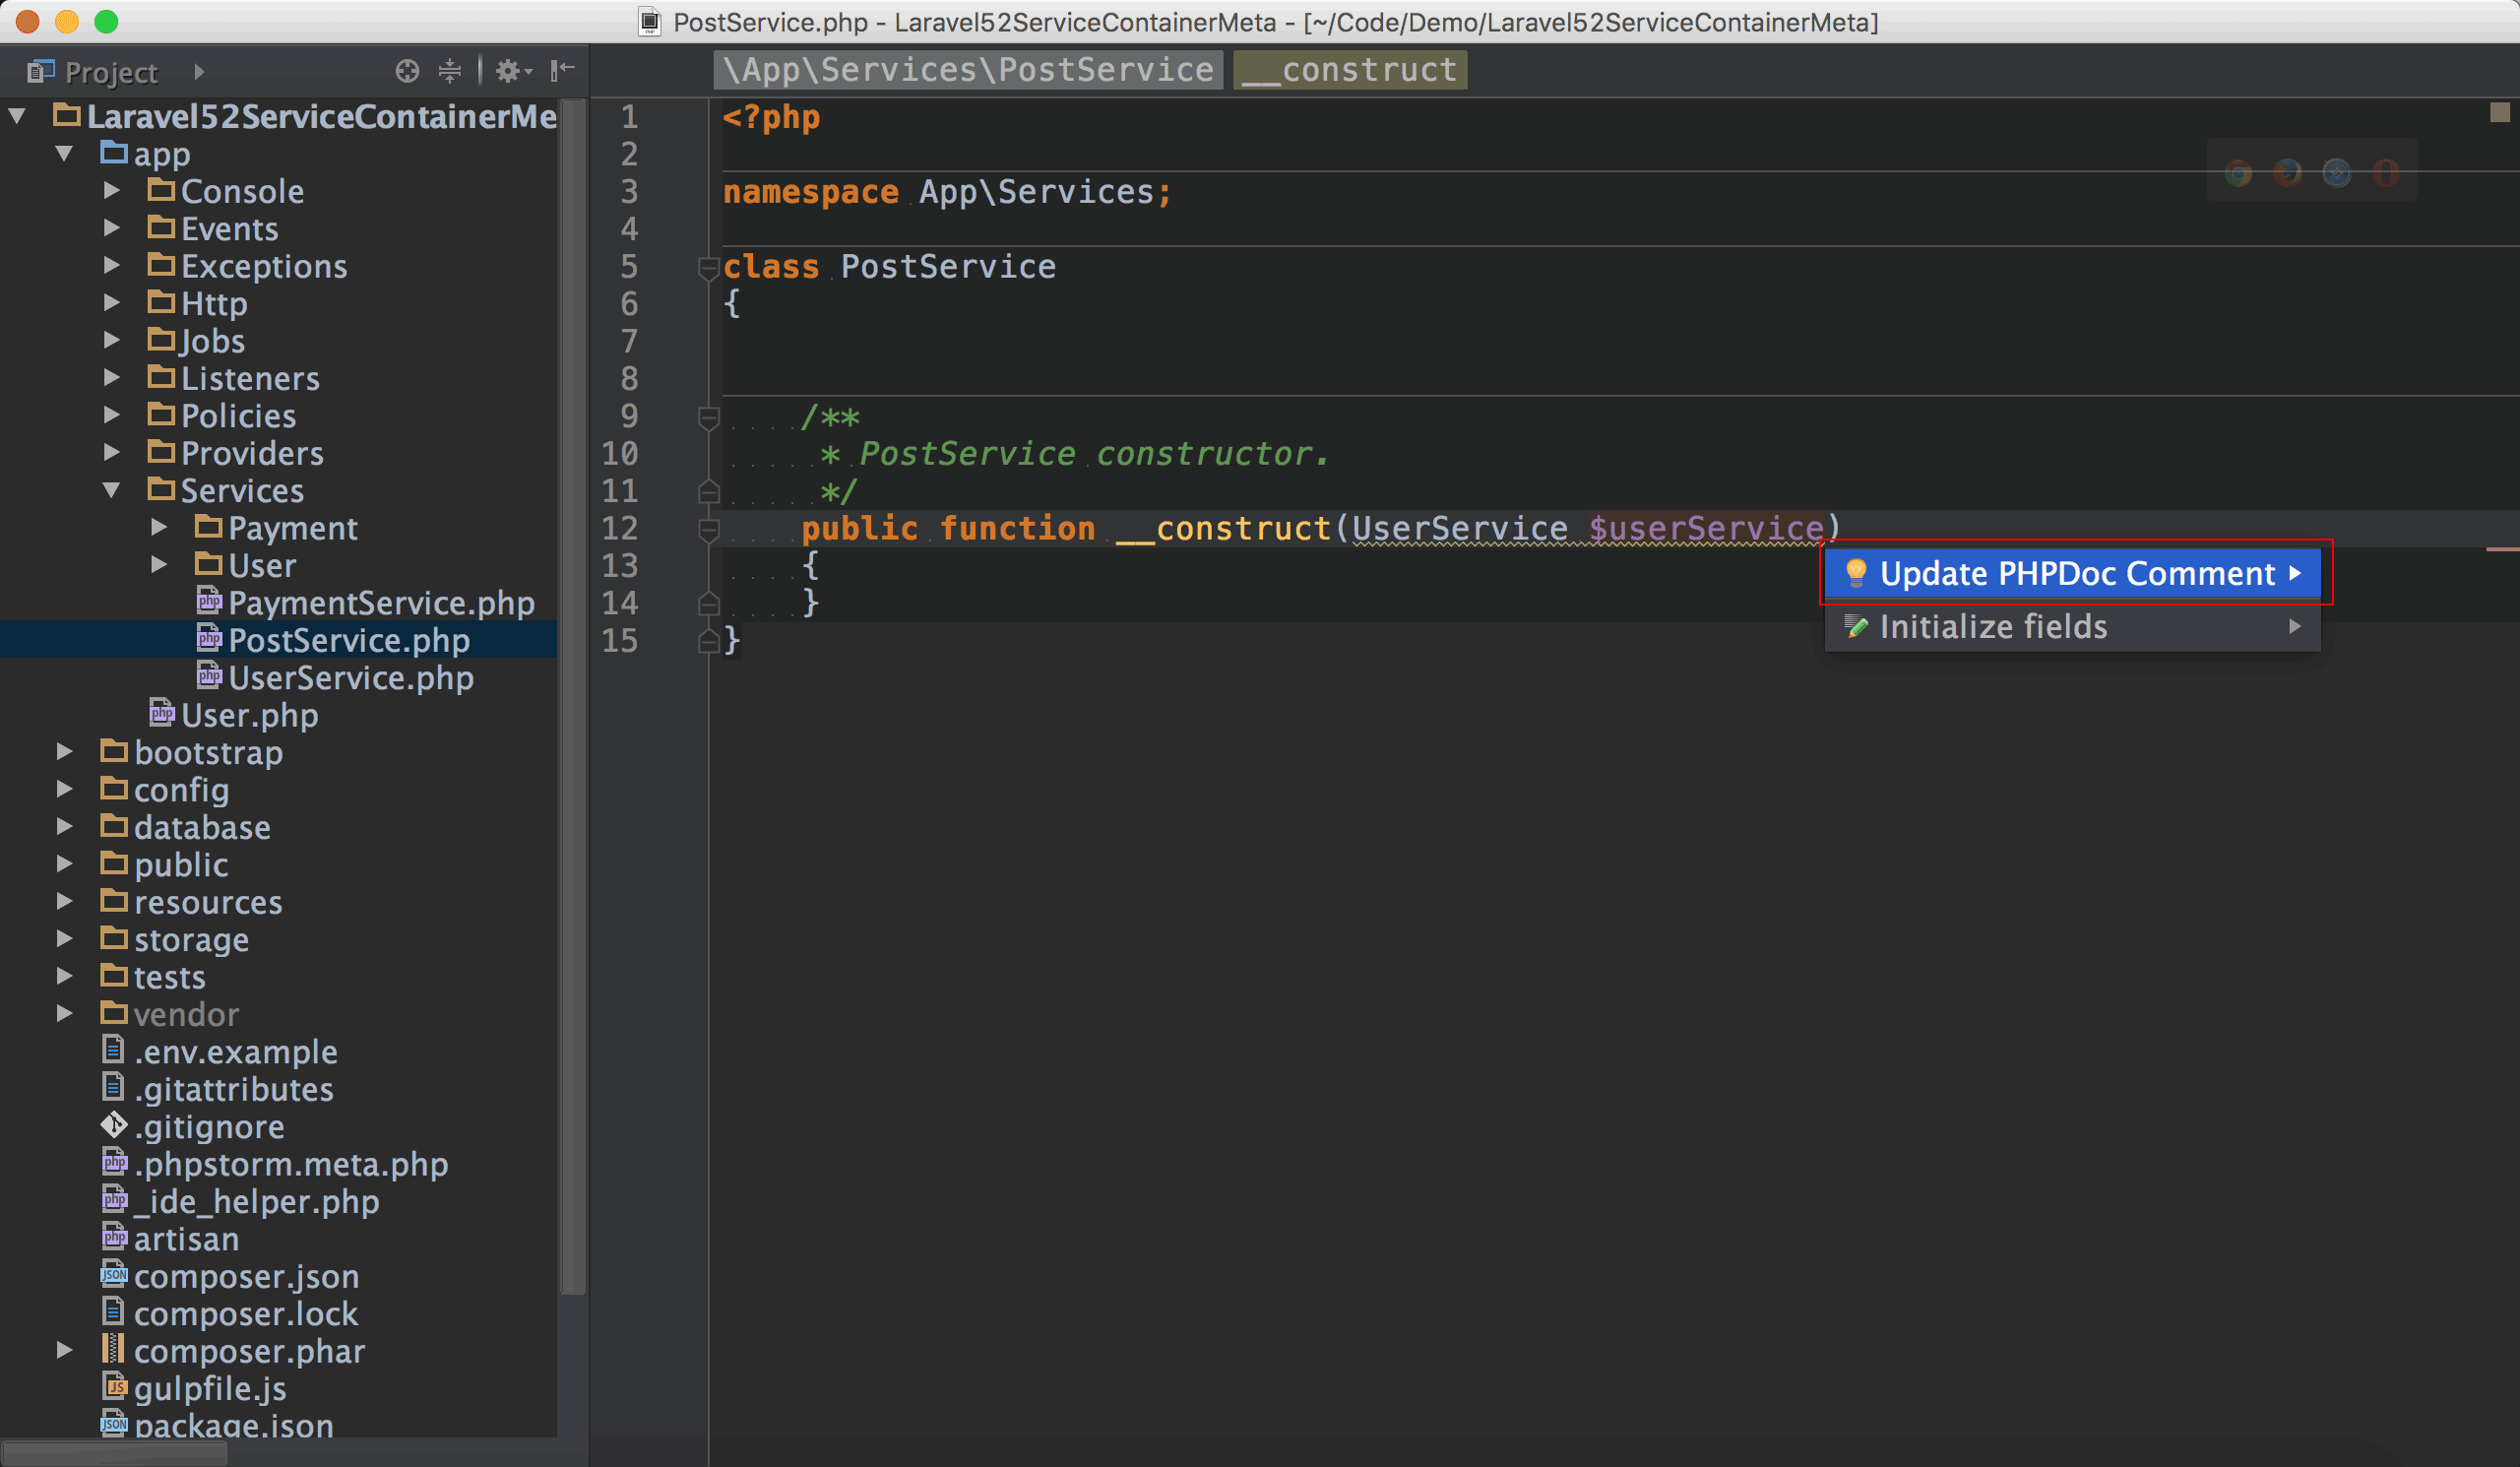
在$userService之後按熱鍵⌥ + ↩,顯示Show Intention Actions視窗,選擇Initialize fields。
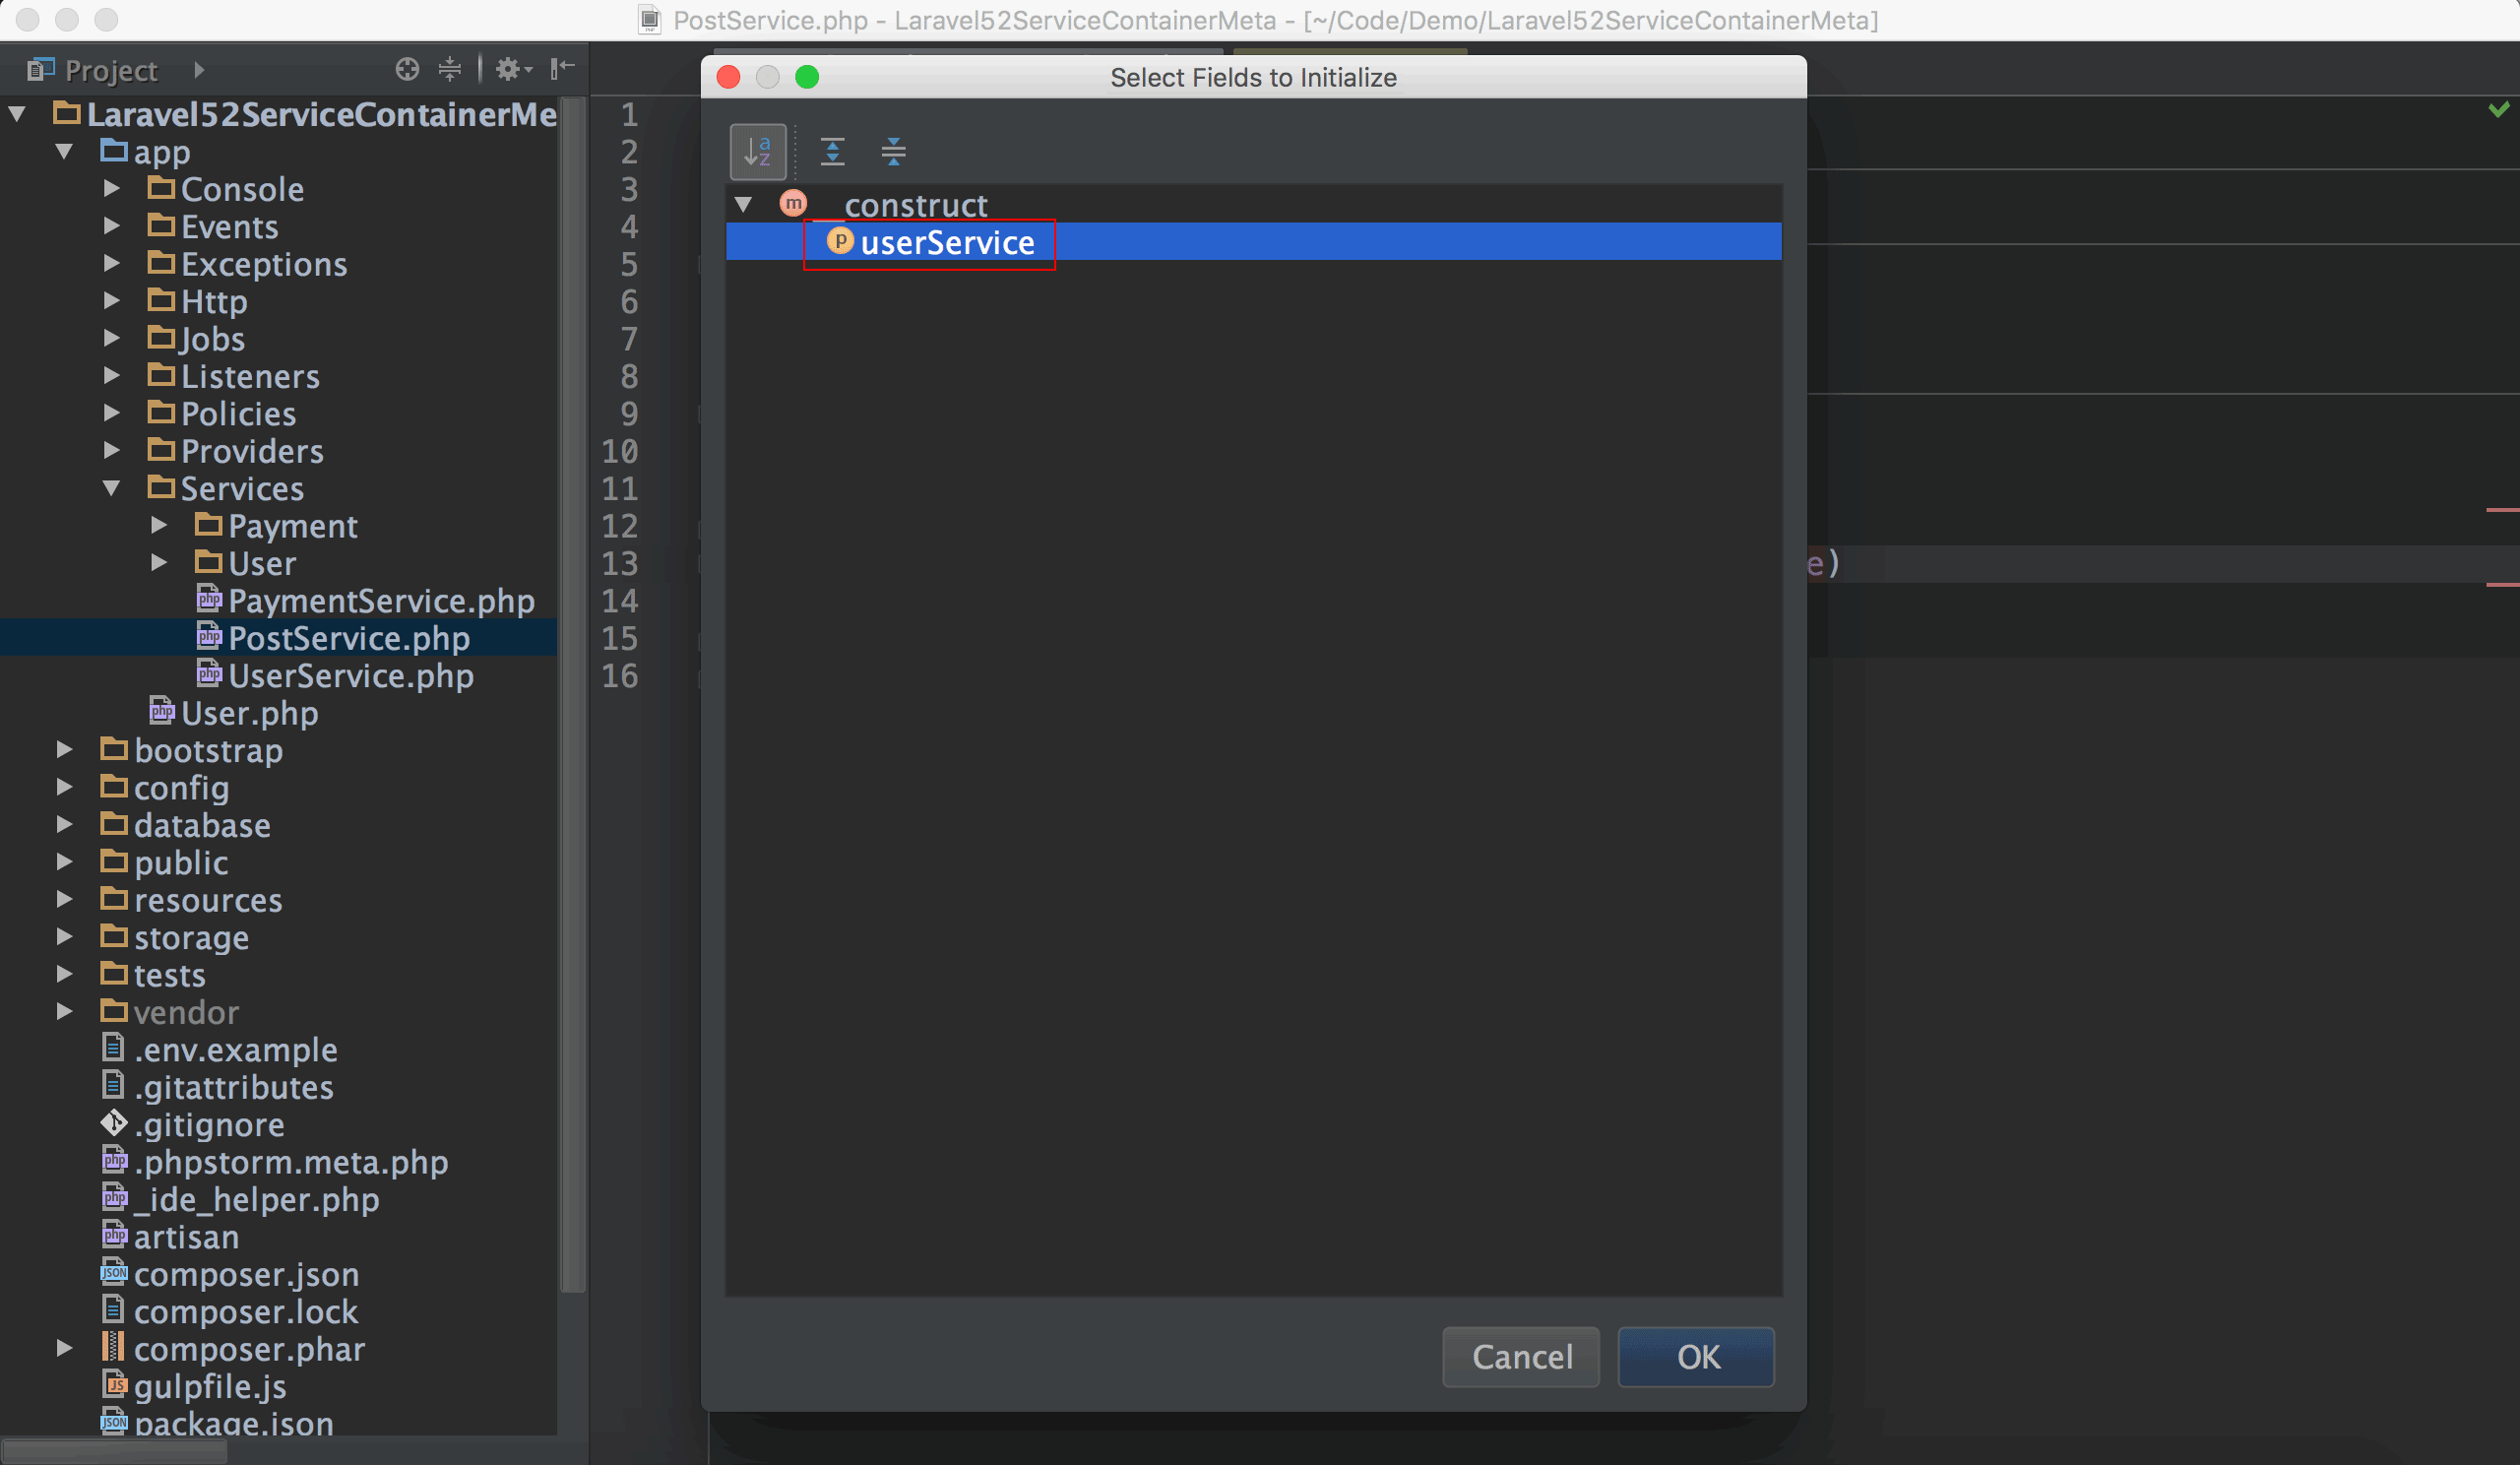
選擇要建立field的constructor parameter。
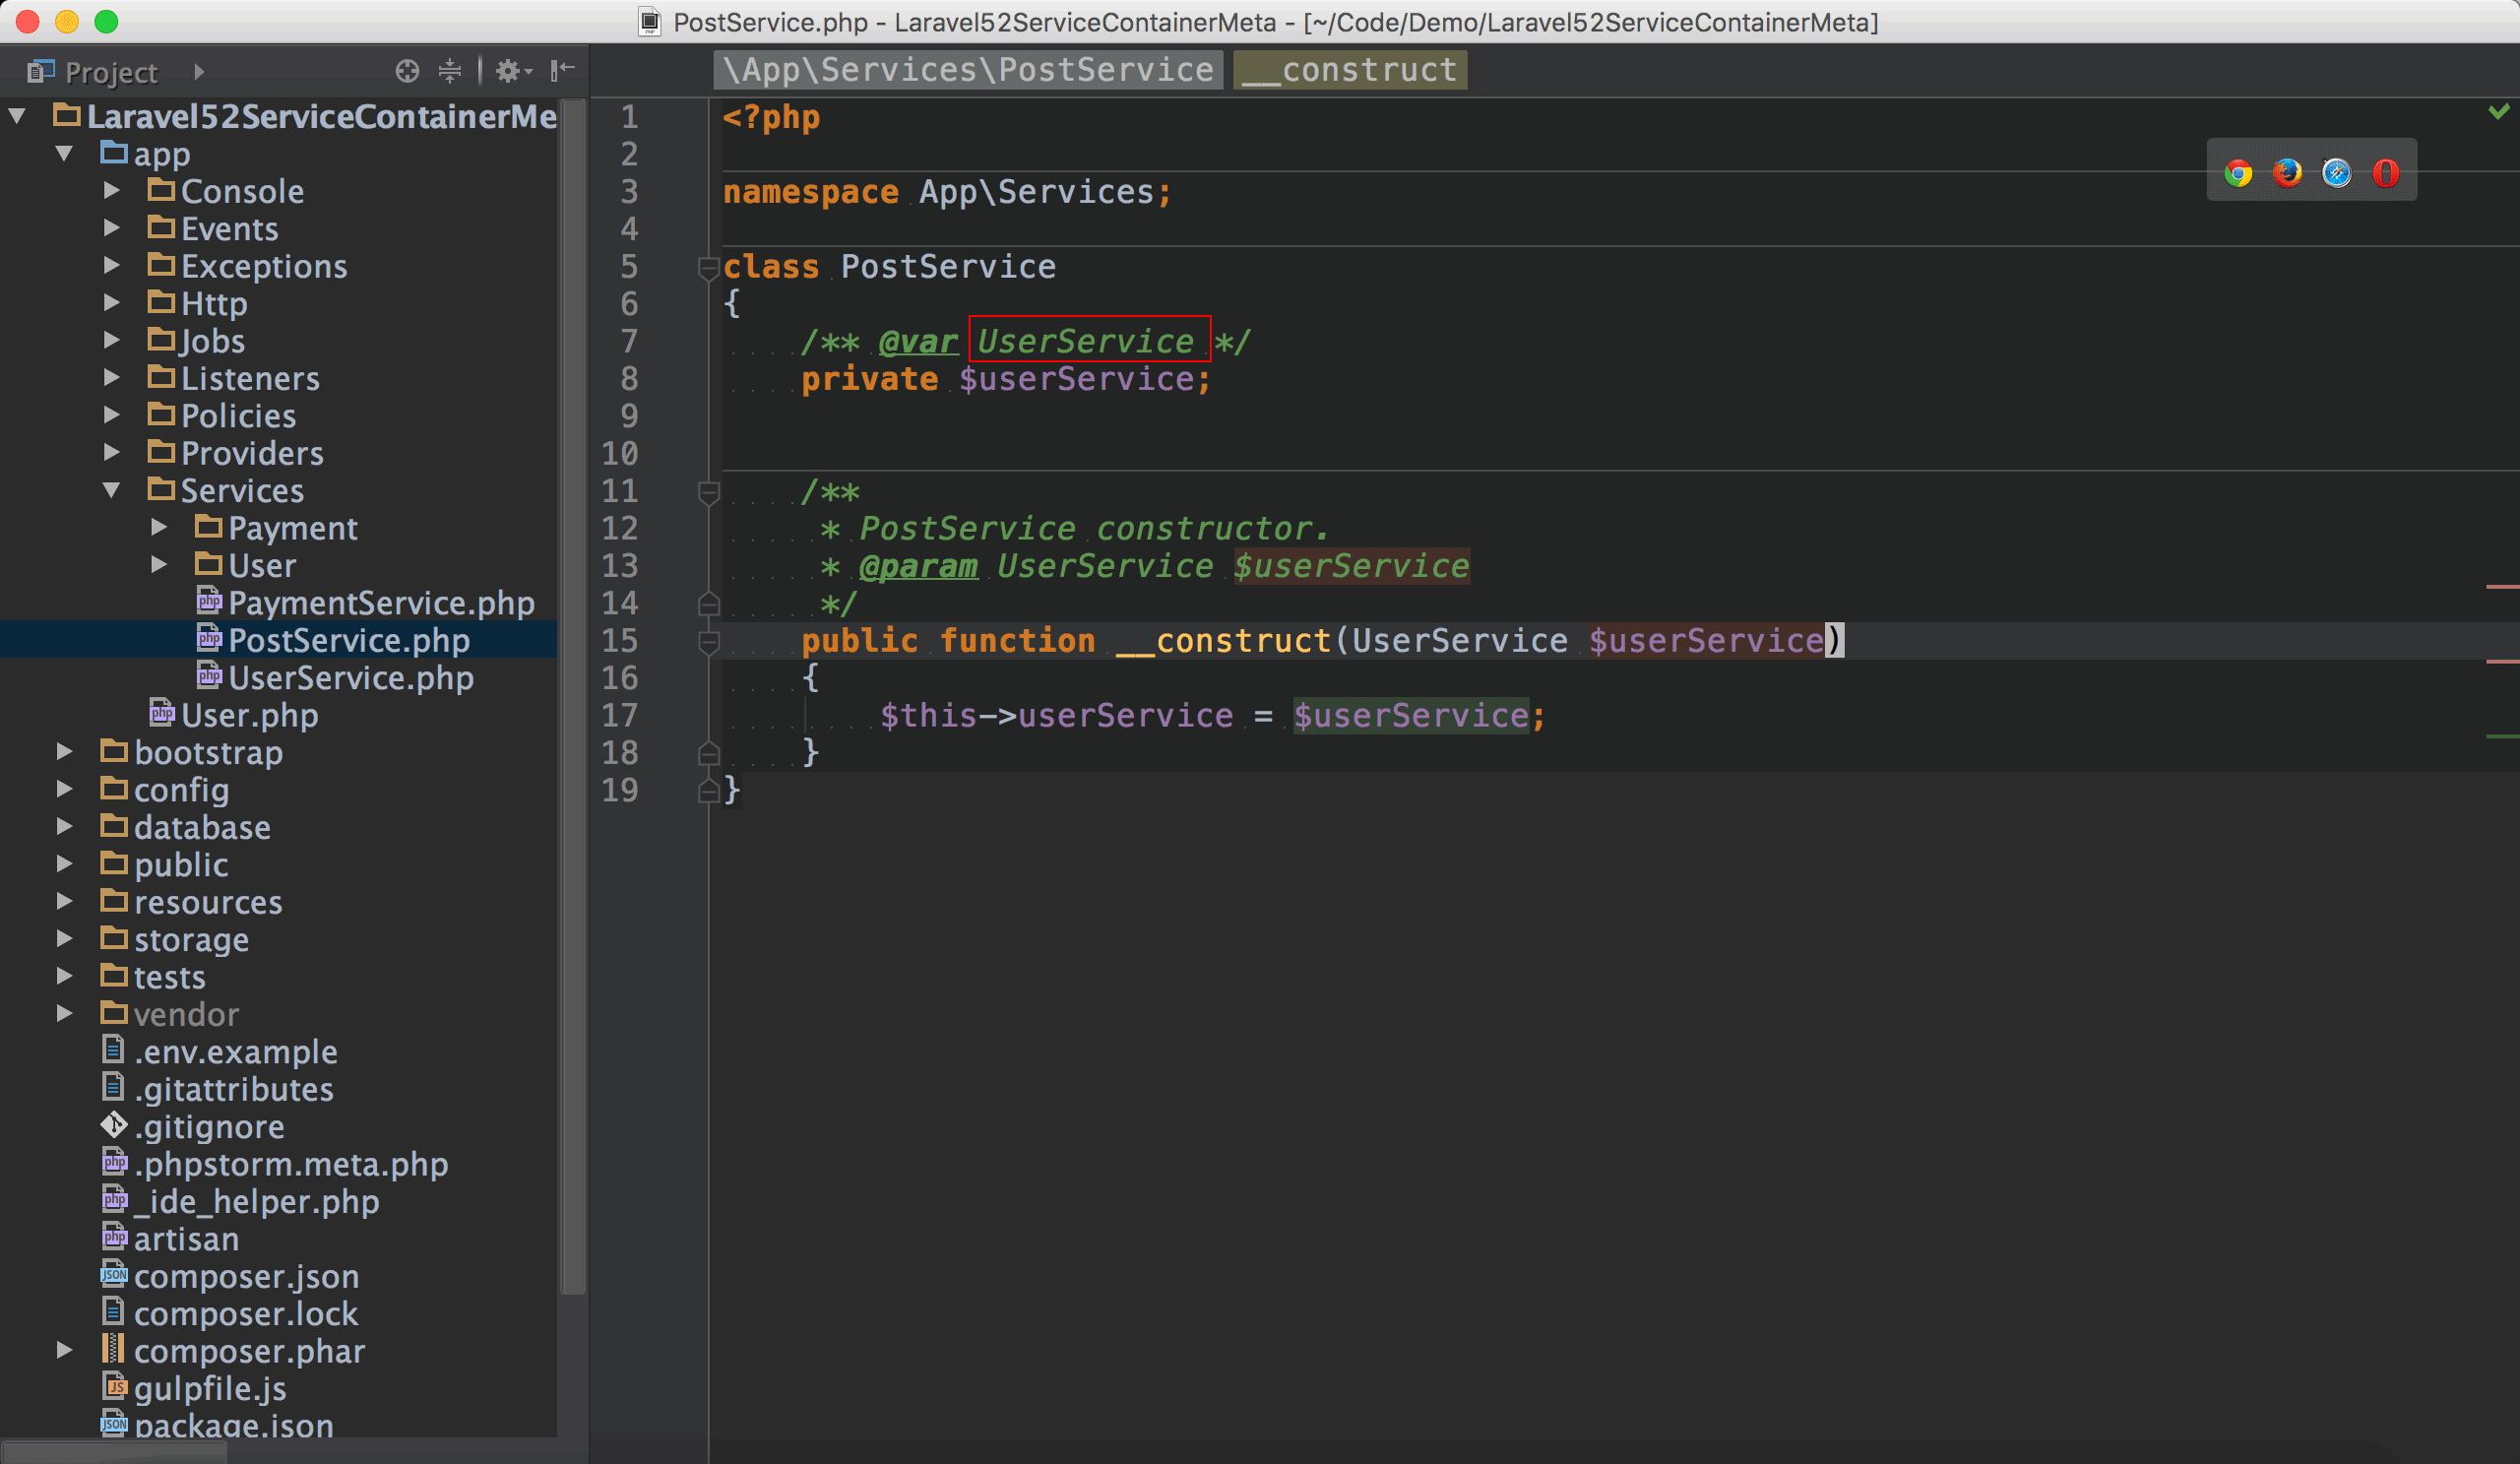
PhpStorm不只幫我們在constructor內補上code,還一併幫我們將field建好,而且PHPDoc也一併建立完成,還自動加上了型別。
由Setter與Getter建立Field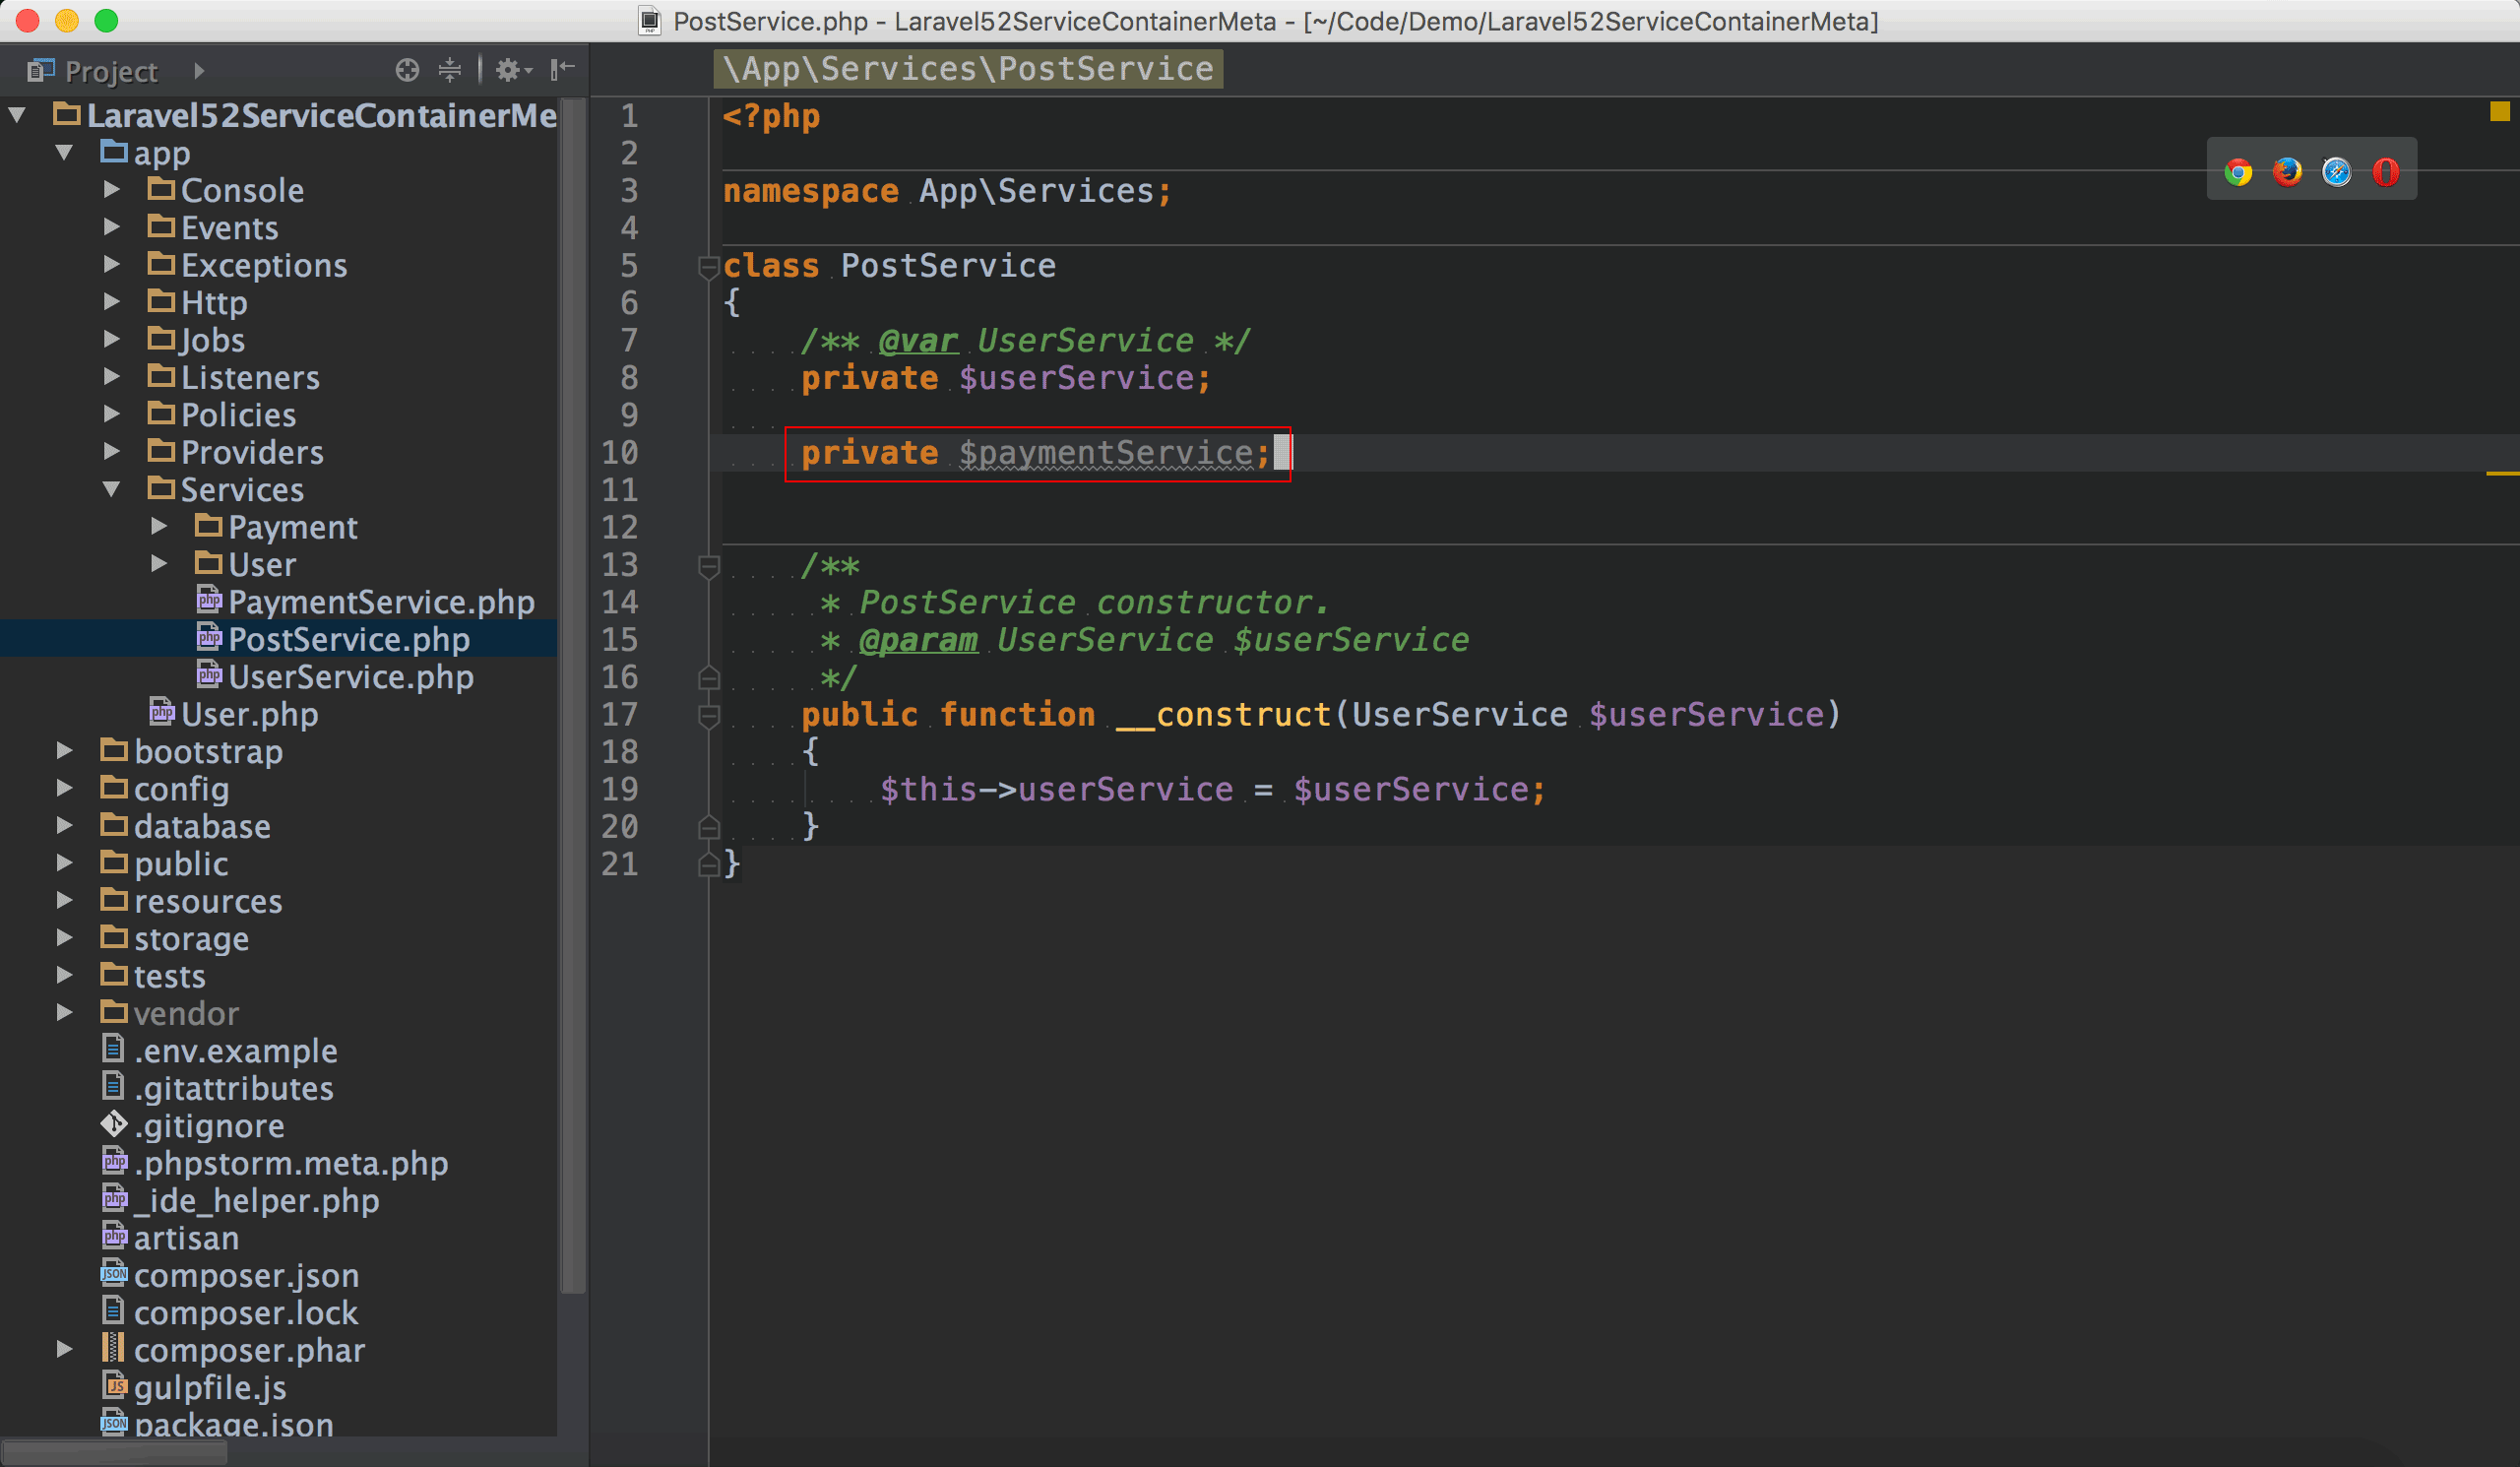
還有另外一類field是使用setter/getter建立,這種field就必須先手動建立field。
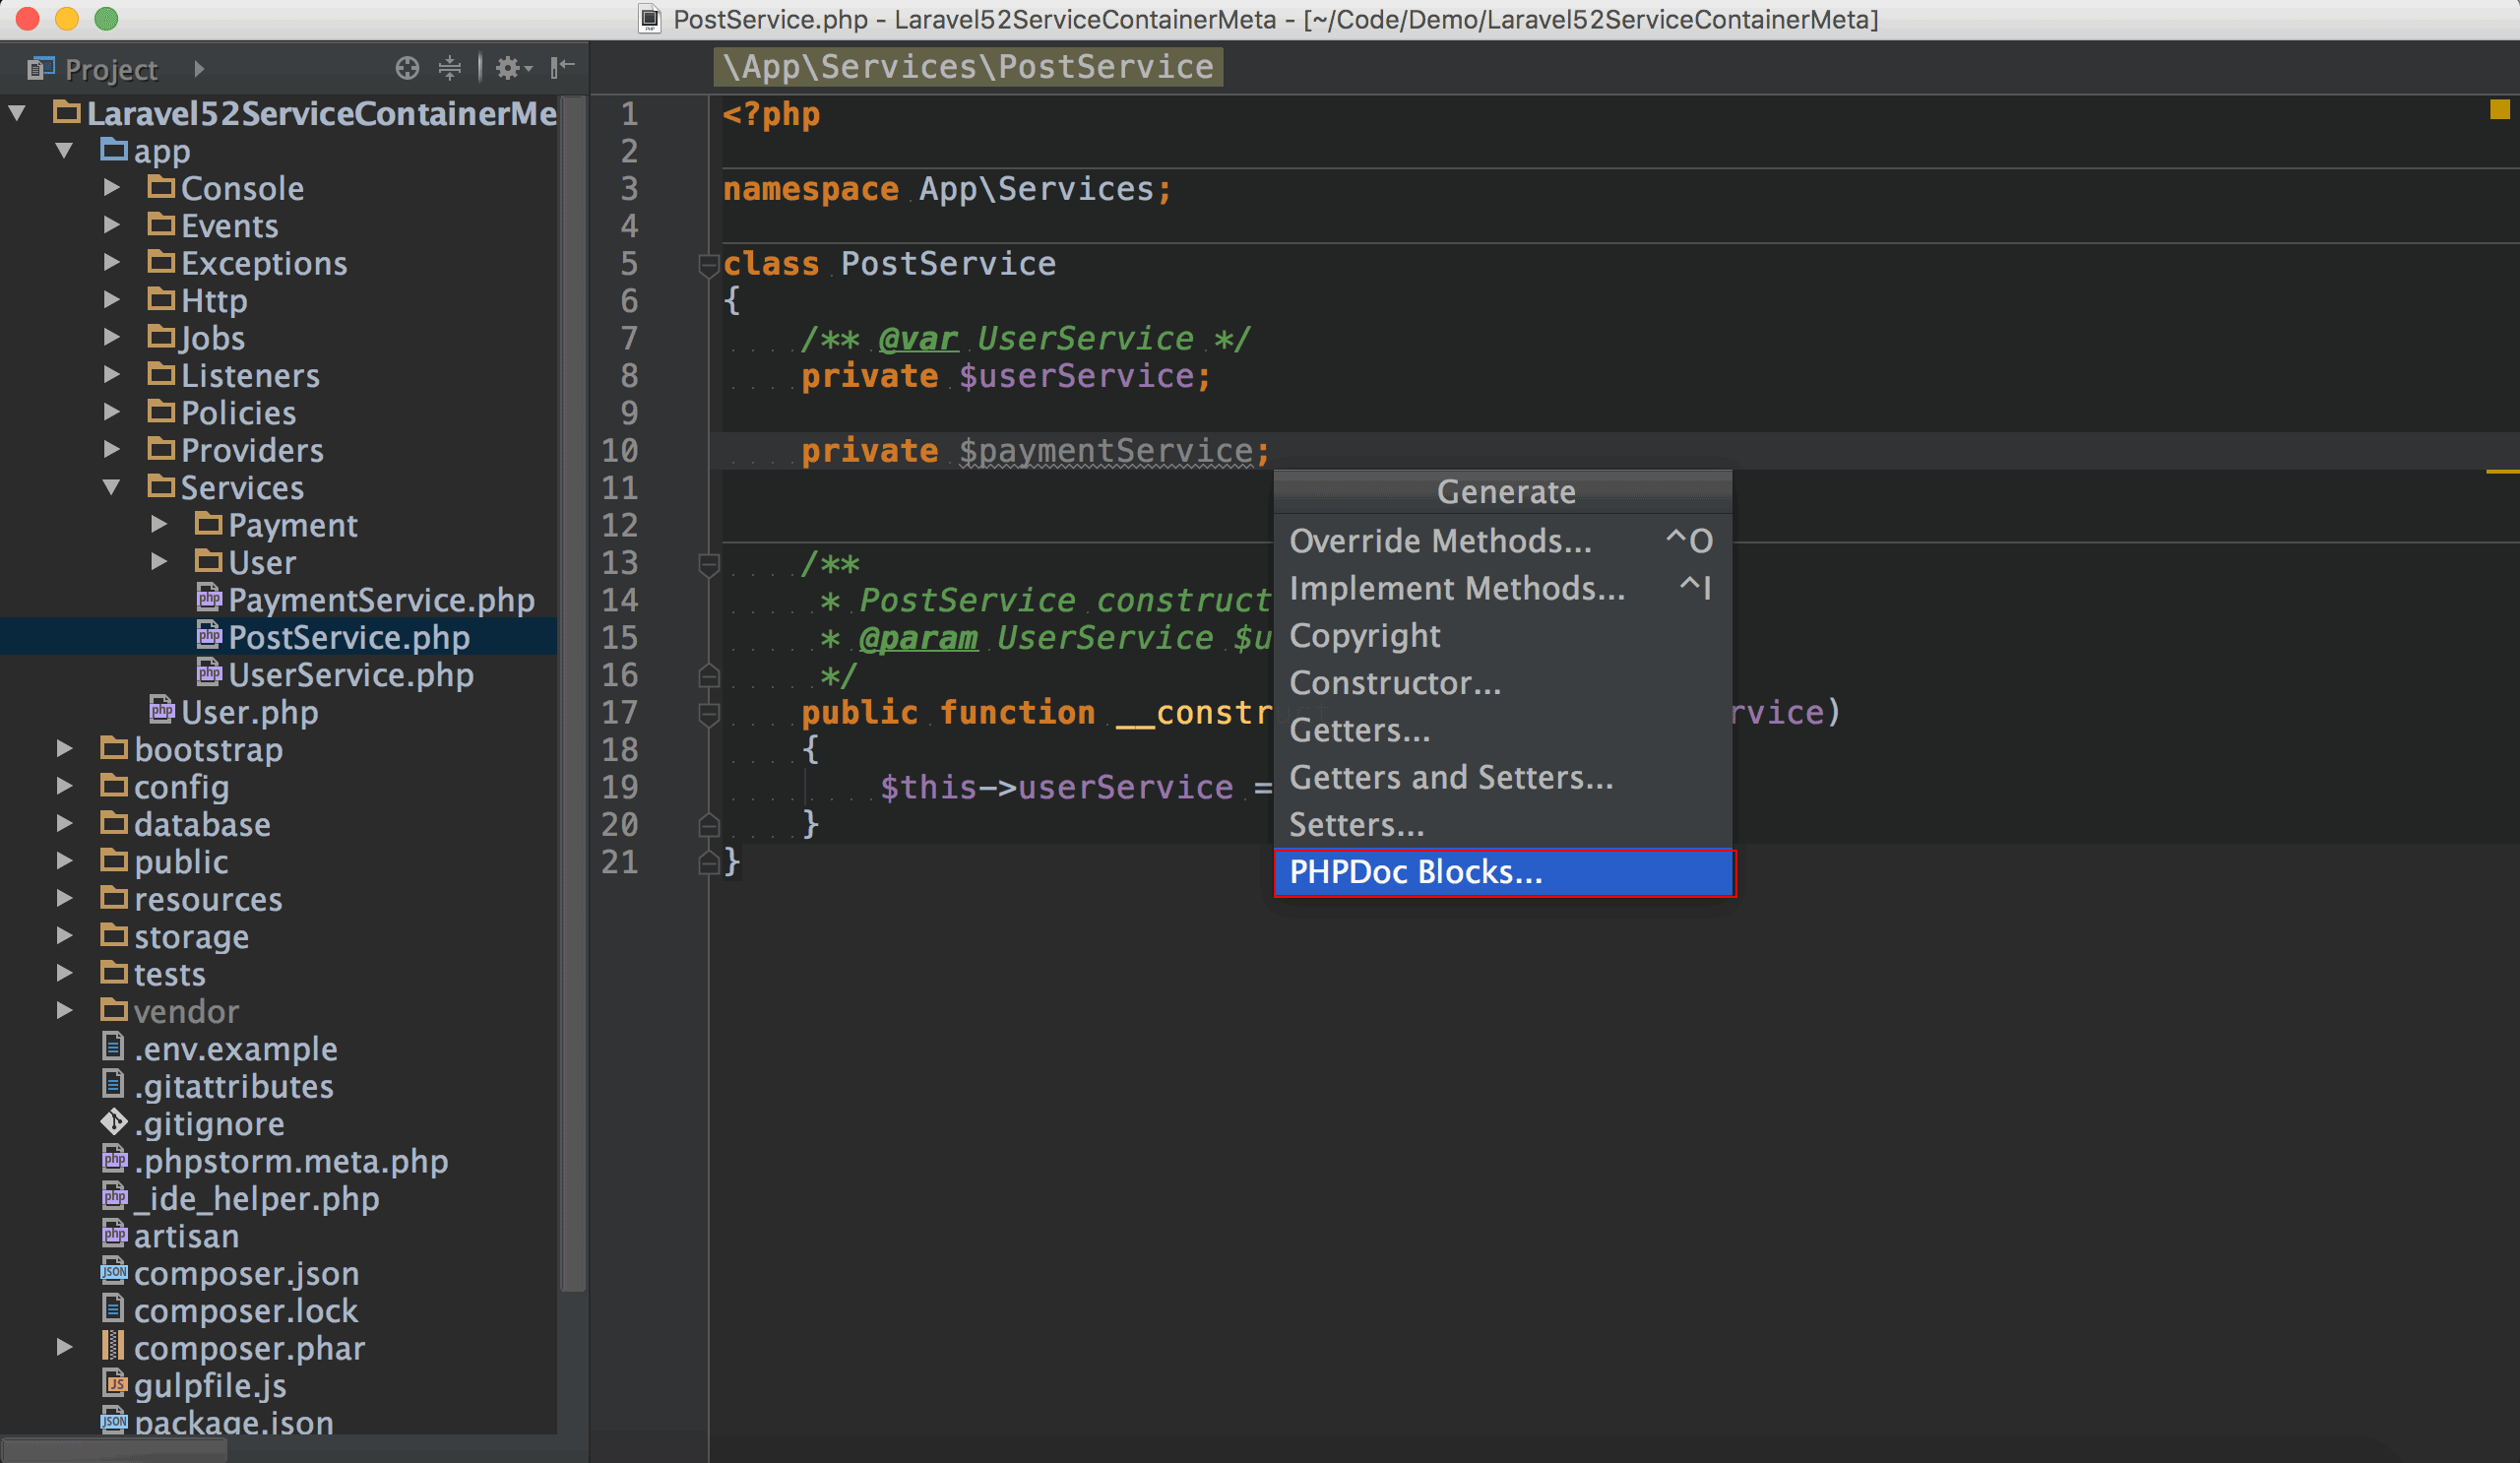
新建立了PostService,按熱鍵⌃ + N,顯示Generate視窗,選擇PHPDoc Blocks...。
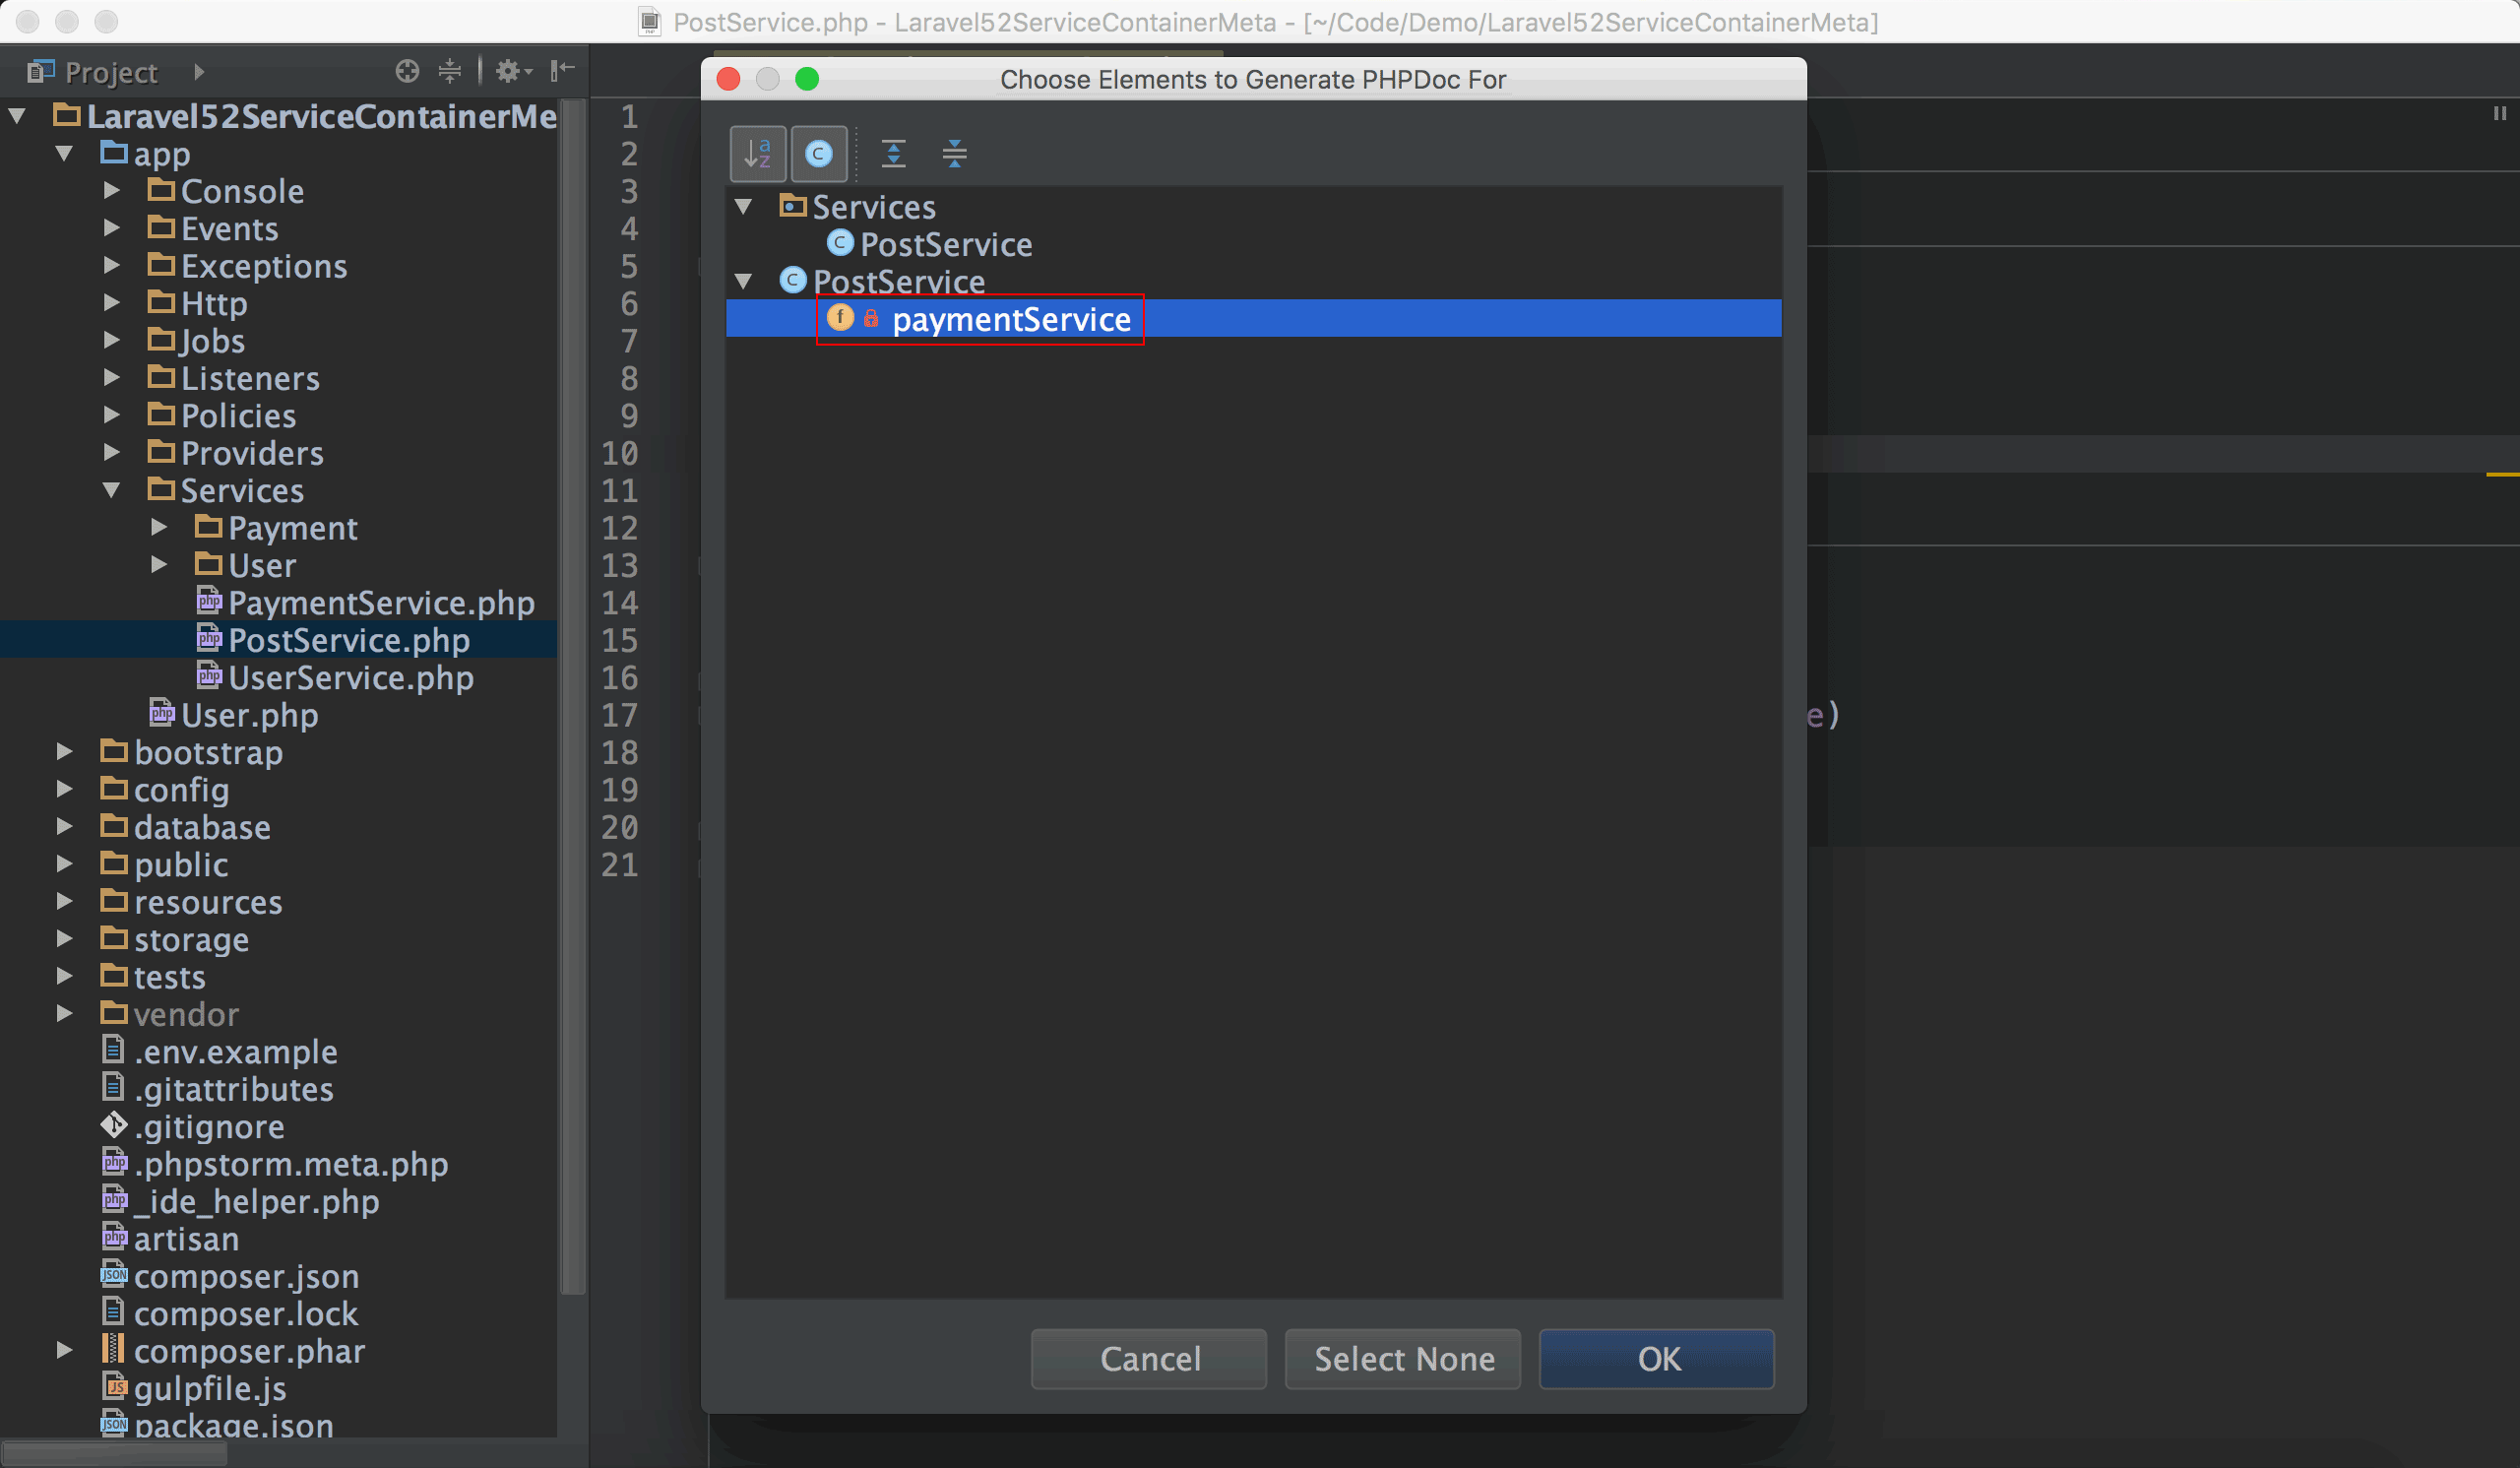
選擇要建立PHPDoc的field。

PhpStorm自動幫我們產生了@var。
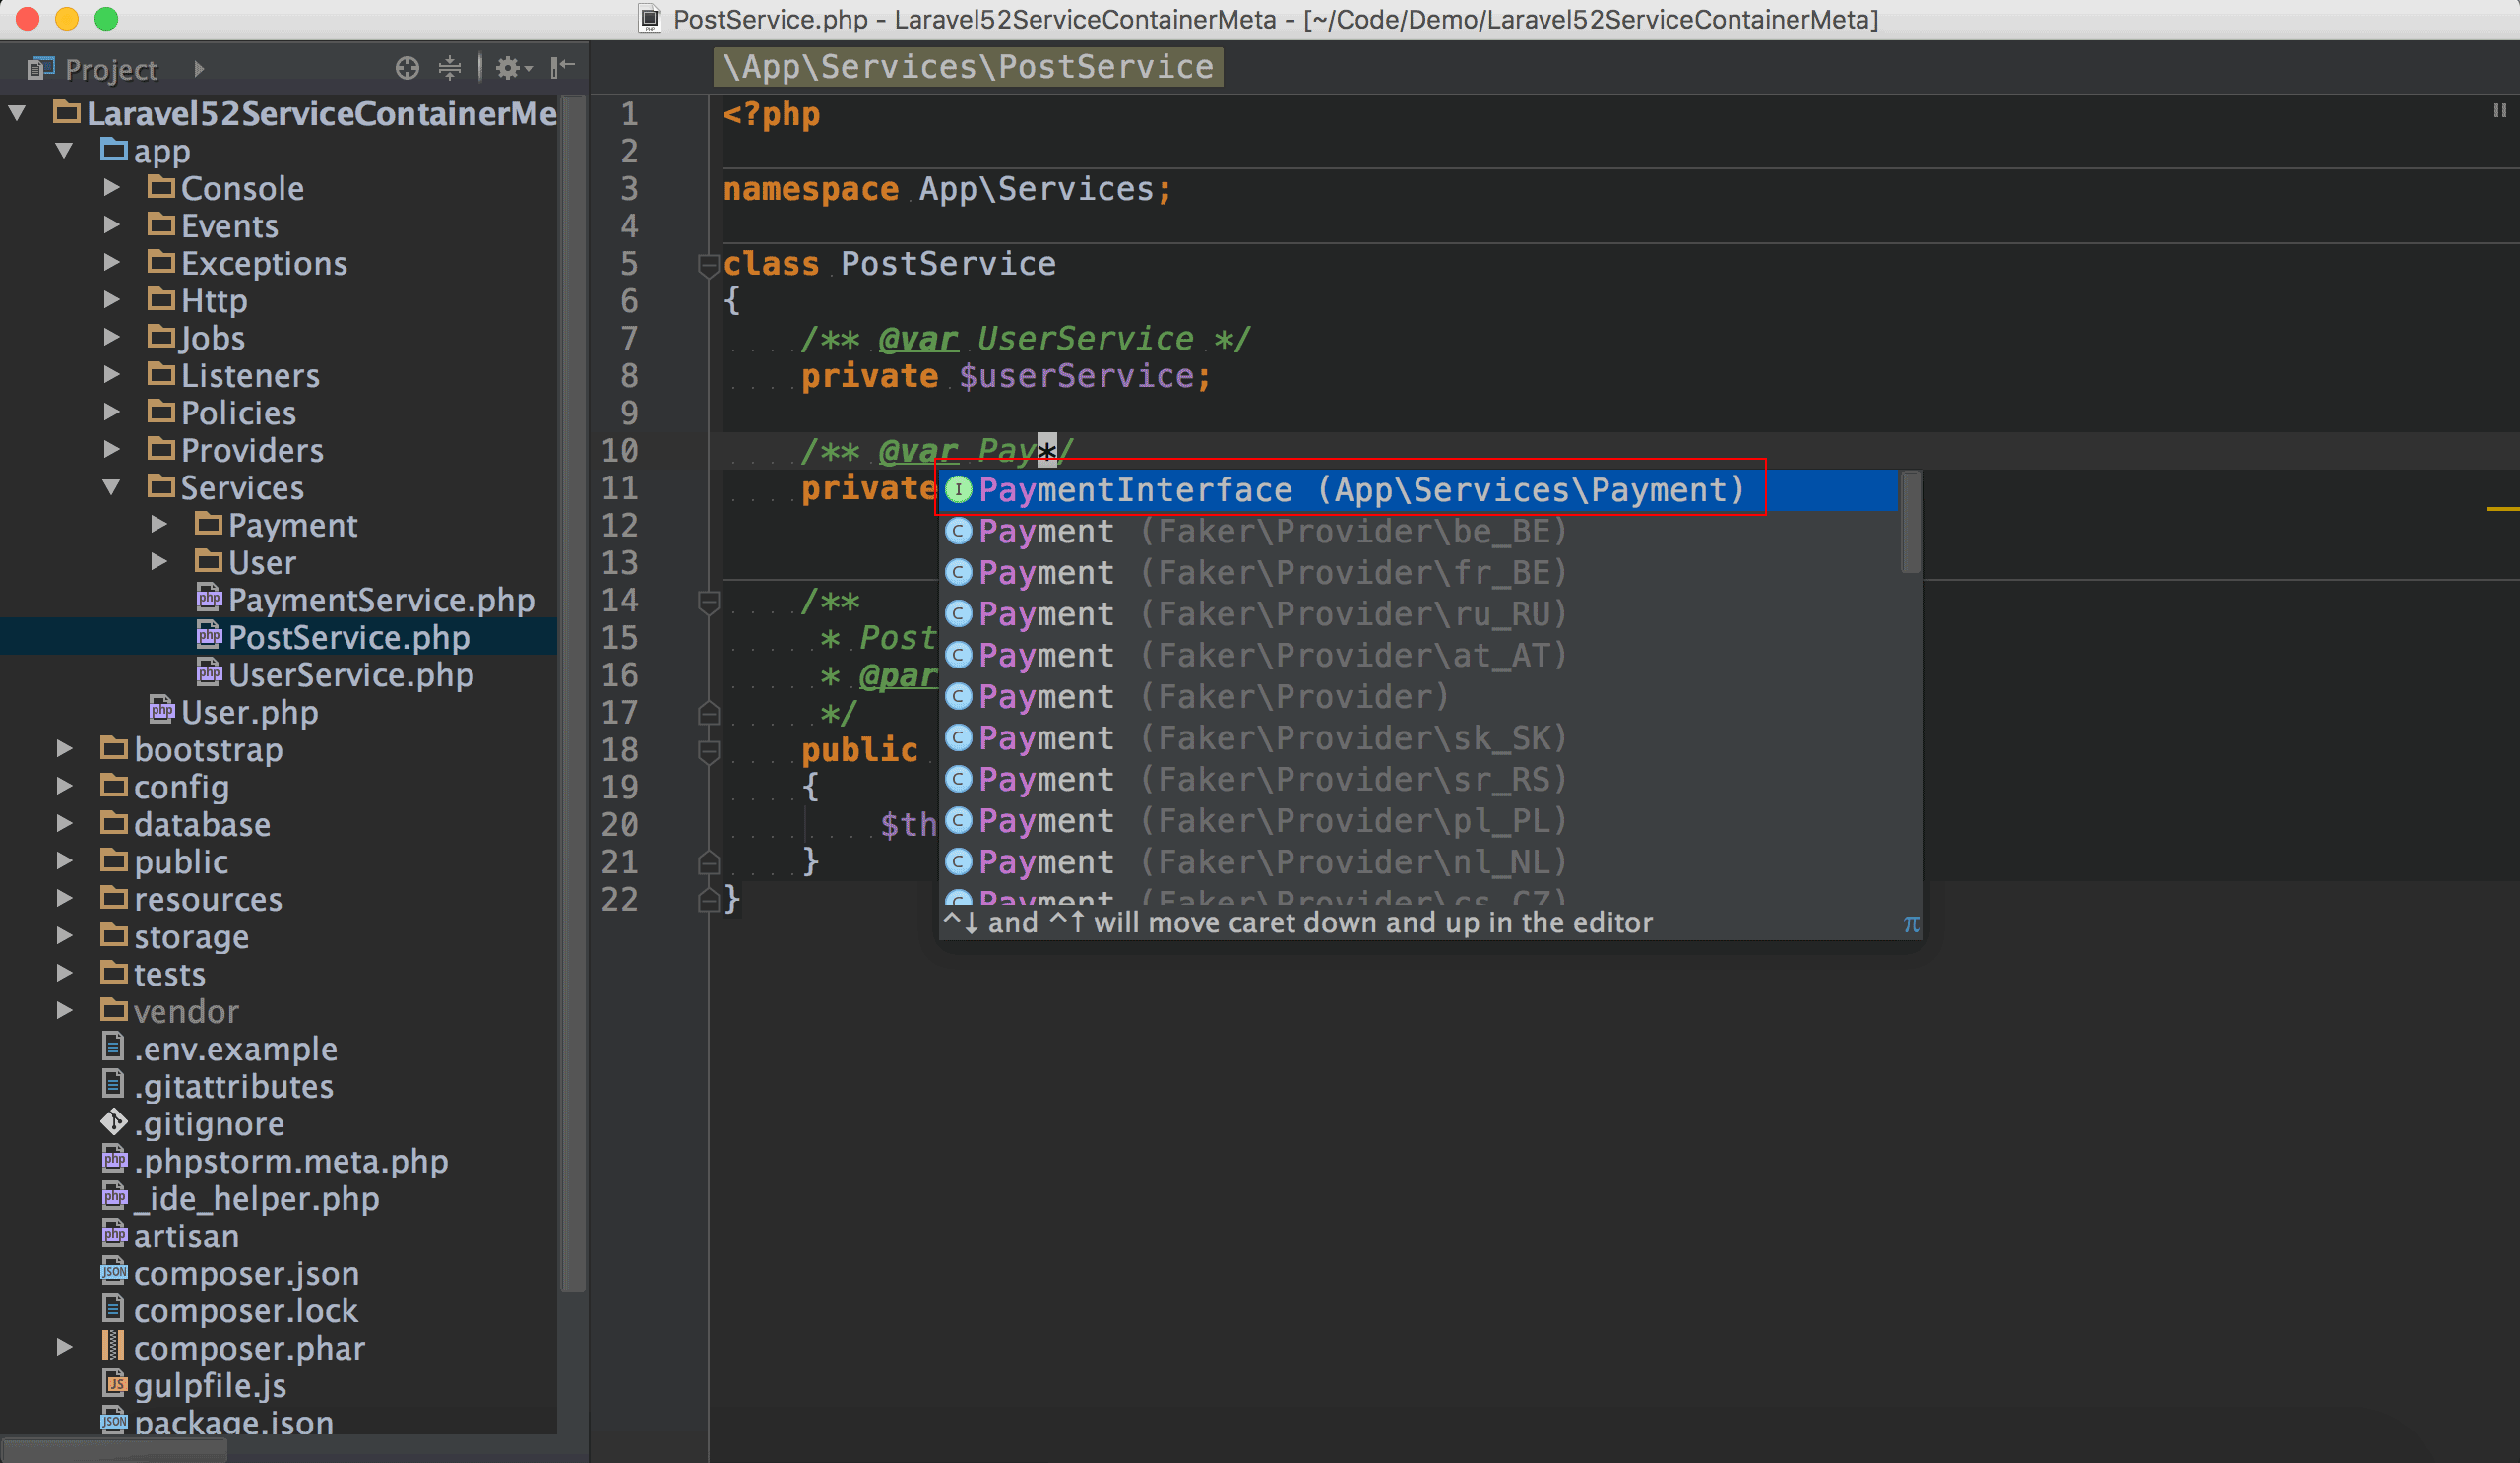
輸入Pay就可以發現PhpStorm的語法提示已經出現了PaymentInterface,按↩選擇之。
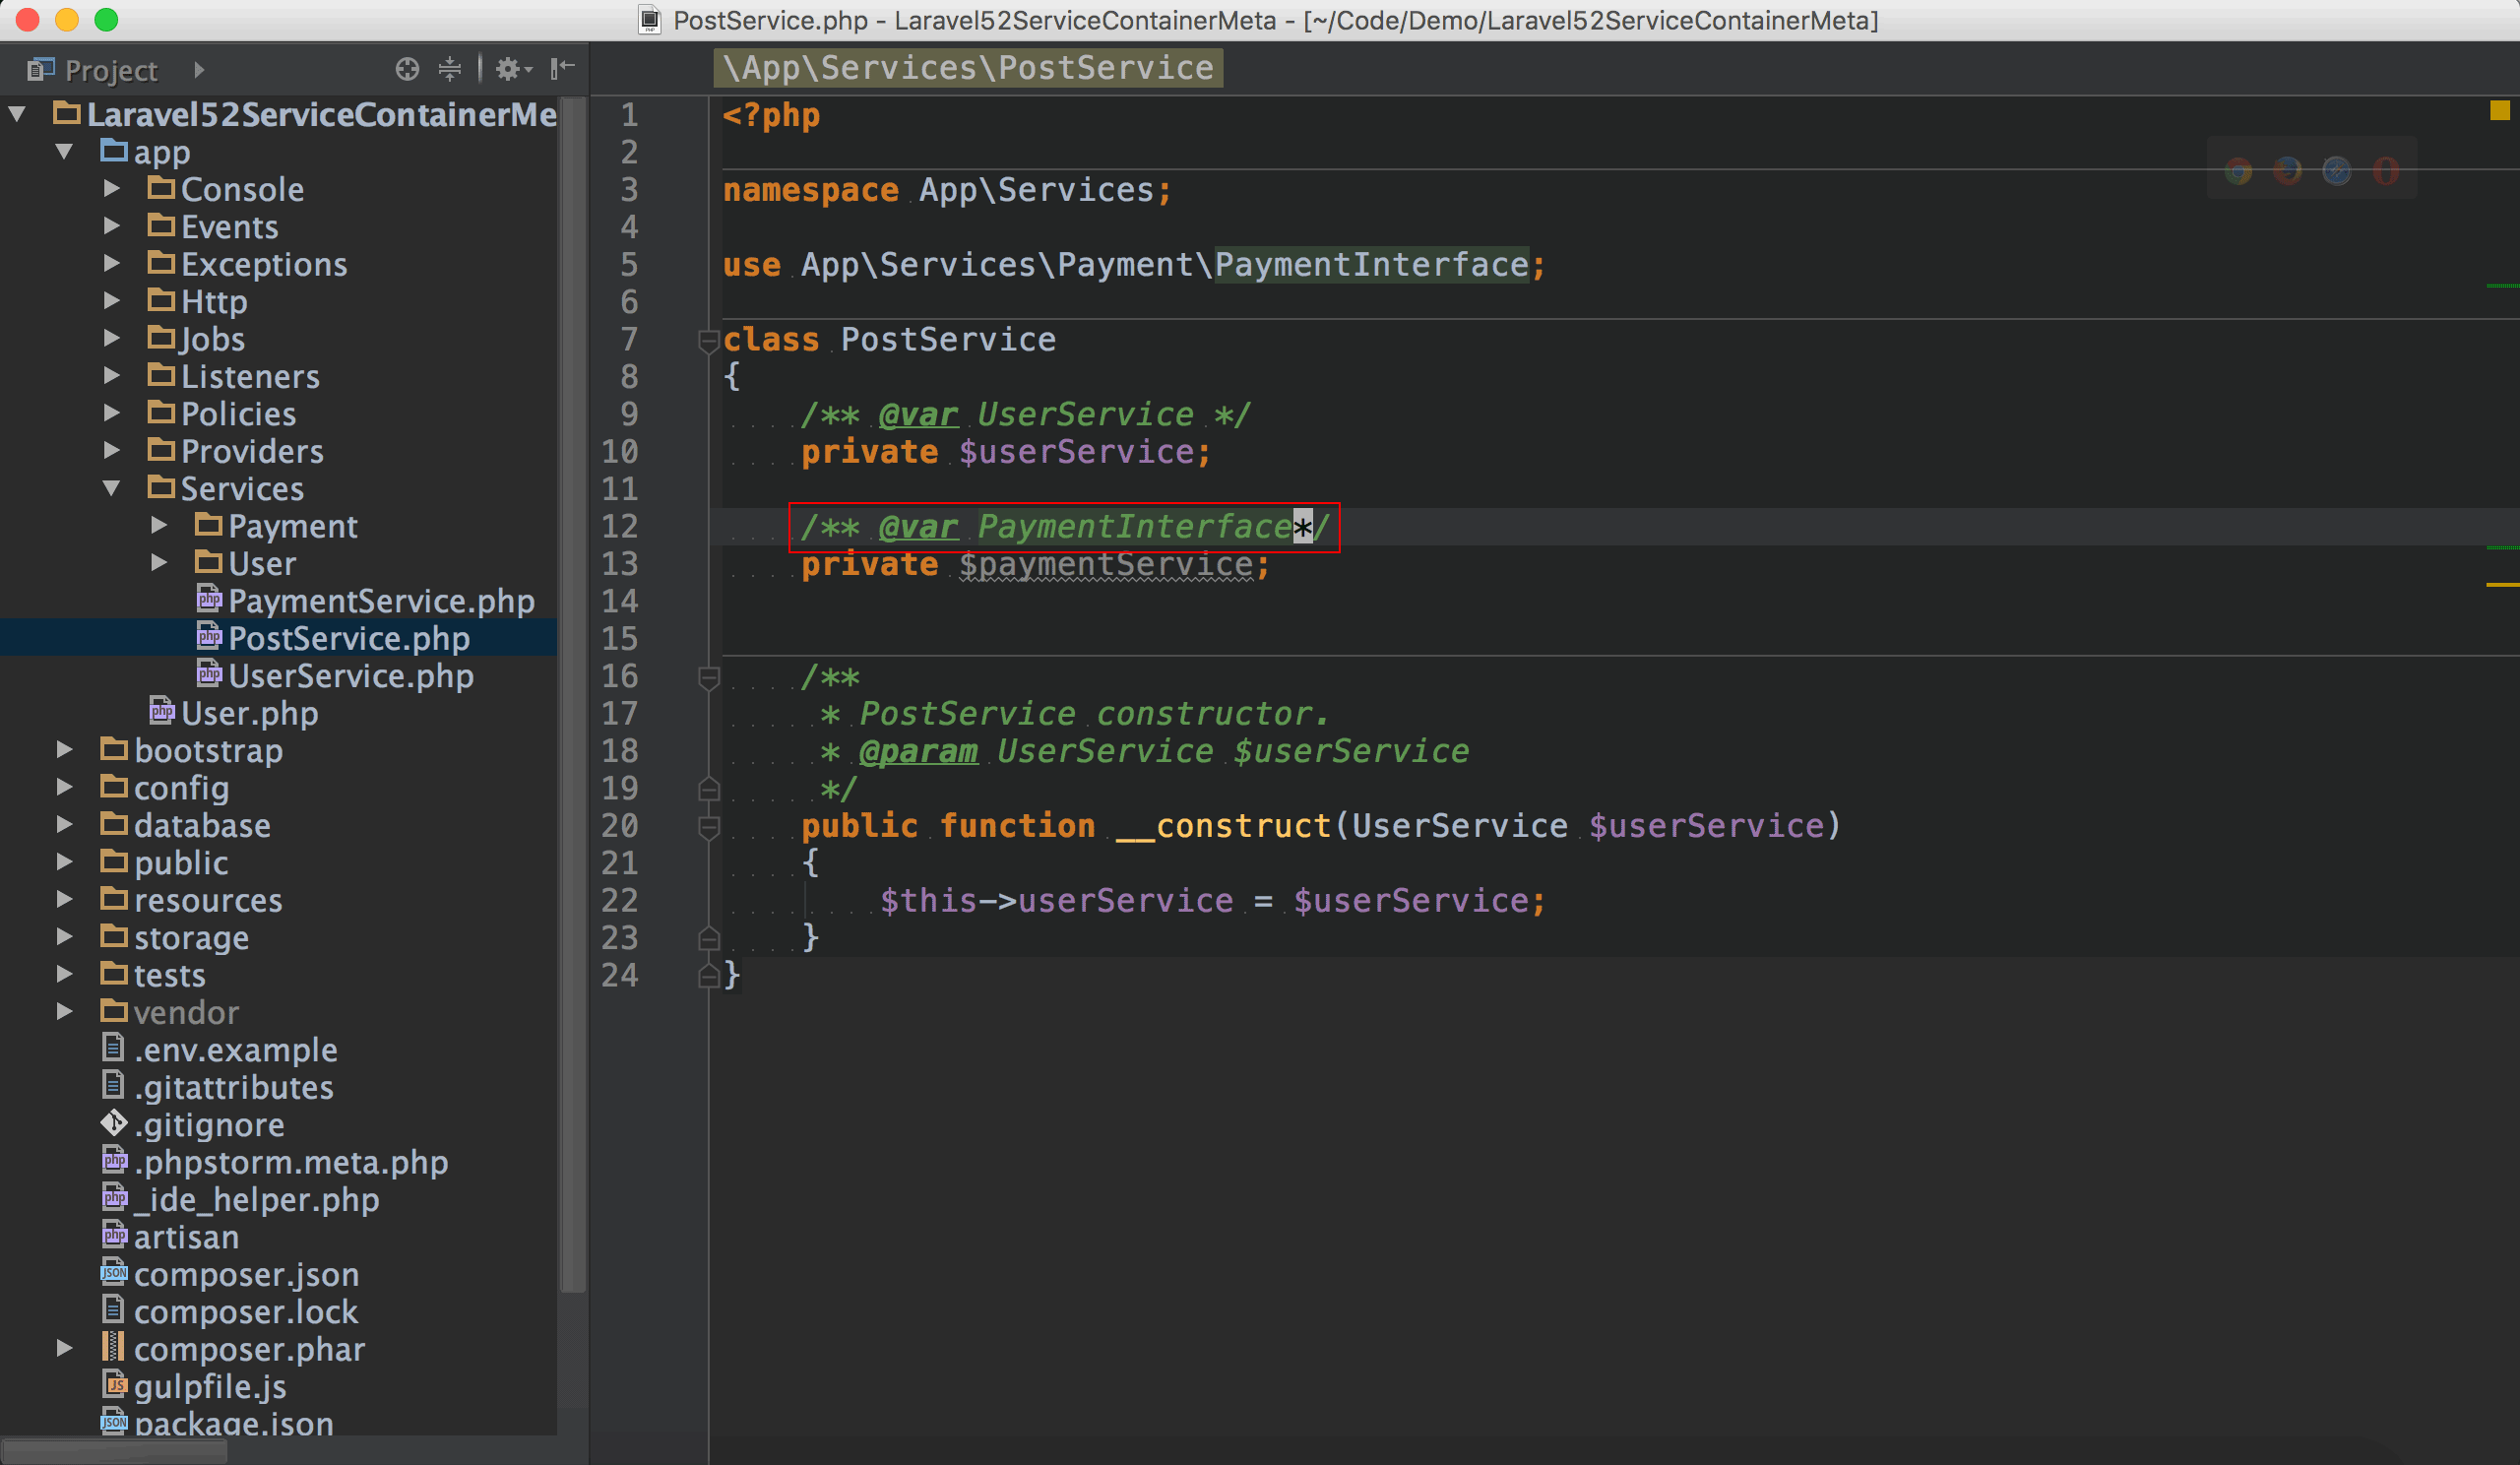
加上了PaymentInterface型別。
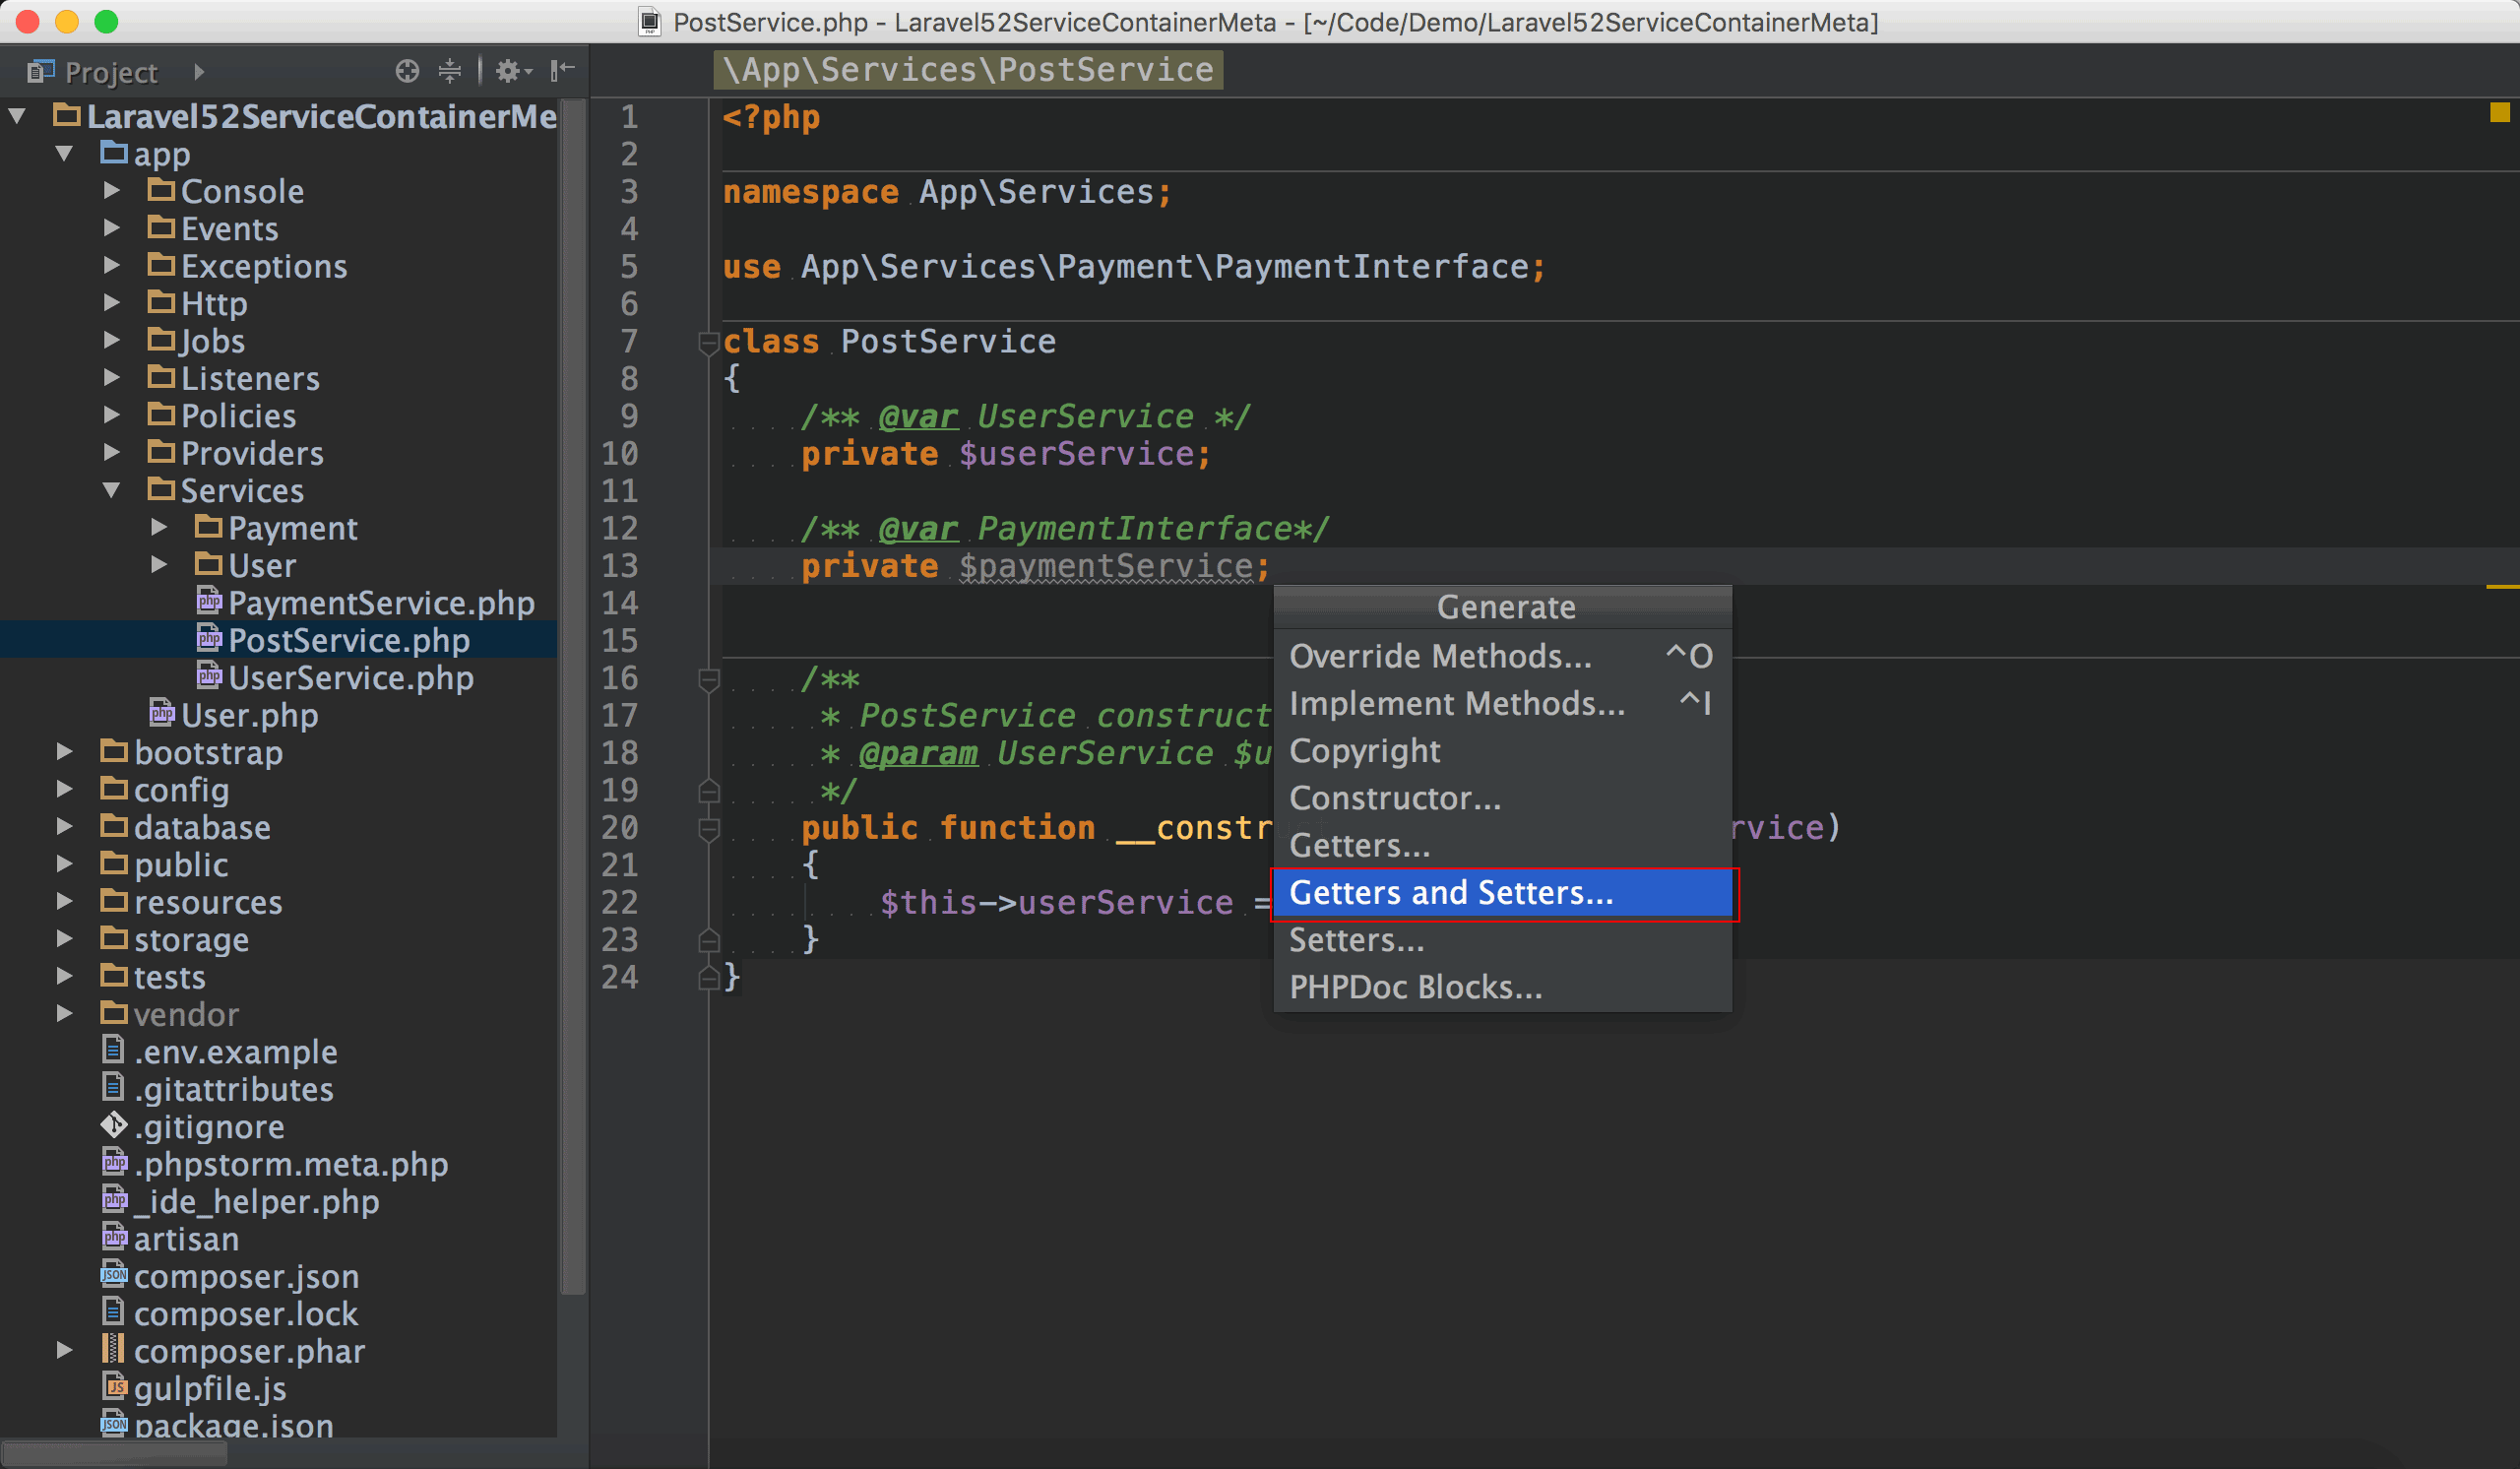
按熱鍵⌃ + N,顯示Generate視窗,選擇Getters and Setters...。
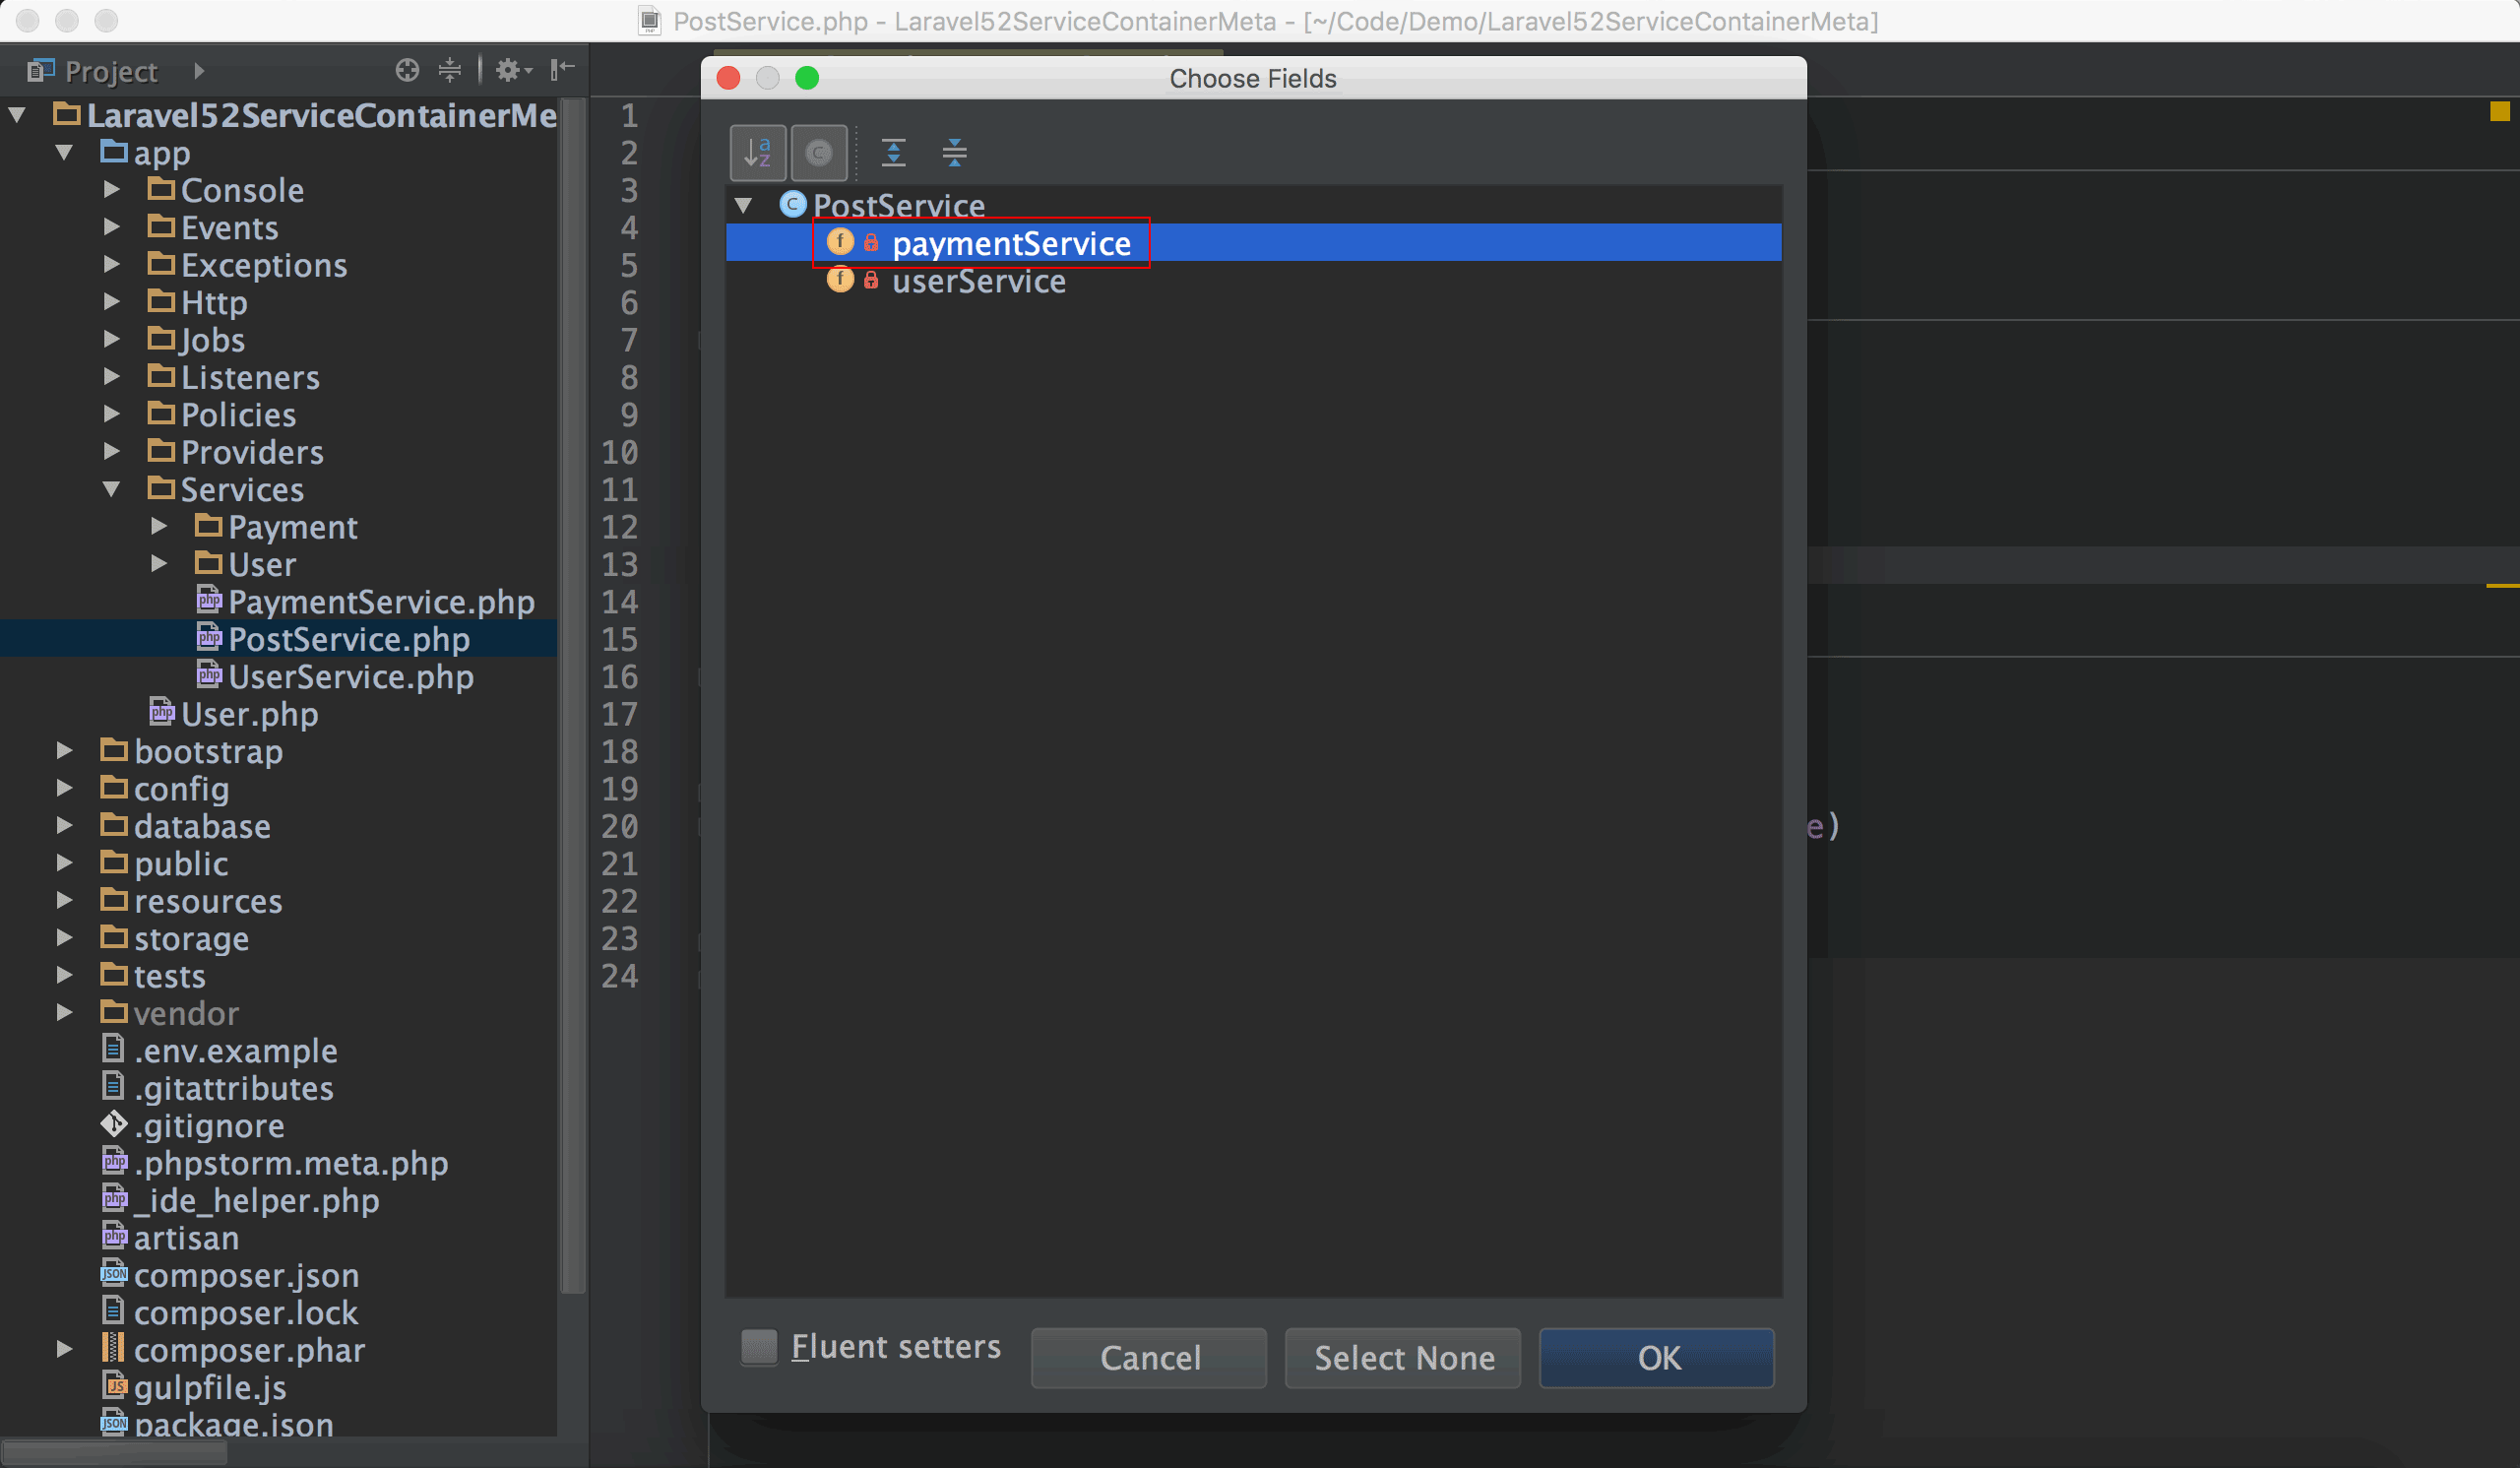
選擇要建立getter與setter的field。
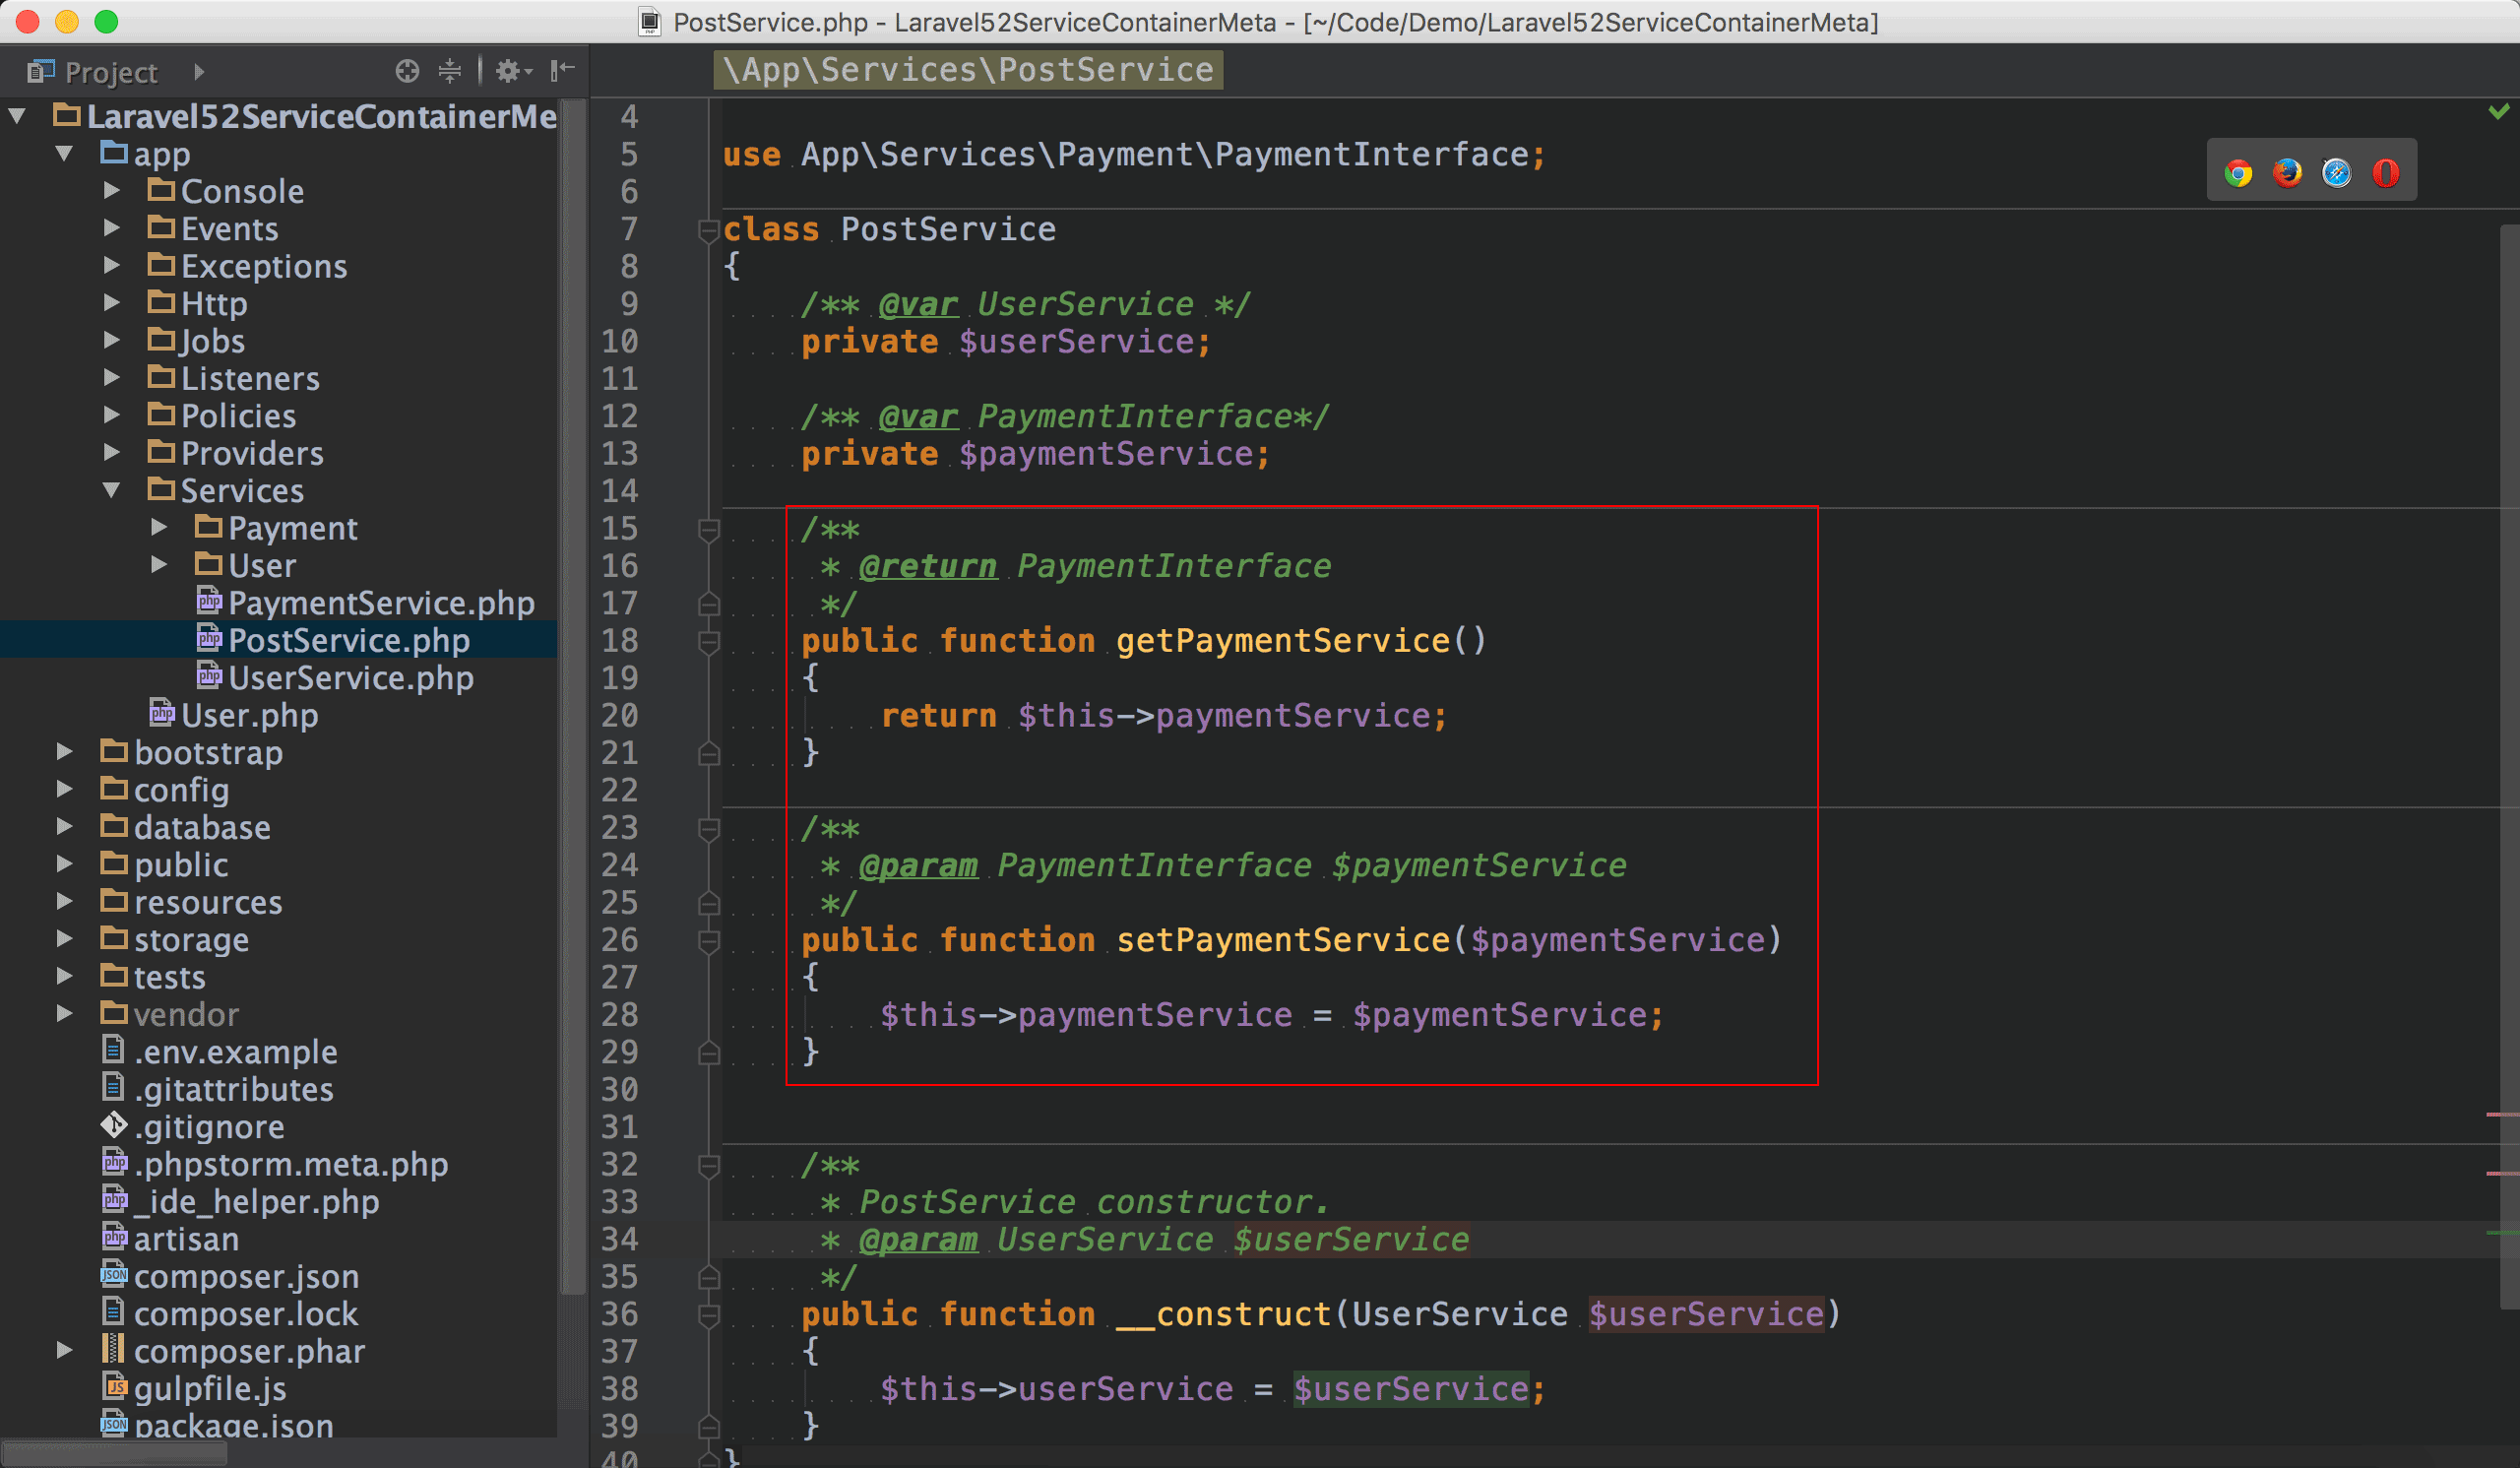
PhpStorm自動幫我們建立了$paymentService的getter與setter。
Adapter Pattern
實務上在接金流時,由於各家SDK所開的API都不一樣,導致我們處理上的困難,因此我們會使用adapter pattern,將各家API抽象化成相同的API,方便service處理。
PayPalSDK.php16 16GitHub Commit : 新增PayPalSDK.php1
2
3
4
5
6
7
8
9
10
11
12
13
14namespace App\Services\Payment;
class PayPalSDK
{
/**
* 付款
*
* @param int $amount
*/
public function pay(int $amount)
{
echo('PayPal pay ' . $amount);
}
}
在此為了講解方便,我們使用PayPalSDK模擬PayPal的付款API,其API為pay()。
AliPaySDK.php17 17GitHub Commit : 新增AliPaySDK.php1
2
3
4
5
6
7
8
9
10
11
12
13
14namespace App\Services\Payment;
class AliPaySDK
{
/**
* 付款
*
* @param $amount
*/
public function bill($amount)
{
echo('AliPay bill ' . $amount);
}
}
在此為了講解方便,我們使用AliPalSDK模擬支付寶的付款API,其API為bill()。
1 | namespace App\Services; |
但我們原本PaymentService,API為setPayment()與checkout(),其中setPayment()為設定第三方支付機構,而checkout()為實際付款。
可以發現我們service定義的checkout()與PayPal的pay()與支付寶的bill()都不合,因此我們需要adapter pattern做一個轉接動作。
PaymentInterface.php18 18GitHub Commit : 新增PaymentInterface.php1
2
3
4
5
6
7
8
9
10
11
12namespace App\Services\Payment;
interface PaymentInterface
{
/**
* 使用金流付款
*
* @param int $amount
* @return void
*/
public function checkout(int $amount);
}
定義了PaymentInterface,為我們原本PaymentService所用的checkout()。
PayPal.php19 19GitHub Commit : 新增PayPal.php1
2
3
4
5
6
7
8
9
10
11
12
13
14
15
16
17
18
19
20
21
22
23
24
25
26
27namespace App\Services\Payment;
class PayPal implements PaymentInterface
{
/** @var PayPalSDK */
private $payPalSDK;
/**
* PayPal constructor.
* @param PayPalSDK $payPalSDK
*/
public function __construct(PayPalSDK $payPalSDK)
{
$this->payPalSDK = $payPalSDK;
}
/**
 * 使用金流付款
 *
 * @param int $amount
 * @return void
 */
public function checkout(int $amount)
{
    $this->payPalSDK->pay($amount);
}
}
PayPal扮演adapter的角色,所以必須實現PaymentInterface的checkout()。
將扮演adaptee角色的PayPalSDK注入進來。
17行1
2
3
4
5
6
7
8
9
10/**
* 使用金流付款
*
* @param int $amount
* @return void
*/
public function checkout(int $amount)
{
$this->payPalSDK->pay($amount);
}
將checkout()轉換成PayPalSDK的pay()。
AliPay.php20 20GitHub Commit : 新增AliPay.php1
2
3
4
5
6
7
8
9
10
11
12
13
14
15
16
17
18
19
20
21
22
23
24
25
26
27namespace App\Services\Payment;
class AliPay implements PaymentInterface
{
/** @var AliPaySDK */
private $aliPaySDK;
/**
* AliPay constructor.
* @param AliPaySDK $aliPaySDK
*/
public function __construct(AliPaySDK $aliPaySDK)
{
$this->aliPaySDK = $aliPaySDK;
}
/**
 * 使用金流付款
 *
 * @param int $amount
 * @return void
 */
public function checkout(int $amount)
{
    $this->aliPaySDK->bill($amount);
}
}
AliPay扮演adapter的角色,所以必須實現PaymentInterface的checkout()。
將扮演adaptee角色的AliPaySDK注入進來。
17行1
2
3
4
5
6
7
8
9
10/**
* 使用金流付款
*
* @param int $amount
* @return void
*/
public function checkout(int $amount)
{
$this->aliPaySDK->bill($amount);
}
將checkout()轉換成AliPaySDK的pay()。
PaymentEnum.php21 21GitHub Commit : 新增PaymentEnum.php1
2
3
4
5
6
7namespace App\Services\Payment;
abstract class PaymentEnum
{
const PayPal = 'PayPal';
const AliPay = 'AliPay';
}
PaymentService的setPayment()要求我們傳字串,但由於將來會將此字串直接做App::bind(),為了減少人為typo,我們希望能提供類似強型別語言的enum,在傳入字串時只要用選的就好,不需直接打字。
不過由於PHP沒有提供enum,我們只能使用abstract class + const模擬類似enum的機制。
UserController.php22 22GitHub Commit : 修改UserController.php1
2
3
4
5
6
7
8
9
10
11
12
13
14
15
16
17
18
19
20
21
22
23
24
25
26
27
28
29
30
31
32namespace App\Http\Controllers;
use App\Http\Requests;
use App\Services\Payment\PaymentEnum;
use App\Services\PaymentService;
use App\Services\UserService;
class UserController extends Controller
{
/** @var UserService */
private $userService;
/** @var PaymentService */
private $paymentService;
/**
* UserController constructor.
* @param UserService $userService
* @param PaymentService $paymentService
*/
public function __construct(UserService $userService, PaymentService $paymentService)
{
$this->userService = $userService;
$this->paymentService = $paymentService;
}
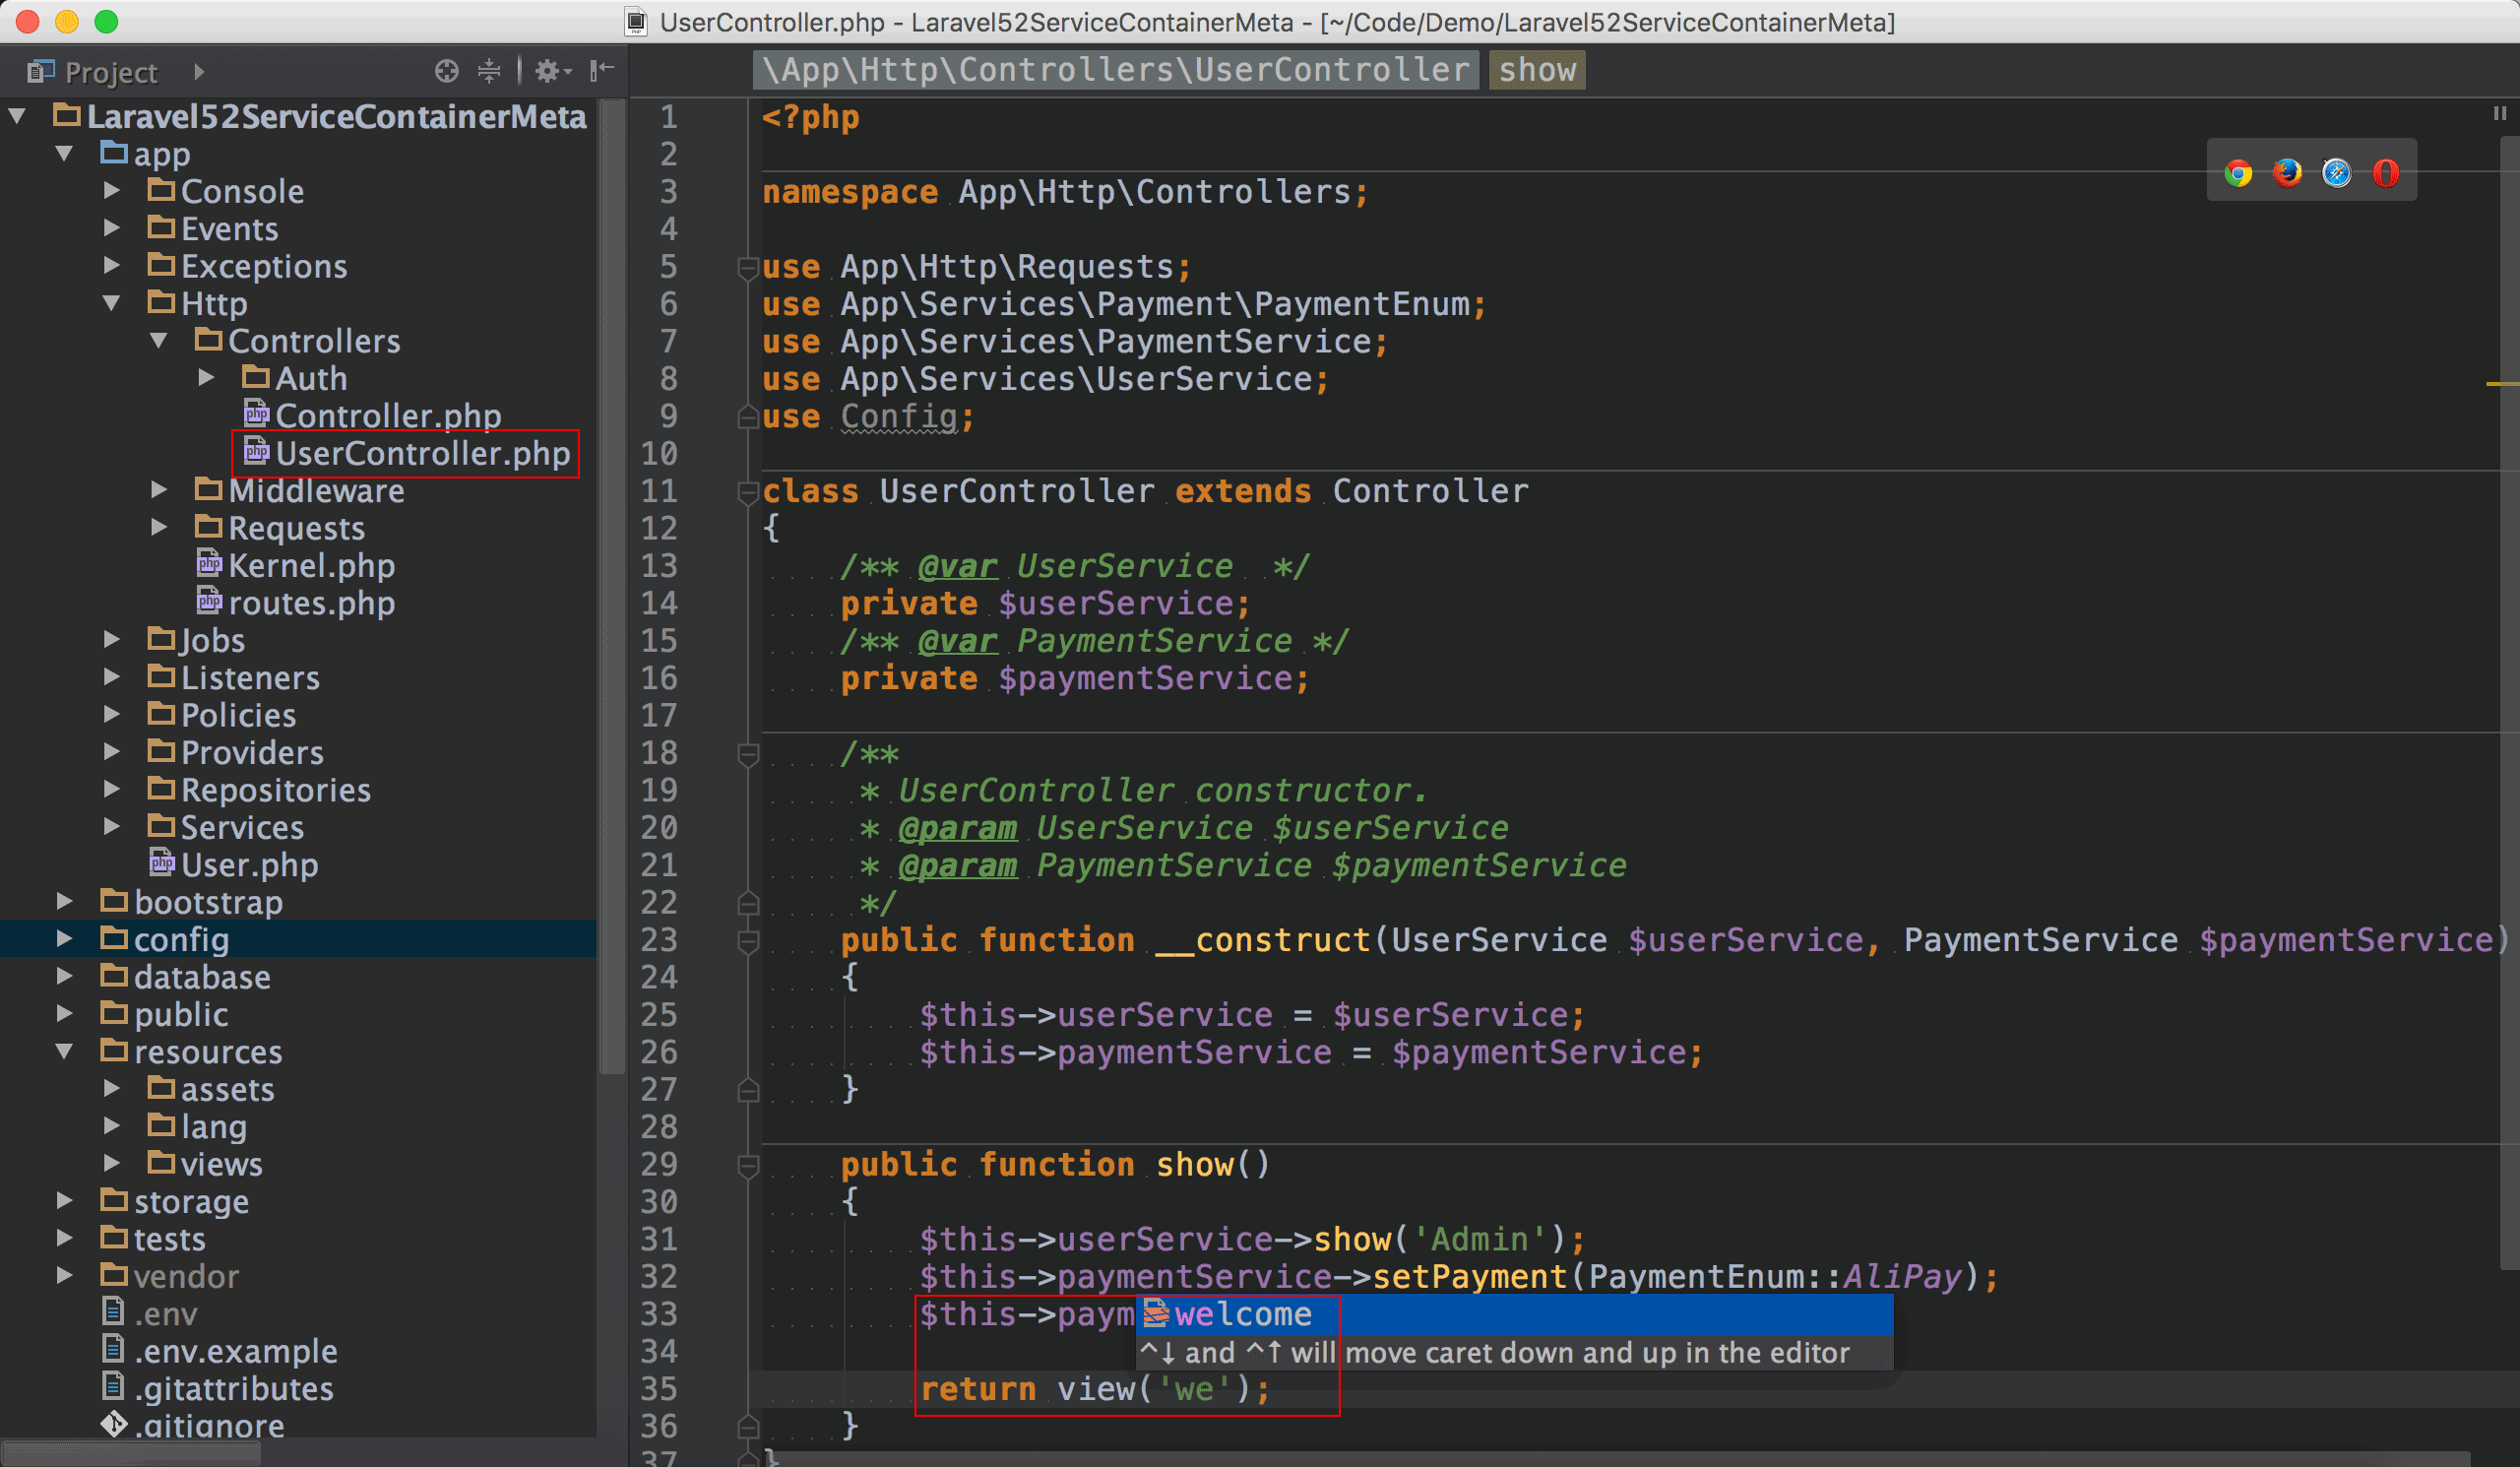
public function show()
{
    $this->userService->show('Admin');
    $this->paymentService->setPayment(PaymentEnum::AliPay);
    $this->paymentService->checkout(1000);
}
}
將PaymentService也注入進來。
26行1
2
3
4
5
6public function show()
{
$this->userService->show('Admin');
$this->paymentService->setPayment(PaymentEnum::AliPay);
$this->paymentService->checkout(1000);
}
使用$this->paymentService->setPayment()設定要用什麼第三方支付機構,這裡使用了PaymentEnum來輸入字串,可以避免人為typo,且程式可讀性也更佳。
無論使用任何第三方支付,都使用相同的$this->paymentService->checkout(),若將來有新的第三方支付方式,只需新增class實現PaymentInterface即可,也不用修改UserController,,達到開放封閉原則的要求。
PaymentService.php23 23GitHub Commit : 新增PaymentService.php1
2
3
4
5
6
7
8
9
10
11
12
13
14
15
16
17
18
19
20
21
22
23
24
25
26
27
28
29
30
31namespace App\Services;
use App;
use App\Services\Payment\PaymentInterface;
class PaymentService
{
/** @var PaymentInterface */
private $payment;
/**
 * 設定第三方支付機構
 *
 * @param string $paymentName
 */
public function setPayment(string $paymentName)
{
    App::bind(PaymentInterface::class, 'App\Services\Payment\\' . $paymentName);
    $this->payment = App::make(PaymentInterface::class);
}
/**
 * 付款
 *
 * @param int $amount
 */
public function checkout(int $amount)
{
    $this->payment->checkout($amount);
}
}
11行1
2
3
4
5
6
7
8
9
10/**
* 設定第三方支付機構
*
* @param string $paymentName
*/
public function setPayment(string $paymentName)
{
App::bind(PaymentInterface::class, 'App\Services\Payment\\' . $paymentName);
$this->payment = App::make(PaymentInterface::class);
}
將傳進的$paymentName字串,直接做App::bind()。
使用App::make()將剛剛bind的PaymentInterface建立成物件。
22行1
2
3
4
5
6
7
8
9/**
* 付款
*
* @param int $amount
*/
public function checkout(int $amount)
{
$this->payment->checkout($amount);
}
由於都實現PaymentInterface,所以只要使用統一個checkout()即可,不用擔心是什麼SDK,就算將來有新的第三方支付SDK,在PaymentService也不用修改,達到開放封閉原則的要求。
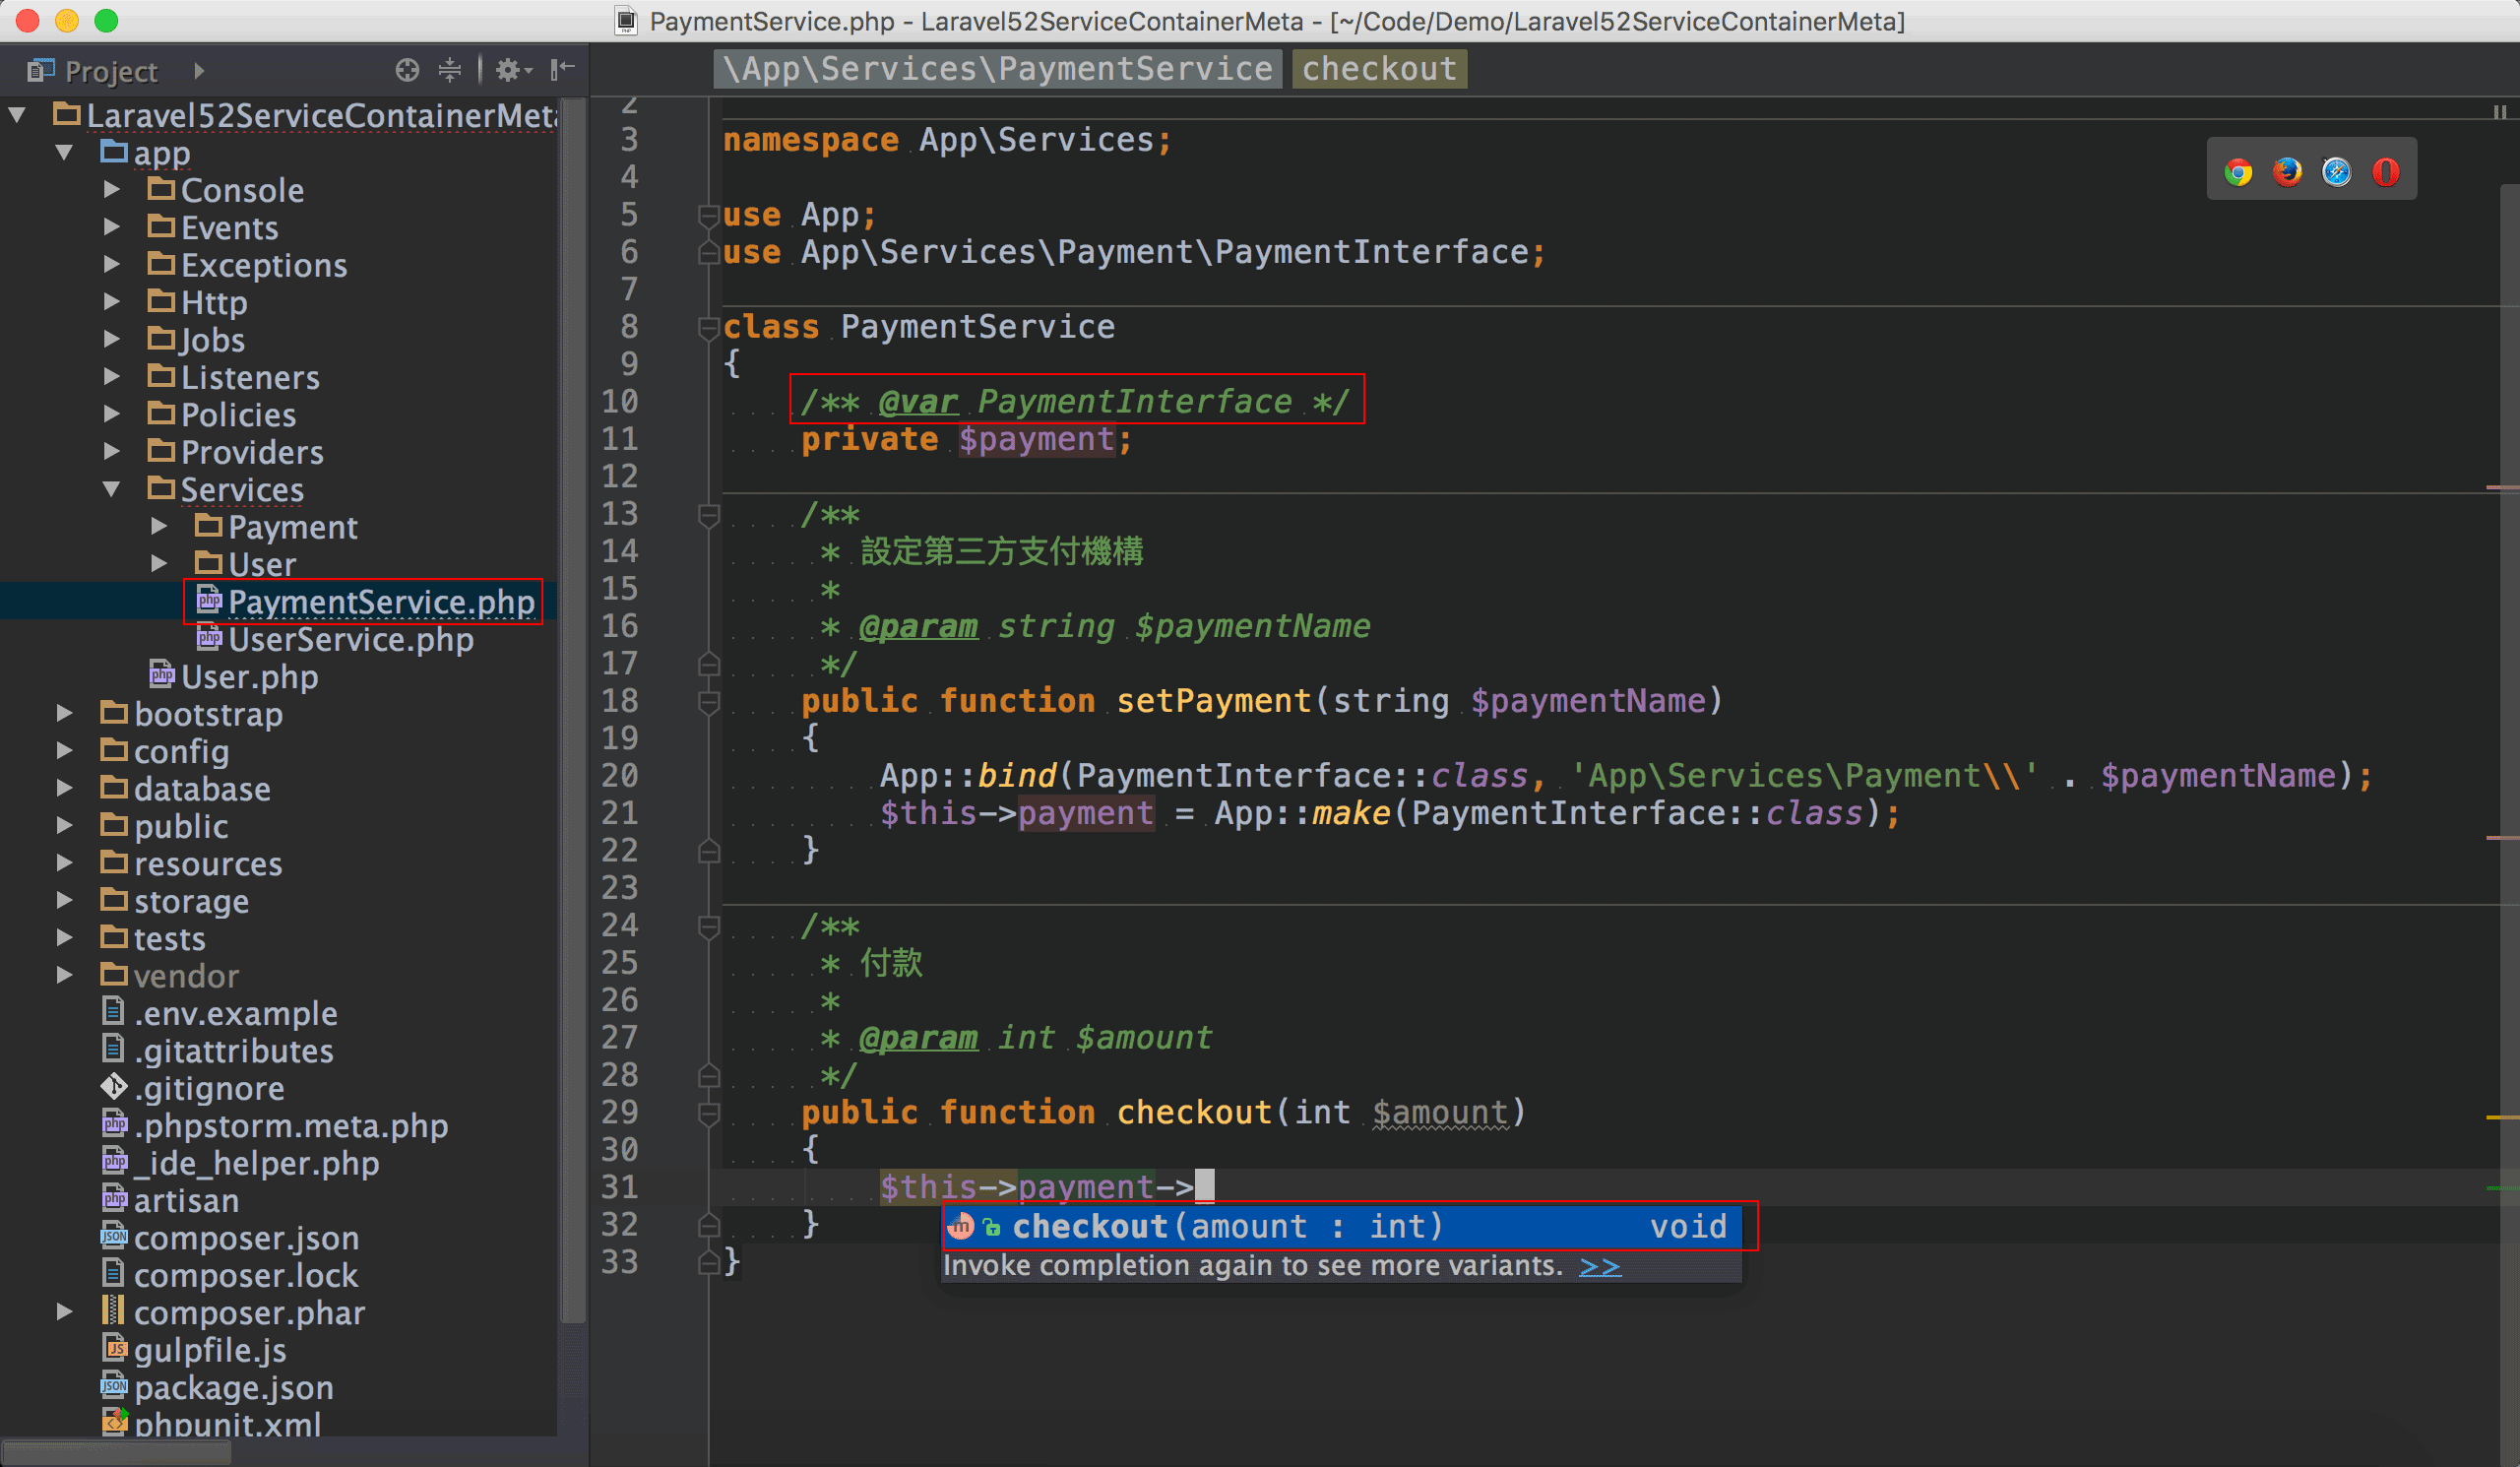
回到本文PHPDoc的重點,$this->payment因為有出現checkout()的語法提示,是因為第10行替private $payment加了@var註解,描述了$payment的型別為PaymentInterface,引此才能出現checkout()的語法提示。
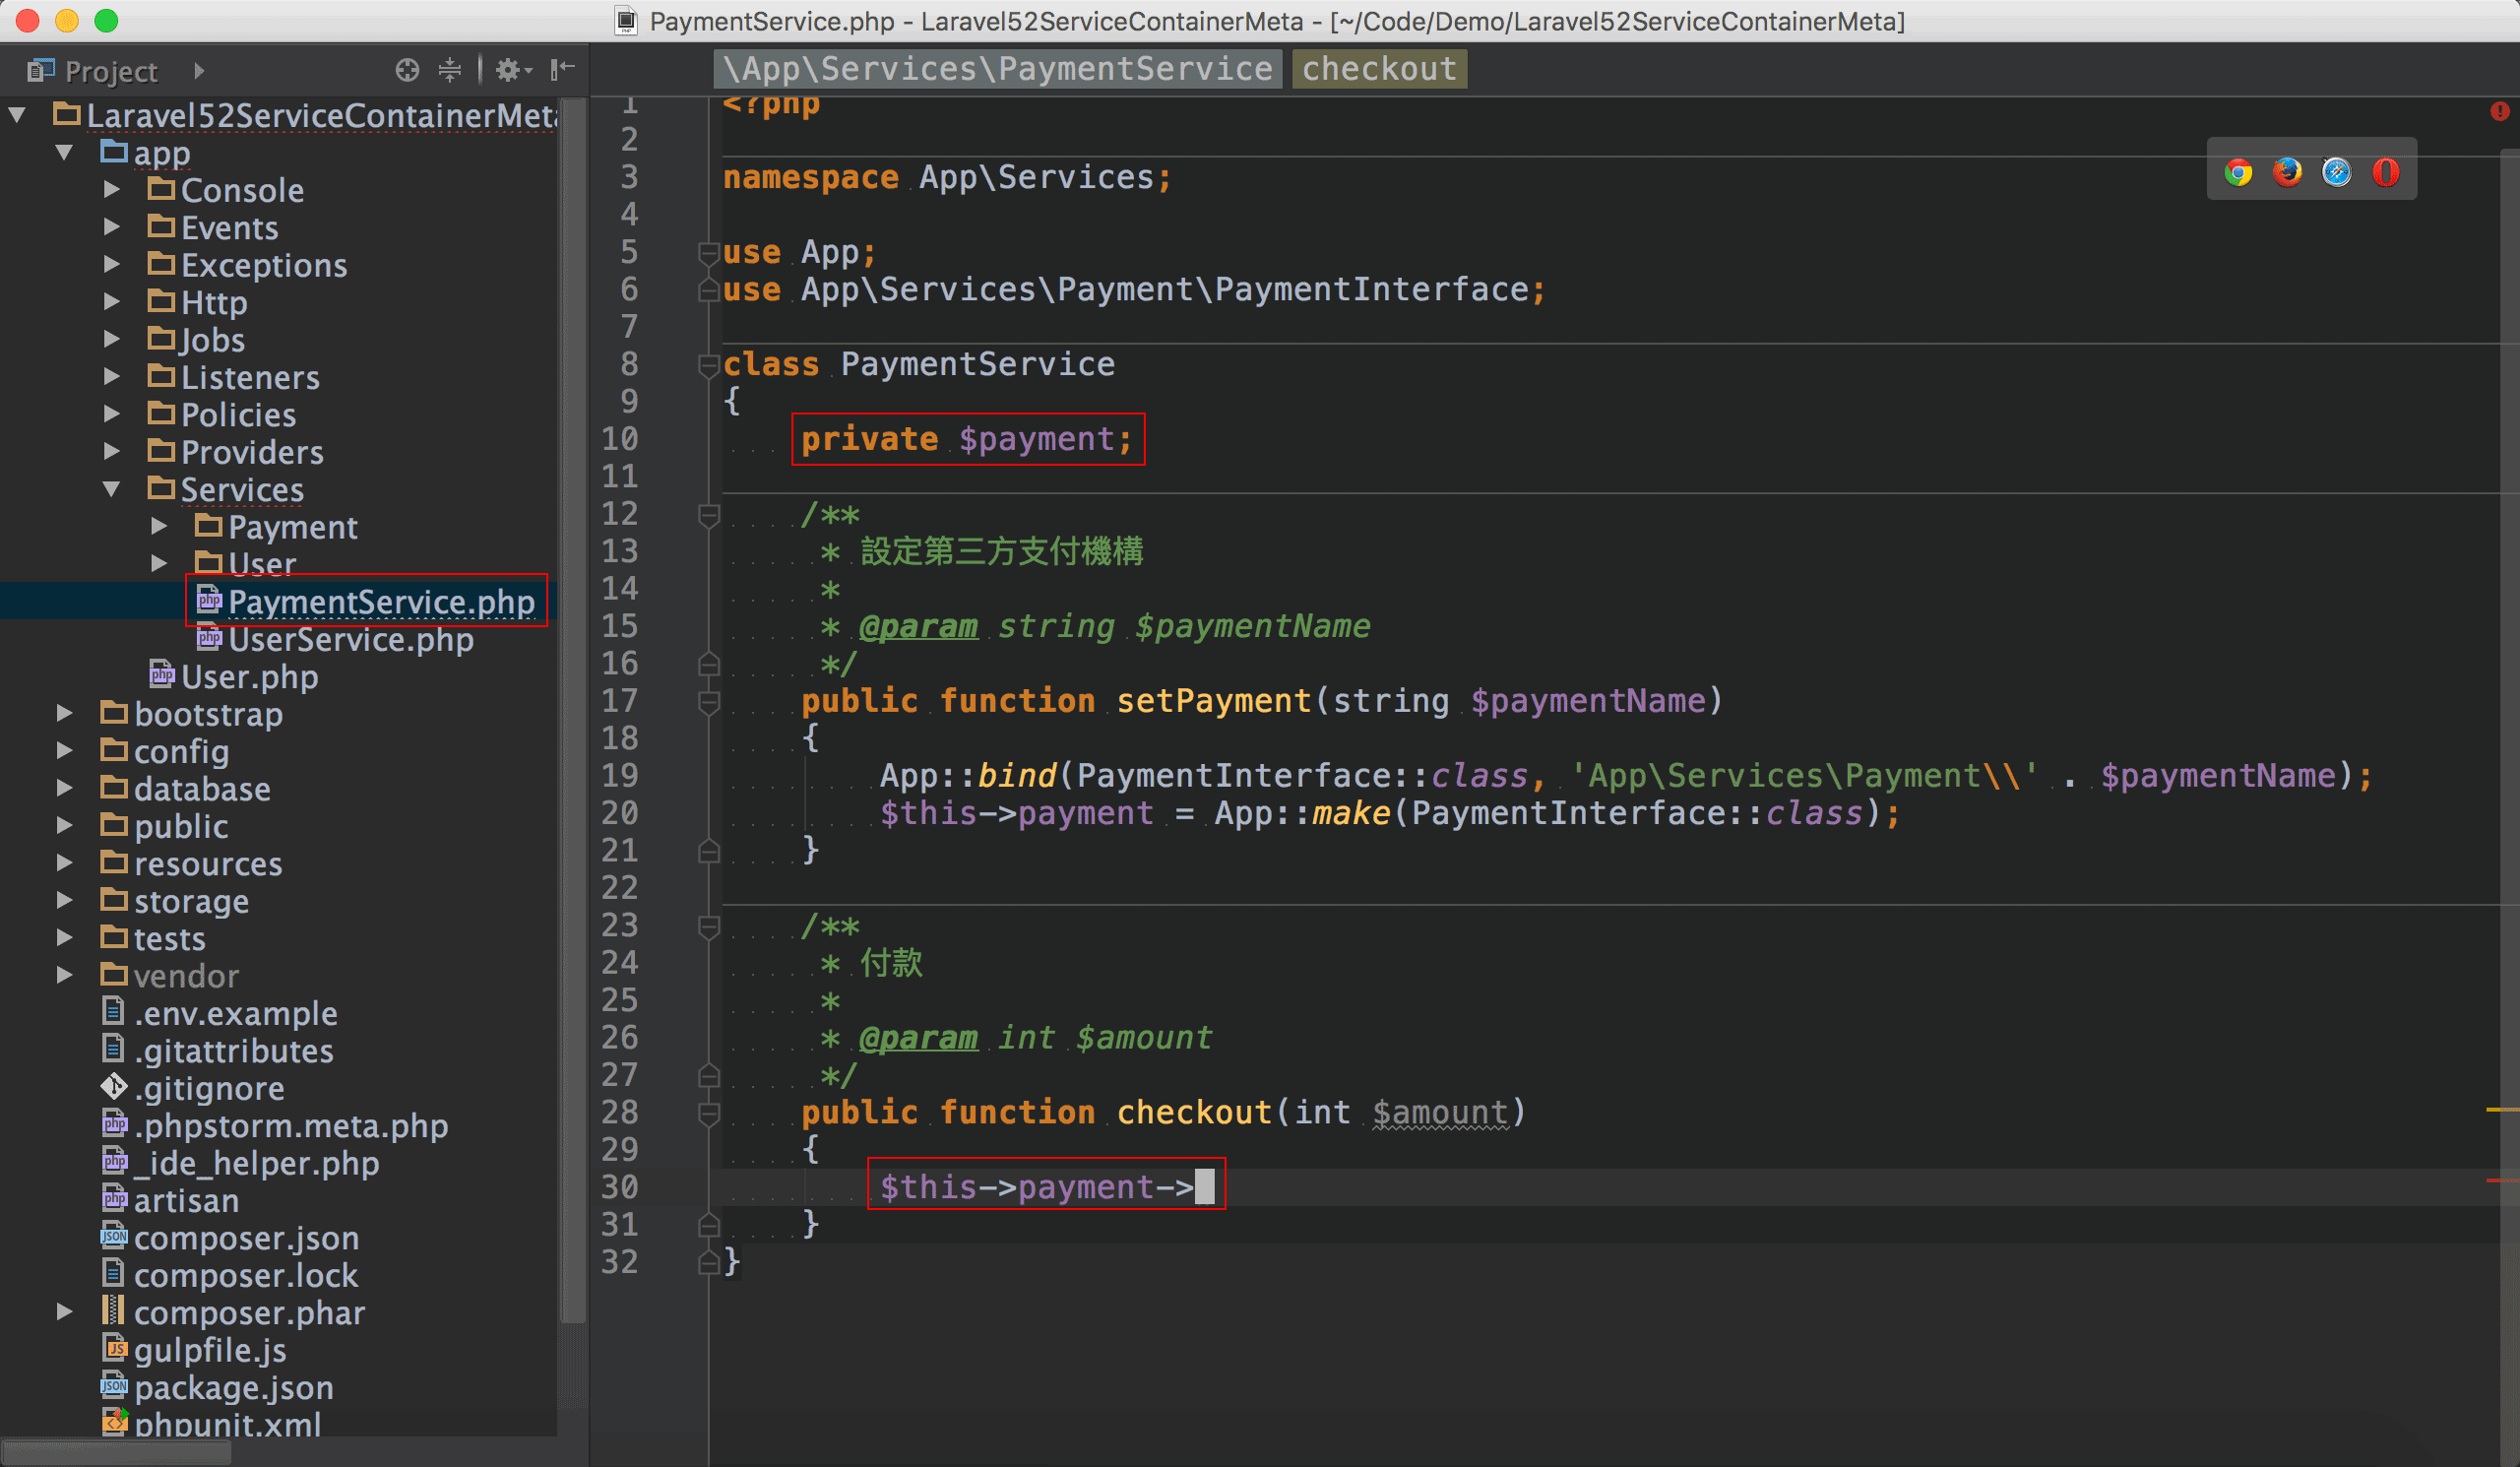
若將private $payment的PHPDoc拿掉,我們發現PhpStorm將不再出現checkout()語法提示,因為PhpStorm不知道$payment的型別,因此無從顯示語法提示。
Method
語法1
2
3
4
5/**
* @param 型別 變數名稱 [註解]
* @return 型別 [註解]
* @throws 型別 [註解]
*/
@param為傳入參數,@return為回傳值,@throws為exception。- 型別可以是PHP原生型別,class,interface或trait。
@param一定要加上變數名稱。- 可選擇性加上註解。
- 若不傳回值,為
@return void
自動建立PHPDoc
實務上建立method會有3種方式 :
- 自行由
pubf建立method。 - 由熱鍵⌃ + I去實踐
abstract class或interface的method。 - 由
extend abstract class或implements interface建立method。
自行由pubf建立method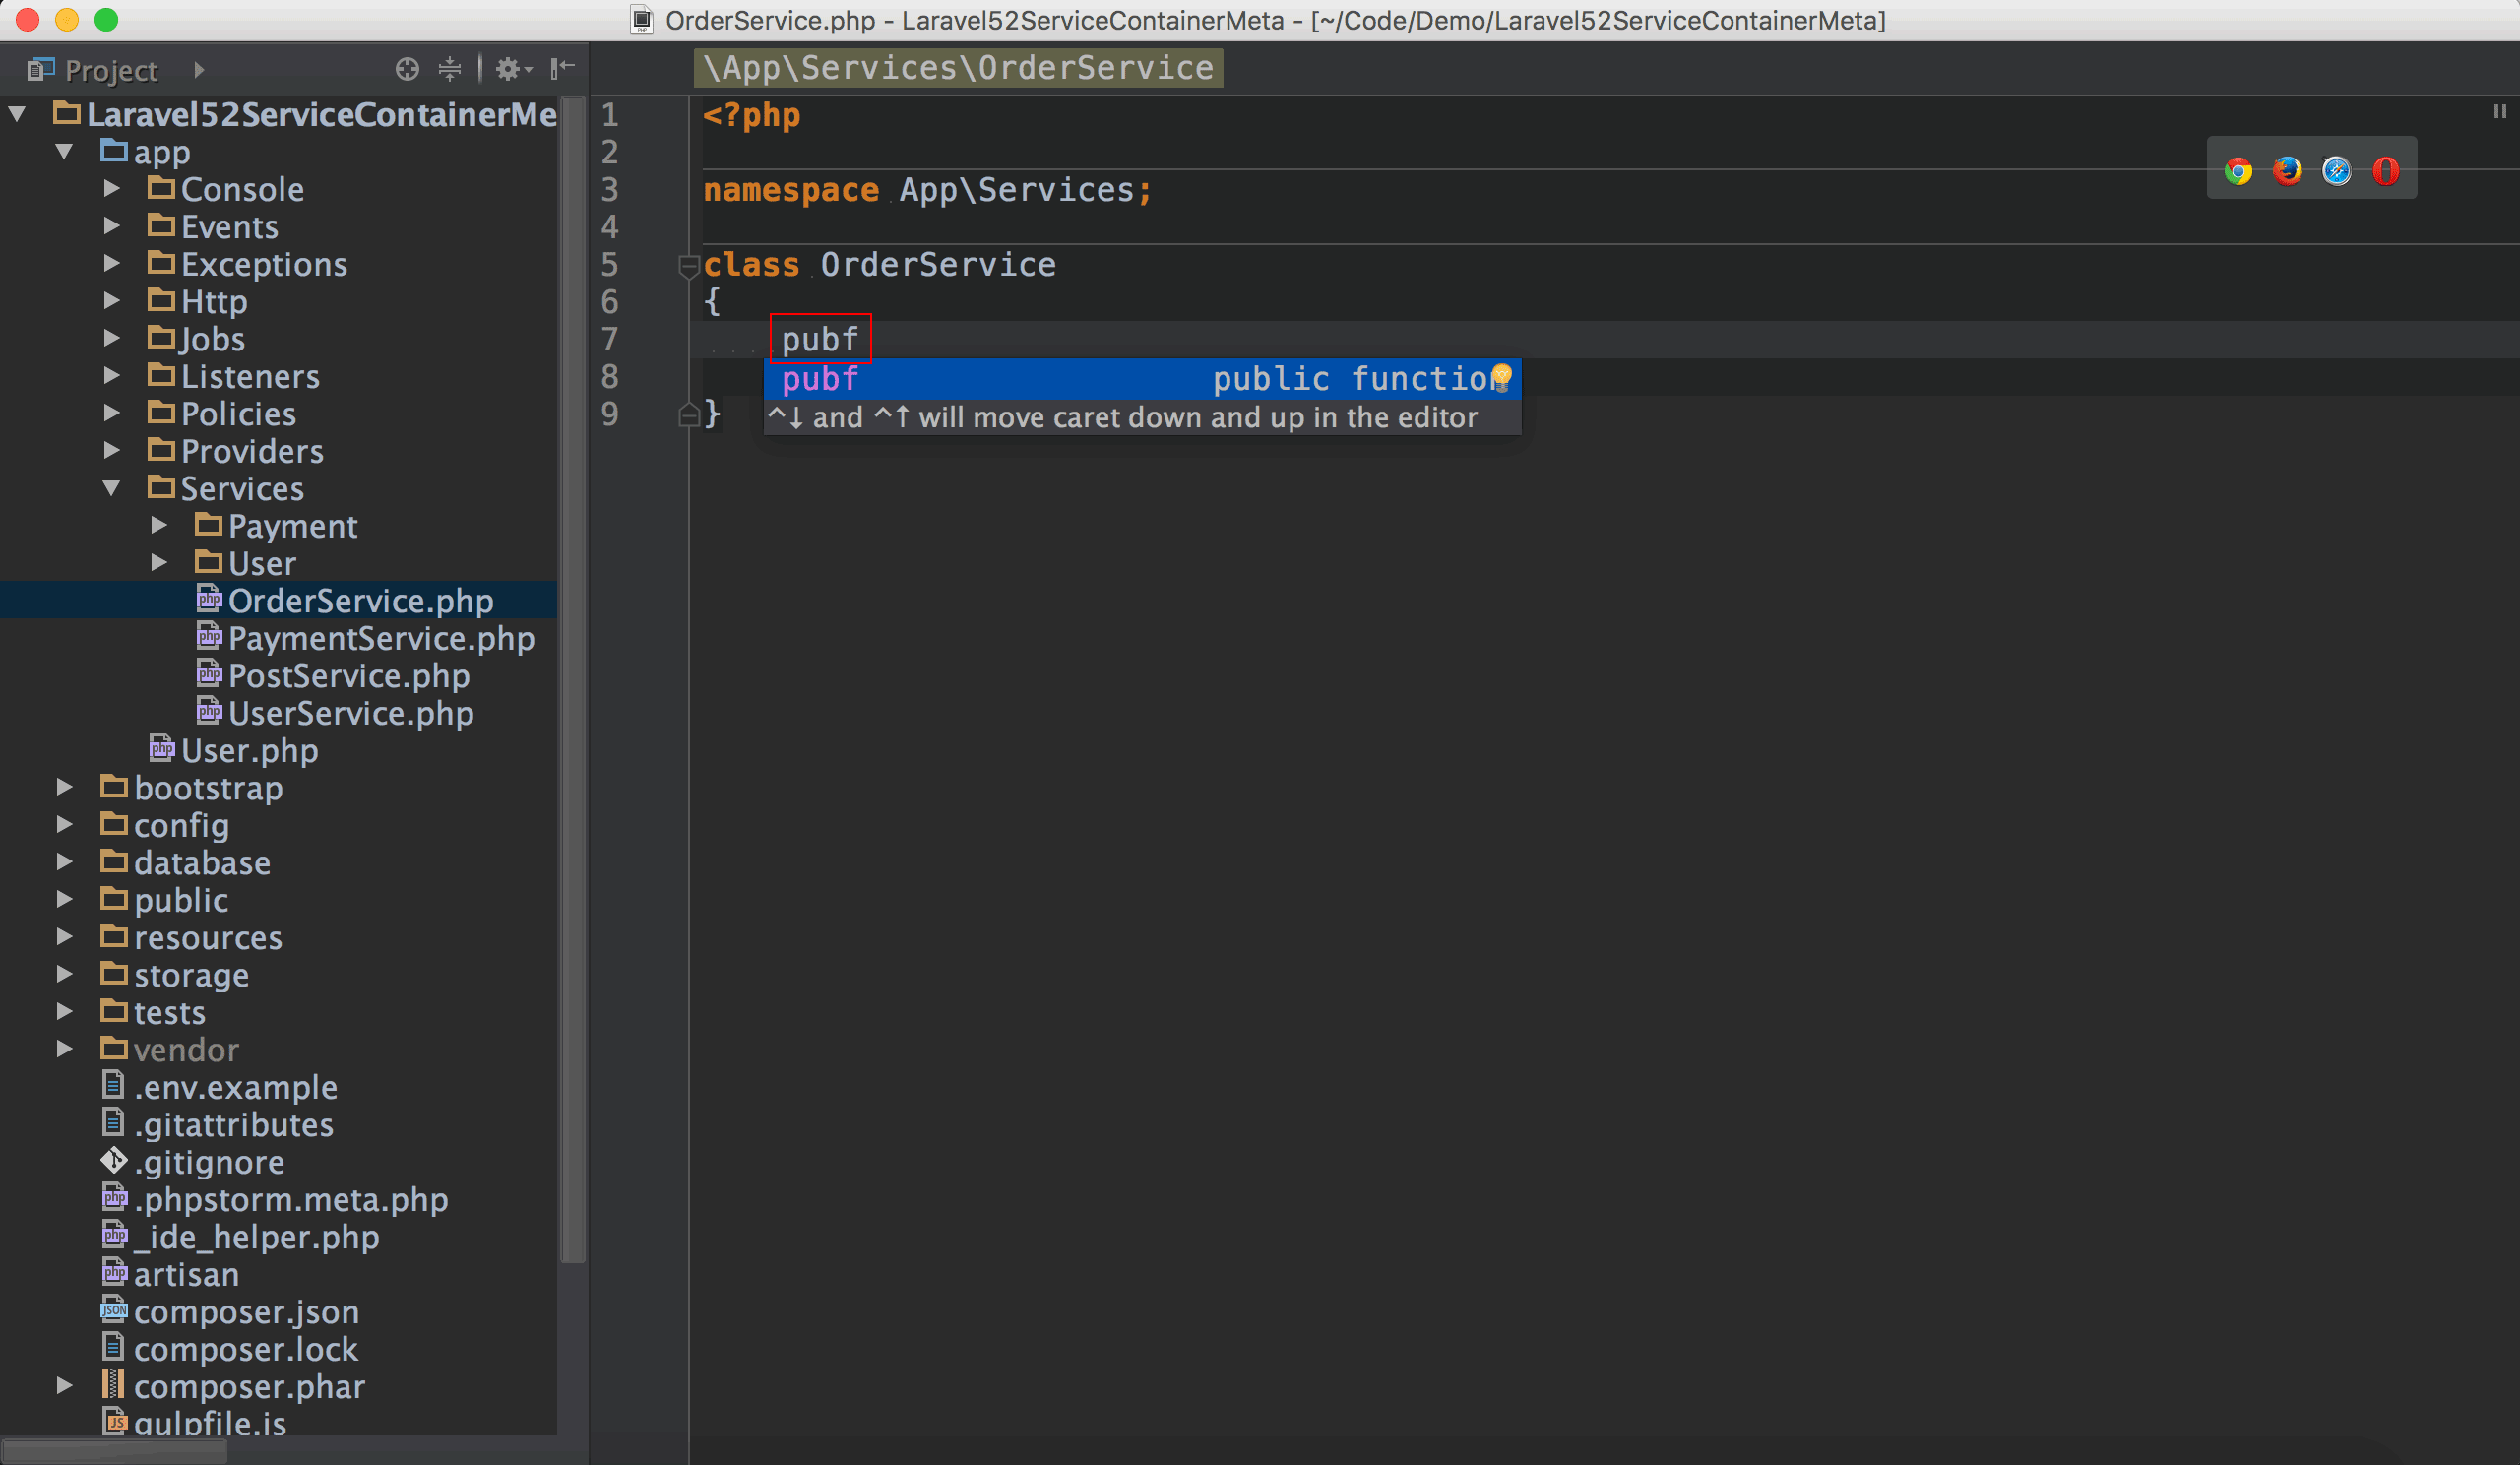
輸入pubf,按⇥。
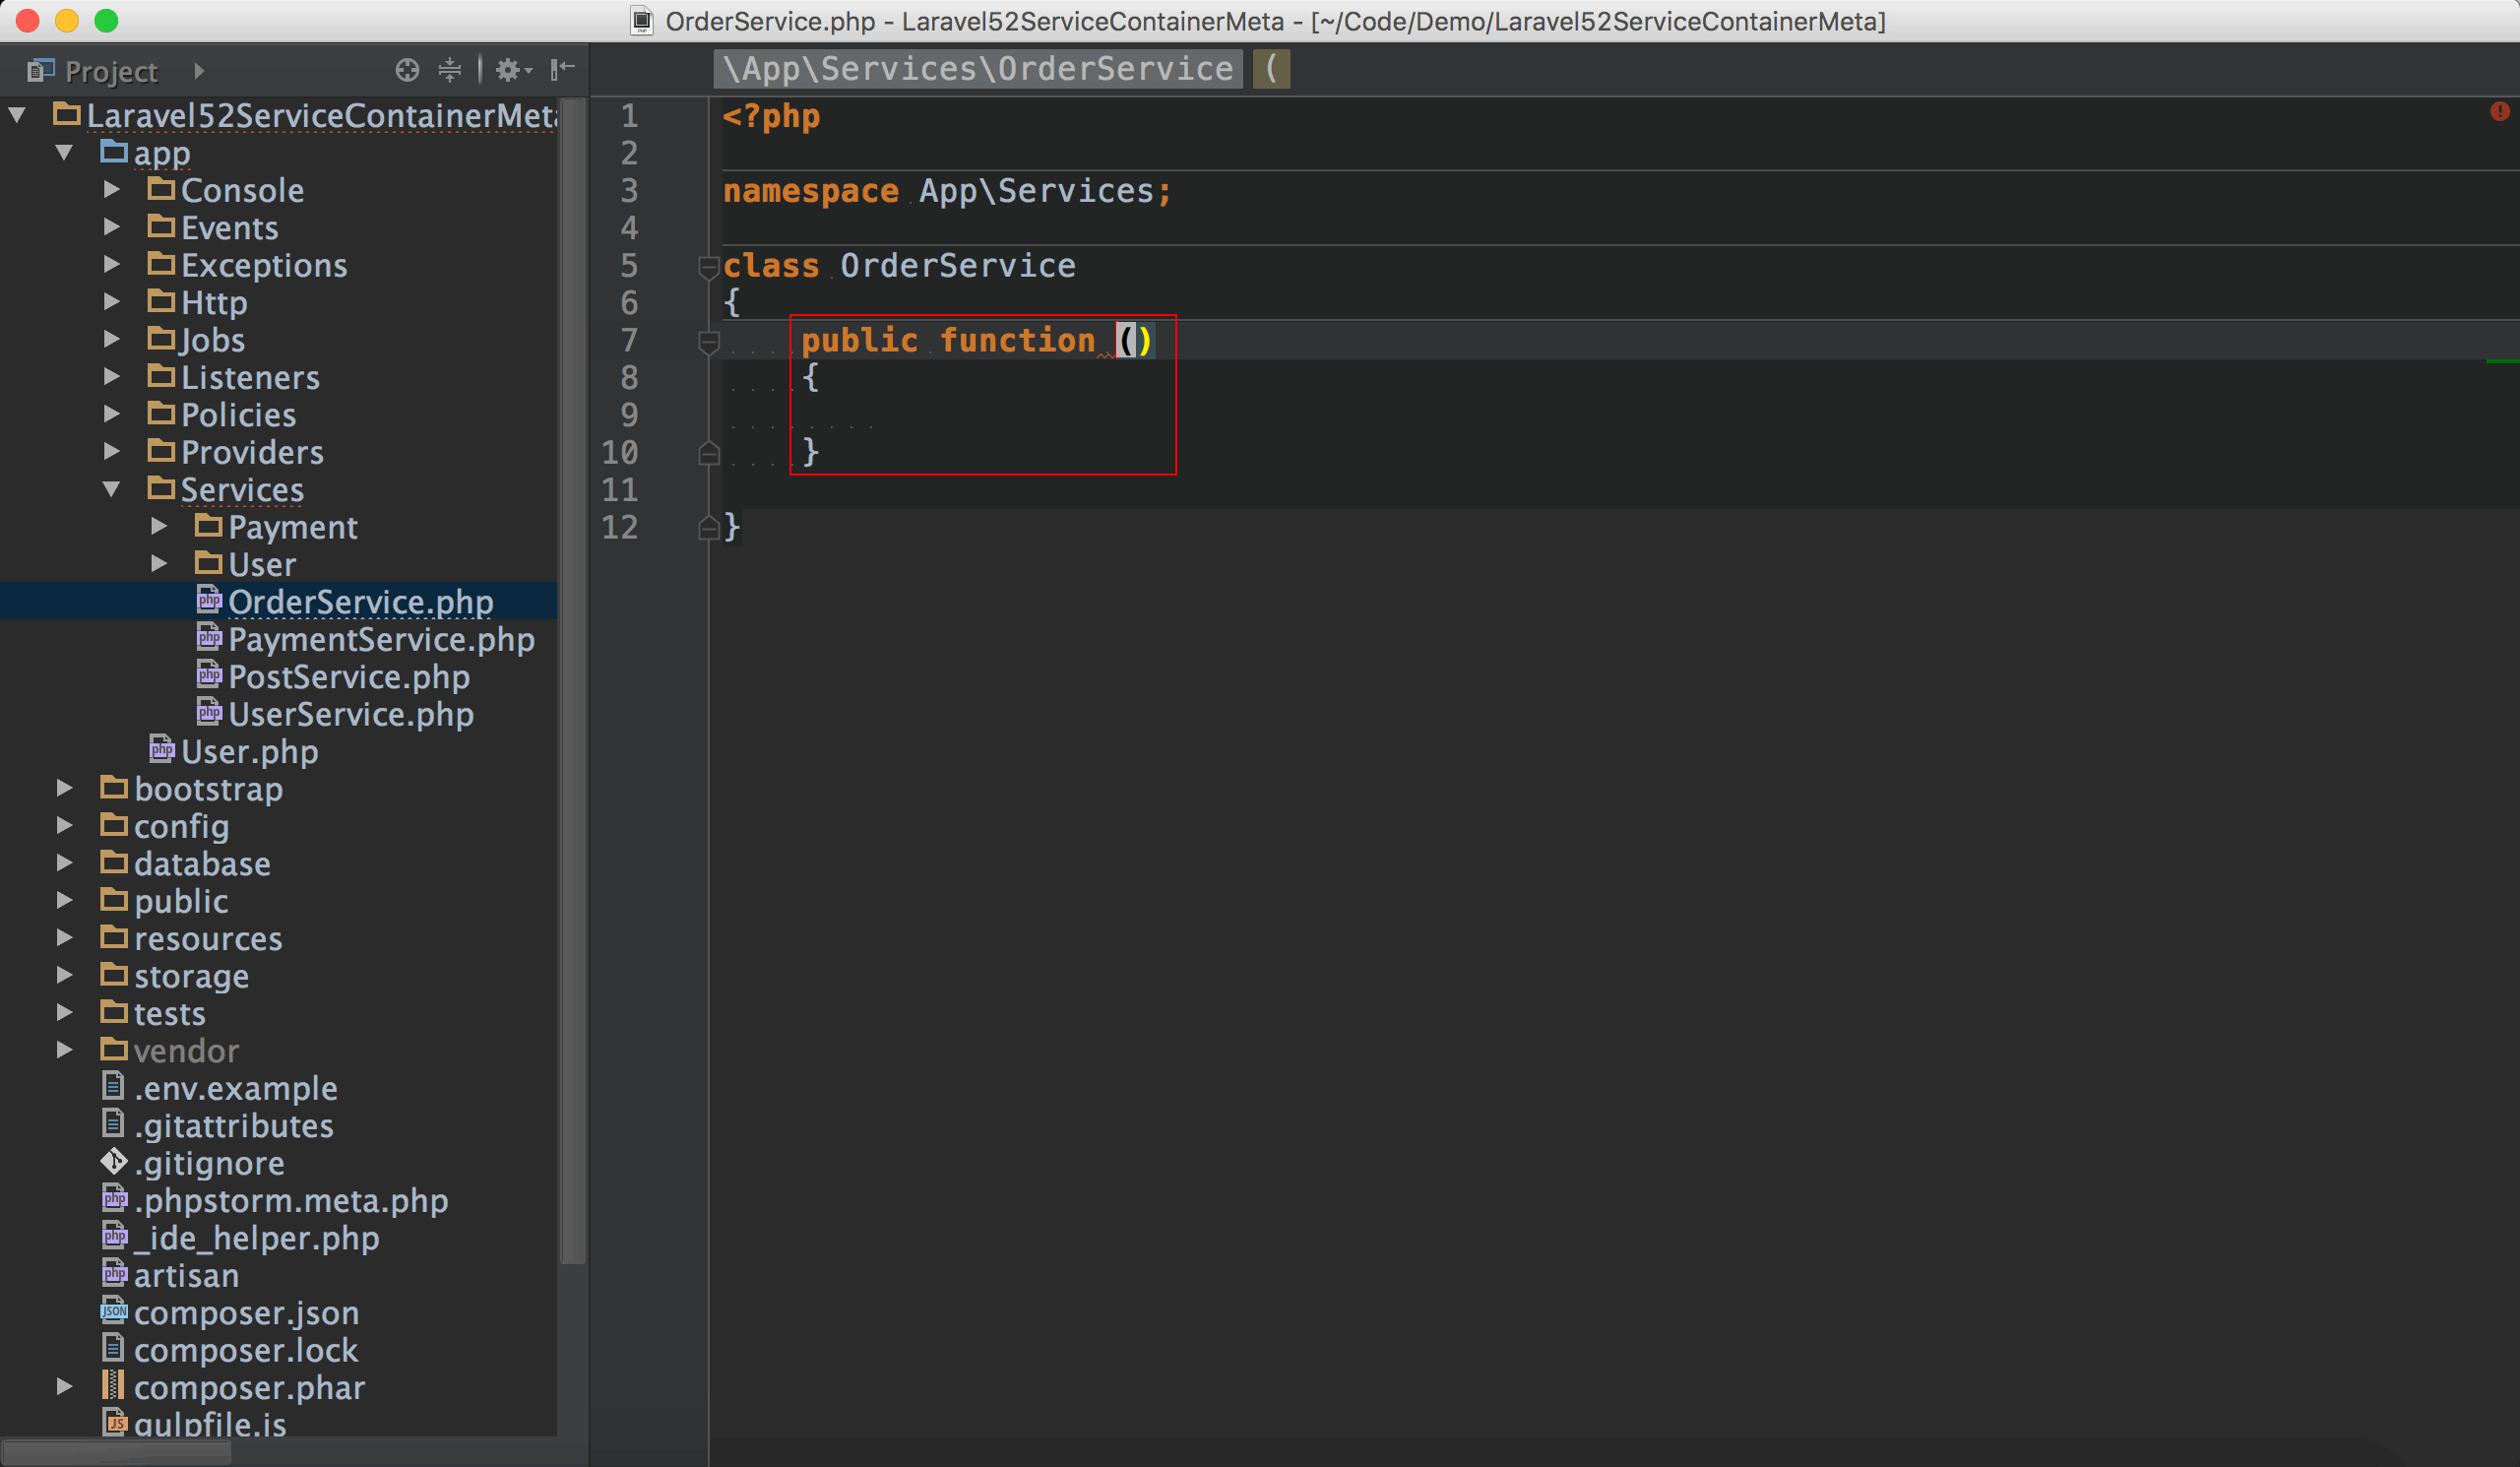
產生public function框架。

自行輸入method名稱,輸入參數型別與名稱,與回傳型別,最後按熱鍵⌥ + ↩,顯示Generate PHPDoc for function,按↩繼續。
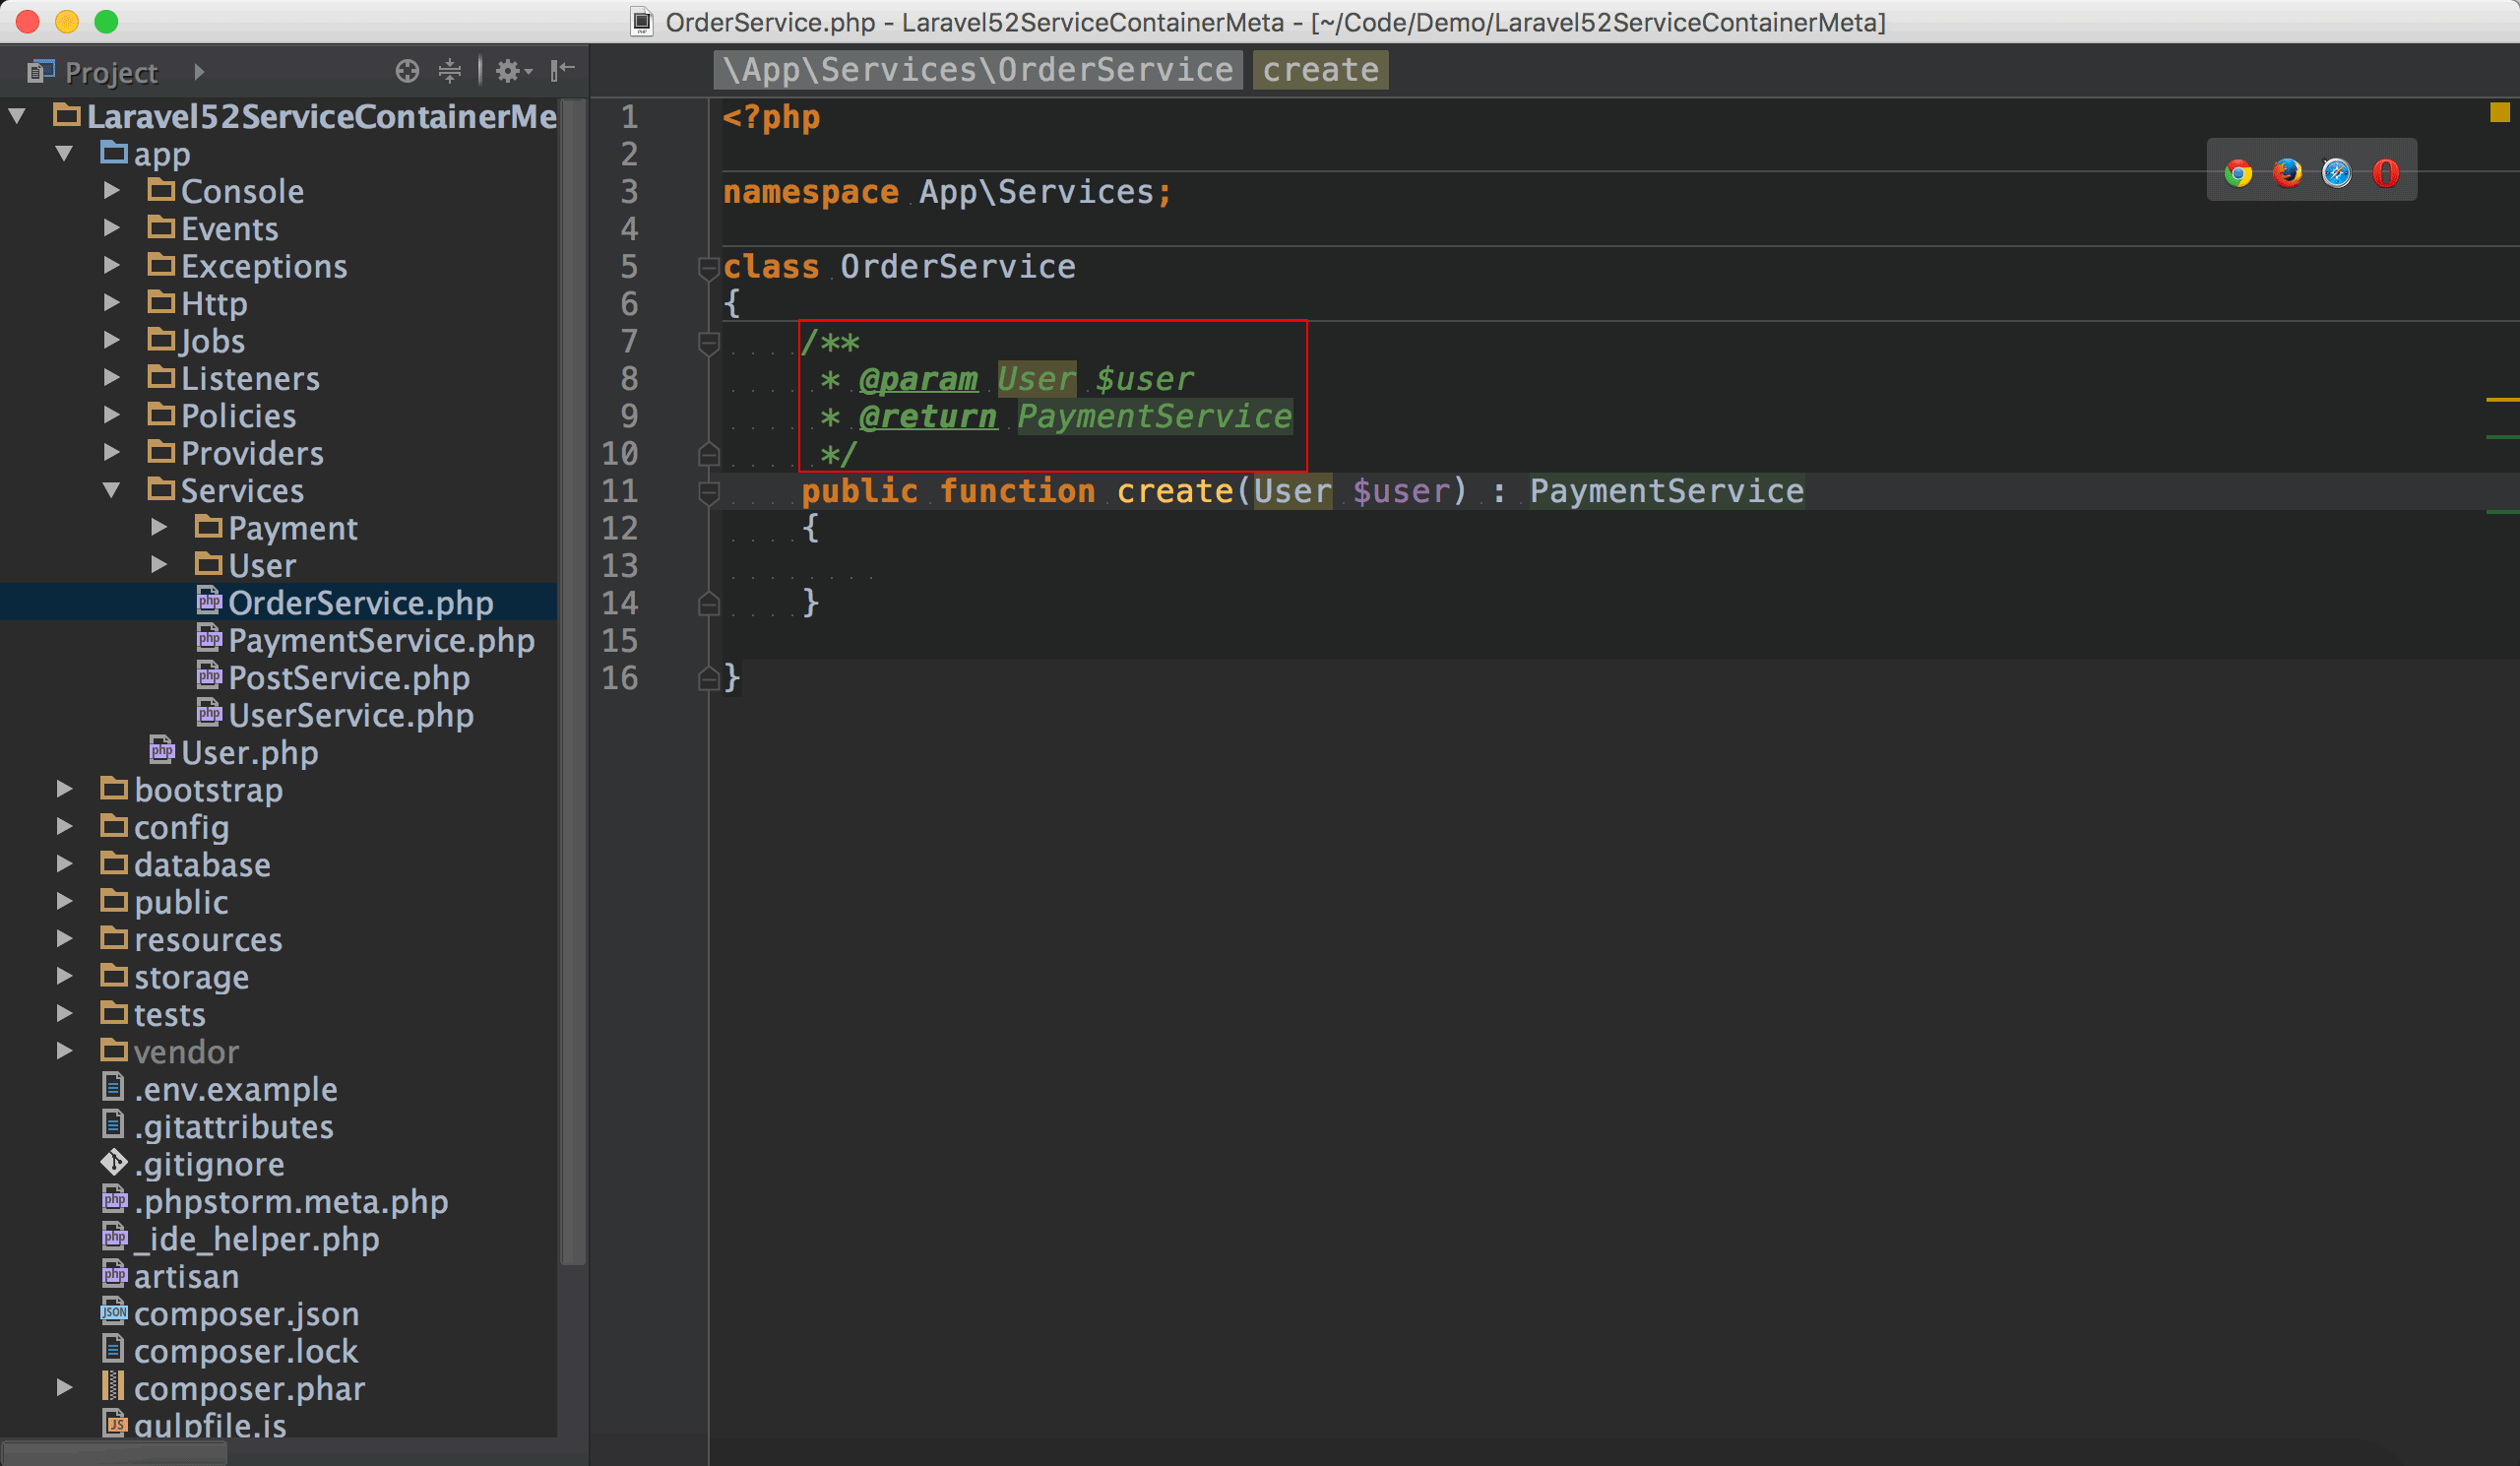
PhpStorm會自動幫你加上PHPDoc,包含@param與@return。
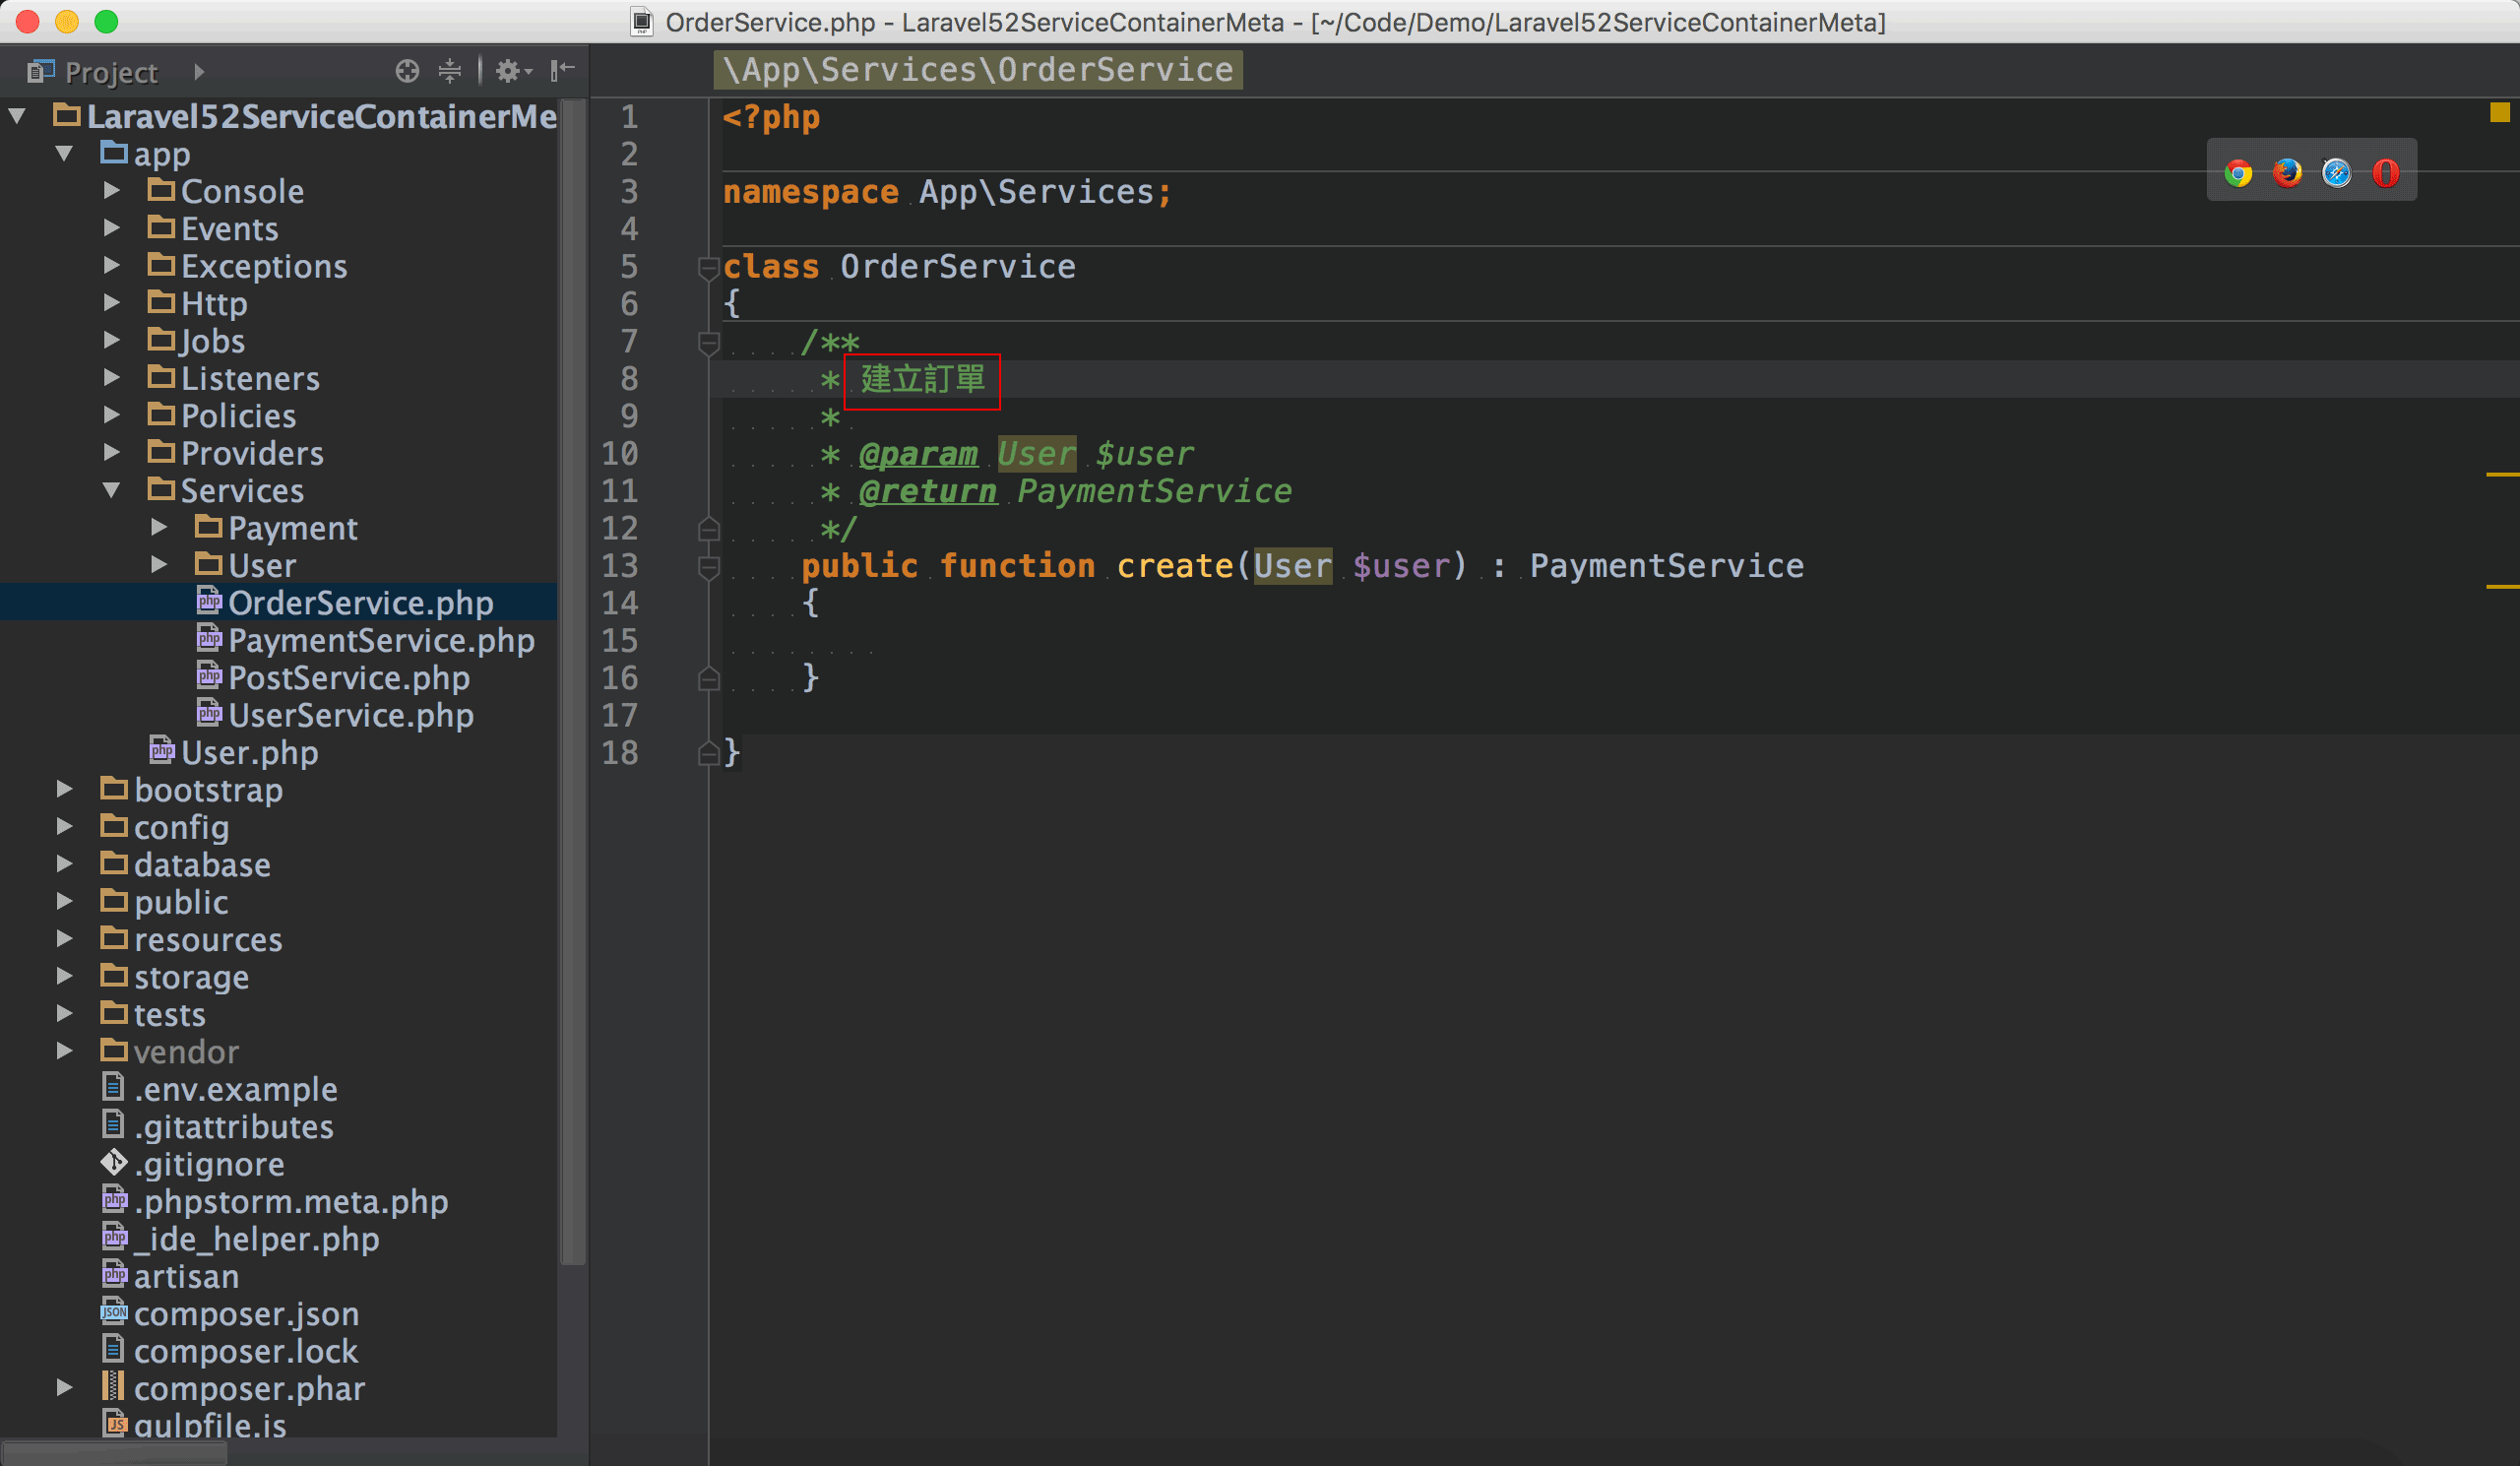
在PHPDoc第一行加上人看得懂的method註解,描述此method的主要功能,中英文皆可。
由熱鍵⌃ + I去實踐abstract class或interface的method
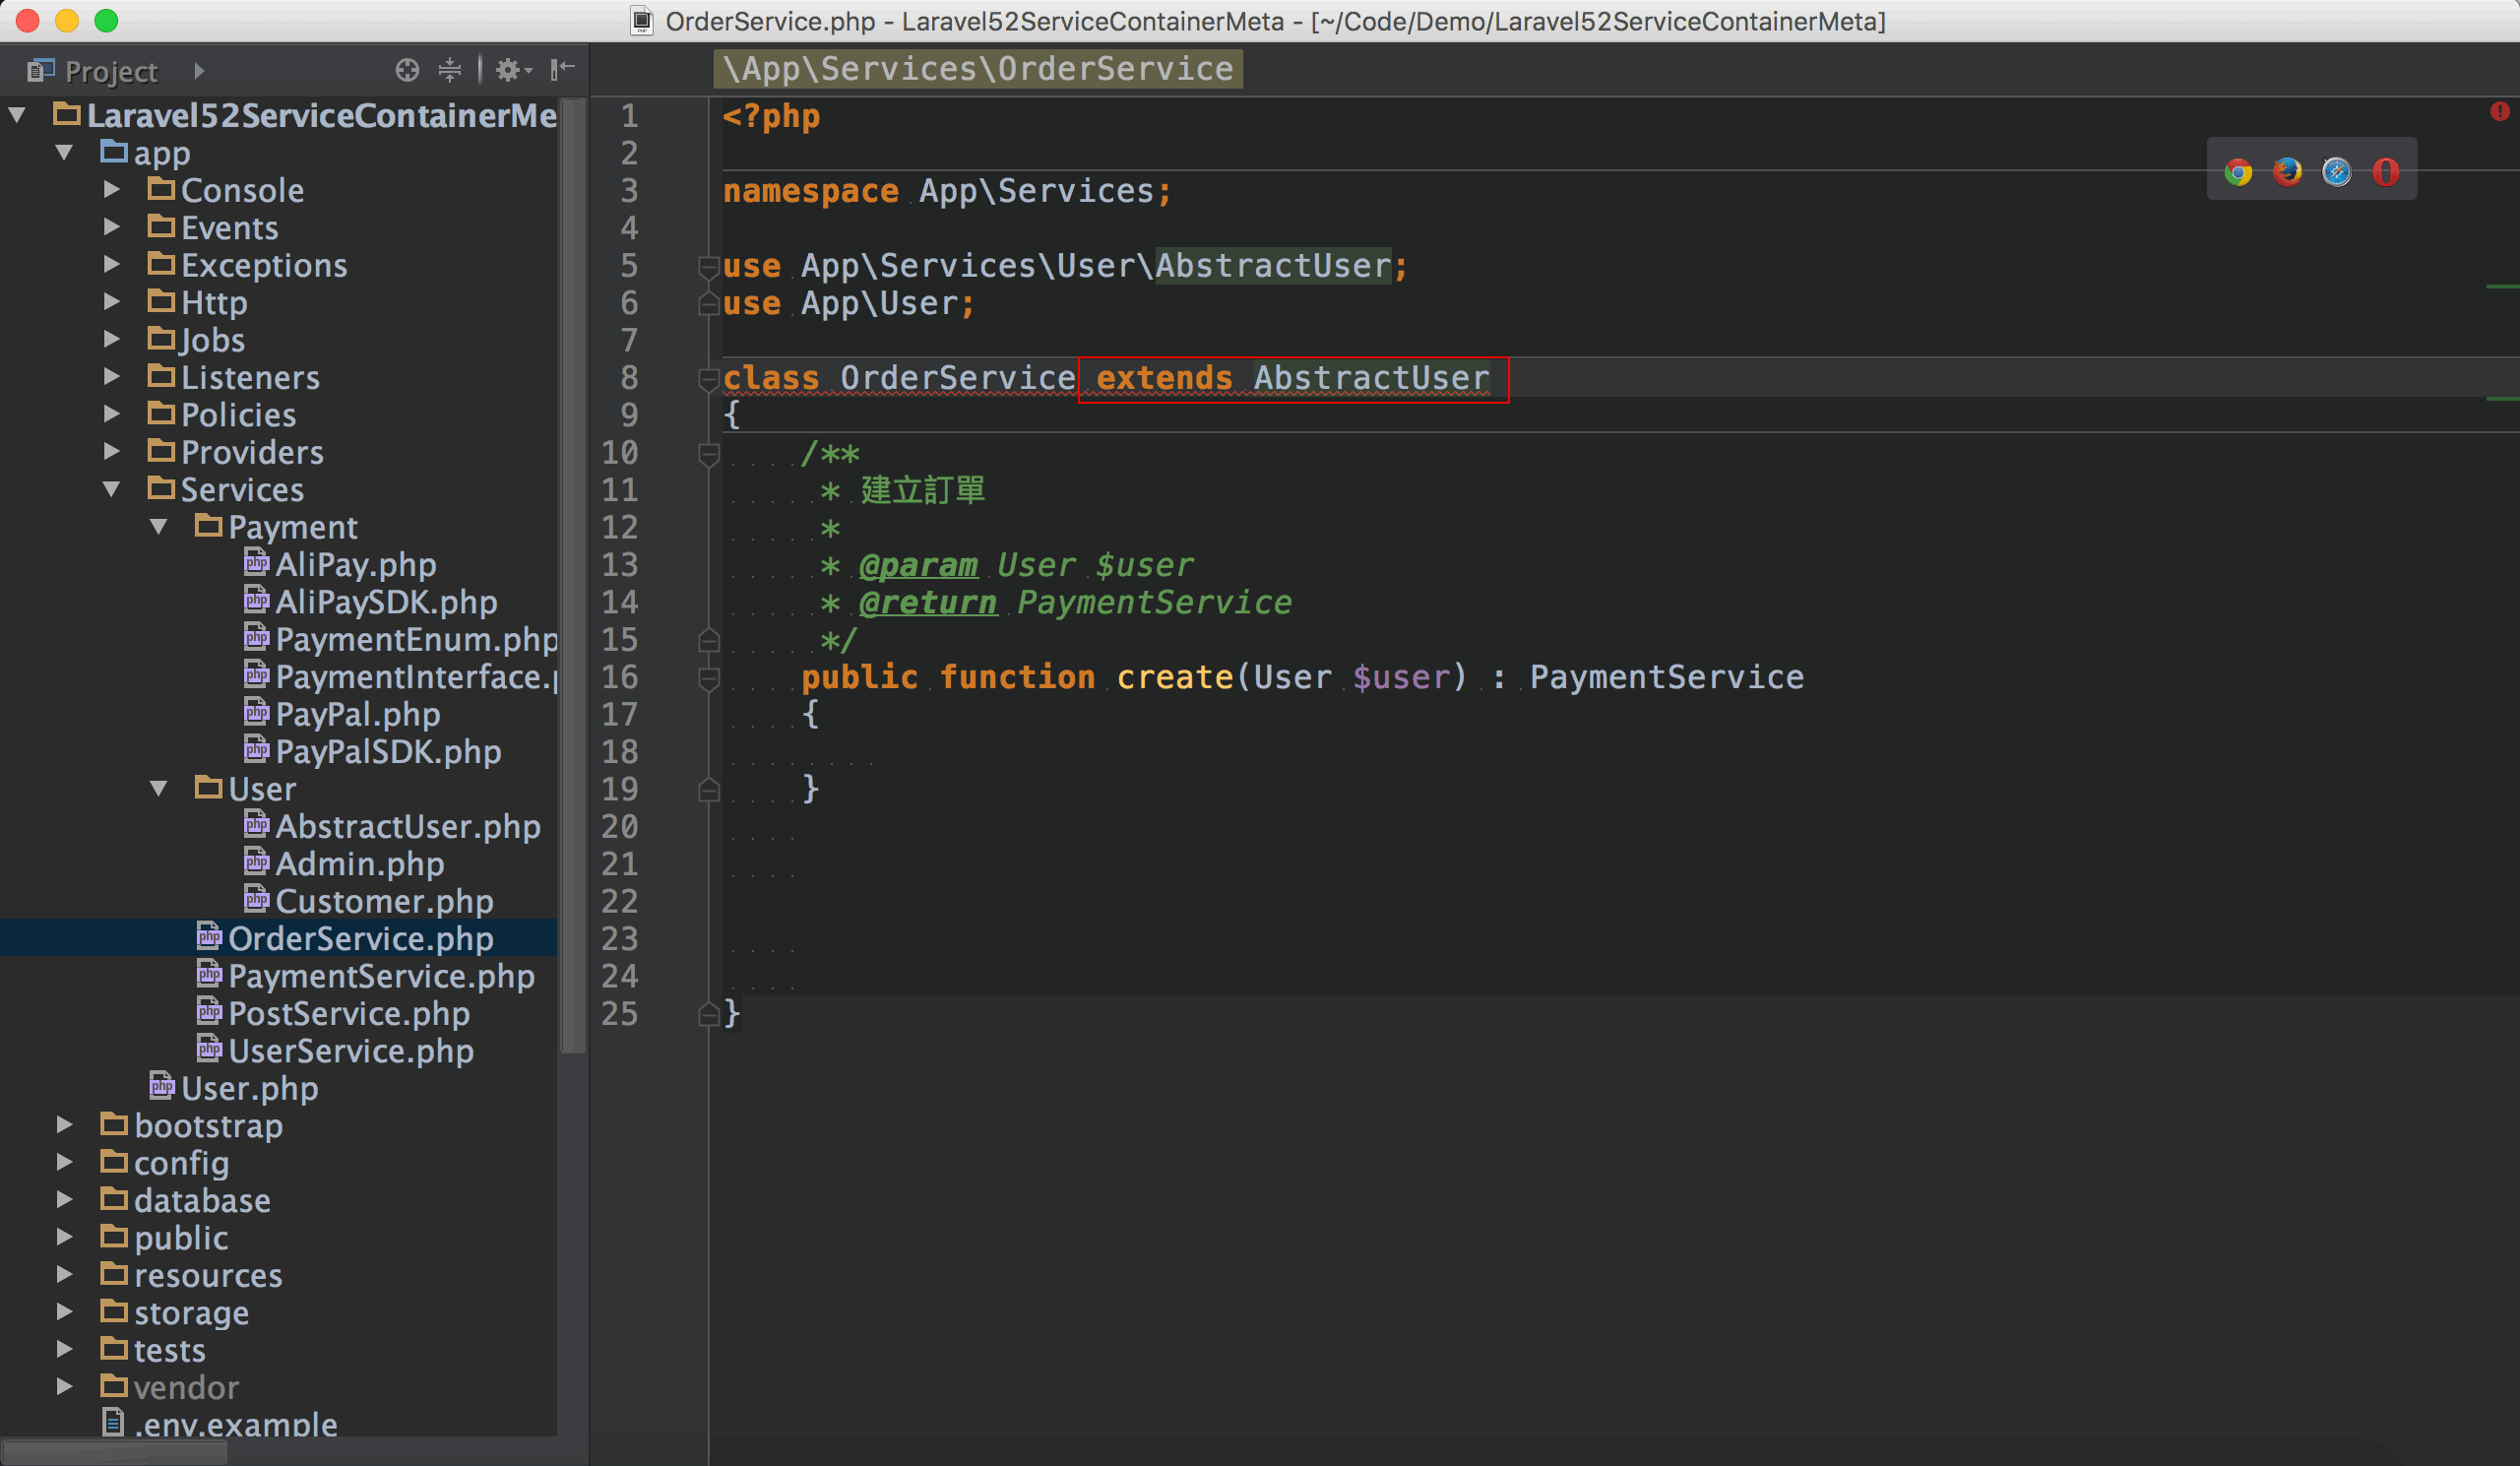
使用extends繼承abstract class。24 24這裡OrderService去繼承AbstractUser完全不合理,純粹是為了demo方便。
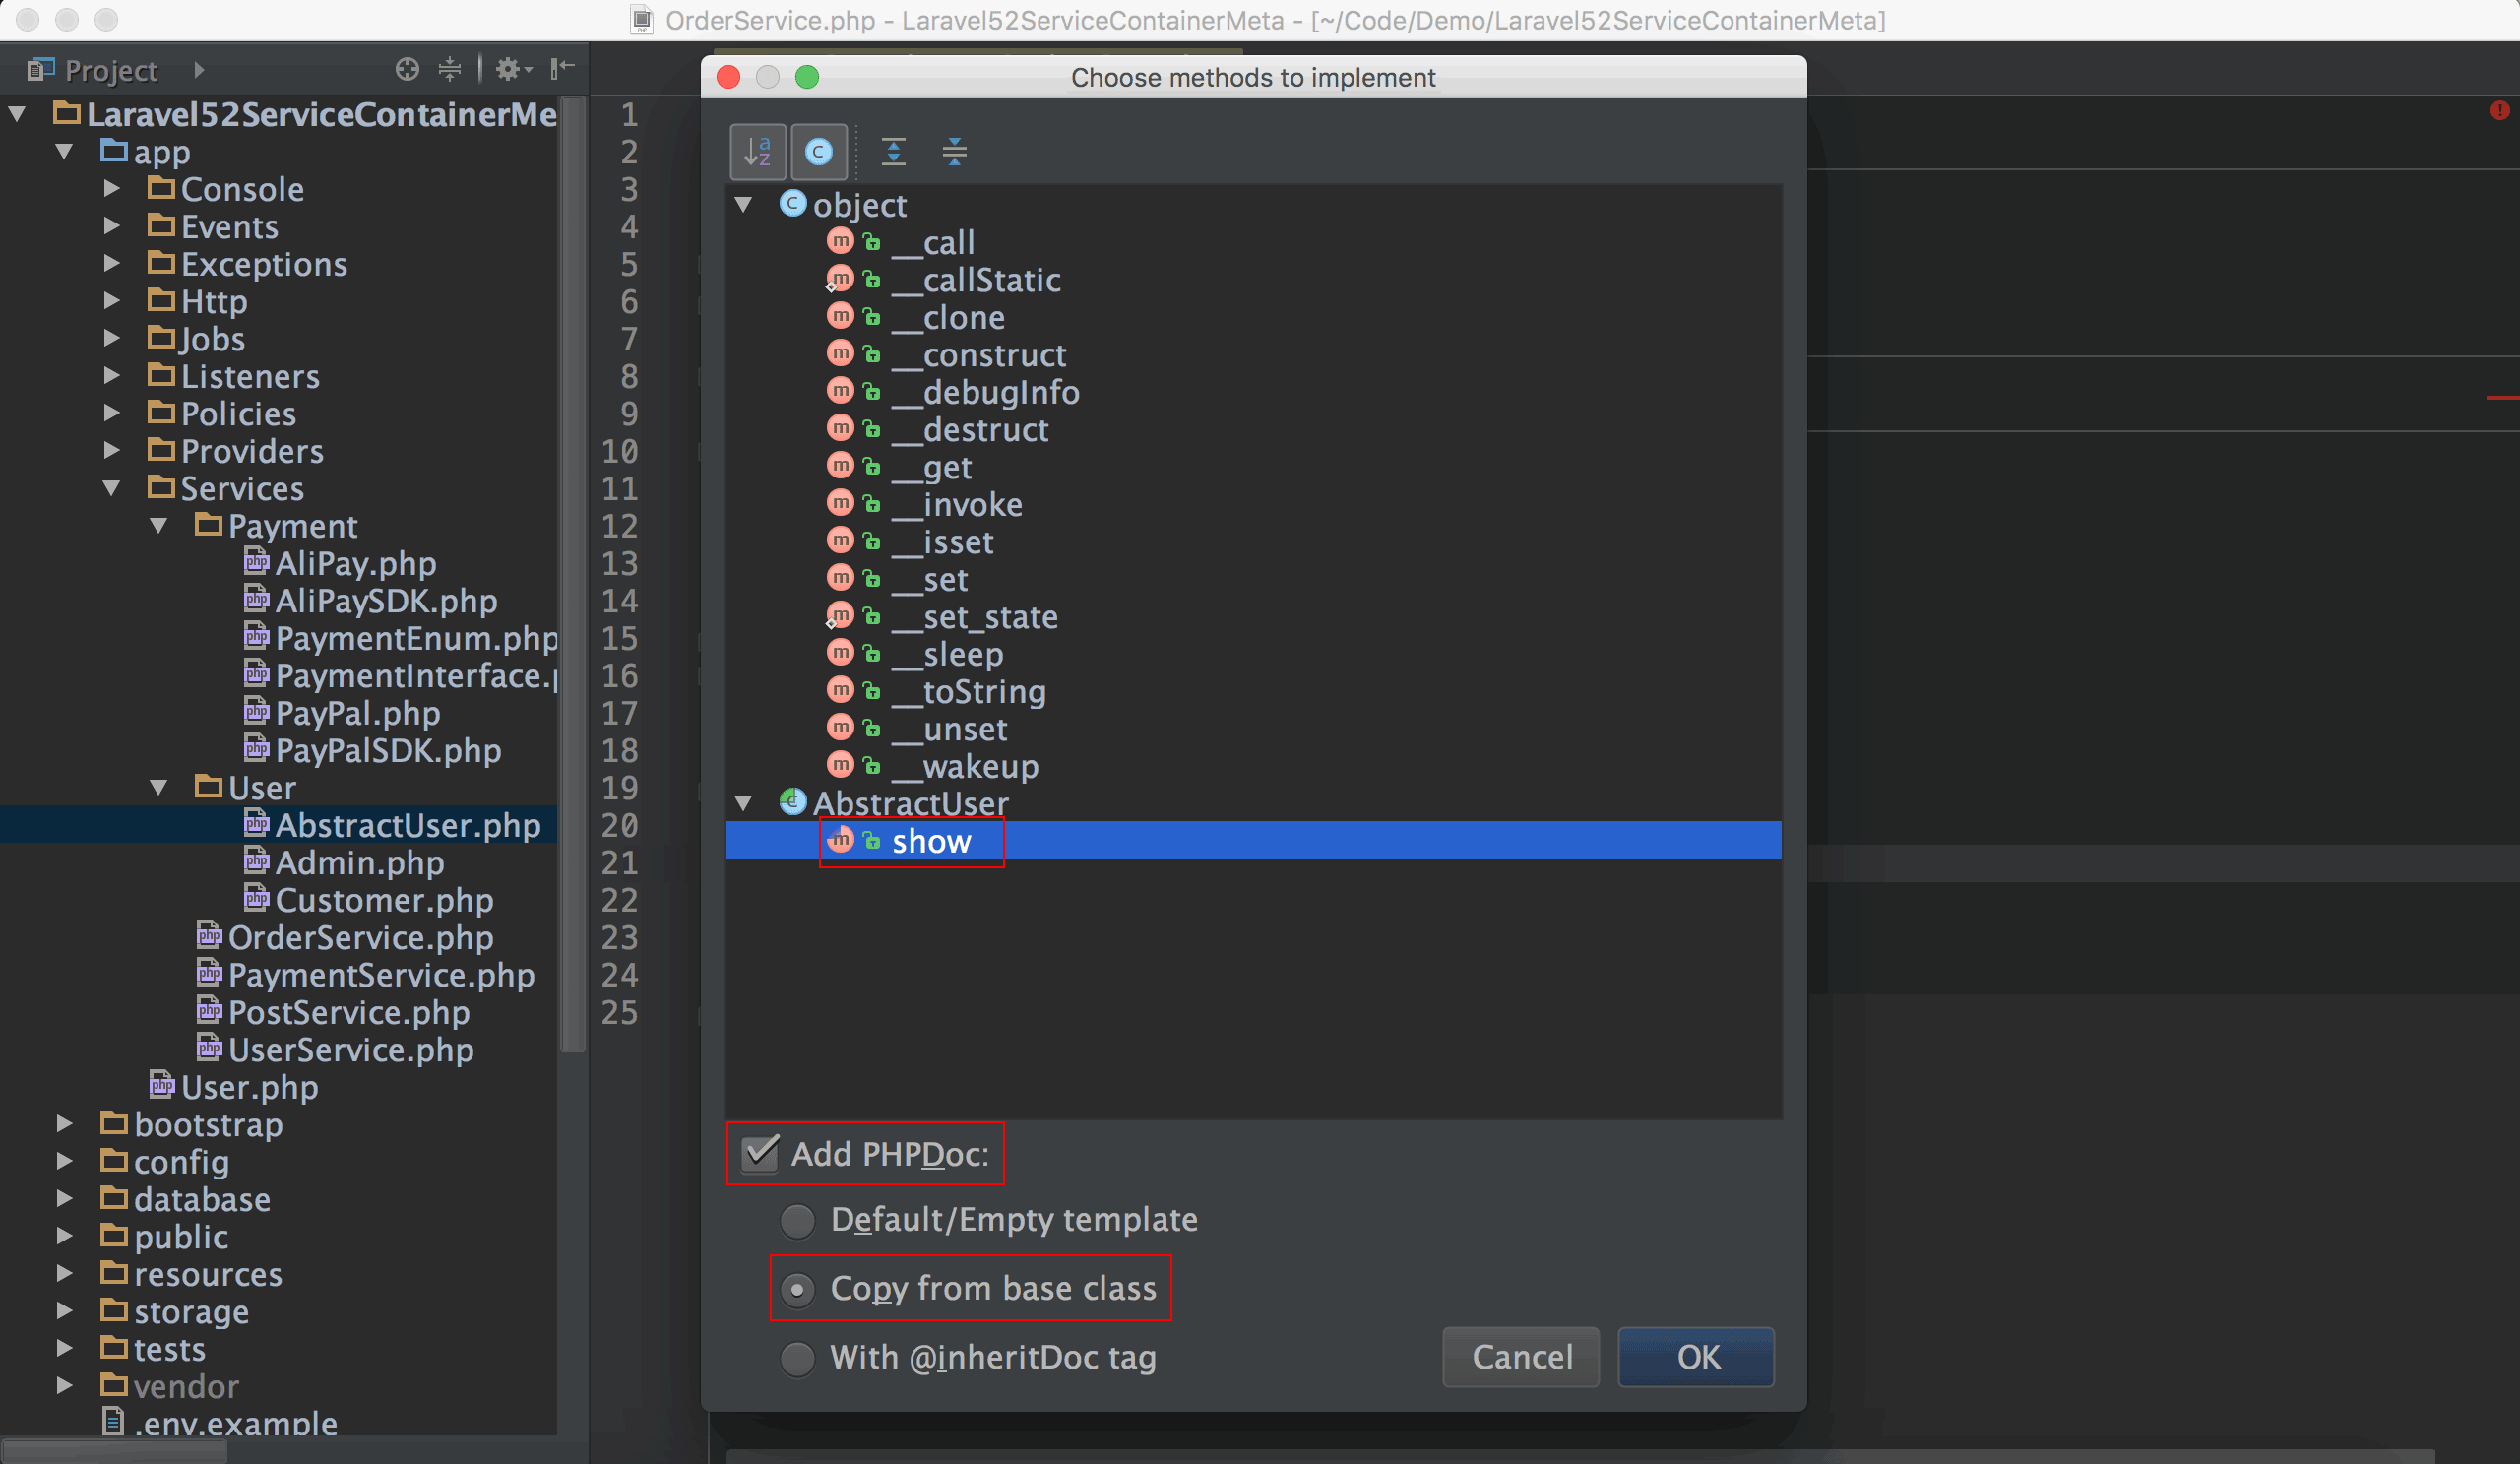
按熱鍵⌃ + I,選擇要實作的method。
要將Add PhHPDoc與Copy from base class打勾。
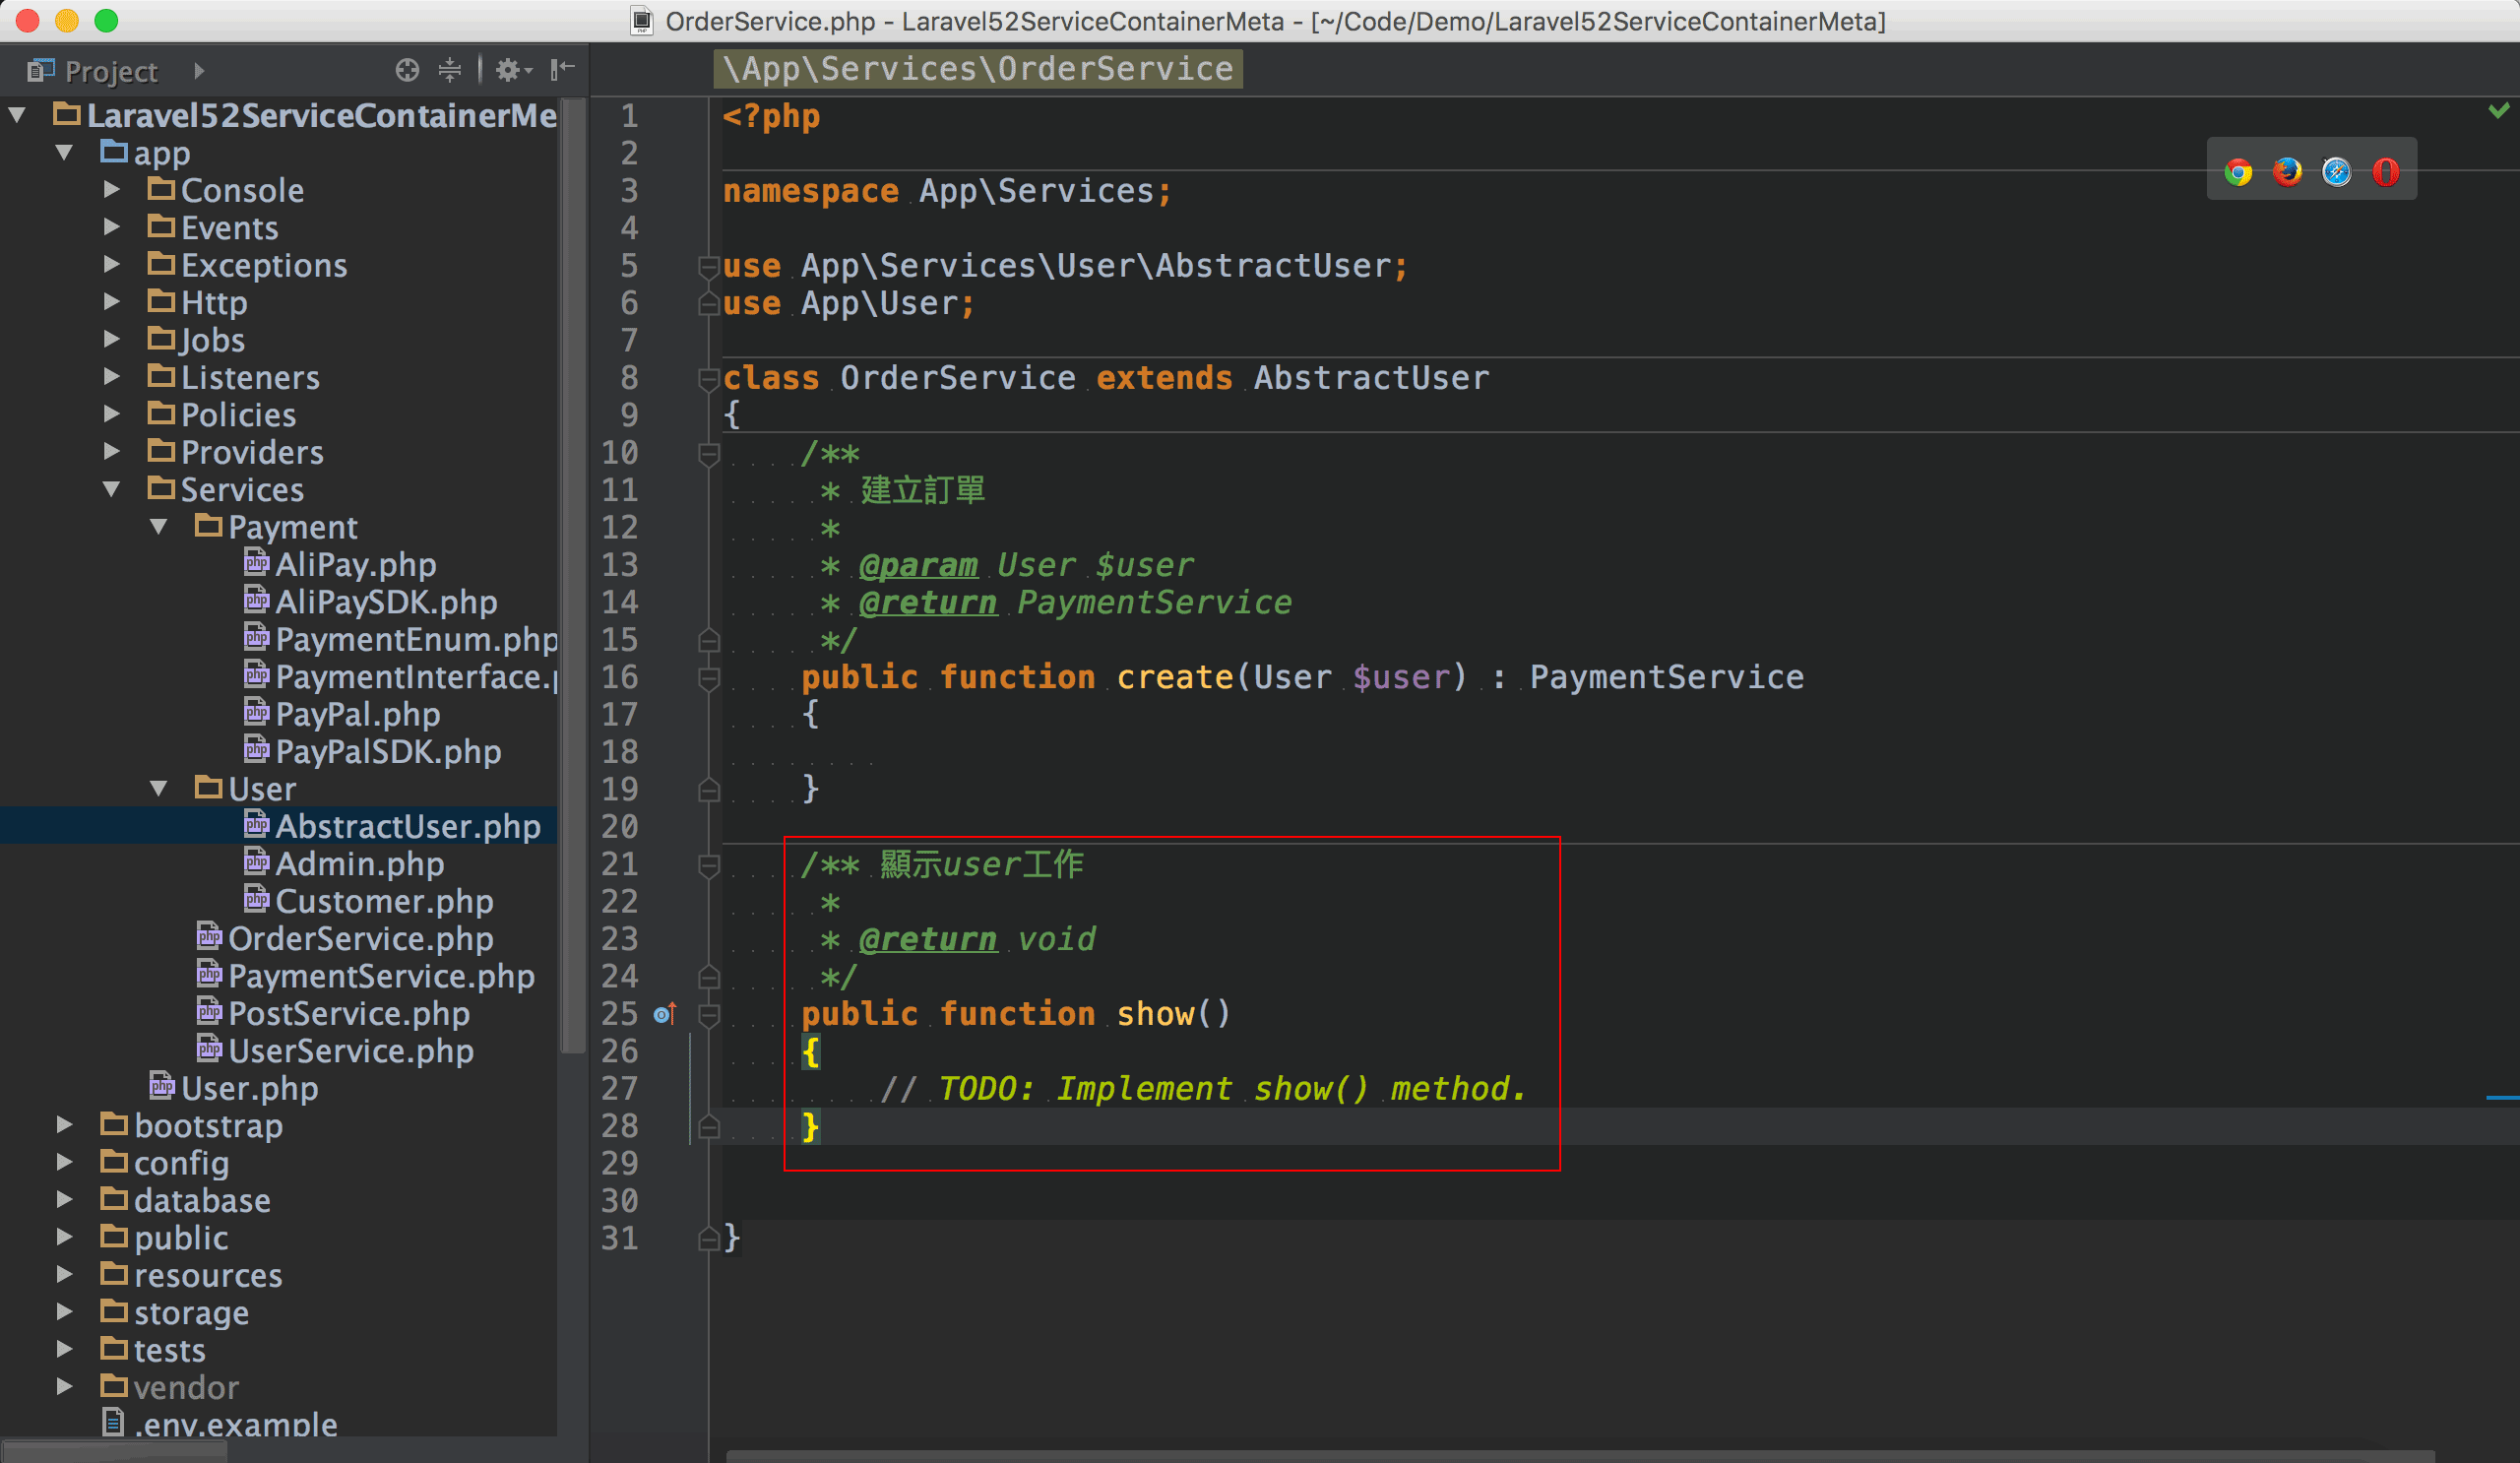
PhpStorm除了會幫我們建立method框架外,連PHPDoc也幫我複製過來了。
由extend abstract class或implements interface建立method

使用implements去實現interface。25 25這裡OrderService去實現PaymentInterface完全不合理,純粹是為了demo方便。
按熱鍵⌥ + ↩,顯示Add method stubs,按↩繼續。
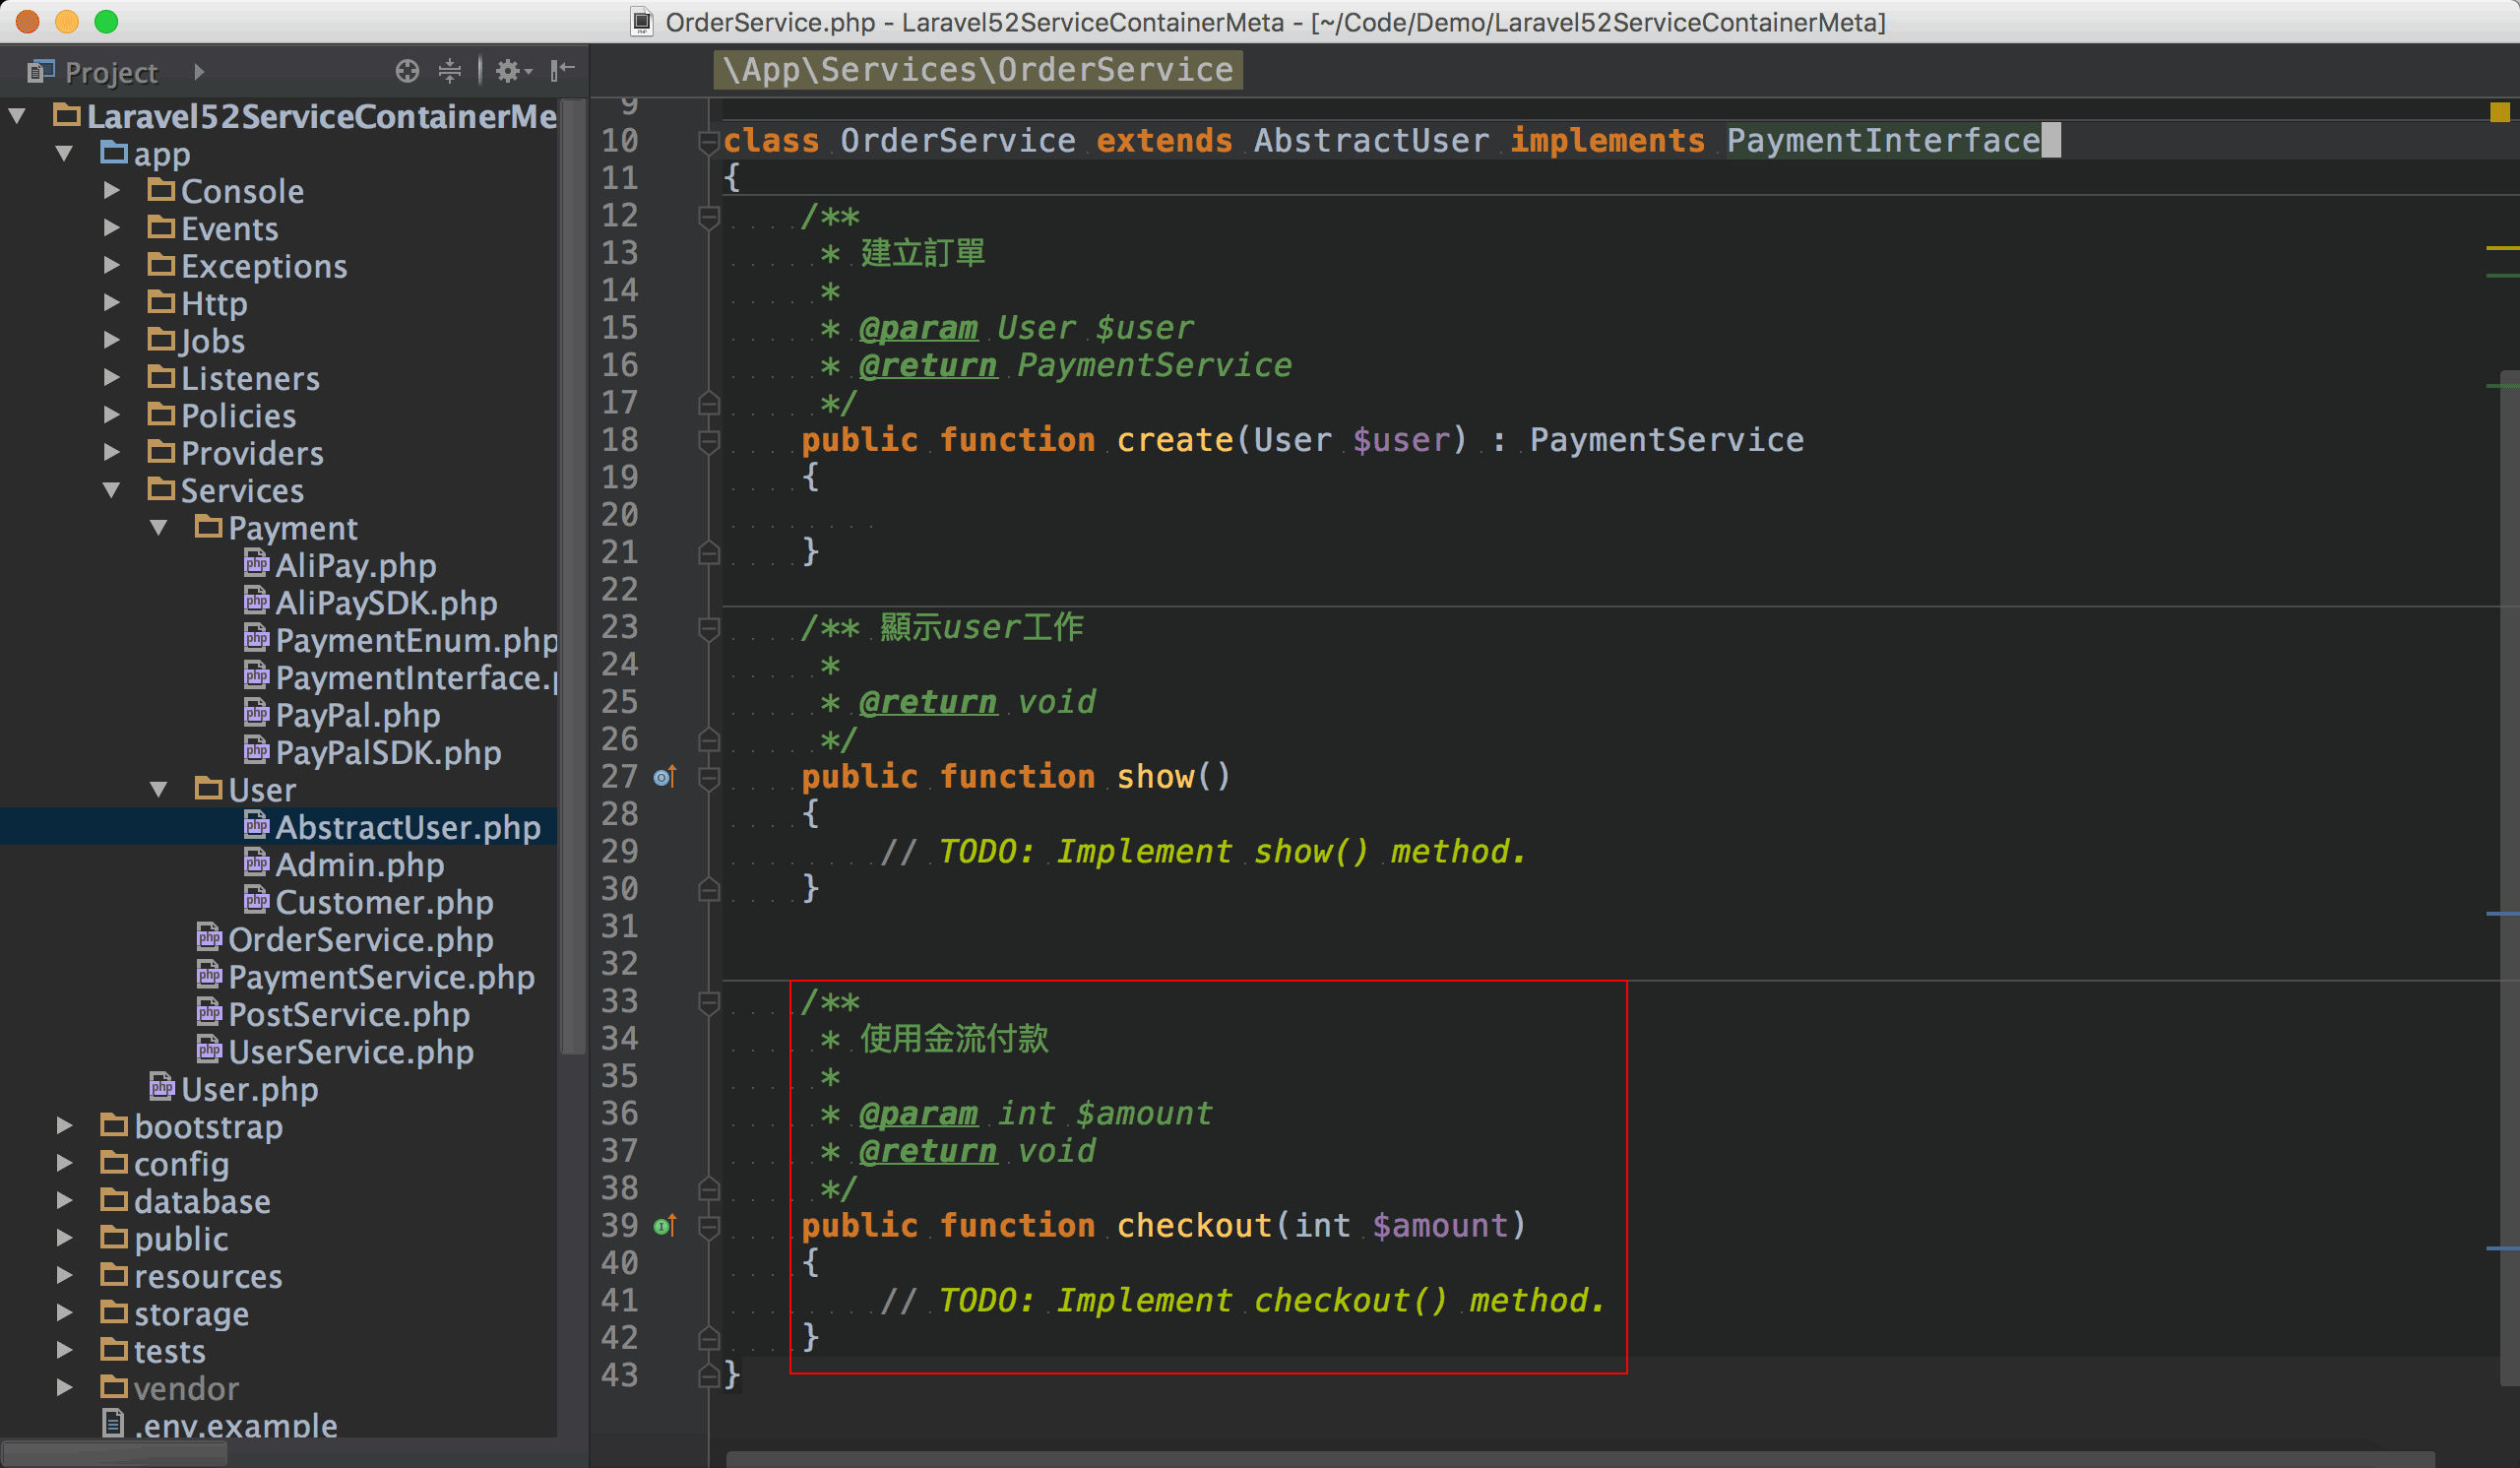
PhpStorm除了會幫我們建立method框架外,連PHPDoc也幫我複製過來了。
Overloading
Property
語法1
2
3/**
* @property 型別 變數名稱 [註解]
*/
若你有使用__get()與__set()動態產生property話,由於是動態產生,PhpStorm無從得知property名稱與其型別,必須依賴@property描述。26 26關於property overloading更詳細的描述,請參考PHP與C#語法快速導覽#Property Overloading
1 | namespace App; |
典型的應用就是Eloquent的model,會根據資料庫欄位動態產生property,Laravel IDE Helper就是利用@property幫我們描述欄位與型別。27 27GitHub Commit : 在User.php加入@propery與@method註解
Method
語法1
2
3/**
* @method 回傳型別 函式名稱 ([參數型別] 參數名稱)
*/
若你有使用__call()與__callStatic()動態產生method話,由於是動態產生,PhpStorm無從得知method名稱、參數與回傳型別,必須依賴@method描述。28 28關於method overloading更詳細的描述,請參考PHP與C#語法快速導覽#Method Overloading
之前的User model也看到了@method的使用。
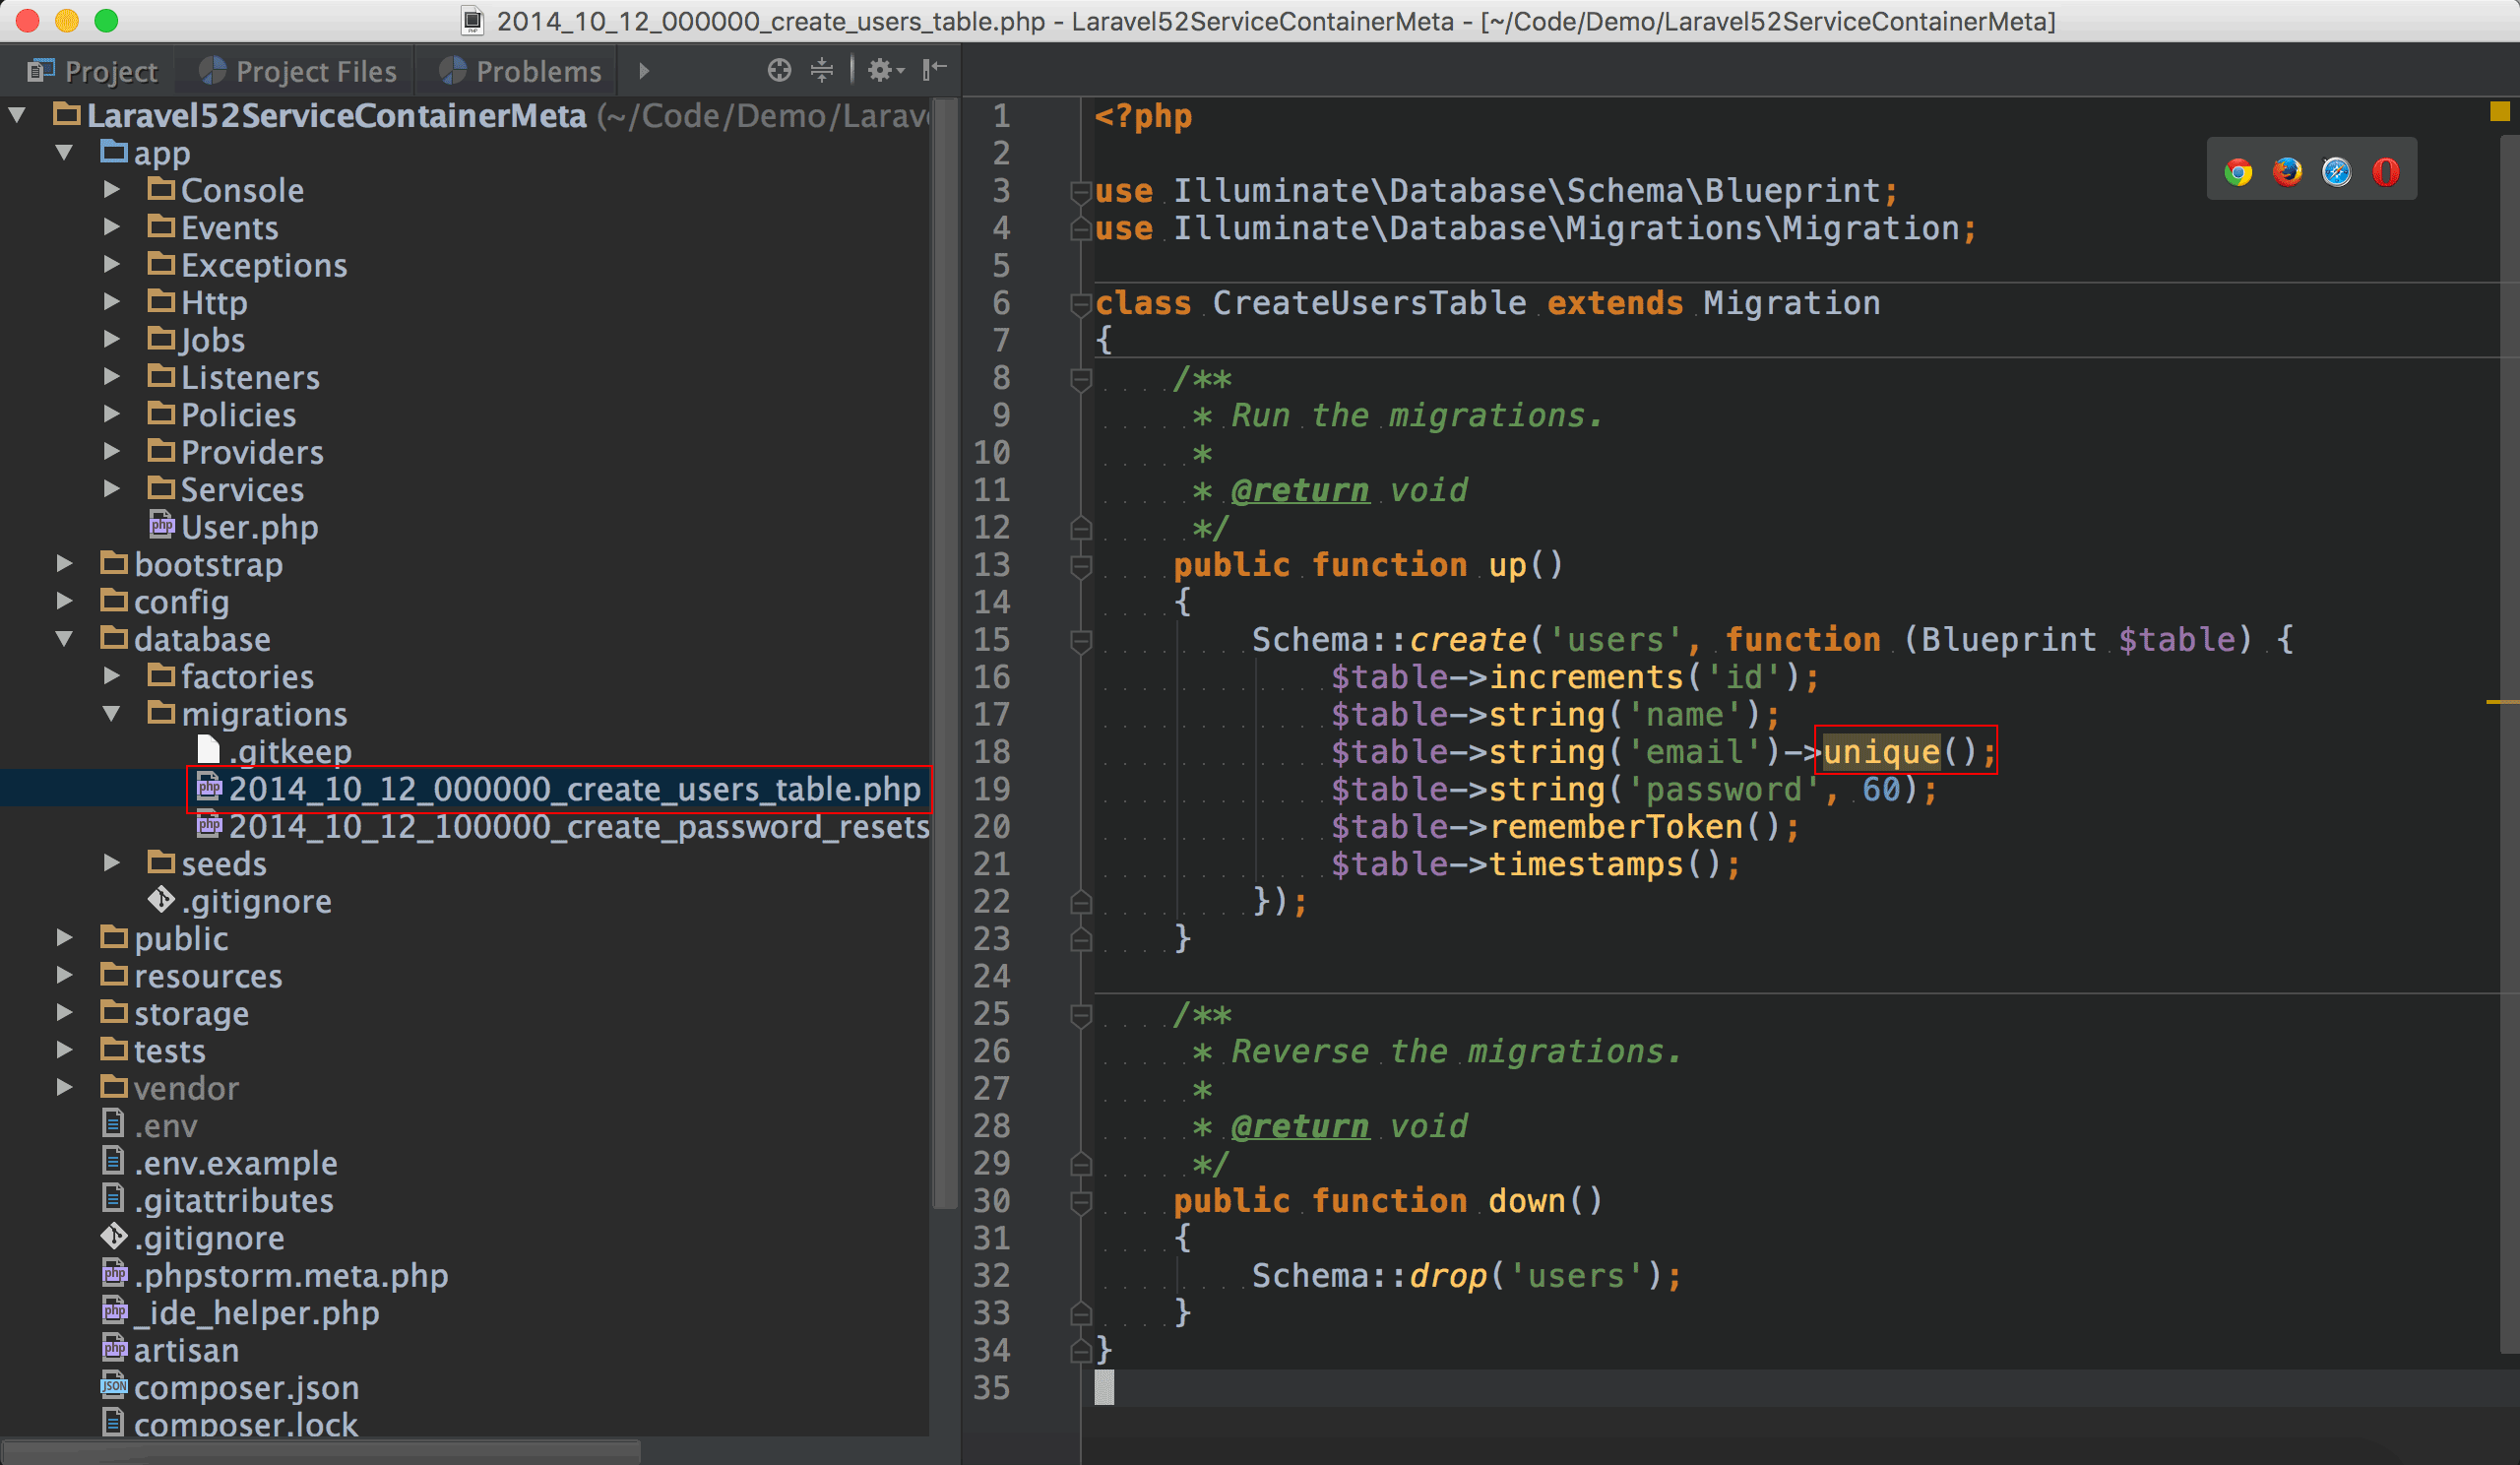
在之前講migration之處,我們還留了一個未解的反白unique(),其實不只有unique(),一些常用的如nullable()、unsigned()與index()都會反白。
原因就是Laravel使用了method overloading的機制寫這些fluent method,所以PhpStorm無法得知,且目前Laravel IDE Helper也沒幫我們處理,必須自己解決。
1 | namespace Illuminate\Support; |
自己建立_migration_helper.php放在專案的跟目錄下,使用@method描述這些Laravel IDE Helper沒描述的method。29 29GitHub Commit : 新增_migration_helper.php
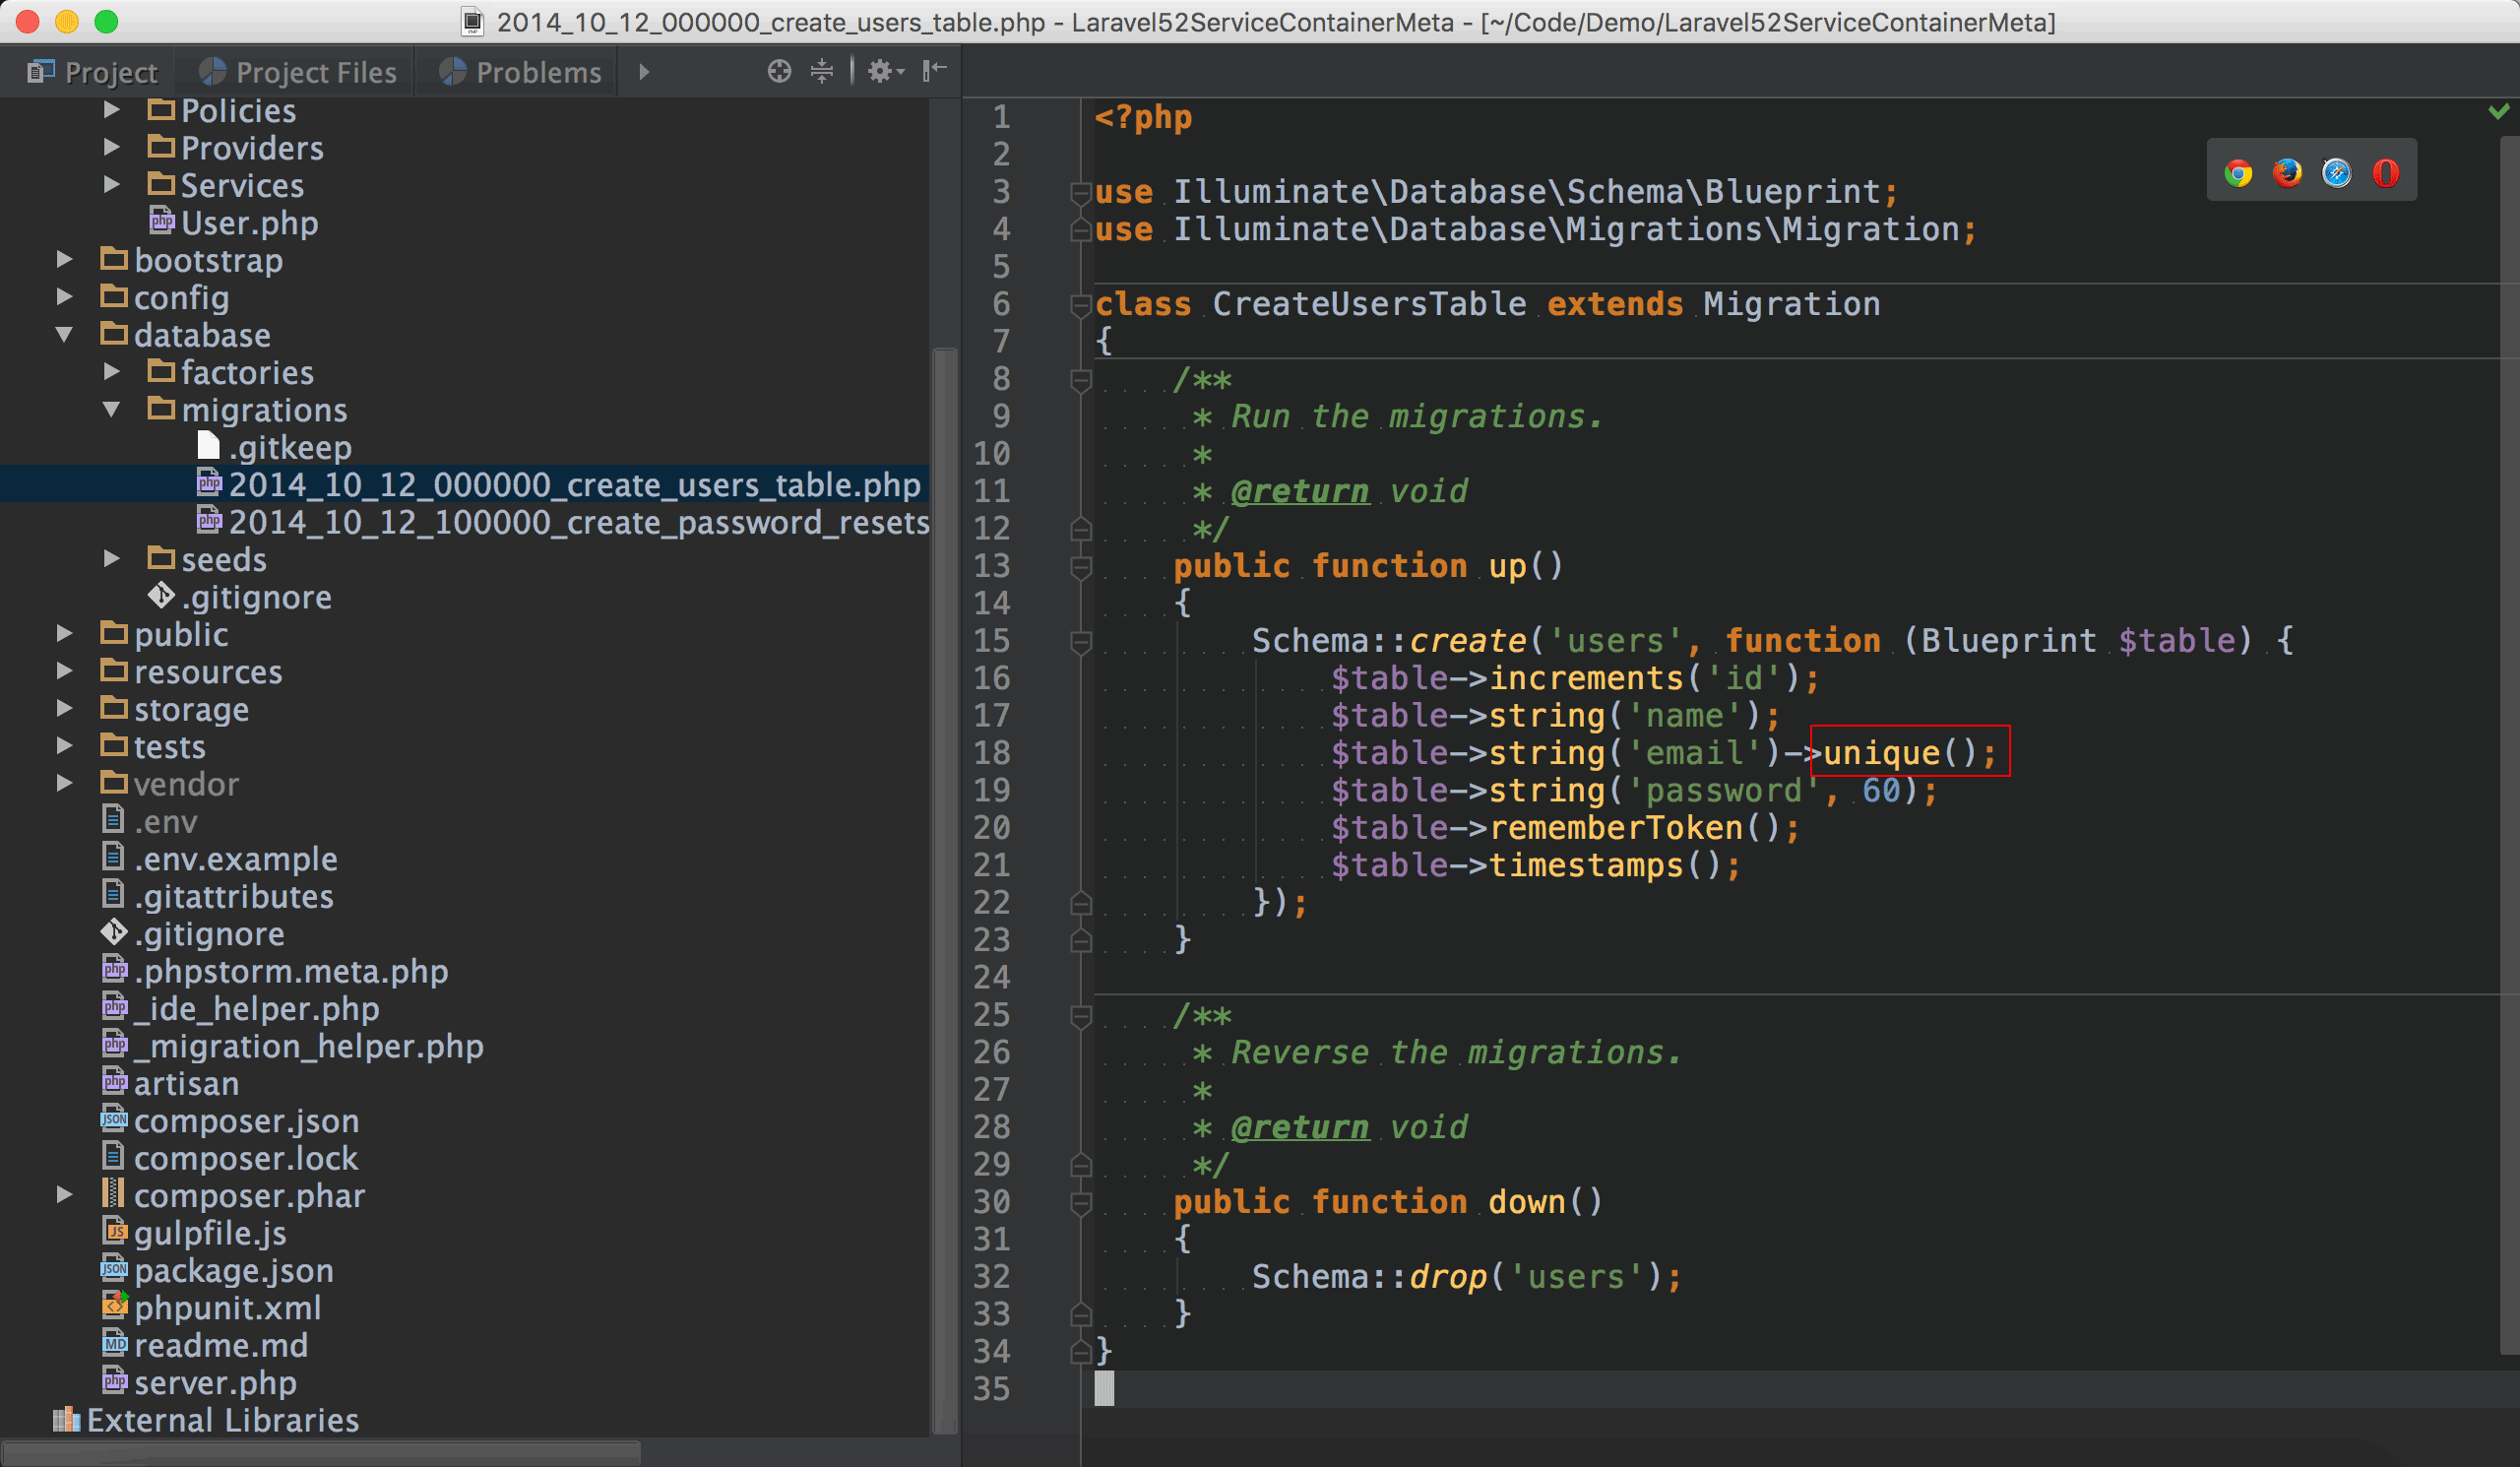
unique()就不再反白了,以後nullable()、unsigned()與index()在PhpStorm也都有了語法提示。
Collection
Collection是我在Laravel又愛又恨的東西,愛的是collection所提供的method遠比PHP原生array優雅強大,我幾乎完全使用collection取代PHP原生array,恨的是collection與array一樣,我無法得知collection內每個element的型別,因此在foreach()時,PhpStorm無法對collection內物件的property與method做語法提示。
1 | namespace App\Repositories; |
一個典型的repository應用,repository負責資料庫邏輯,在getAllUsers()傳回Collection。30 30GitHub Commit : 新增UserRepository.php
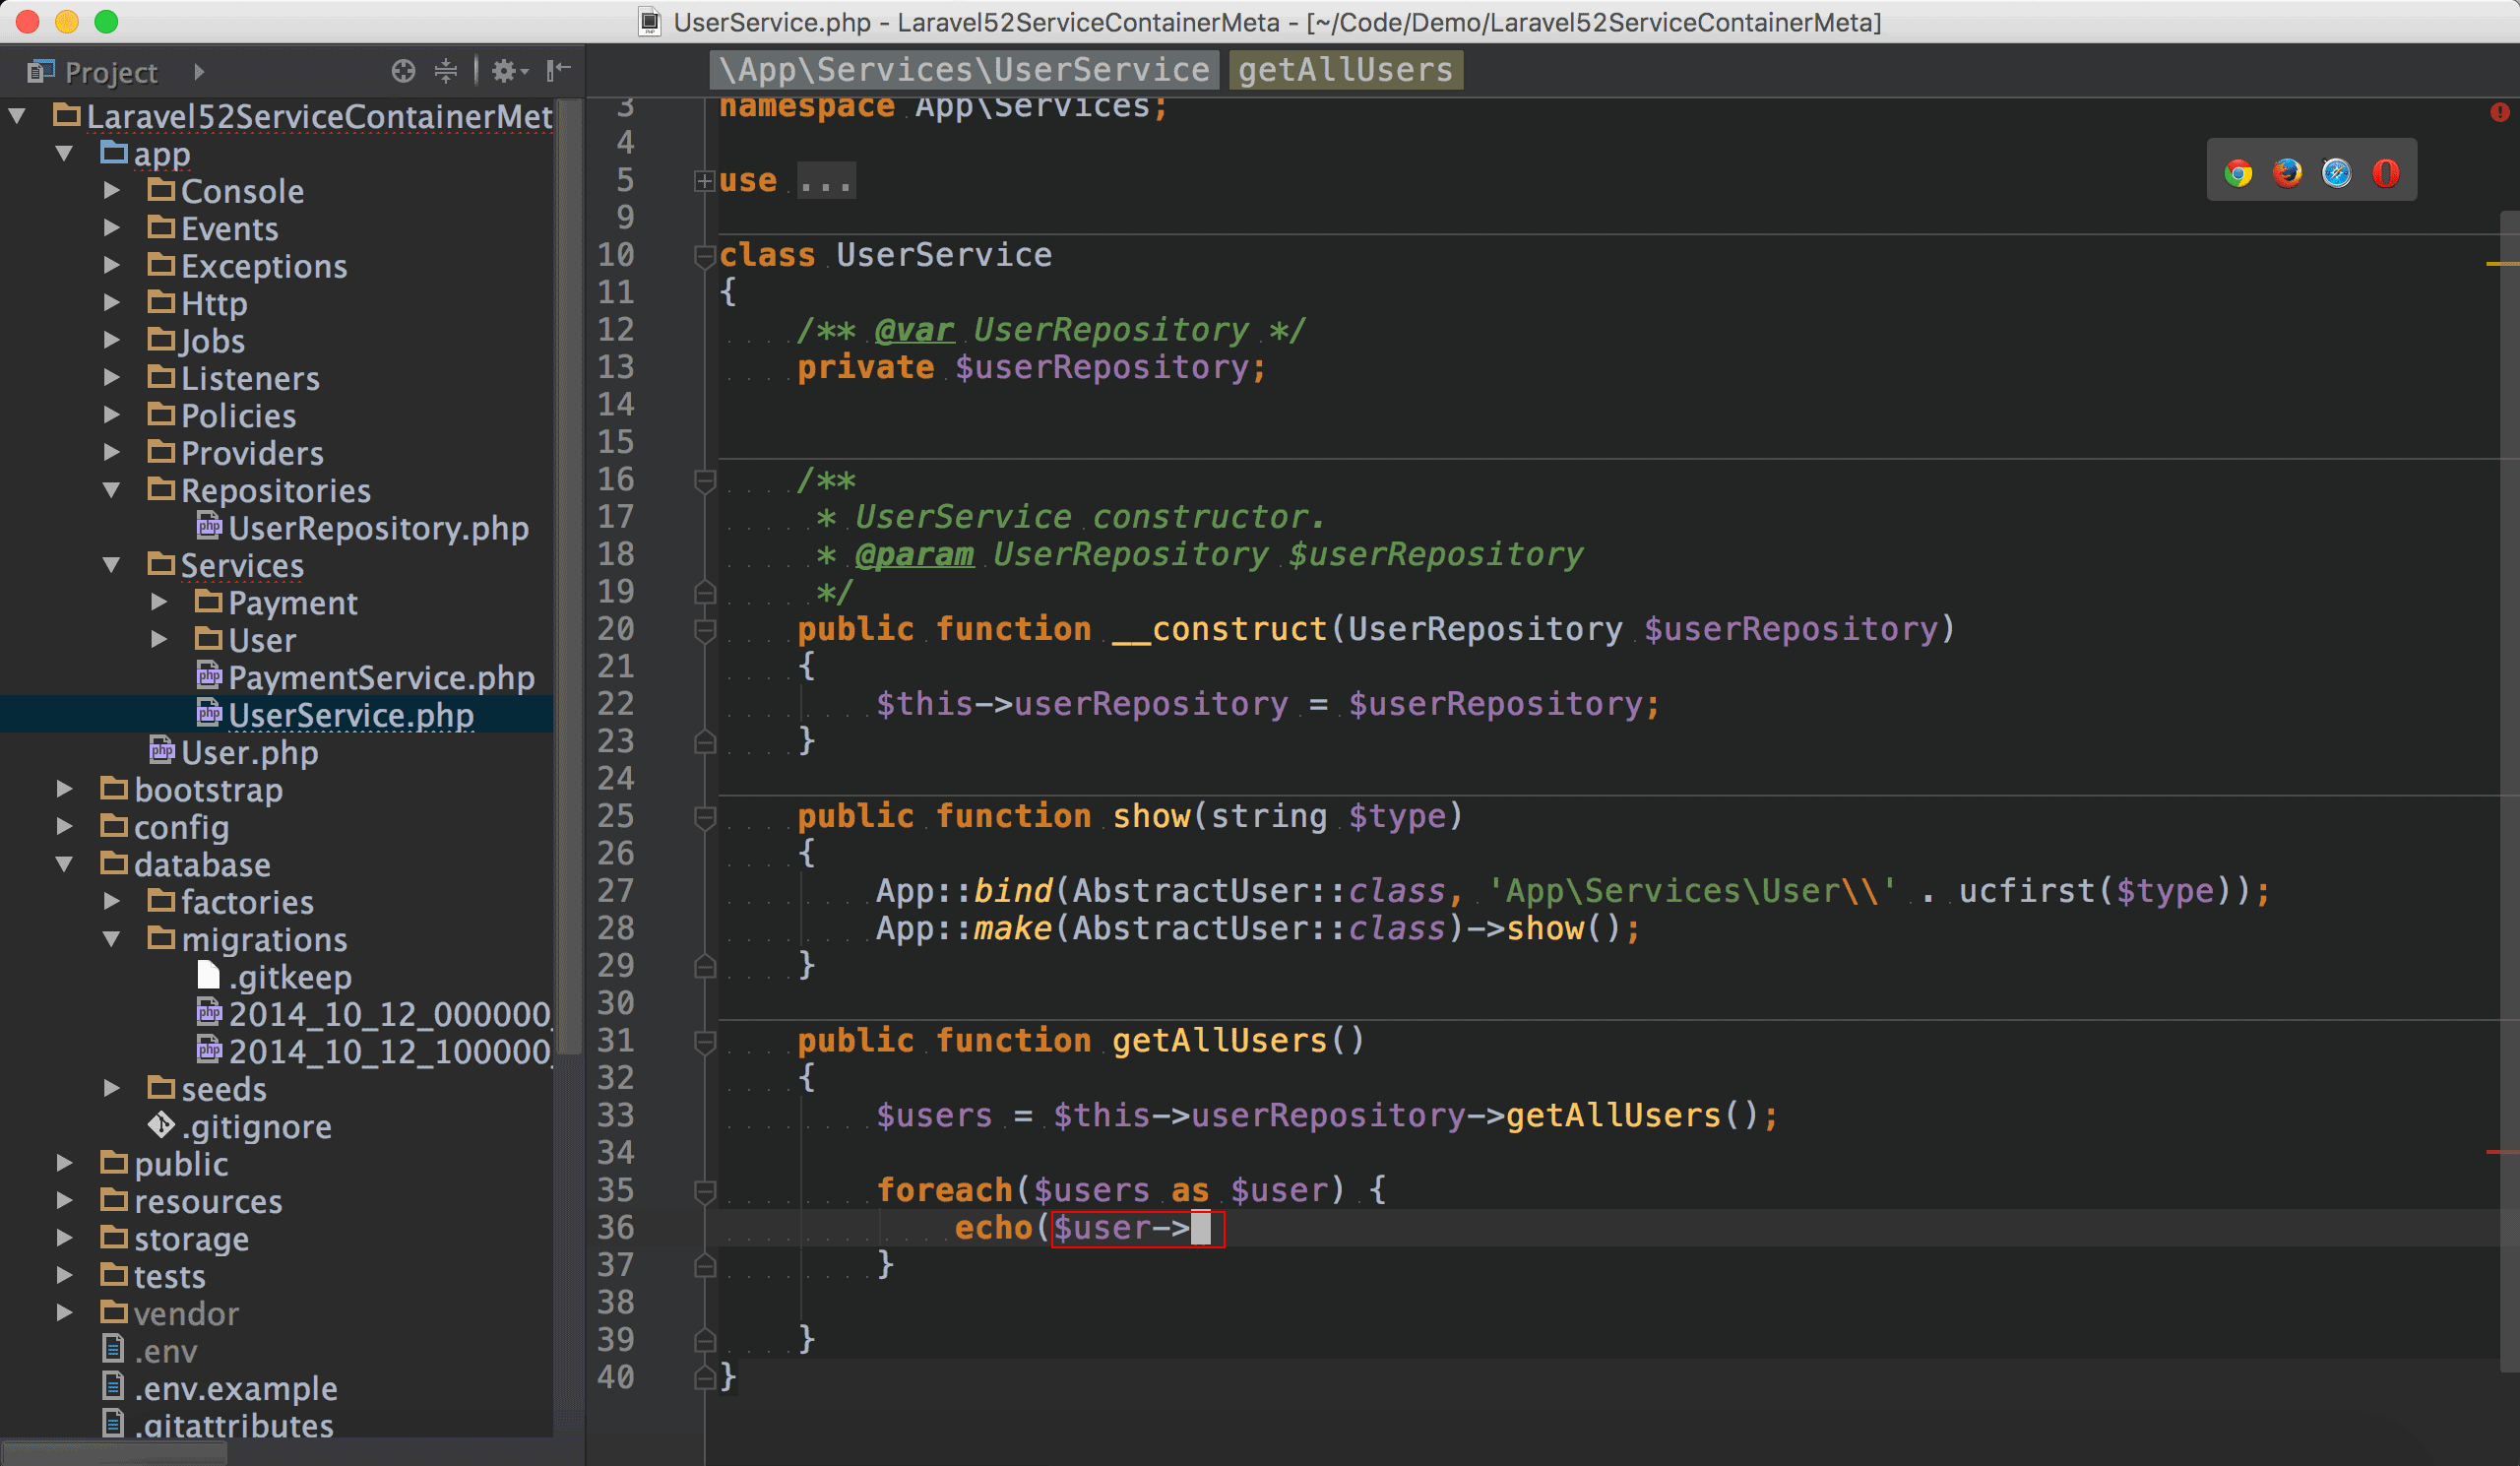
一個典型的service應用,注入repository後,從UserRepository的getAllUsers()獲得collection,要foreach()時,發現PhpStorm無法對User model的資料庫欄位名稱做語法提示。
之前辛辛苦苦使用Laravel IDE Helper替User model加了PHPDoc,結果在使用collection之後,竟然完全用不上。
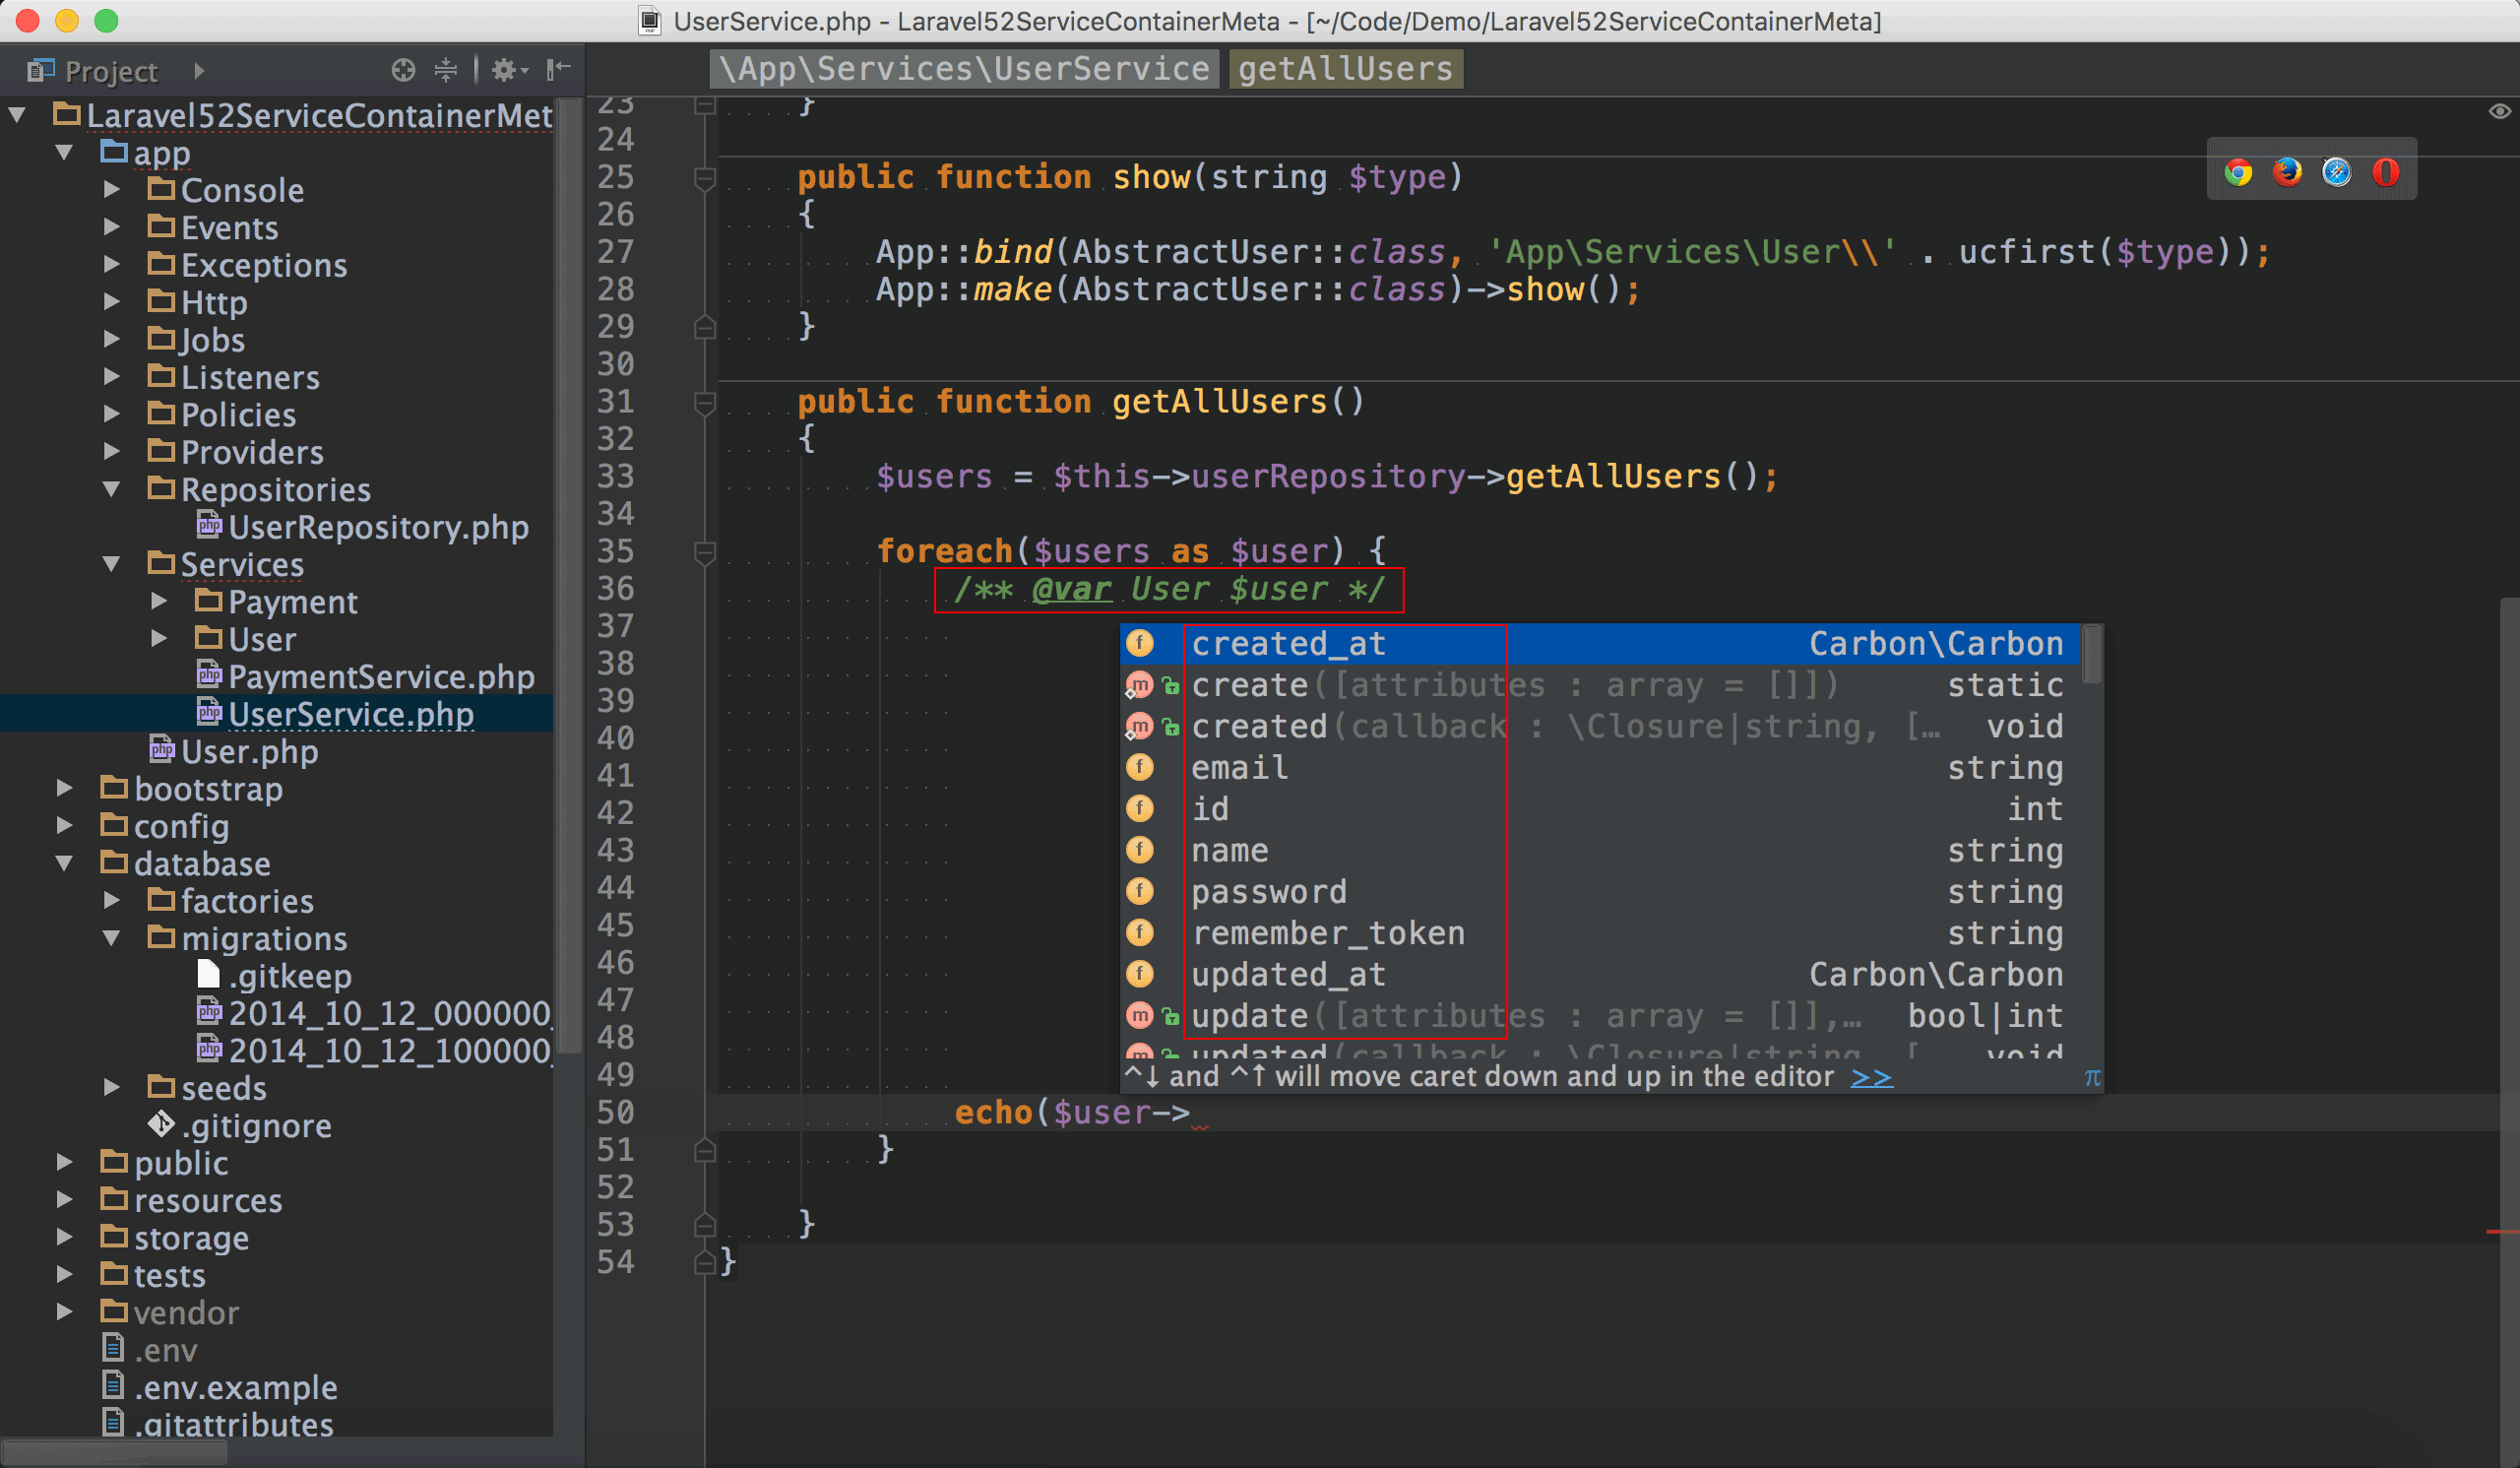
很多人的做法,是在foreach()之內補一行/** @var User $user*/描述$user型別,這樣雖然可以另$user出現資料庫欄位的語法提示,但缺點是這種inline PHPDoc很醜,且每次foreach()都要加一次很麻煩。
比較好的方式是將PHPDoc加在UserRepository的@return內。
1 | namespace App\Repositories; |
20行1
2
3
4
5
6
7
8
9 /**
* 傳回所有User
*
* @return Collection|User[]
*/
public function getAllUsers() : Collection
{
return $this->user->all();
}
在@return內除了Collection外,還加上了User[],這是模仿Java array的宣告方式,目的是告訴PhpStorm這個物件除了是collection,其每個item內的型別是User,因為描述了兩種型別資訊,中間要加上|符號。31 31GitHub Commit : UserRepostory.php加上User[]註解
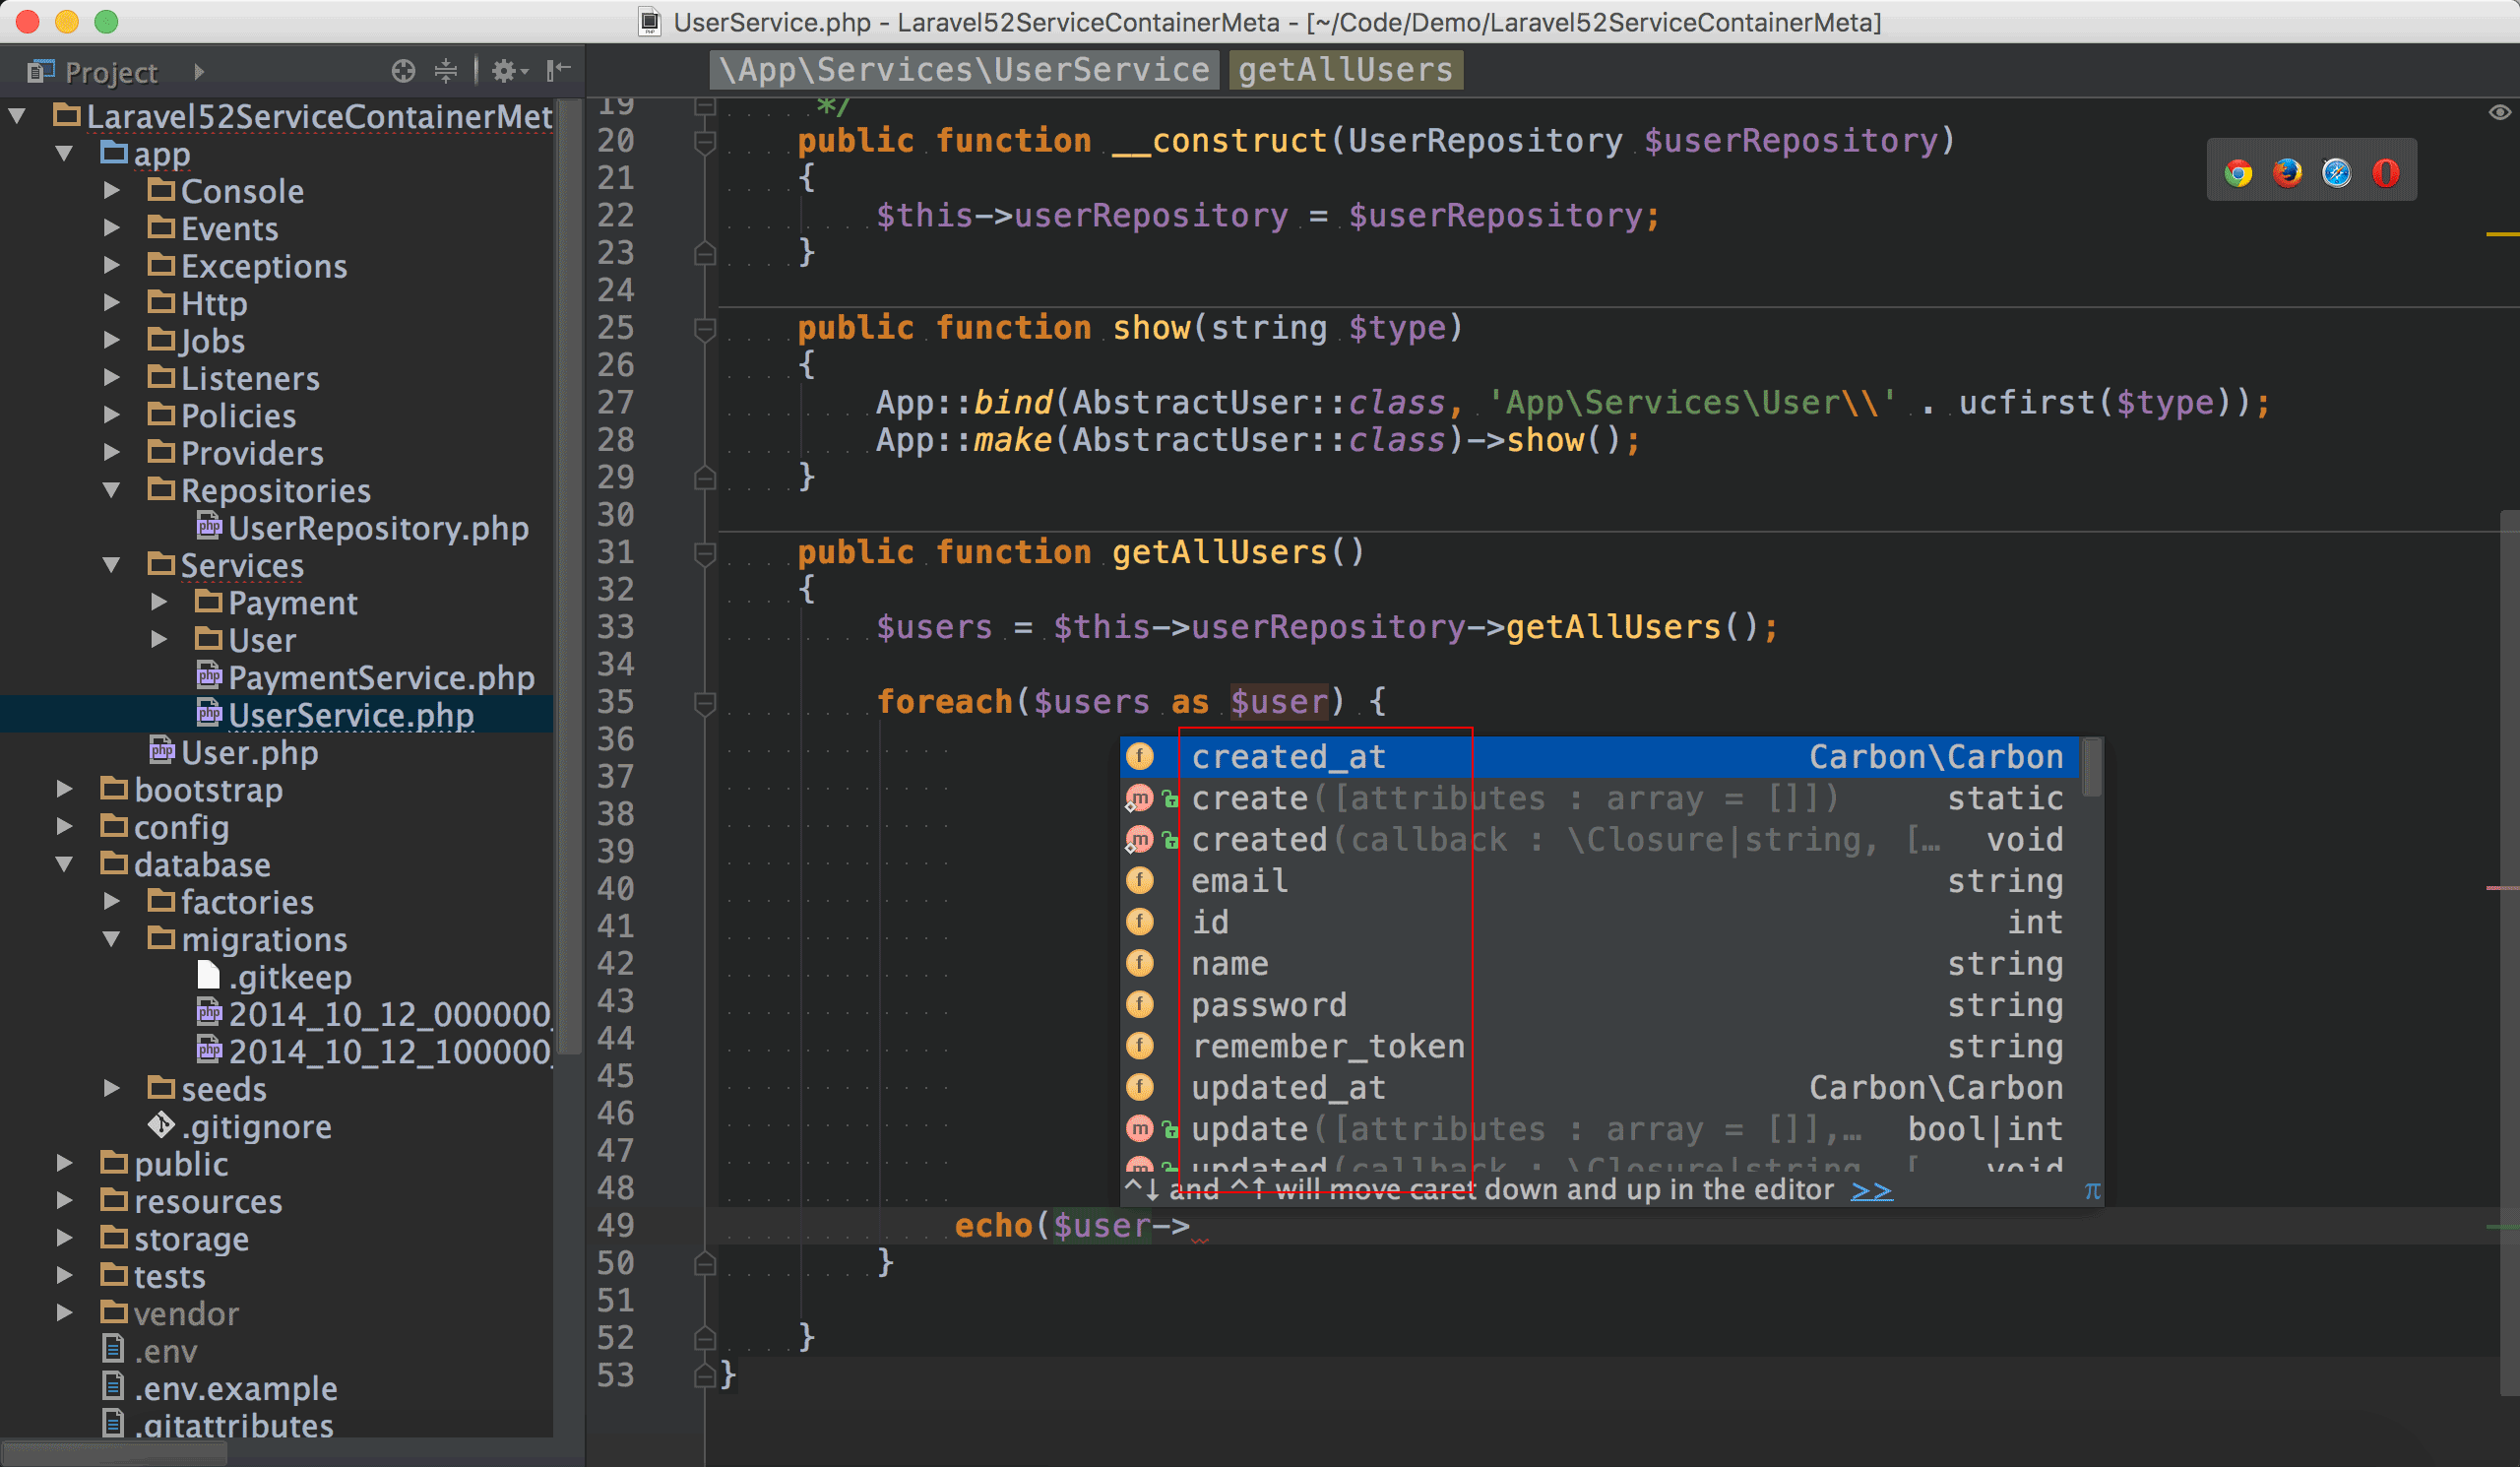
再也不用每個foreach()都補上inline PHPDoc,就可以讓PhpStorm對collection內的model做資料庫欄位名稱的語法提示。32 32GitHub Commit : 新增UserService.php
Conclusion
- Laravel IDE Helper + Laravel Plugin幫我們補上了大部分Laravel部分的PHPDoc,但自己寫的class,則有賴自己使用PHPDoc。
- 隨著PHP 7對type hint的支援更加完整,PHPDoc的重要性沒以往重要,不過對於field,collection與overloading,目前還是得依賴PHPDoc,PhpStorm才能達到較滿意的語法提示與語法檢查功能。
Sample Code
完整的範例可以在我的GitHub上找到。